Newsletter Subscribe
Enter your email address below and subscribe to our newsletter

HVAC made simple

By Jake Lawson — The HVAC Specialist
A mini split can be an excellent way to add efficient heating and cooling without installing a traditional duct system. But choosing the right equipment is only part of the project. Where the indoor and outdoor units are placed, how the refrigerant lines are routed, and how condensate water is drained can have a major influence on comfort, reliability, appearance and serviceability.
I often see homeowners spend hours comparing SEER2 ratings, capacities and features, then treat installation as if it were simply a matter of attaching an indoor unit to a wall. In reality, installation planning should begin before the equipment is purchased.
A well-planned mini-split installation considers the entire path from the indoor unit to the outdoor condenser, including refrigerant piping, communication or power wiring, condensate drainage, wall penetrations, clearances and future service access. Here is what homeowners should understand before installation begins.

Before anyone makes a hole in the wall, the contractor should determine where the indoor and outdoor equipment can work effectively. Indoor-unit placement affects how conditioned air moves through the room. Outdoor-unit placement affects airflow, noise, weather exposure and service access. The two locations also determine the route required for the line set, electrical connections and condensate drain.
ENERGY STAR advises homeowners to consider airflow when choosing indoor-unit locations. Open spaces are generally easier to condition than separated rooms, and conditioned air may not move effectively through closed doors. For outdoor equipment, ENERGY STAR recommends unobstructed airflow and consideration of accessibility, roof runoff and winter defrost water.
That is why the shortest possible refrigerant route is not automatically the best installation. The objective is to find a practical combination of comfort, equipment performance, drainage, appearance and serviceability.
ENERGY STAR — Ductless Heating & Cooling

A wall-mounted mini split conditions a space by drawing room air through the indoor unit and sending heated or cooled air back into the room. That airflow needs somewhere useful to go. An indoor head hidden in a corner may be visually unobtrusive, but it may not provide the air distribution the room needs. Similarly, expecting one indoor unit to effectively condition several bedrooms simply because those rooms are nearby can lead to disappointing results.
Doors, walls, ceiling height, furniture and room geometry all affect air movement. ENERGY STAR specifically notes that it can be difficult for heat to move through an open doorway and impossible through a closed one.
The indoor unit should therefore be positioned according to both the manufacturer’s installation instructions and the room’s layout. Think about where people actually spend time. A strong stream of conditioned air aimed directly at a sofa, bed or desk may be uncomfortable even though the thermostat says the room has reached its target temperature. Placement should support broad, useful air circulation rather than simply putting the unit wherever installation is easiest.

Installation cannot compensate for equipment that was incorrectly sized. Before deciding where a mini split goes, determine how much heating and cooling the space actually requires. ENERGY STAR recommends proper sizing and specifically points homeowners toward a Manual J load calculation. ACCA describes Manual J as the ANSI-recognized residential standard for calculating HVAC equipment sizing loads.
Once the load is established, equipment selection should consider the manufacturer’s actual performance data. ACCA’s Manual S framework uses heating and cooling loads, design conditions and manufacturer performance information when selecting residential HVAC equipment.
ACCA — Manual J Residential Load Calculation
ACCA — Manual S Residential Equipment Selection
Sizing determines what equipment the home needs. Placement determines how effectively that equipment can serve the intended space.
The line set connects the indoor and outdoor portions of the refrigeration system. Rather than thinking of it as simply “two copper pipes,” homeowners should understand that it is a critical part of the refrigerant circuit. The exact tubing sizes, permitted lengths, elevation differences, insulation requirements and refrigerant procedures depend on the equipment.
That last point is important. Do not assume that line-set requirements from one mini split apply to another. Manufacturers establish requirements for their particular systems, and multi-zone installations can become even more model-specific. The installation manual should determine the acceptable configuration.
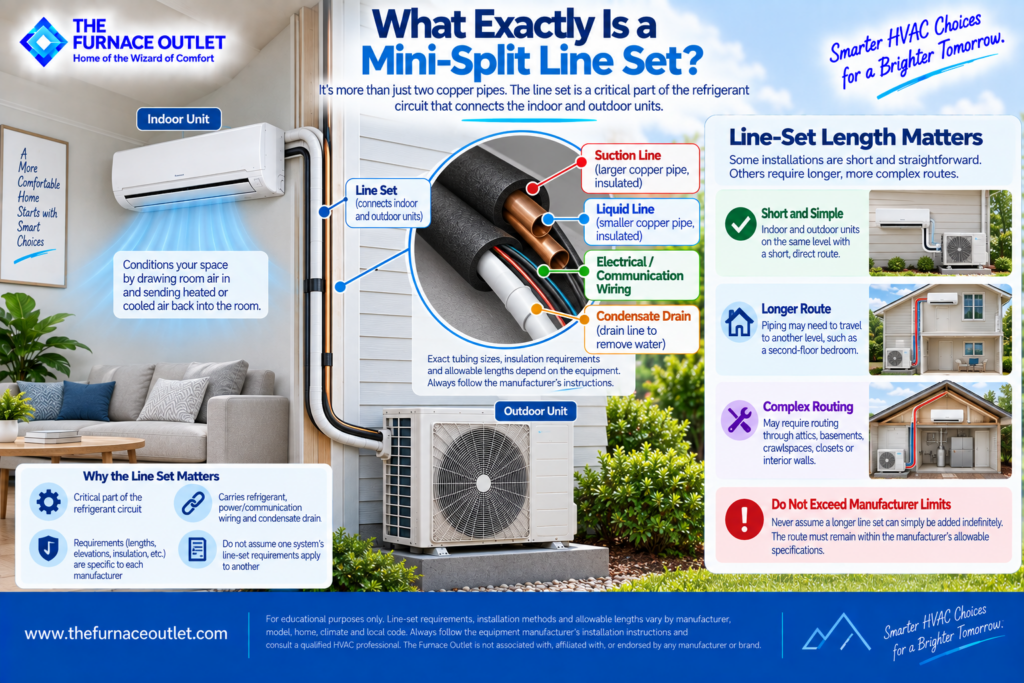
Sometimes the indoor unit can be installed almost directly opposite the outdoor condenser. That can produce a relatively short and straightforward route. Other homes require the piping to travel considerably farther.
For example, a second-story bedroom may be served by an outdoor unit located at ground level. A finished interior may require routing through an attic, basement, crawlspace or closet. Multi-zone systems may send individual refrigerant lines in several directions. ENERGY STAR notes that thoughtful routing through areas such as closets, garages, basements, crawlspaces, attics or stairways can sometimes reduce the amount of wall and ceiling patching required.
Longer or more complicated routes can also mean more materials and installation labor. Most importantly, however, the route must remain within the manufacturer’s allowable specifications. Never assume that a longer line set can simply be added indefinitely.
When refrigerant piping is routed along the exterior wall, contractors commonly use a protective line-cover system, often called line hide. This creates a cleaner appearance than leaving insulated tubing and wiring exposed. Homeowners should discuss appearance before installation rather than after the lines have already been routed. Ask where the line set will exit the house, where it will travel and how the exterior covering will look.
In some homes, owners prefer refrigerant piping concealed inside walls. That may create a cleaner architectural appearance, but concealed routing can increase labor and construction complexity and may make future access more difficult. There is no universal best choice. The right solution depends on the building and the homeowner’s priorities.

Mini-split refrigerant piping requires proper installation procedures. Connections need to be made according to the equipment manufacturer’s instructions, and the completed refrigerant circuit needs appropriate installation and commissioning procedures.
Federal refrigerant regulations also matter. The U.S. Environmental Protection Agency states that work that can reasonably be expected to violate the integrity of a refrigerant circuit—including adding or removing refrigerant and connecting or disconnecting hoses—falls within Section 608 requirements. EPA specifically states that adding or removing refrigerant during mini-split installation, or connecting/disconnecting pre-charged lines in the circumstances it describes, requires Section 608 technician certification.
EPA — Section 608 Technician Certification Requirements
That is one reason homeowners should distinguish between mounting equipment and performing regulated refrigerant work.

During cooling and dehumidification, moisture from indoor air condenses on the indoor coil. That water has to go somewhere. In a straightforward installation, a properly designed drain can carry condensate away from the indoor unit. When the installation does not permit suitable gravity drainage, the system design may require another manufacturer-approved drainage solution, potentially including a condensate pump.
This seemingly small part of the installation deserves careful planning because poor drainage can create annoying and potentially damaging problems. A condensate problem can result in dripping, staining, moisture around the indoor unit or unwanted water inside the building.
Ask the installer a simple question: “Where will the condensate water go?”
You should be able to understand the answer before installation begins.
Where the equipment and building layout allow it, gravity provides a straightforward way to move condensate away from an indoor unit. But gravity drainage depends on proper routing.
The drain should follow the manufacturer’s requirements and applicable codes, and the termination point must be appropriate for the installation. Routing should also account for practical issues such as freezing conditions and future maintenance. When gravity drainage is impractical, a condensate pump may provide a solution. Pumps, however, introduce another component that can require maintenance and may eventually need service.
This does not make a pumped installation inherently bad. It simply means the drainage strategy should be understood rather than treated as an afterthought.

The outdoor condenser needs adequate airflow. Squeezing it into a confined area because that location hides the equipment may work against what the system needs. Manufacturer-specified clearances around the unit should always take precedence over a generic rule. ENERGY STAR recommends avoiding tight locations obstructed by shrubs or structures and considering future service access when selecting the outdoor location.
Homeowners should also think about everyday use of the property. Will the unit be directly beside a patio? Under a bedroom window? Along a narrow walkway? In a location likely to become blocked by vegetation? A few minutes of planning can prevent years of irritation.
Heat pumps operate outdoors during winter, so snow, ice and defrost water become part of the installation discussion. ENERGY STAR advises considering roof runoff and notes that outdoor heat-pump units release water during winter defrost; locating them near doors or walkways can potentially contribute to icy areas.
Depending on the climate, equipment and manufacturer requirements, contractors may use an appropriate stand, bracket or other mounting arrangement to position the outdoor unit. The correct height and configuration are project-specific. Do not rely on a universal number copied from an online diagram.
Follow the manufacturer’s installation requirements and local conditions.

A multi-zone installation multiplies many of these decisions. Each indoor unit needs an appropriate location. Each zone requires consideration of refrigerant routing, wiring or communication connections and condensate management. The outdoor system must also be selected and configured according to the manufacturer’s approved combinations and performance data.
Imagine four indoor units distributed across two floors. One may have easy gravity drainage through an exterior wall. Another may require a longer line-set route. A third could be on an interior wall. The fourth might be above a finished room where concealed piping is desired. Calling this simply a “four-zone installation” hides a lot of important detail. The number of zones tells you how many spaces are being served. It does not tell you how difficult the installation will be.
Homeowners understandably prefer clean installations. Refrigerant lines, wiring and drains are not decorative features. But concealment should be balanced against future serviceability. Equipment eventually needs cleaning, inspection or repair. Filters require access. Drain systems may need attention. Outdoor units require maintenance. Components should not be positioned in ways that make normal service unnecessarily difficult.
ENERGY STAR specifically identifies serviceability and ease of access as considerations for outdoor-unit placement. A visually beautiful installation that becomes extremely difficult to service may prove less attractive after the first repair.

Before approving the installation, I would ask the contractor to walk through these points:
These questions do not require a homeowner to become an HVAC technician. They simply make the installation plan visible before work begins.
When I look at a mini-split installation, I do not see an indoor head and an outdoor condenser as two separate pieces of equipment. I see a complete system. The indoor unit needs to deliver conditioned air where it is useful. The outdoor unit needs adequate airflow and service access. The refrigerant lines need an appropriate route within the manufacturer’s specifications. Condensate needs a reliable path away from the indoor unit. Electrical and refrigerant work must meet the applicable equipment instructions, regulations and local requirements.
That is why two homes using similar mini-split equipment can require very different installations. Choose the equipment for the home’s calculated heating and cooling requirements, then design the installation around the actual building—not around whichever wall happens to be easiest to drill through.
When placement, line-set routing and condensate management are planned together, the finished installation has a much better foundation for comfort, reliability and long-term serviceability.
https://thefurnaceoutlet.com/best-mini-split-systems-of-2026-complete-brand-model-comparison/
This article is for educational purposes only. Mini-split sizing, refrigerant piping, condensate drainage, electrical requirements, equipment clearances and installation procedures vary by manufacturer, model, building, climate and local code. Always follow the equipment manufacturer’s current installation instructions and applicable regulations, and consult qualified HVAC and electrical professionals where appropriate.
The Furnace Outlet is not associated with, affiliated with, endorsed by or sponsored by the manufacturers, agencies or organizations referenced in this article. We do not receive manufacturer compensation for inclusion or rankings.