Newsletter Subscribe
Enter your email address below and subscribe to our newsletter

HVAC made simple
By Jake Lawson — Jake the HVAC Specialist
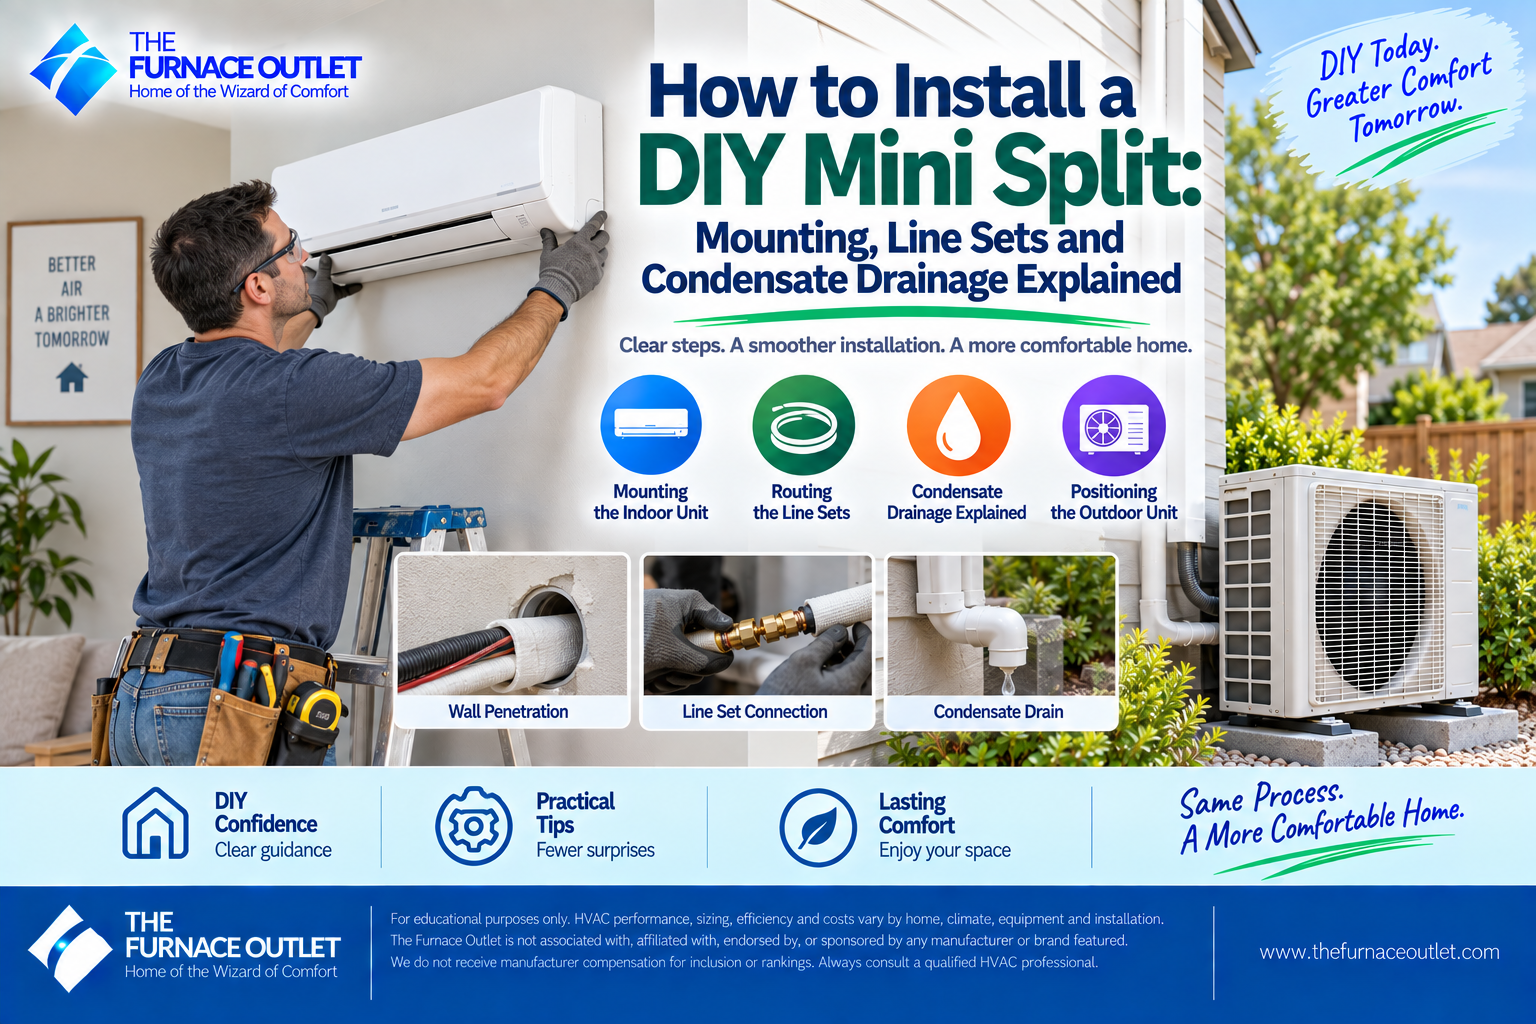
Installing a purpose-built DIY mini split is one of those home-improvement projects that can look deceptively simple when condensed into a short installation video. Mount the indoor air handler, drill a hole through the wall, run the line set outside, connect the outdoor condenser and turn everything on. In reality, each of those steps contains details that can determine whether the finished system operates reliably or leaves you dealing with vibration, water leaks, damaged refrigerant lines or an installation that does not meet the manufacturer’s requirements.
The good news is that today’s genuine DIY mini-split systems can remove some of the specialized refrigeration work traditionally associated with ductless installation. Certain systems use factory-prepared, pre-charged line sets and proprietary quick-connect fittings that can eliminate conventional field flaring and evacuation when installed exactly as the manufacturer specifies. That does not mean every mini split is DIY, however, and it certainly does not mean every part of the installation can be improvised. Current MRCOOL documentation, for example, provides specific mounting, wall-hole, line-set and drainage procedures for its DIY equipment rather than treating installation as a generic process.
In this guide, I am concentrating primarily on the mechanical side of a wall-mounted DIY mini-split installation: selecting locations, installing the mounting plate, creating the wall penetration, positioning the indoor unit, routing a factory-prepared line set, managing condensate drainage and positioning the outdoor condenser. Electrical work deserves separate attention because a system being marketed as DIY does not automatically make installing a new electrical circuit a homeowner project. MRCOOL’s own installation guidance recommends licensed electrical involvement, and electrical requirements vary by model and jurisdiction.

Before opening the tool box, find the current installation manual for the exact indoor unit, outdoor unit and line-set combination you purchased. Don’t assume that a video covering a similar-looking mini split gives you the correct clearances, wall-hole location, line-set procedure or condensate arrangement for your equipment. Manufacturers revise products, and even different generations within the same product family can use different components and installation procedures.
I would read the complete manual once before beginning and then keep it available throughout the installation. Pay particular attention to required indoor and outdoor clearances, permitted piping directions, wall-hole dimensions, mounting requirements, maximum and minimum line lengths, line-set compatibility, condensate instructions, electrical specifications and the commissioning sequence. If the manual and an online video disagree, I would follow the current manufacturer documentation for the exact model rather than treating the video as the final authority.
This matters especially with equipment described as “DIY.” A purpose-built DIY system is engineered around a particular installation method. You should not take a conventional mini split and assume you can turn it into a no-vacuum DIY system simply by purchasing something advertised as a quick connector. Likewise, don’t assume that line sets from different generations or models are interchangeable because the connectors appear similar.

The best mini-split installation usually begins before the first hole is drilled. I like to think of the indoor unit, wall penetration, line-set route, condensate drain and outdoor condenser as one connected layout rather than five independent decisions. Moving one component can change the requirements for everything else.
Start by identifying the area you want to condition and determining an appropriate indoor-unit location. A wall-mounted air handler needs sufficient clearance around it, a solid mounting surface and a position that allows conditioned air to move through the intended space. ENERGY STAR recommends considering airflow and room layout because a single wall unit cannot magically distribute heating and cooling through every closed doorway or obstructed area of a home.
ENERGY STAR — Ductless Heating & Cooling
Then look outside. Where will the refrigerant line set emerge? Can the condensate drain maintain the required downward route? Where will the outdoor condenser sit? Is there enough space around the condenser for airflow and service access? Will the supplied line set reach without being stretched, kinked or modified improperly? Answering these questions on paper is much easier than solving them after a large wall penetration has already been made.

A wall-mounted indoor air handler should not be positioned solely according to where it looks best. The unit has to draw room air into its return area and distribute conditioned air without unnecessary obstruction. Furniture, tall cabinets, curtains and architectural features can interfere with airflow, while placing the unit too close to the ceiling or an adjacent wall may violate the manufacturer’s required clearances.
The wall itself also matters. The mounting plate must be secured according to the manufacturer’s instructions to a structure capable of supporting the indoor unit. MRCOOL’s DIY documentation, for example, directs installers to use its template to mark mounting points and specifies locating mounting screw points at wall studs for the equipment covered by that manual.
MRCOOL DIY Mini-Split Installation Manual
Before drilling, use an appropriate method to identify studs and check for hidden electrical wiring, plumbing and other services. A mini-split wall opening is large enough that blindly drilling through an unknown wall cavity is not something I would recommend.
The metal mounting plate may look like one of the least sophisticated components in the box, but it establishes the final position of the indoor air handler. If the plate is poorly secured or incorrectly positioned, the problem follows the rest of the installation.
Use the supplied template or mounting plate exactly as instructed for your system. MRCOOL notes that its DIY and EZPRO systems include mounting templates intended to help installers locate screw holes and piping positions accurately. It also advises installers to double-check measurements and level before drilling or cutting.
MRCOOL — Mini-Split Mounting Templates
Secure the mounting plate using the fastening method specified for the wall construction and equipment. Check it with a level rather than relying on the ceiling, trim or floor as a visual reference. Houses are not always perfectly square, and a mounting plate that looks level against nearby architecture may not actually be level.
Don’t rush this stage. Once the air handler is hanging on the bracket and the line-set bundle has been routed through the wall, correcting a poorly positioned mounting plate becomes considerably more inconvenient.
The wall penetration has several jobs. It provides a path for the refrigerant piping, condensate drain and interconnecting cable, and its position affects how neatly the indoor unit sits against the wall.

The diameter and location of that hole are model-specific. For example, MRCOOL’s current fifth-generation DIY quick-start documentation specifies a roughly 3.54-inch wall opening for the equipment covered by that guide, while older documentation similarly describes a roughly 3.5-inch opening. Those figures are examples, not universal mini-split dimensions, so use the measurement specified for your exact system.
The direction of the hole can also matter for drainage. MRCOOL’s cited DIY documentation calls for drilling through the wall at a slight downward angle toward the exterior to help support proper condensate drainage.
Before cutting, confirm both the indoor and outdoor exit positions. Check the wall cavity for wiring, pipes and structural obstacles. If the manufacturer provides a wall sleeve, install it according to the instructions. The objective is to create a smooth, protected passage for the bundle rather than dragging insulated refrigerant tubing and drain hose across rough wall material.
The bundle behind a typical wall-mounted mini split can include insulated refrigerant piping, a condensate drain hose and indoor-to-outdoor electrical or communication wiring. These components may travel together for part of the route, but they serve completely different purposes.
The refrigerant piping carries refrigerant between the indoor and outdoor equipment. The condensate hose removes water produced at the indoor coil during cooling and dehumidification. The interconnecting cable can provide power, communication or both depending on the equipment design.
The arrangement of these components is important. MRCOOL’s DIY documentation specifically instructs installers, for applicable equipment, to place the condensate drain hose at the bottom of the bundled piping. Its manual warns that incorrect drain positioning can interfere with drainage and potentially cause the drain pan to overflow.
That is why I would not simply bundle everything together until it looks neat. Follow the exact orientation and routing illustrated in the installation manual.

Once the mounting plate, wall penetration and piping bundle are prepared, the indoor unit can be attached to its bracket. On MRCOOL’s current DIY quick-start sequence, the air handler hooks onto the mounting bracket and the lower portion is pressed into position until it locks into place.
This is a stage where an extra pair of hands can be valuable. The indoor unit may not be extraordinarily heavy, but you are trying to support it while protecting refrigerant tubing, wiring and a condensate hose. Forcing the unit against the wall while something is trapped or sharply bent behind it can turn a straightforward installation into a repair.
After mounting, verify that the unit is securely engaged with the bracket and sits as intended. Check the rear piping path and make sure the condensate hose has not been pinched or pushed upward. The air handler should not be held away from the wall because a bundle was routed poorly behind it.
The line set is not simply a pair of flexible hoses. It is part of the sealed refrigeration system, and damaging it can compromise the entire installation.
When routing the line set, avoid sharp bends, crushing, twisting and kinking. Make gradual bends and respect any minimum bend-radius instructions provided by the manufacturer. Don’t use the connector as a handle or allow the weight of a long line set to hang from a fitting.
MRCOOL’s current support information for its DIY pre-charged line sets specifically tells installers to keep fittings clean, avoid kinking the line and perform a leak check before opening the refrigerant valves. It also identifies particular couplers and line sets for particular product configurations, reinforcing why compatibility needs to be checked rather than assumed.
MRCOOL — DIY Pre-Charged Line Set Guidance
Keep protective caps in place until the installation instructions tell you to remove them. Dirt, moisture and physical damage have no place at a refrigerant connection.
This distinction is important enough to repeat. A condenser being factory charged does not automatically mean the entire mini split uses a homeowner-installable no-vacuum connection system.
Conventional mini splits may arrive with refrigerant stored in the outdoor unit while still requiring field-installed copper piping, properly prepared connections, leak or pressure testing and evacuation before the system is commissioned. A purpose-built DIY system can be different because the manufacturer has engineered the line set and connection method around a specific procedure.
Current MRCOOL fifth-generation DIY documentation, for example, describes compatible systems using factory-prepared Quick Connect line sets and states that its specified configuration eliminates vacuuming during installation.
That statement applies to the compatible equipment and procedure the manufacturer documents. It should not be generalized to other mini splits.
For a genuine factory-engineered DIY system, follow the connection sequence exactly. Do not substitute a generic online technique for the instructions supplied with the connectors.
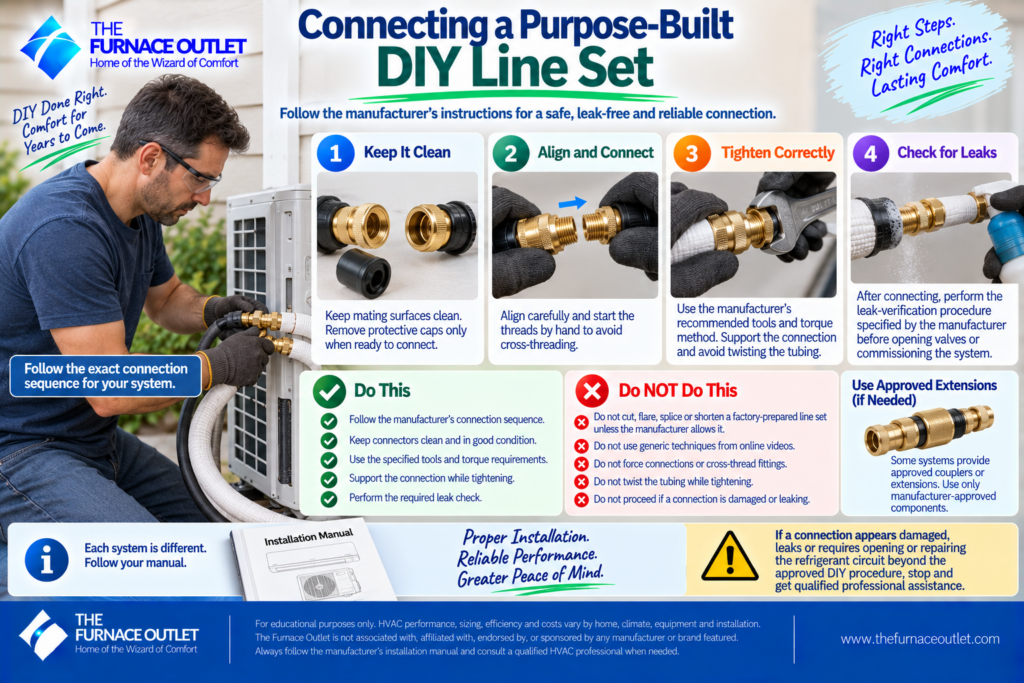
Keep the mating surfaces clean, align connections carefully and start threaded connections correctly so you don’t cross-thread them. Use the tools, tightening method and torque requirements specified by the manufacturer. Avoid twisting the tubing while tightening a fitting, and support the connection so the mechanical force is applied where intended.
Do not cut, flare, splice or shorten a factory-prepared pre-charged line set unless the manufacturer explicitly provides a procedure that allows it. Some systems provide approved extensions or couplers, but that does not mean arbitrary modifications are acceptable. MRCOOL, for example, identifies compatible Quick Couplers for certain DIY line sets and advises managing unused length rather than treating the pre-charged tubing like conventional field-cut copper.
After making the connections, perform whatever leak-verification procedure the manufacturer requires before proceeding with commissioning. If a connection appears damaged, leaks, or requires opening or repairing the refrigerant circuit beyond the approved DIY procedure, stop and get qualified assistance.
Homeowners should also understand that refrigerant handling is regulated in the United States. EPA guidance states that Section 608 technician certification is required for activities that could reasonably be expected to violate the integrity of a stationary appliance’s refrigeration circuit, including adding or removing refrigerant and certain connections or disconnections involving refrigerant-containing components.
U.S. EPA — Homeowner Refrigerant FAQs
This is one more reason to stay strictly within the manufacturer-documented installation procedure for equipment specifically designed for homeowner installation. If the job turns into refrigerant recovery, charging, repairing a leaking circuit, cutting refrigerant tubing or other regulated refrigerant service, it has moved beyond an ordinary DIY mechanical installation.
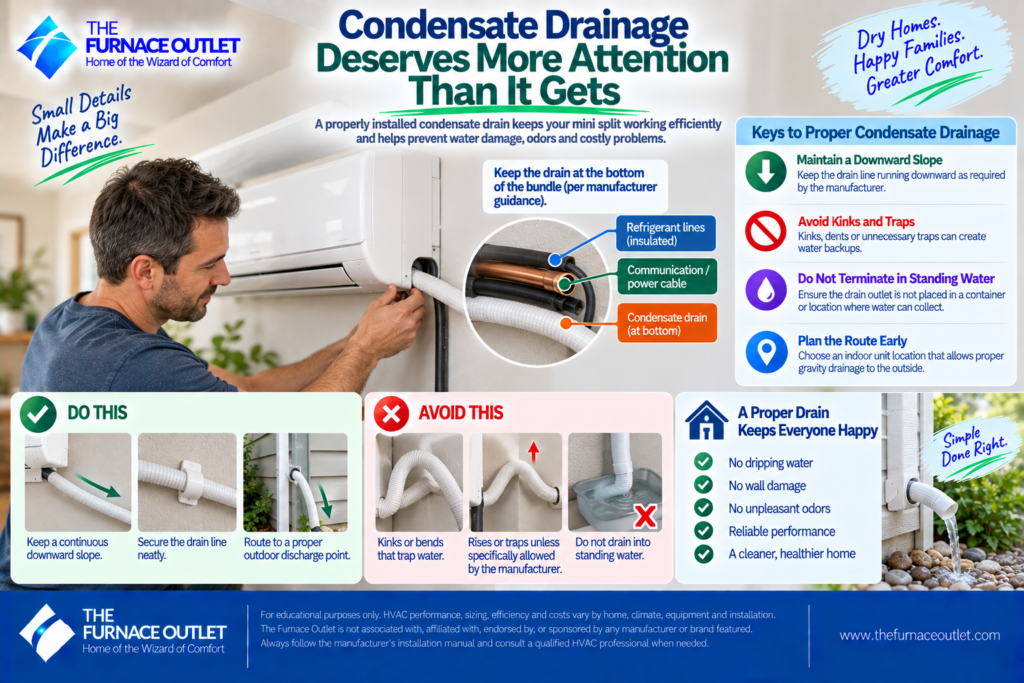
A mini split removes moisture from indoor air during cooling. That water collects at the indoor coil and drain pan and must leave the building through the condensate drain. Gravity-drained wall units therefore depend heavily on the drain route. A poor drain installation can result in dripping water, wall damage, odors or an overflowing drain pan even when the refrigeration system itself is working properly.
The drain should generally maintain the manufacturer-required downward path without unnecessary rises, kinks or traps unless the specific equipment design calls for something different. MRCOOL’s wall-mounted DIY documentation emphasizes keeping the drain hose at the bottom of the bundle and warns that kinks and dents can create water traps. Its documentation also says not to terminate the drain hose in standing water.
This is why I recommend planning the condensate route before finalizing the indoor-unit location. A beautiful air-handler location becomes a poor choice if gravity drainage cannot be achieved as required.
Don’t wait for a humid summer afternoon to discover that your condensate hose doesn’t drain correctly. Follow the manufacturer’s procedure for verifying drainage before completing trim work or making the route difficult to access.
Look for continuous drainage to the intended termination point and inspect the indoor unit and wall penetration for evidence of leakage. Make sure the hose has not been crushed behind the air handler and that exterior routing does not create a low spot where water can collect.
Where local plumbing or mechanical requirements regulate condensate disposal, follow those rules. Don’t assume that allowing water to drip anywhere outside is automatically acceptable. Drain termination requirements can vary by jurisdiction and application.
The principle is straightforward: water should move away from the indoor unit predictably and without backing up.

The outdoor unit needs a stable, appropriately located base or mounting system and adequate airflow around the cabinet. ENERGY STAR recommends prioritizing unobstructed airflow and avoiding tight placements against shrubs, structures and other obstacles. Follow the exact manufacturer’s clearance requirements rather than using a generic distance. Those requirements can differ around the sides, rear, front and top of the condenser.
The unit should also be positioned with service access in mind. Don’t bury it behind landscaping or place it where technicians would have difficulty reaching panels and connections later. Consider snow accumulation, roof runoff, vegetation, debris and other site conditions relevant to your climate.
MRCOOL’s DIY installation guidance also advises positioning the condenser in a well-ventilated location and keeping it level and stable.
Purpose-built DIY systems sometimes provide fixed or predetermined line-set lengths. If your actual route is shorter, you may have excess tubing to manage. Do not automatically cut it. For factory-prepared pre-charged line sets, shortening the tubing could open the refrigerant circuit and defeat the engineered DIY connection method. Instead, follow the manufacturer’s instructions for managing excess line-set length. MRCOOL’s current support guidance for certain DIY line sets advises storing excess length horizontally behind the condenser and using approved Quick Couplers where additional length is needed.
Avoid creating tight coils, sharp bends or kinked sections simply to hide excess tubing. The objective is to maintain a smooth refrigerant path while protecting the line set from physical damage.
Once the installation has been tested, an appropriate line-hide system can make exposed piping look much cleaner while also providing some physical and weather protection. Just don’t let appearance override the manufacturer’s bend, access and routing requirements.
Even if you complete the mechanical installation yourself, the mini split still needs a correctly designed electrical supply. Depending on the equipment, that can involve a dedicated branch circuit, correctly sized conductors and overcurrent protection, an outdoor disconnect, grounding and indoor-to-outdoor wiring.
A DIY refrigerant connection does not automatically make this DIY electrical work. MRCOOL’s current DIY installation material explicitly advises that electrical work be performed by a licensed electrician and comply with local codes. If installing the system requires adding a breaker, working inside the electrical panel, running a new branch circuit or determining code-compliant wiring methods, I would have a qualified electrician handle that portion. That still leaves plenty of meaningful work for a capable homeowner. DIY does not have to mean doing absolutely everything yourself.
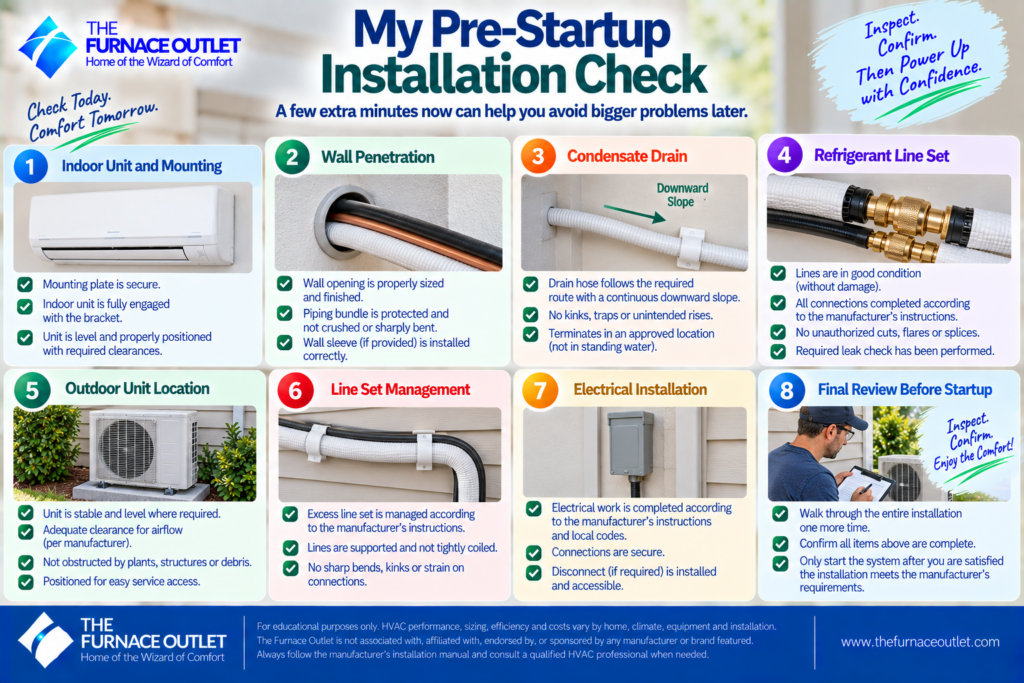
Before attempting to start the system, I would walk through the installation from the indoor unit to the outdoor condenser as though I were inspecting someone else’s work. Check that the indoor mounting plate is secure, the air handler is fully engaged with the bracket, the wall penetration is properly finished and the piping bundle has not been crushed or sharply bent.
Next, trace the condensate hose and confirm that it follows the required route without kinks or unintended rises. Inspect the refrigerant line set for damage and verify that every connection has been completed according to the manufacturer’s instructions. Confirm that any required leak checks have been performed before opening valves or commissioning the equipment.
At the outdoor unit, check that the condenser is stable, level where required, adequately clear of obstructions and positioned for airflow and service access. Verify that excess line set is managed according to the manufacturer’s instructions rather than tightly coiled or cut. Finally, make sure the electrical installation has been completed and checked appropriately before energizing the equipment. A few extra minutes spent inspecting the installation is considerably easier than troubleshooting a problem after startup.
The mistakes I would watch most closely are not necessarily dramatic ones. A mounting plate installed slightly out of position can complicate drainage and fit. A wall hole drilled before checking the exterior can emerge in an inconvenient location. A drain hose accidentally routed upward can create water problems. A refrigerant line bent too aggressively can kink internally even when the insulation hides some of the damage.
Other problems come from treating manufacturer instructions as suggestions. Cutting a factory-prepared line set because it looks too long, using an unapproved extension, tightening a refrigerant fitting by feel instead of following the specified procedure, copying wiring from another model or ignoring required condenser clearances can undermine the advantages of buying a purpose-built DIY system in the first place. The manufacturer’s engineering is what makes a legitimate DIY system approachable. Following that engineering is therefore part of the DIY process, not an inconvenience that should be worked around.
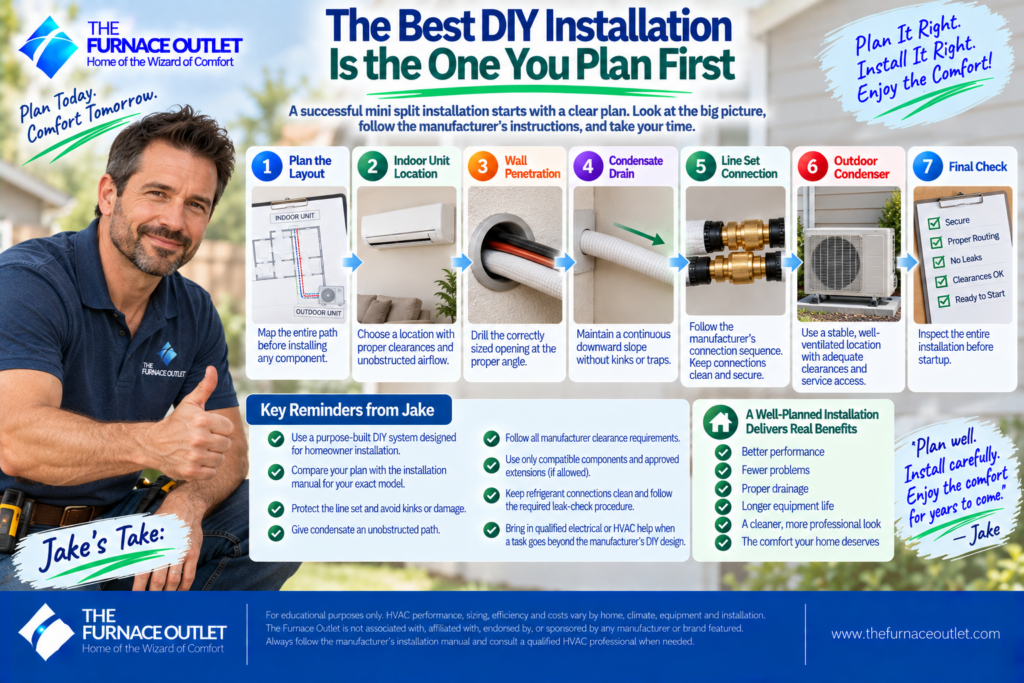
If I had to reduce this entire installation guide to one piece of advice, it would be this: plan the complete path before installing any individual component. Know where the indoor unit will sit, where the mounting plate attaches, where the wall penetration will emerge, how the drain will maintain the required route, how the line set will reach the outdoor equipment, where excess tubing will be managed and where the condenser will have sufficient airflow and service access. Then compare that entire plan with the installation manual for your exact system.
Purpose-built quick-connect mini splits can make the refrigerant side of installation much more approachable, but they don’t eliminate the need for careful workmanship. A factory-prepared line set can still be damaged by a kink. A perfectly connected refrigerant circuit can still be accompanied by a poorly routed condensate drain. A correctly mounted indoor unit can still perform poorly if the outdoor condenser is surrounded by obstructions.
DIY should mean following a system specifically engineered for homeowner installation, not improvising your way through conventional HVAC work. Take your time with the mounting plate. Protect the line set. Give condensate an unobstructed path. Respect equipment clearances. Use only compatible components. Keep refrigerant connections clean. Follow the manufacturer’s commissioning procedure, and bring in qualified electrical or HVAC help whenever the installation moves beyond the tasks the manufacturer has actually designed for homeowner completion. Do those things well, and the finished installation has a much better chance of looking professional, draining correctly and delivering the comfort the equipment was designed to provide.
Can I install a mini split myself?
Some mini splits are specifically engineered and documented for homeowner installation, while conventional systems may require professional refrigerant piping, evacuation and commissioning. Check the exact manufacturer’s documentation rather than assuming that every ductless mini split is DIY-friendly. Electrical, permit and inspection requirements also vary by location.
Does a DIY mini split need a vacuum pump?
It depends entirely on the system. Conventional field-installed refrigerant piping commonly requires evacuation, while certain purpose-built DIY systems use compatible factory-prepared line sets designed around a documented no-vacuum connection procedure. A factory-charged outdoor condenser alone does not prove that the system is a no-vacuum design.
Should the mini-split wall hole slope downward?
For systems whose manuals specify it, yes. MRCOOL’s cited DIY documentation instructs installers to drill the wall penetration at a slight downward angle toward the exterior to assist drainage. Follow the dimensions and slope instructions for your exact equipment rather than copying a generic measurement.
Where should the condensate hose sit in the line-set bundle?
For the MRCOOL DIY equipment referenced in its installation documentation, the drain hose is positioned at the bottom of the bundle to support gravity drainage. Other equipment should be installed according to its own manual.
Can I cut a pre-charged DIY line set if it is too long?
Do not cut a factory-prepared pre-charged line set unless the manufacturer explicitly provides an approved procedure allowing it. Opening or modifying a charged refrigeration circuit can also create regulatory and technical issues. Follow the manufacturer’s method for managing excess length.
Can I extend a DIY mini-split line set?
Some manufacturers provide compatible extensions or couplers for particular models and tubing sizes. MRCOOL, for example, documents approved Quick Couplers for certain DIY line sets. Compatibility should be verified for the exact equipment rather than assumed from connector appearance.
Can the condensate drain run uphill?
A conventional gravity drain needs a suitable path that allows water to flow away from the indoor unit. Unintended rises, kinks and water traps can interfere with drainage. Some applications may use condensate pumps or equipment-specific drainage arrangements, but those should be designed and installed according to the relevant instructions.
How close can the outdoor condenser be to a wall?
There is no single clearance that applies to every mini split. Use the minimum clearances in the installation manual for your exact outdoor unit. ENERGY STAR also recommends keeping outdoor equipment free from airflow obstructions such as tight structures and vegetation.
Can I hide the line set inside the wall?
This depends on the equipment, local requirements and manufacturer’s instructions. Some proprietary DIY line-set manufacturers provide specific routing guidance and may advise against concealing certain connections or lines within inaccessible wall cavities. Check the exact manual before planning a concealed installation.
Do I still need an electrician for a DIY mini split?
Potentially, and in many installations that is the sensible division of labor. A system may have a homeowner-friendly refrigerant connection while still requiring a dedicated circuit, breaker, disconnect, grounding and other electrical work. MRCOOL’s DIY installation guidance recommends licensed electrical involvement.
What should I check before turning the mini split on?
Confirm secure mounting, correct clearances, an unobstructed condensate path, undamaged line-set routing, properly completed refrigerant connections, required leak checks, stable outdoor-unit placement and a correctly completed electrical installation. Then follow the exact startup and commissioning sequence in the manufacturer’s manual rather than simply energizing the equipment and hoping everything is correct.
Editorial Disclosure: The Furnace Outlet is not associated with, affiliated with, endorsed by, or sponsored by any manufacturer or company mentioned in this article. We do not receive manufacturer compensation for inclusion or rankings. Installation procedures, equipment designs and code requirements vary by model and location. Always use the current installation documentation for your exact equipment and consult qualified HVAC and electrical professionals when required
https://thefurnaceoutlet.com/best-diy-mini-split-systems-of-2026-no-hvac-technician-required/