Newsletter Subscribe
Enter your email address below and subscribe to our newsletter

HVAC made simple

By Jake Lawson — the HVAC Specialist
Buying a mini split online has never been easier, but installing one without professional help is a different matter. In 2026, the words “DIY mini split” are used for everything from a genuinely homeowner-installable system with sealed quick-connect refrigerant lines to an ordinary ductless heat pump that happens to arrive in several manageable boxes. Those products may look similar on a retailer’s website, yet the work required to commission them can be very different. That distinction affects the tools you need, the final project cost, the warranty, code compliance and, most importantly, whether the system will perform as intended.
After more than a decade around residential and light-commercial HVAC equipment, I do not consider a system genuinely DIY simply because a capable homeowner can mount the indoor head and set the condenser on a pad. Most mechanically confident people can complete those physical tasks with enough time and care. The dividing line is the refrigerant circuit. If the installation requires cutting and flaring copper, pressure-testing with dry nitrogen, pulling and verifying a deep vacuum, releasing refrigerant correctly or repairing a leak, the job has moved beyond ordinary home improvement and into HVAC commissioning.
That does not mean every part of the project must be handed to one contractor. A homeowner may be able to plan the route, prepare the mounting surface and install the equipment while using a licensed electrician for the power supply. In another jurisdiction, permits or manufacturer terms may require professional participation. The right question is therefore not simply, “Can I install this?” It is, “Which portions can I complete safely and legally, and which portions should be handled by a qualified professional?” This guide answers that question while comparing the leading product families and use cases for 2026.
Editorial disclosure: The Furnace Outlet is not affiliated with, endorsed by or sponsored by any manufacturer or brand discussed in this guide. We do not receive manufacturer compensation for inclusion or rankings. Product availability, specifications, prices, efficiency ratings and warranty terms can change, so verify the current model documentation before purchasing.

For a buyer who wants the short version, my best overall choice is the current MRCOOL DIY single-zone family because its factory-charged, sealed quick-connect design addresses the refrigerant work that normally prevents a mini split from being a true homeowner project. The same platform also gives buyers several capacities and a multi-zone route, although adding zones increases planning, lifting, electrical and condensate-management demands. My best-value advice is more conditional: a competitively priced conventional system from Pioneer, Senville or Cooper & Hunter can represent excellent equipment value, but it should not be described as fully DIY when its instructions call for evacuation, leak testing or professional commissioning.
| Category | Leading 2026 choice | Why it stands out | Important limitation |
|---|---|---|---|
| Best overall genuine DIY system | MRCOOL DIY single-zone family | Purpose-built precharged quick-connect line set removes conventional evacuation and flaring from the normal installation sequence | Dedicated electrical work, permits and code compliance may still require professionals |
| Best value | Correctly sized entry-level single-zone system with professional commissioning budgeted | A Pioneer, Senville or Cooper & Hunter package can offer strong equipment value when installation requirements are priced honestly | A precharged condenser alone does not make the refrigerant connection DIY |
| Best for a garage | Appropriately sized MRCOOL DIY single-zone unit | Straightforward one-room application with heating and cooling in one system | Garages can have extreme loads, poor insulation and code complications |
| Best for a bedroom | A smaller-capacity, quiet single-zone heat pump selected from certified performance data | Modulating output and low indoor sound can support comfortable overnight operation | Oversizing can cause short cycling, drafts and weak humidity control |
| Best for a large room | Higher-capacity MRCOOL DIY single-zone model after a load calculation | Keeps the installation to one indoor head while serving an open space | Square footage alone is not a sufficient sizing method |
| Best for cold weather | A properly sized cold-climate-rated heat pump with verified low-temperature capacity | Published performance at 5°F and below matters more than a broad “works in winter” claim | The best cold-climate product may require professional installation |
| Best multi-zone DIY option | MRCOOL DIY multi-zone family | Extends the sealed connection concept to multiple indoor units | More zones mean more line routing, drainage, branch matching and commissioning risk |
These are product-family recommendations rather than promises about every capacity, line-set combination or indoor-unit match. Efficiency and low-temperature performance can change by exact system combination. Before buying, confirm the model numbers in the AHRI Directory of Certified Product Performance and compare the certificate with the combination in your cart. A familiar series name is not enough when the condenser, indoor head and line-set length determine the final matched system.
A conventional mini split normally arrives with refrigerant stored in the outdoor unit. That fact often creates confusion because sellers may describe the equipment as “precharged.” The charge inside the condenser does not automatically mean the field-installed copper lines are ready to operate. After the indoor and outdoor units are connected, a conventional system generally requires correctly made flare joints, a leak test and evacuation of the field piping before the service valves are opened. Skipping those steps can leave air and moisture inside the circuit, leading to poor operation, acid formation, restricted flow or premature component failure.
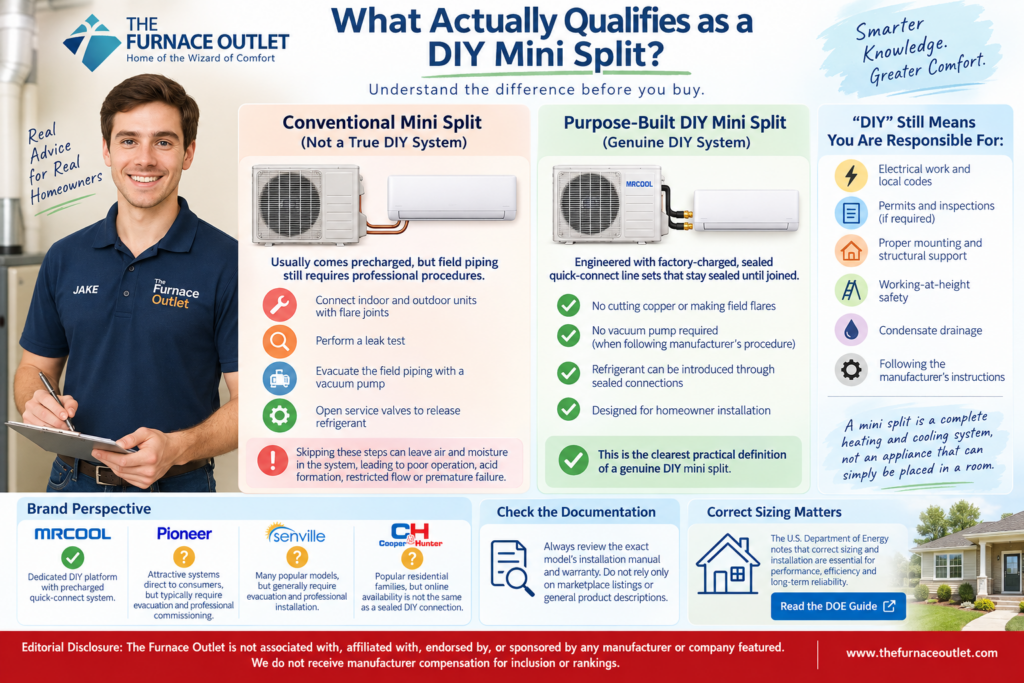
A purpose-built DIY design changes that part of the process. Its line set and connections are engineered to remain sealed until the factory-prepared fittings are joined. When the manufacturer’s procedure is followed, refrigerant can be introduced without cutting copper, making field flares or attaching a vacuum pump. That is the clearest practical definition of a genuine DIY mini split. Even then, “DIY” refers mainly to the refrigerant connection; it does not suspend electrical codes, structural requirements, permits, working-at-height precautions or the manufacturer’s instructions.
This distinction is especially important when comparing MRCOOL with Pioneer, Senville and Cooper & Hunter. MRCOOL markets a dedicated DIY platform around its precharged quick-connect system. Pioneer and Senville sell many attractive ductless systems directly to consumers, while Cooper & Hunter offers several popular residential families, but direct online availability is not the same as a sealed DIY refrigerant connection. Some retailers bundle installation kits or use loose DIY language, so the controlling evidence should be the exact model’s installation manual and warranty, not the headline on a marketplace listing.
The U.S. Department of Energy’s ductless mini-split overview also reminds homeowners that correct sizing and installation affect performance. A mini split is a complete heating and cooling system, not an appliance that can simply be placed in a room. Refrigerant piping, condensate removal, electrical supply, airflow and equipment location all interact, and an error in any one of them can undermine otherwise capable equipment.
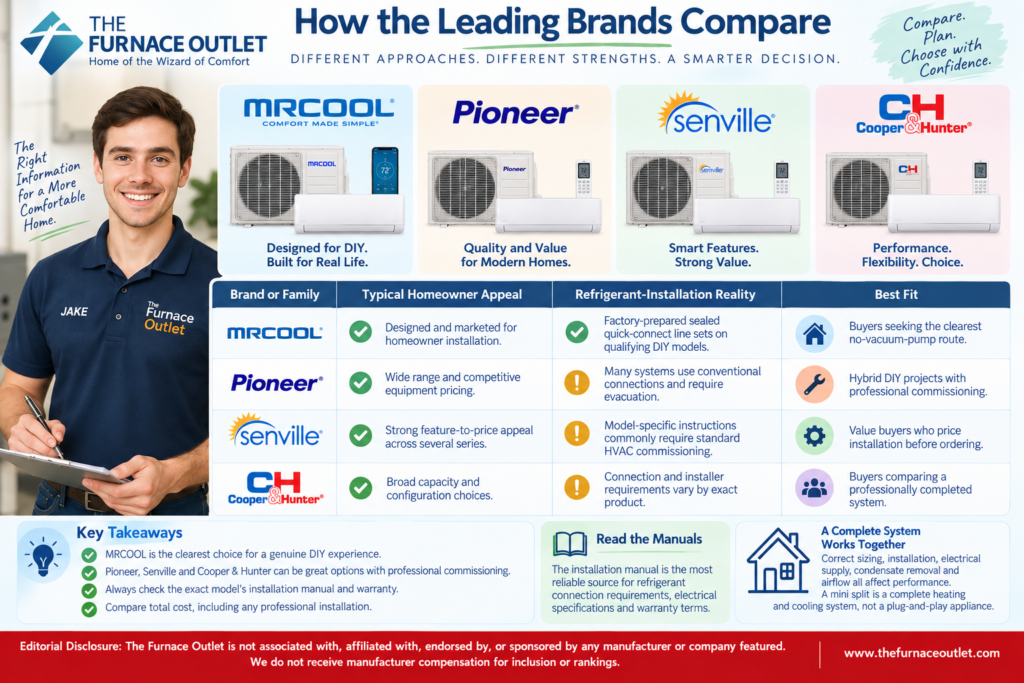
MRCOOL is the natural starting point for a true DIY discussion because its DIY family was designed around the homeowner-installable connection. The current-generation line includes single-zone and multi-zone configurations, app-connected controls and multiple capacity choices. The strongest reason to choose it is not that every MRCOOL specification is automatically superior to every competitor. It is that the product design reduces the specialized refrigerant tasks that form the biggest barrier for a homeowner.
Pioneer, Senville and Cooper & Hunter all sell appealing ductless systems, often with competitive pricing and broad capacity choices. They can be good candidates for a hybrid project in which the homeowner handles preparation and mounting while a qualified technician commissions the refrigerant circuit. The controlling evidence is always the exact model’s manual: if it specifies conventional flare connections, pressure testing and evacuation, the equipment is not equivalent to a sealed quick-connect DIY design, regardless of retailer wording.
| Brand or family | Typical homeowner appeal | Refrigerant-installation reality | Best fit |
|---|---|---|---|
| MRCOOL DIY | Designed and marketed for homeowner installation | Factory-prepared sealed quick-connect line sets on qualifying DIY models | Buyers seeking the clearest no-vacuum-pump route |
| Pioneer | Wide range and competitive equipment pricing | Many systems use conventional connections and require evacuation | Hybrid DIY projects with professional commissioning |
| Senville | Strong feature-to-price appeal across several series | Model-specific instructions commonly require standard HVAC commissioning | Value buyers who price installation before ordering |
| Cooper & Hunter | Broad capacity and configuration choices | Connection and installer requirements vary by exact product | Buyers comparing a professionally completed system |
For most homeowners determined to complete as much of the work as possible, the MRCOOL DIY single-zone family is my best overall recommendation for 2026. Its main advantage is a complete installation concept rather than one standout efficiency number. The precharged quick-connect line set avoids field flaring and the normal vacuum procedure, while a single indoor head keeps layout, drainage and controls relatively manageable. A buyer can select a capacity appropriate to a bedroom, garage, workshop, addition or open living space without immediately taking on the complexity of a multi-zone system.
The product is not risk-free or skill-free. The outdoor unit needs a stable base and required clearances; the wall opening needs careful placement and weather sealing; and the line set must be routed without kinks or damage. The head needs correct mounting and reliable condensate fall, while the circuit, disconnect and conductors must match the nameplate and local code. A qualifying system may remove the need for HVAC evacuation and charging, but electrical work, permits, masonry drilling, second-story access or structural questions can still require professional help.

The lowest equipment price is rarely the lowest completed-system price. A conventional mini split can undercut a purpose-built DIY model at checkout, but the comparison changes after adding a wall bracket or pad, line-hide, surge protection, disconnect, whip, circuit materials, permits, condensate accessories, specialized tools and professional commissioning. If a contractor is unwilling to commission owner-installed equipment, you may also face scheduling problems or a higher service charge than expected.
For that reason, my best-value recommendation is not one universal brand. It is the correctly sized system with a documented installation path and a complete budget. A Pioneer, Senville or Cooper & Hunter package can be a very good value when a qualified installer has agreed in advance to perform the required work. For a homeowner who would otherwise have to buy a vacuum pump, micron gauge, nitrogen regulator and other tools for one job, paying for commissioning can be the wiser financial choice.
The MRCOOL DIY family can still win the total-cost comparison when local labor rates are high or qualified technicians do not accept partial homeowner installations. Its higher equipment price may purchase a simpler refrigerant connection, clearer project planning and less dependence on a separate commissioning appointment. Ask for written quotes before ordering either route, because local labor and permit costs can move the answer considerably.
A single-zone MRCOOL DIY system is a practical choice for many garages because the room usually has a simple zone boundary and an accessible exterior wall. The real challenge is sizing. Garages commonly have thin doors, slab-edge losses, air leakage and little insulation above or within the walls. They may also gain intense afternoon heat through a dark roof or west-facing door. A rule based only on floor area can therefore miss the actual heating or cooling load by a wide margin.
Before choosing capacity, address obvious leakage and insulation where practical, decide whether the space will be conditioned continuously and account for local design temperatures. Keep the head away from heavy dust, grinding debris and vehicle exhaust, and remember that a mini split does not provide outdoor ventilation. Fuel vapors, finishing chemicals or other hazardous materials justify professional review.

For a bedroom, I favor the smallest correctly sized modulating single-zone system that can meet the design load while operating quietly at low speed. Bigger is not better. An oversized head can satisfy the thermostat quickly and then cycle or reduce output before it has mixed the room air and removed enough humidity. The result may be a cold draft near the bed, a warmer corner across the room and a clammy feeling during mild weather.
Look beyond one advertised decibel number by comparing indoor sound across fan settings, outdoor sound and condenser location relative to windows. Sleep schedules, display-light control and gentle fan modes can also matter. A difficult line or condensate route may still make professional installation the better choice.
An open living area, studio or finished basement may suit a higher-capacity single-zone DIY system, provided air can circulate through the occupied space. The installer must still consider ceiling height, glass area, insulation, solar exposure, infiltration, occupancy and heat-producing appliances. A nominally large room with excellent insulation may need less capacity than a smaller sunroom with extensive glass.
As room size grows, the head needs an unobstructed throw and adequate return-air space. Avoid blowing directly into a nearby wall, cabinet or seating area. If walls divide the space or doors stay closed, one large head cannot replace proper zoning, and professional design may be appropriate.
Cold-climate shopping requires more than checking whether the product can operate at a low outdoor temperature. A unit may continue running at 5°F or below while delivering substantially less heat than it does at 47°F. The useful questions are how much rated capacity remains at the local winter design temperature, what the coefficient of performance is at that condition and whether another heat source will cover the remaining load.
The best cold-weather DIY choice is therefore the correctly sized, cold-climate-capable configuration whose low-temperature data can be verified for the exact matched system. MRCOOL’s DIY family may be the leading installation choice where an appropriate cold-weather model and capacity are available, but do not choose it solely because it is easier to connect. In severe climates, a professionally installed system with stronger verified low-temperature capacity may be the better long-term decision.
Use the ENERGY STAR air-source heat pump guidance as a starting point, then check extended performance tables and the AHRI certificate. Defrost water, ice and snow clearance also matter; the condenser may need elevation while the line set and penetration require climate-appropriate weatherproofing.
MRCOOL’s DIY multi-zone family is the clearest choice for homeowners who need several indoor heads while preserving a quick-connect installation approach. It can reduce the number of outdoor units and provide individual room control, but multi-zone is not merely a single-zone project repeated two or three times. The condenser has rules for compatible indoor-unit combinations, connected capacity, port use and permitted line lengths. Each head also needs its own defensible location and condensate route.
Multi-zone systems share capacity among active rooms, and the larger compressor’s minimum output may be excessive when only one small zone calls. Errors also multiply with every head, line set and drain. This route is most compelling for a skilled homeowner with simple, accessible paths rather than every multi-room house.
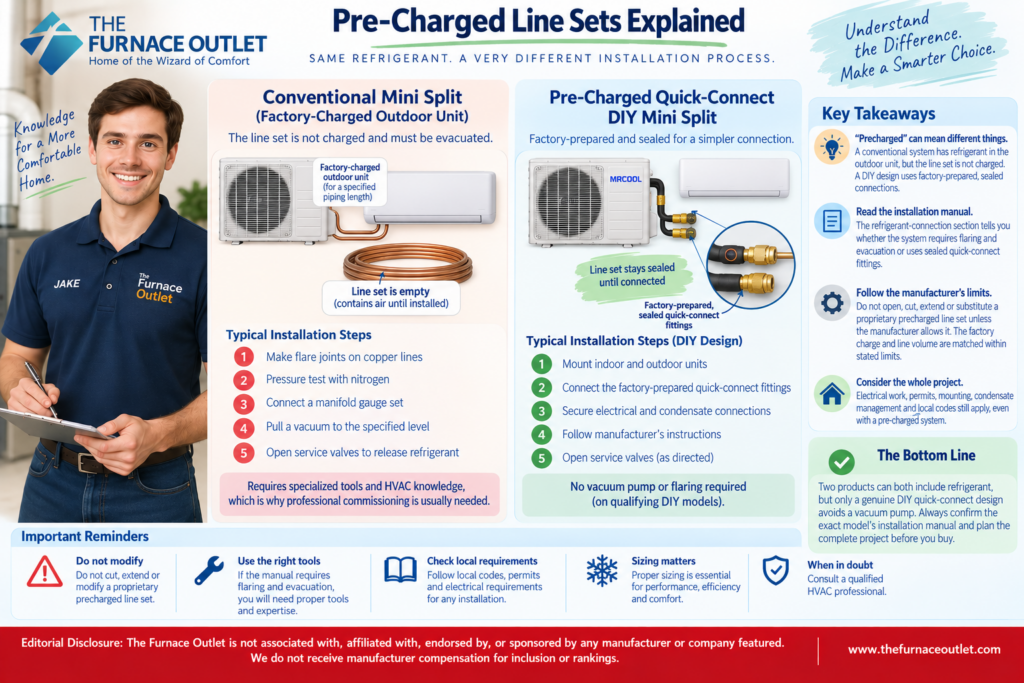
“Precharged” is one of the most misunderstood words in mini-split marketing. In a conventional system, the outdoor unit is usually factory-charged for a specified piping allowance, while the copper line set itself contains air until it is installed and evacuated. In a genuine DIY quick-connect design, the relevant components are factory-prepared and sealed so that the connection procedure can establish the refrigerant path without exposing the circuit in the conventional way.
This difference explains why two products can both claim to include refrigerant while only one avoids a vacuum pump. Before ordering, find the installation manual and read the refrigerant-connection section. If it tells you to make flare joints, pressurize the system with nitrogen, connect a manifold and pull a vacuum to a specified level, you are looking at a conventional installation. If it describes sealed, keyed or proprietary quick-connect fittings and explicitly states that field evacuation is not required, it is a genuine no-vacuum DIY connection for that model.
Do not open, cut, extend or substitute a proprietary precharged line set unless the manufacturer explicitly allows the procedure. The factory charge and line volume are matched within stated limits. An improvised modification can release refrigerant, introduce contamination and defeat the feature that made the system homeowner-installable in the first place.
Quick-connect fittings trade flexibility for simplicity. They eliminate field flares and ordinary evacuation when used exactly as designed, but can cost more, come in limited lengths and offer less freedom to alter the copper. Cross-threading or incorrect torque can still cause damage, so “quick” does not mean casual.
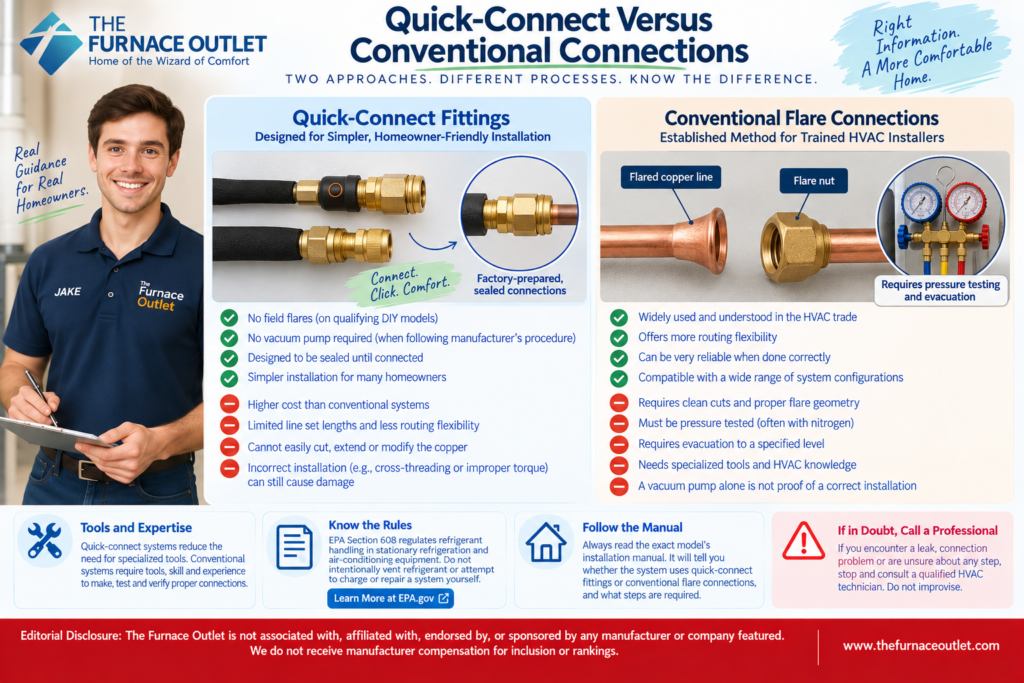
Conventional flare connections give trained installers more routing flexibility and are widely understood in the HVAC trade. Properly executed joints can be reliable, but success depends on clean cuts, correct flare geometry, appropriate torque, pressure testing and verified dehydration. A vacuum pump by itself is not proof of a sound installation; a technician uses measurement and testing to establish that the system is tight and sufficiently dry.
Federal refrigerant rules are another reason not to improvise. The EPA’s Section 608 resources explain requirements related to stationary refrigeration and air-conditioning equipment and refrigerant handling. A homeowner installing a sealed system according to its instructions is in a different position from someone intentionally opening the refrigerant circuit, adding charge or attempting a repair. If a leak or connection problem occurs, stop and use a qualified technician rather than venting refrigerant or experimenting with charging.
Most mini splits require a dedicated circuit, appropriately sized overcurrent protection, an outdoor disconnect and wiring between the outdoor and indoor equipment. Exact requirements come from the nameplate, installation instructions and locally adopted electrical code. Voltage alone does not determine the breaker or conductor size, and copying an online installation video is not an acceptable substitute for the documentation supplied with your model.
Electrical work can be the point where a project legitimately becomes hybrid DIY. A homeowner may mount the equipment and route the manufacturer-approved line set, while a licensed electrician installs or verifies the circuit, disconnect, grounding, conductor sizing and surge protection. That division still preserves much of the labor savings without treating high-voltage work as an afterthought. The National Fire Protection Association’s National Electrical Code information provides useful background, but enforcement depends on the edition and amendments adopted by your local authority.
Never energize equipment with temporary cords, an undersized circuit or wiring selected by guesswork. If the panel lacks capacity, the route is difficult or the jurisdiction restricts homeowner electrical work, hire a licensed electrician. A purpose-built DIY refrigerant connection does not make the power supply plug-and-play.
The indoor mounting plate must be secured to framing or an approved structural surface, not merely to drywall anchors chosen for convenience. The head needs specified clearance above and around it, a clear airflow path and a serviceable location. The wall sleeve or penetration should slope and seal as directed so water, insects and outdoor air do not enter the building. Before drilling, check both sides of the wall and locate studs, wiring, plumbing and exterior obstructions.
The condenser needs a level, stable base and manufacturer-required clearance for airflow and service. A ground pad can be simple, while a wall bracket may transmit vibration or require structural evaluation. Snow country often demands elevation; coastal and corrosive locations may require additional material considerations. Avoid roof drainage, dryer exhaust and confined corners that encourage recirculation of discharge air.
During cooling, the indoor coil removes moisture from the air, and that water must drain safely. A gravity drain should maintain continuous fall, avoid traps or sags not allowed by the manufacturer and terminate where water cannot damage the building or create a nuisance. The indoor head must be mounted correctly because even a small tilt in the wrong direction can contribute to overflow.
If gravity drainage is impossible, a condensate pump may solve the routing problem but adds noise, maintenance and another failure point. Test drainage before closing line-hide or declaring the job finished. Water damage from a poor drain route can quickly erase the savings from self-installation.
A genuine quick-connect project commonly requires measuring and layout tools, a level, drill and hole saw, specified wrenches or torque tools, structural fasteners, a stable ladder, sealant and suitable safety equipment. The final list depends on the wall, mounting method and manual, while heavy condensers may require lifting help.
A conventional installation adds specialized HVAC tools and procedures, potentially including a quality eccentric flaring tool, deburring tools, torque wrench or flare-nut heads, dry-nitrogen cylinder and regulator, manifold or core tools, vacuum-rated hoses, vacuum pump, micron gauge, leak-detection equipment and charging instruments. Buying the tools is not the same as knowing how to interpret them. If this is your only planned installation, professional commissioning may cost less than assembling a trustworthy tool set and absorbing the risk of a learning mistake.
Permit rules vary by city, county and state. A project may require mechanical and electrical permits even when no conventional refrigerant work occurs. Equipment placement can also be affected by setbacks, property lines, homeowner-association rules, historic-district restrictions and noise ordinances. Contact the local authority having jurisdiction before purchasing so you know what documents, licensed trades and inspections are required.
Warranty terms are equally model-specific. Registration deadlines, proof of purchase, approved sales channels, installation records and maintenance requirements can affect coverage. Some warranties distinguish between parts and labor, and many do not pay for diagnosis, access, shipping or the labor needed to replace a covered component. A DIY-friendly warranty should be confirmed in writing rather than inferred from the product name.
Keep invoices, model and serial numbers, installation photographs, permits, registration confirmation and startup documentation. Complete any manufacturer checklist because organized records can simplify future service and warranty communication.
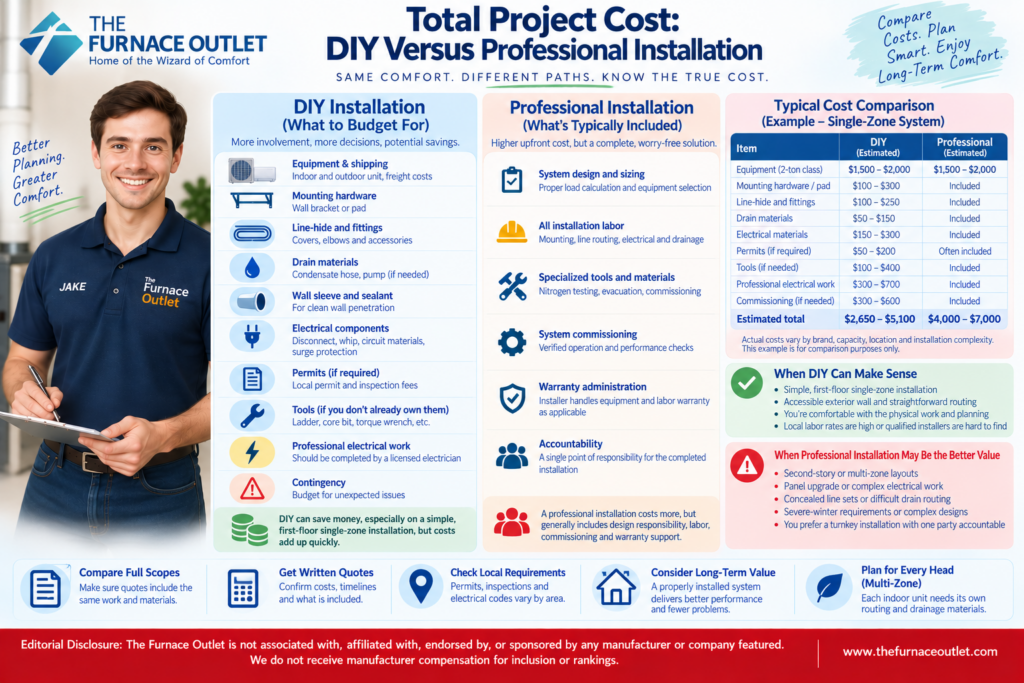
A realistic DIY budget begins with equipment and shipping, then adds mounting hardware, pad or bracket, line-hide, drain materials, wall sleeve, sealant, disconnect, whip, circuit materials, surge protection, permits and any tools you do not already own. It should also include professional electrical work and the cost of correcting an unexpected problem. Multi-zone jobs need separate routing and drainage materials for every head.
A conventional direct-to-consumer system may look cheaper until nitrogen testing, evacuation and startup labor are included. A fully professional quote costs more because it generally includes design responsibility, labor, specialized tools, commissioning, warranty administration and a party accountable for the completed installation. Compare scopes carefully rather than treating the difference as pure labor markup.
DIY savings are most realistic on a clean, first-floor single-zone route. A second-story multi-zone layout with a panel upgrade, concealed drains or severe-winter requirements may deliver better value through professional installation.
The most common mistake begins before installation: selecting capacity from a square-footage chart without considering the actual load. Other frequent errors include choosing a poor head location, leaving inadequate condenser clearance, routing the line set with sharp bends, failing to protect the wall penetration, damaging a quick-connect fitting, overtightening or undertightening connections, creating a condensate sag, ignoring required line-set length rules and energizing the system before every connection has been checked.
Conventional systems add another group of failures, including weak flares, omitted nitrogen pressure tests, evacuation judged only by the sound of the pump, failure to verify vacuum with a micron gauge, opening service valves too early and adding refrigerant without proper measurement. These are not cosmetic errors. They can cause leaks, moisture contamination, reduced efficiency and compressor damage.
The best defense is a deliberate installation plan based on the exact manual. Lay out the equipment, line route, drain route, electrical path, clearances and service access before drilling. Confirm that every kit component matches the model and desired line length. If the project no longer matches the conditions described in the manual, pause and get qualified help.

DIY should stop when the job requires opening or repairing the refrigerant circuit, adding or recovering refrigerant, fabricating a connection you cannot test properly, performing electrical work that you are not qualified or permitted to do, lifting equipment in an unsafe manner or interpreting structural and code conditions beyond your experience. It should also stop when the system’s warranty or installation manual expressly requires a licensed or certified installer.
Calling a professional after completing the straightforward work is not a failed DIY project. It is responsible project management. The homeowner’s goal should be a safe, code-compliant and reliable comfort system, not proving that every step can be completed alone.
For the clearest homeowner-installable path in 2026, I recommend starting with the MRCOOL DIY single-zone family and selecting the exact capacity through a real load assessment. Its sealed quick-connect approach addresses the refrigerant barrier that prevents many other online mini splits from being genuinely DIY. Buyers needing several rooms can consider the MRCOOL DIY multi-zone platform, but they should recognize that design and routing complexity rise quickly with each additional head.
Pioneer, Senville and Cooper & Hunter deserve consideration as equipment brands, especially for value-conscious buyers and professionally commissioned installations. I would not, however, label every system from those brands “no HVAC technician required.” If the exact model uses conventional flare connections and requires pressure testing and evacuation, budget for qualified commissioning from the start. That honest classification makes cost comparisons fairer and protects both performance and warranty expectations.
Finally, do not allow easy refrigerant connections to distract from sizing, electrical safety, drainage and local rules. The best DIY mini split is not merely the one you can connect yourself. It is the system that fits the load, performs in your climate, can be installed within the manufacturer’s requirements and continues delivering comfortable, efficient service after the satisfaction of installation day has passed.
Educational note: This guide provides general educational information. HVAC performance, sizing, efficiency, installation requirements and costs vary by home, climate, equipment and jurisdiction. Consult qualified HVAC, electrical and code professionals where appropriate, and follow the current instructions supplied with the exact equipment.