Newsletter Subscribe
Enter your email address below and subscribe to our newsletter

HVAC made simple

By Jake Lawson — Jake the HVAC Specialist
The phrase “DIY mini split” sounds simple enough. Buy the equipment, mount the indoor unit, place the condenser outside, connect everything, turn it on and enjoy heating and cooling without paying for a full professional installation. That is certainly the idea behind a genuine DIY system, but after working around HVAC equipment for years, I think homeowners need a more precise definition before ordering anything.
Not every mini split sold directly to homeowners is actually a DIY mini split. Not every system advertised as “precharged” can be installed without HVAC tools. And even a purpose-built DIY system does not mean that every part of the project should—or legally can—be handled by every homeowner.
The distinction matters because a mini split is still a complete refrigeration, electrical, drainage and air-conditioning system. The U.S. Department of Energy describes ductless mini-splits as air-source heat-pump systems that can provide zoned heating and cooling without conventional ductwork. Correct equipment selection and installation remain fundamental to how well that system performs.
My goal here is to draw a practical line between the work a capable homeowner may reasonably undertake and the point where DIY should stop.
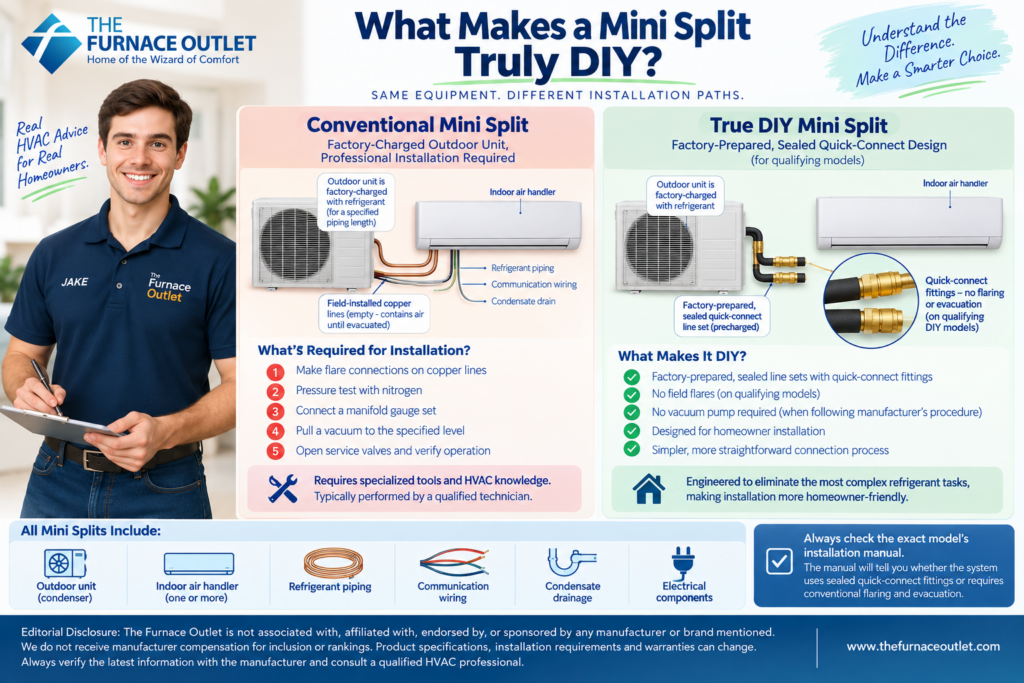
A conventional mini split usually consists of an outdoor condenser, one or more indoor air handlers, refrigerant piping, communication wiring, condensate drainage and electrical components. The outdoor unit typically arrives from the factory containing refrigerant, which is where much of the confusion begins. You may see the word “precharged” and assume that means you simply connect the copper tubing and start the system. Usually, that is not what it means.
With a conventional mini split, the outdoor condenser may contain the factory refrigerant charge while the field-installed copper piping initially contains ordinary air. After the indoor and outdoor equipment are connected, those lines generally need properly formed connections, leak or pressure testing, and evacuation according to the manufacturer’s installation procedure before the system is commissioned.
That work requires more than owning a vacuum pump. Correct conventional commissioning can involve flare preparation, torque specifications, pressure testing, vacuum measurement and verification that the refrigeration circuit is both tight and sufficiently dry.
A purpose-built DIY mini split changes the refrigerant-connection process. Instead of expecting the homeowner to fabricate conventional refrigerant connections and evacuate field piping, qualifying DIY systems use factory-prepared sealed connections designed to be joined according to a specific procedure.
MRCOOL, for example, documents precharged Quick Connect line sets specifically designed for its DIY series. Its support documentation identifies these as refrigerant-charged line sets with Quick Connect fittings intended for compatible DIY equipment. That is much closer to what I consider a genuine DIY mini split.
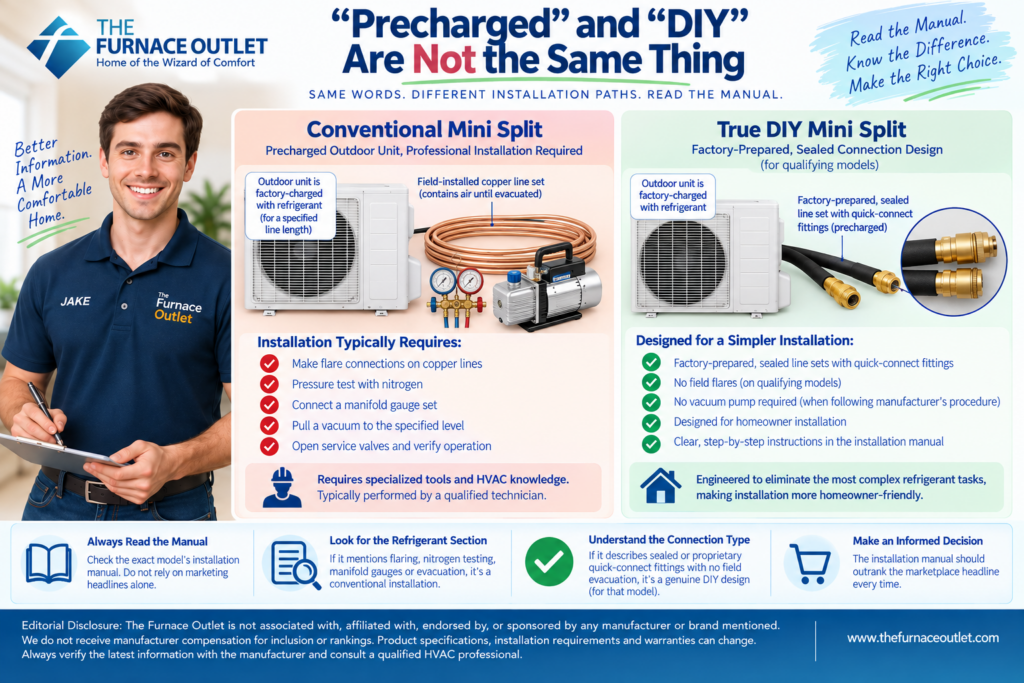
This is probably the most important lesson in this article. A precharged outdoor unit does not automatically make a mini split DIY. Imagine two systems sitting next to each other in an online store. Both may say that refrigerant is already included. One uses a conventional copper line set that must be connected, tested and evacuated according to the installation manual. The other uses a factory-prepared sealed connection specifically designed to eliminate conventional field evacuation.
Those are fundamentally different installation paths. Before buying any mini split marketed as DIY-friendly, download the exact installation manual—not a manual for a similar series—and find the refrigerant-piping section. Look for instructions involving flaring, nitrogen pressure testing, manifold gauges, evacuation or a specified vacuum procedure. If those steps are required, you are dealing with a conventional HVAC installation regardless of how casually a retailer uses the word “DIY.”
If the manufacturer’s instructions instead describe proprietary sealed or quick-connect fittings and explicitly provide a homeowner-installation procedure without conventional field evacuation, you are looking at a much more legitimate DIY design. The installation manual should outrank the marketplace headline every time.

There is plenty of meaningful work a capable homeowner can potentially handle. Depending on the equipment, building, local requirements and the homeowner’s skills, this can include planning the location, preparing the wall opening, installing an approved mounting plate, positioning an outdoor pad or bracket, routing a compatible line-set assembly, installing line-hide, planning condensate drainage and completing other mechanical preparation specifically permitted by the manufacturer.
A straightforward first-floor single-zone installation is naturally more DIY-friendly than a complicated multi-zone project. If the indoor head goes on an exterior wall and the condenser sits almost directly outside, the routing can be relatively simple. Once indoor units are placed on interior walls, upper floors or opposite sides of a house, the project becomes much more complicated.
I would also encourage homeowners to spend considerable time on location before installation begins. An indoor unit needs appropriate airflow and service clearance. The outdoor condenser needs adequate airflow, drainage and access for future maintenance. Condensate needs a reliable route away from the building. Refrigerant lines cannot simply be forced around corners because a particular route looks neater.
The best DIY installation is usually the one that was thoroughly planned before the first hole was drilled.
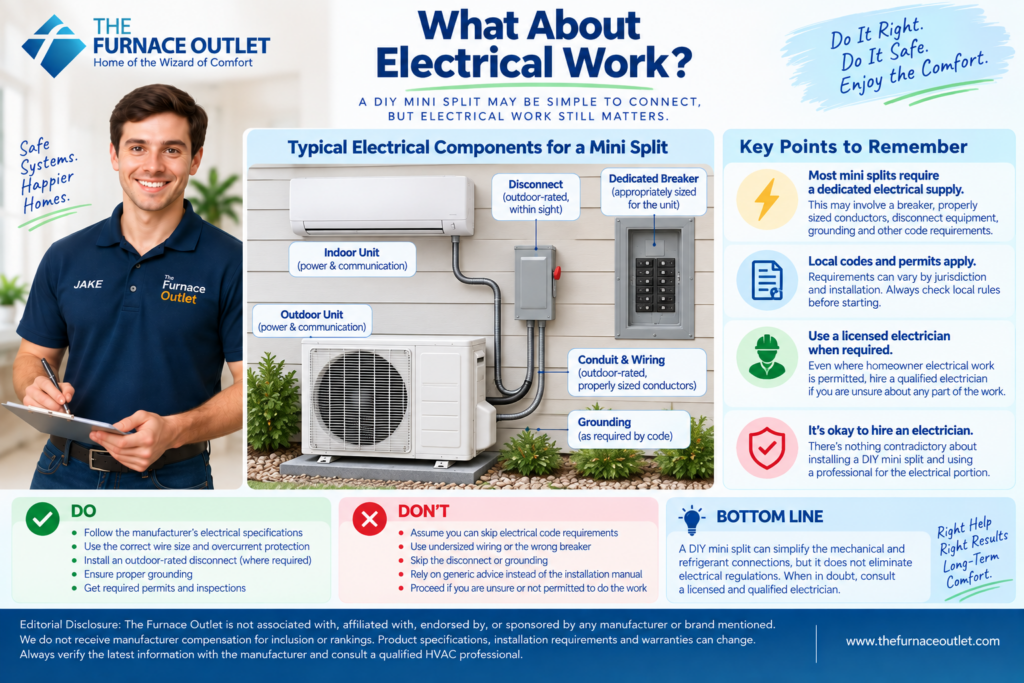
This is where the word DIY can become misleading. A homeowner-installable refrigerant connection does not automatically create homeowner-installable electrical work. Mini splits typically require a dedicated electrical supply, and the installation may involve a breaker, appropriately sized conductors, disconnect equipment, grounding, outdoor-rated components and other requirements determined by the equipment and applicable electrical code. Requirements can vary substantially by jurisdiction and installation.
Your mini-split manufacturer may make connecting the indoor and outdoor equipment relatively straightforward, but that does not eliminate electrical regulations or local permit requirements. If local rules require licensed electrical work, use a licensed electrician. Even where homeowner electrical work is permitted, anyone who is uncertain about conductor sizing, overcurrent protection, grounding, disconnect requirements or the manufacturer’s electrical specifications should bring in someone qualified.
There is nothing contradictory about installing a DIY mini split and hiring an electrician for the electrical portion.
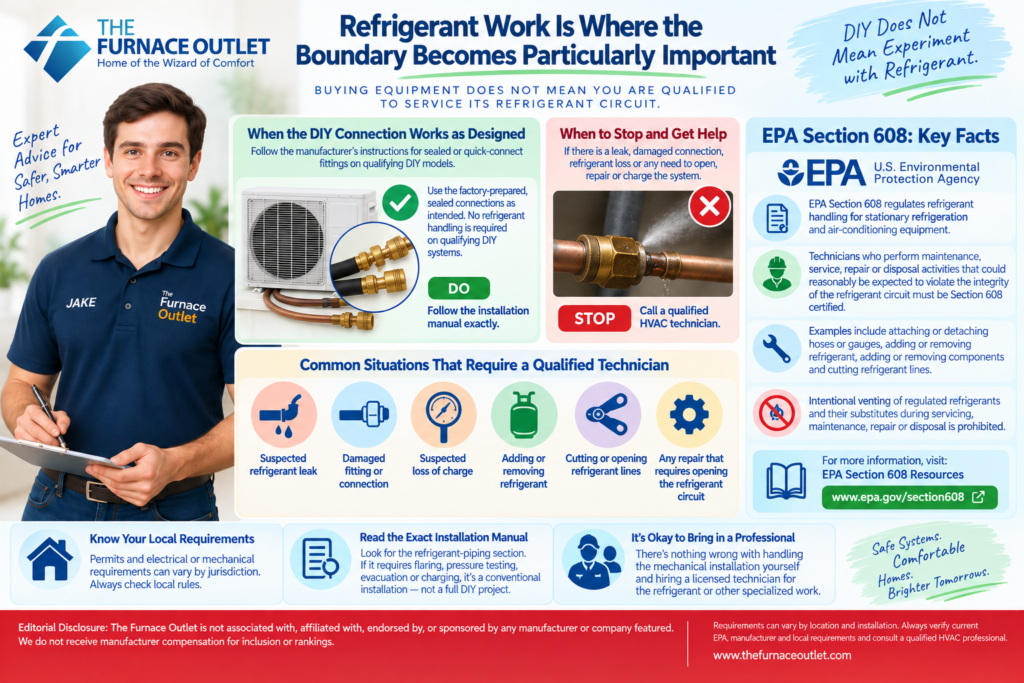
Homeowners should be especially careful about assuming that buying HVAC equipment gives them permission or the expertise to service its refrigerant circuit. EPA’s Section 608 rules govern refrigerant handling for stationary refrigeration and air-conditioning equipment, including prohibitions against intentional venting of regulated refrigerants and their substitutes during servicing, maintenance, repair and disposal. EPA also maintains specific homeowner resources covering the purchase, servicing and disposal of stationary air-conditioning equipment.
EPA guidance states that Section 608 certification is required for activities that could reasonably be expected to violate the integrity of the refrigeration circuit, including activities such as adding or removing refrigerant and cutting refrigerant lines. So if your sealed DIY connection does not work correctly, that is not an invitation to start experimenting with refrigerant.
If you encounter a leak, damaged fitting, suspected loss of charge or a situation requiring the refrigerant circuit to be opened or repaired, stop and get qualified help.
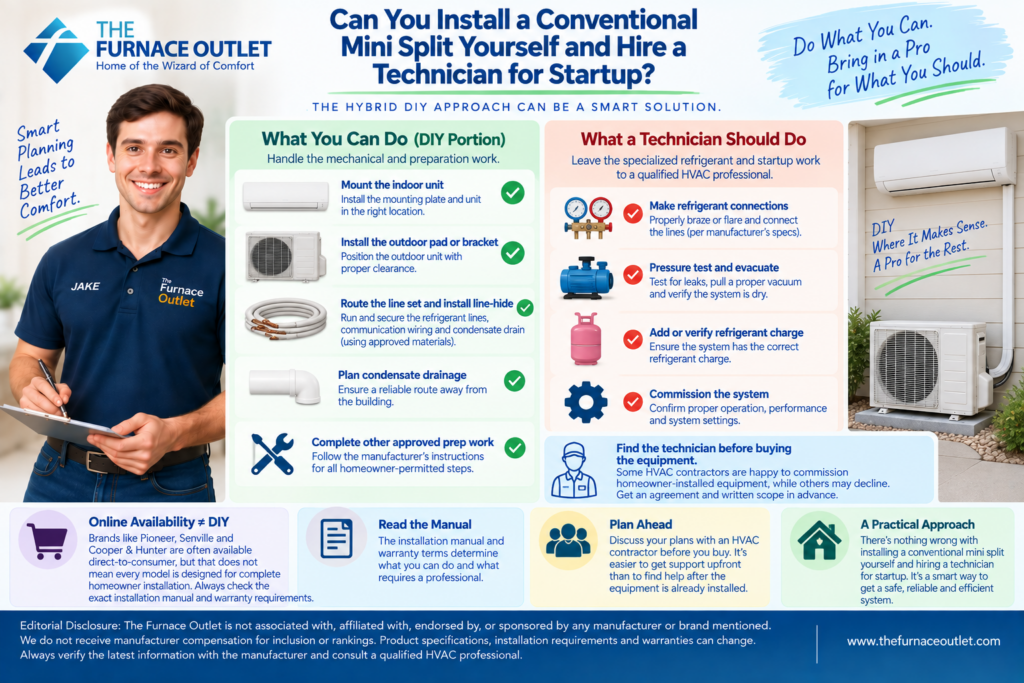
This is the hybrid DIY approach, and for some homeowners it can make considerable sense. You might mount the indoor unit, install the outdoor equipment pad, prepare line-hide and complete other approved mechanical work, while leaving conventional refrigerant connections, testing, evacuation and commissioning to a qualified HVAC technician.
Brands such as Pioneer, Senville and Cooper & Hunter are frequently attractive to homeowners because of their equipment selection and direct-to-consumer availability. But online availability does not by itself mean that every model is designed for complete homeowner installation. The exact installation manual and warranty requirements determine the answer.
There is another practical consideration: find the technician before buying the equipment. Some contractors are perfectly willing to commission homeowner-installed equipment, while others may decline because they do not want responsibility for work they did not perform. Calling five contractors after the equipment is already hanging on the wall is a much weaker position than getting an agreement and written scope before placing the order.
The refrigerant connection gets most of the DIY attention, but sizing may have a greater effect on everyday comfort. I would never choose a mini split solely because a product listing says something like “covers up to 1,000 square feet.” Square footage is useful information, but it does not tell me enough about the actual heating and cooling load.
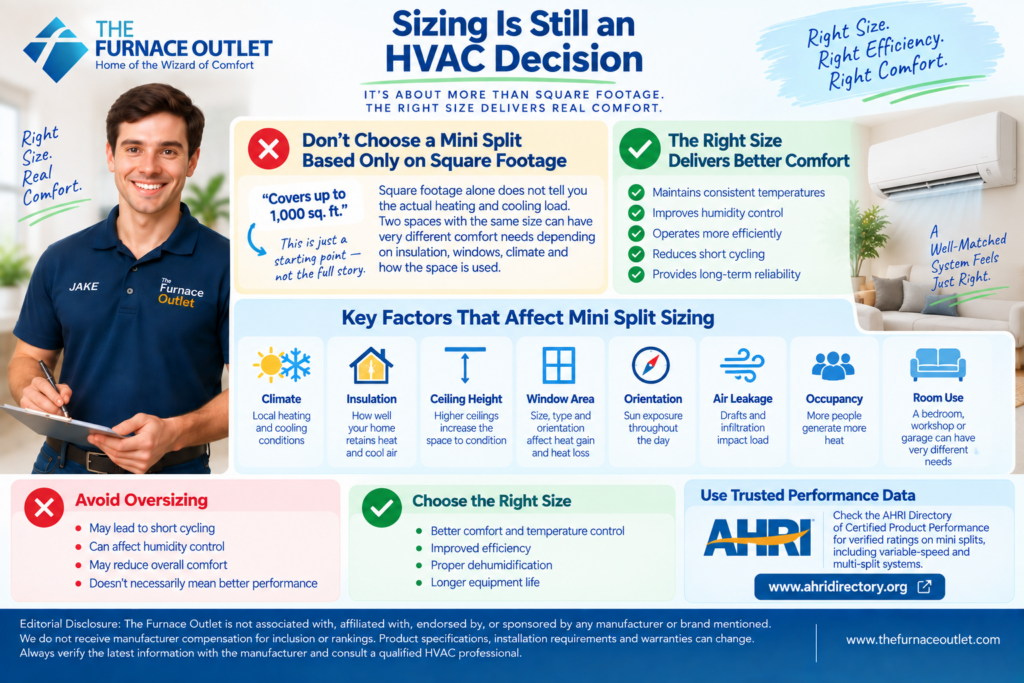
Climate, insulation, ceiling height, window area, orientation, solar exposure, air leakage, occupancy and the way the room is used all influence capacity requirements. A poorly insulated garage can behave completely differently from an insulated bedroom of similar size. Oversizing isn’t a harmless way of buying extra comfort. A badly oversized system may operate differently from a properly matched system, potentially affecting temperature distribution, humidity management and overall comfort.
For equipment comparison, homeowners can also use the AHRI Directory of Certified Product Performance, which includes certified categories for variable-speed mini-split and multi-split air conditioners and heat pumps.
AHRI Directory of Certified Product Performance
If this is your first mini-split installation, I consider a straightforward single-zone project the most approachable scenario. One indoor head means one primary refrigerant route, one condensate route and fewer opportunities for installation complexity. A garage, workshop, bedroom, home office or open living area can therefore make a logical application when the load and equipment are correctly matched.
Multi-zone DIY systems deserve more planning. Every additional indoor head creates another location decision, another condensate path and another line route. Equipment matching also becomes important because you cannot assume that any collection of indoor units can be attached to any outdoor condenser.
Multi-zone installations can absolutely be achievable with equipment designed for that purpose, but DIY does not mean complexity disappears. It simply means the manufacturer has engineered certain portions of the installation to be completed without conventional refrigerant commissioning.
This is the rule I would want every homeowner to remember: DIY ends when the project exceeds the equipment’s instructions, your skills or the rules governing the installation.
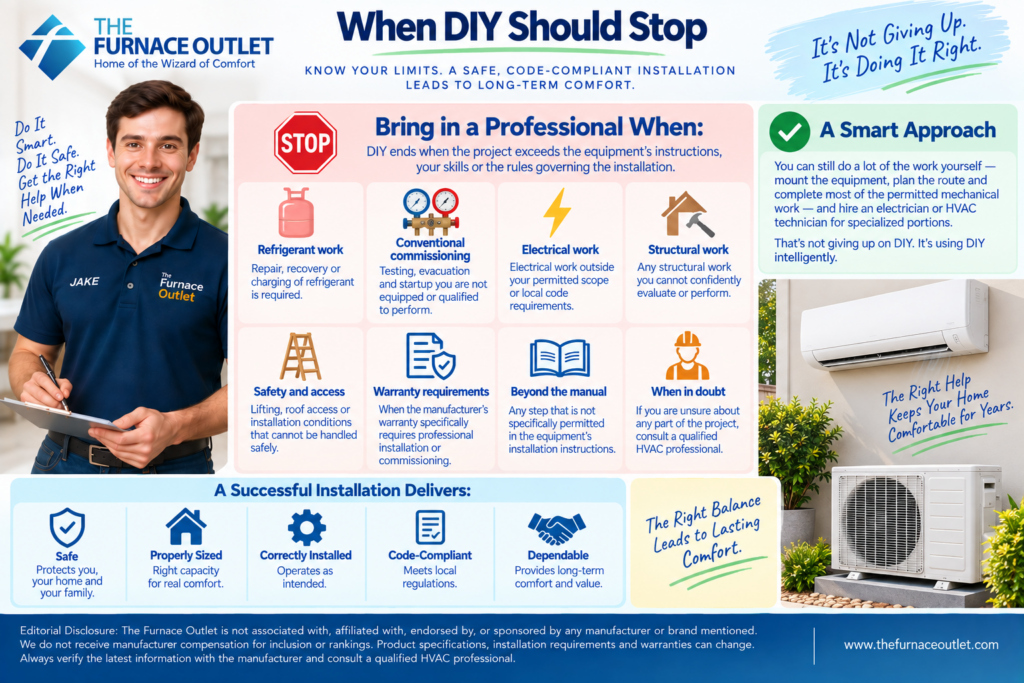
Stop and bring in the appropriate professional when the project requires refrigerant-circuit repair, refrigerant recovery or charging, conventional commissioning you are not equipped or qualified to perform, electrical work outside your permitted scope, structural work you cannot confidently evaluate, or lifting and access conditions that cannot be handled safely.
The same applies when the manufacturer’s warranty specifically requires professional installation or commissioning. That isn’t giving up on DIY. If you mount the equipment, plan the route and complete most of the permitted mechanical work but hire an electrician or HVAC technician for specialized portions, you have still used DIY intelligently.
My measure of success isn’t how few professionals entered the property. It is whether the finished system is safe, properly sized, correctly installed, code-compliant and dependable.
Homeowners sometimes compare a $1,500 DIY system with a $4,000 contractor quote and conclude that they will save $2,500. That comparison may be incomplete.

Your DIY budget can include equipment, shipping, outdoor pad or wall bracket, line-hide, condensate materials, wall sleeve, sealant, disconnect, electrical materials, surge protection, permits, tools and professional electrical work. A conventional system may additionally require professional refrigerant commissioning.
On the other hand, a full contractor proposal may include sizing and design responsibility, labor, specialized tools, startup, commissioning, permit handling, warranty support and accountability for the completed job. That doesn’t mean professional installation is automatically the better value, nor does it mean DIY always saves money. The useful comparison is completed system versus completed system.
For a clean single-zone installation with an accessible exterior wall, DIY savings can be substantial. For a second-floor multi-zone installation requiring difficult drainage, extensive electrical upgrades and complex routing, professional installation may change the economics dramatically.
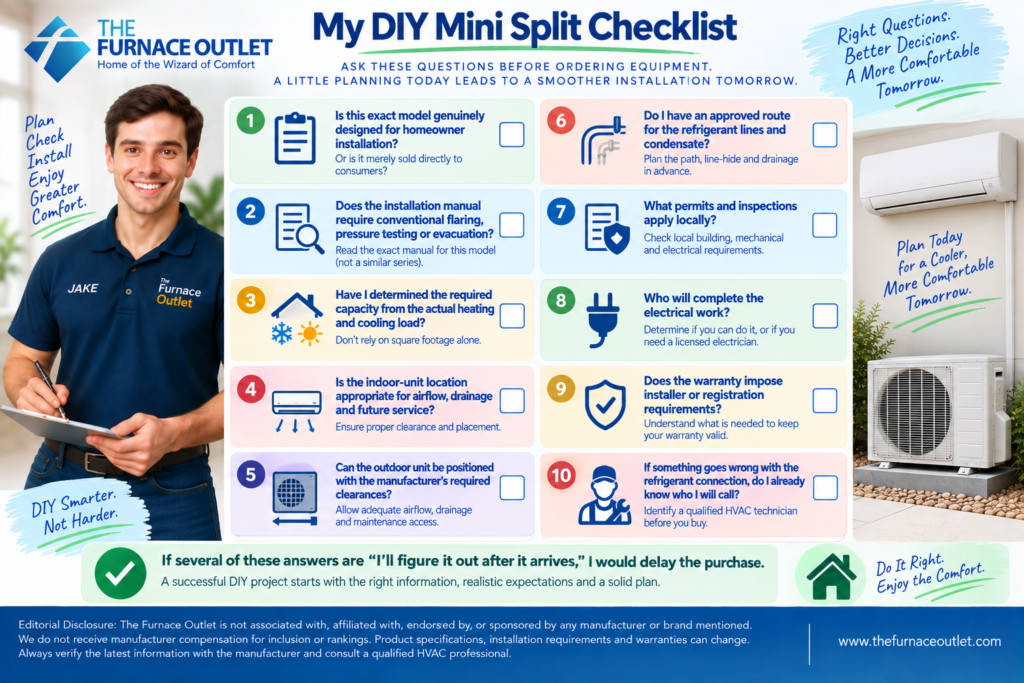
Before ordering equipment, I would want a homeowner to be able to answer these questions confidently:
If several of those answers are “I’ll figure it out after it arrives,” I would delay the purchase.
A genuine DIY mini split is not simply a conventional HVAC system with the word DIY printed on the box. The best purpose-built systems redesign one of the hardest parts of installation—the refrigerant connection—so that a capable homeowner can complete it according to a controlled manufacturer procedure without conventional field evacuation. That is a meaningful innovation, but it doesn’t turn HVAC installation into furniture assembly.
You still have to select the correct capacity, position the equipment intelligently, manage condensate, comply with electrical and building requirements, protect the equipment and follow the manufacturer’s instructions exactly. Most importantly, you need to recognize when a problem has crossed the boundary between homeowner installation and professional HVAC service.
I like DIY systems because they can give homeowners another legitimate installation path. I don’t like the idea that DIY means “do absolutely everything yourself.” The smarter interpretation is “do the portions the equipment was designed for you to do, and use qualified help where the project requires it.”
Get that distinction right, and a DIY mini split can be a practical way to add efficient zoned heating and cooling without pretending that the technical realities of HVAC have disappeared.
Editorial Disclosure: The Furnace Outlet is not associated with, affiliated with, endorsed by, or sponsored by any manufacturer or brand mentioned in this article. We do not receive manufacturer compensation for inclusion or rankings. Product specifications, installation requirements and warranties can change; always verify the exact model and current manufacturer documentation before purchasing.
https://thefurnaceoutlet.com/best-diy-mini-split-systems-of-2026-no-hvac-technician-required/