Newsletter Subscribe
Enter your email address below and subscribe to our newsletter

HVAC made simple
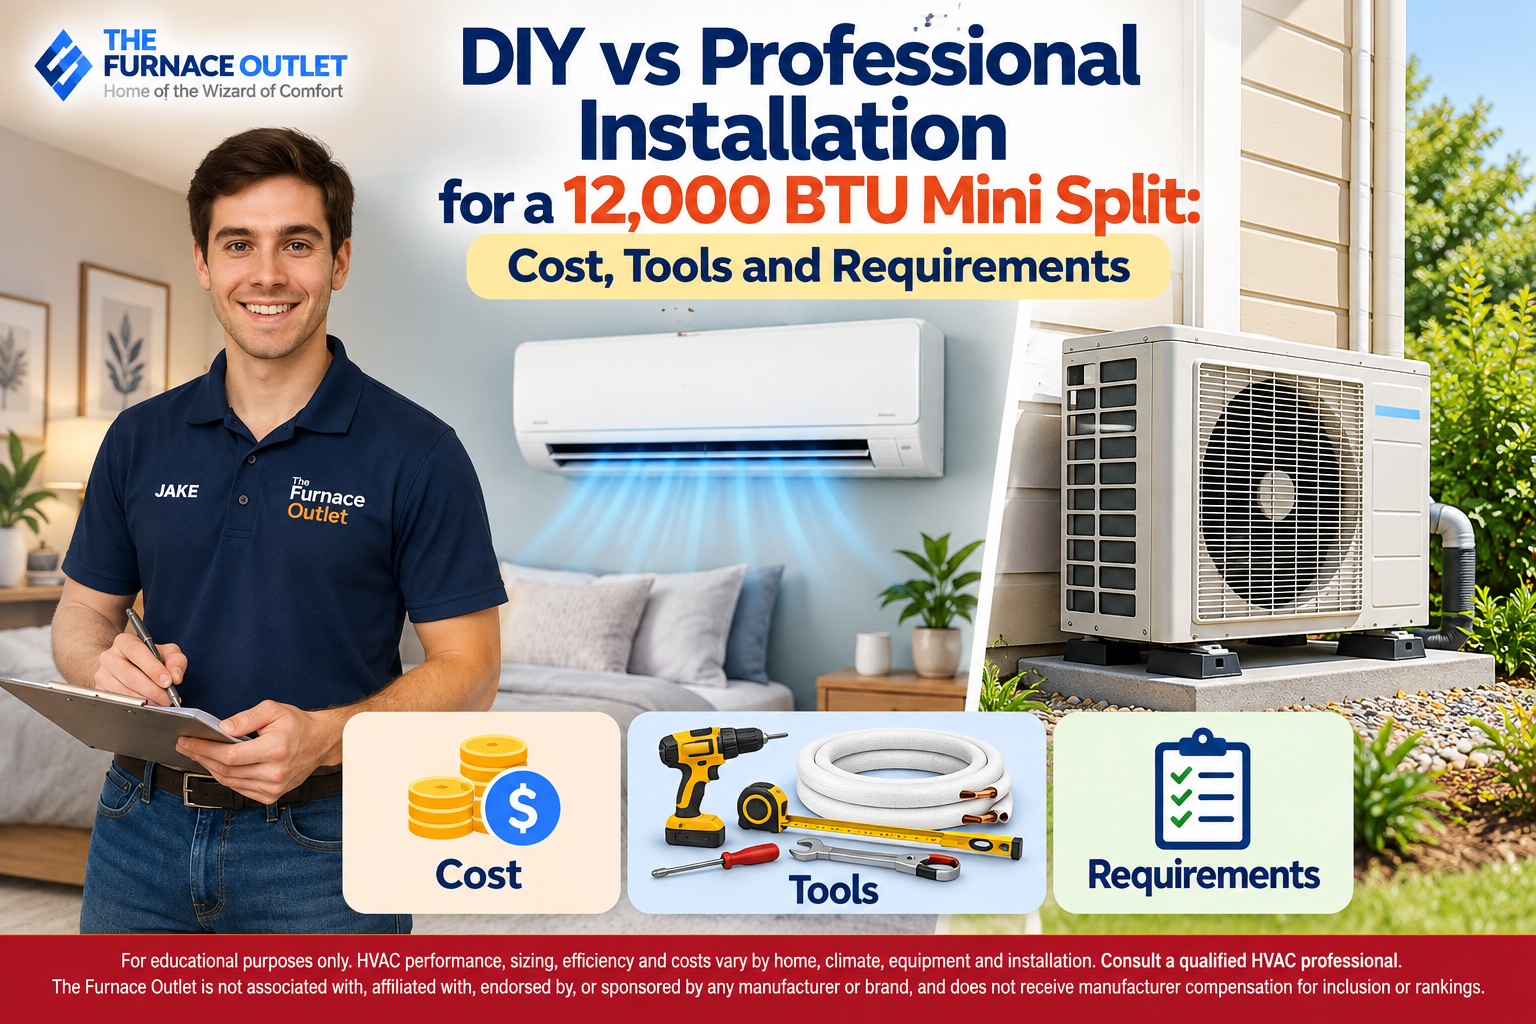
Installing a 12,000 BTU mini split can look deceptively simple. A typical single-zone system has an indoor air handler, an outdoor condenser, refrigerant lines, a condensate drain, electrical connections and controls. Compared with installing a conventional ducted HVAC system, there is no large duct network to build, which is one reason mini splits are frequently marketed as approachable installation projects.
The important distinction is that not every 12K mini split is actually designed for complete homeowner installation. Some products use factory-designed pre-charged or quick-connect arrangements intended to simplify the refrigerant side of the job, while conventional mini splits normally involve refrigerant-circuit work that can trigger federal technician-certification requirements. Electrical work, permits, local codes, manufacturer instructions and warranty conditions can also affect what a homeowner may reasonably or legally perform.
When I compare DIY and professional installation, I therefore look beyond the price of labor. I consider the type of mini split, refrigerant connection method, electrical requirements, tools, installation difficulty, code requirements, commissioning needs and warranty implications. The cheapest installation on day one is not necessarily the best-value installation over the life of the equipment.
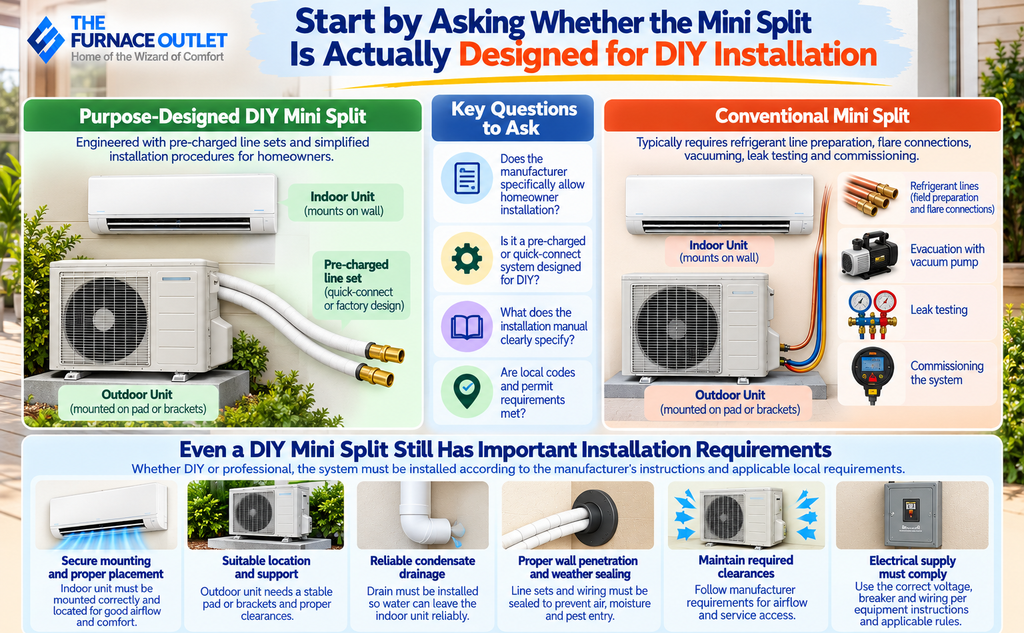
The first question should not be whether you personally feel comfortable using tools. It should be whether the specific equipment is designed and documented for the installation approach you intend to use.
A conventional 12K mini split typically consists of separate indoor and outdoor units connected by refrigerant tubing. Depending on the system, installation can involve preparing or modifying refrigerant lines, making flare connections, leak testing, evacuation with a vacuum pump, verifying the integrity of the refrigerant circuit and commissioning the equipment.
That is very different from a purpose-designed DIY system that uses a manufacturer-engineered pre-charged line-set arrangement and installation procedure intended to reduce or eliminate certain conventional refrigerant commissioning steps.
Even then, the word “DIY” should not be interpreted as “no technical requirements.” The indoor unit still needs secure mounting and appropriate placement, the outdoor condenser requires a suitable location and support, the condensate system needs reliable drainage, wall penetrations must be weather-sealed, required clearances must be maintained and the electrical supply must comply with the equipment instructions and applicable rules.
I would consequently treat “DIY mini split” as a specific equipment and installation category, not as a blanket description for every ductless heat pump sold online.
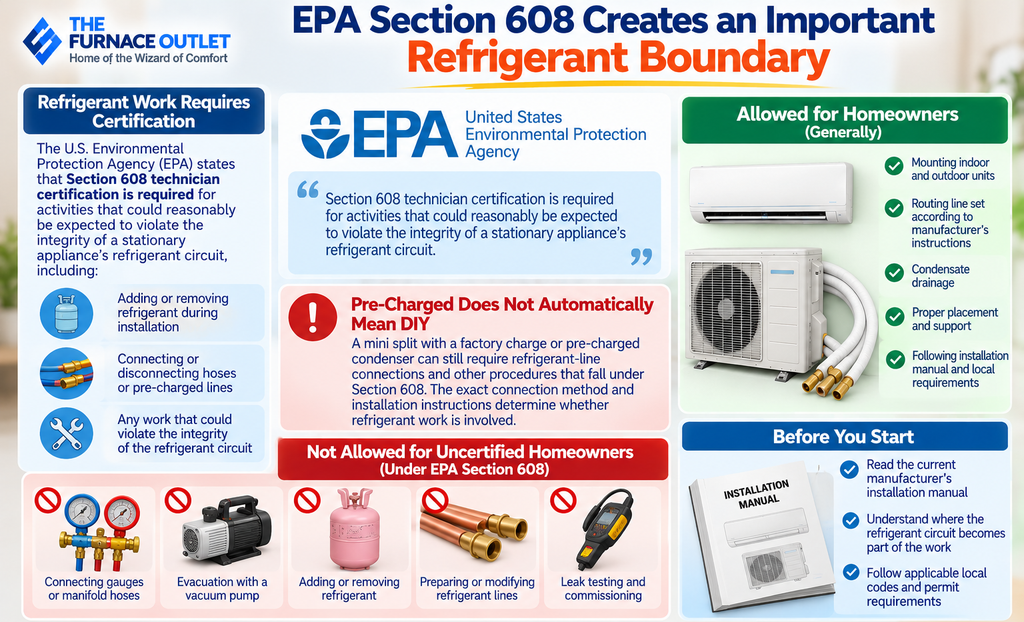
For U.S. homeowners, refrigerant work is one of the most important distinctions between a genuine DIY installation and a conventional mini-split project.
The U.S. Environmental Protection Agency states that Section 608 technician certification is required for activities that could reasonably be expected to violate the integrity of a stationary appliance’s refrigerant circuit. EPA specifically says that adding or removing refrigerant from a mini split during installation, and connecting or disconnecting hoses or pre-charged lines in circumstances covered by the rule, requires Section 608 technician certification.
That means I would never assume that purchasing a pre-charged condenser automatically makes a conventional mini split a legal homeowner refrigerant project. The exact connection method and installation procedure matter.
This is also why homeowners should be cautious with internet tutorials that demonstrate vacuum pumps, manifold gauges, refrigerant handling or modifications to sealed systems without discussing certification requirements. A video showing that a procedure is physically possible does not establish that an uncertified homeowner may legally perform it.
Before beginning the project, read the current manufacturer’s installation manual and understand where the refrigerant circuit becomes part of the work.
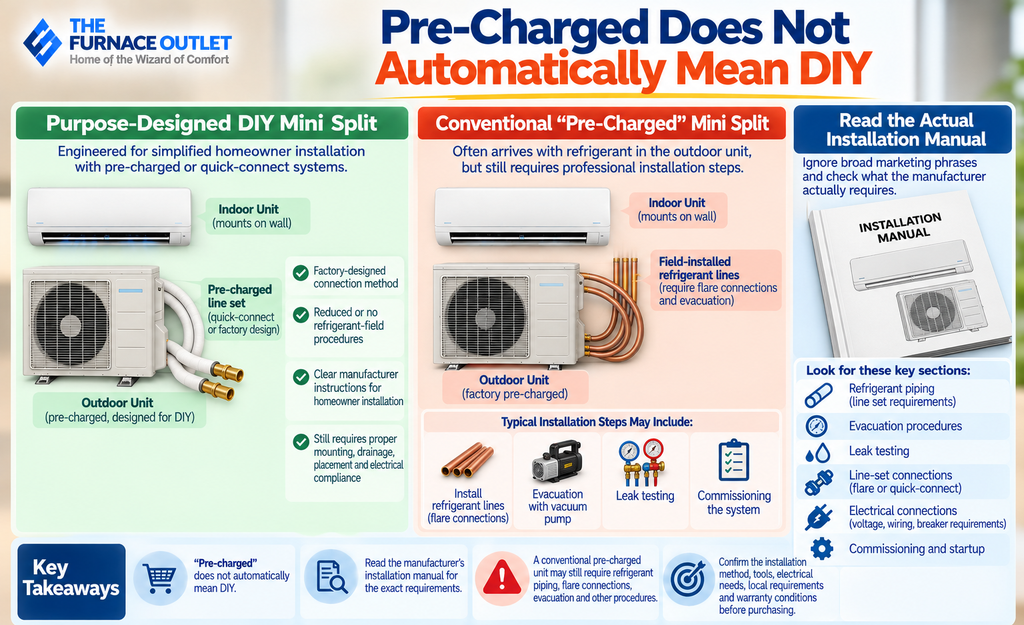
This is one of the most common points of confusion in mini-split shopping. Many conventional mini splits arrive with refrigerant already contained in the outdoor unit. That alone does not necessarily make them DIY systems.
A conventional pre-charged condenser may still require field-installed refrigerant piping, flare connections, evacuation and other procedures before refrigerant is released into the completed circuit. Those are very different requirements from a purpose-designed system whose connection arrangement and manufacturer instructions are specifically intended for homeowner installation.
The terminology on retailer pages can make the distinction less obvious than it should be. I would therefore ignore broad marketing phrases and read the actual installation manual before purchasing the equipment.
Look specifically at the sections covering refrigerant piping, evacuation, leak testing, line-set connections, electrical connections and commissioning. Those pages usually tell you far more about the real installation requirements than a “DIY-friendly” label in an advertisement.
There are several parts of a mini-split project that a capable homeowner may be able to perform when allowed by the manufacturer’s instructions and local requirements. The exact boundary varies by equipment and jurisdiction, so this should not be interpreted as universal permission to perform every listed task.
Typical mechanical preparation can include planning the installation location, locating wall framing, mounting an indoor-unit bracket, creating the required wall penetration, installing a line-set cover, preparing a suitable outdoor-unit location and routing components according to the manufacturer’s instructions.
Condensate drainage also requires attention. The drain needs to follow the manufacturer’s requirements so water can leave the indoor unit reliably without backing up, leaking into the wall or causing moisture problems.
A homeowner can also carefully plan clearances, airflow and service access before installation. These seemingly basic decisions matter because poor placement can affect comfort, noise, serviceability and equipment performance.
However, being comfortable with these mechanical tasks does not automatically qualify someone to perform refrigerant or electrical work. I would treat those as separate decisions.
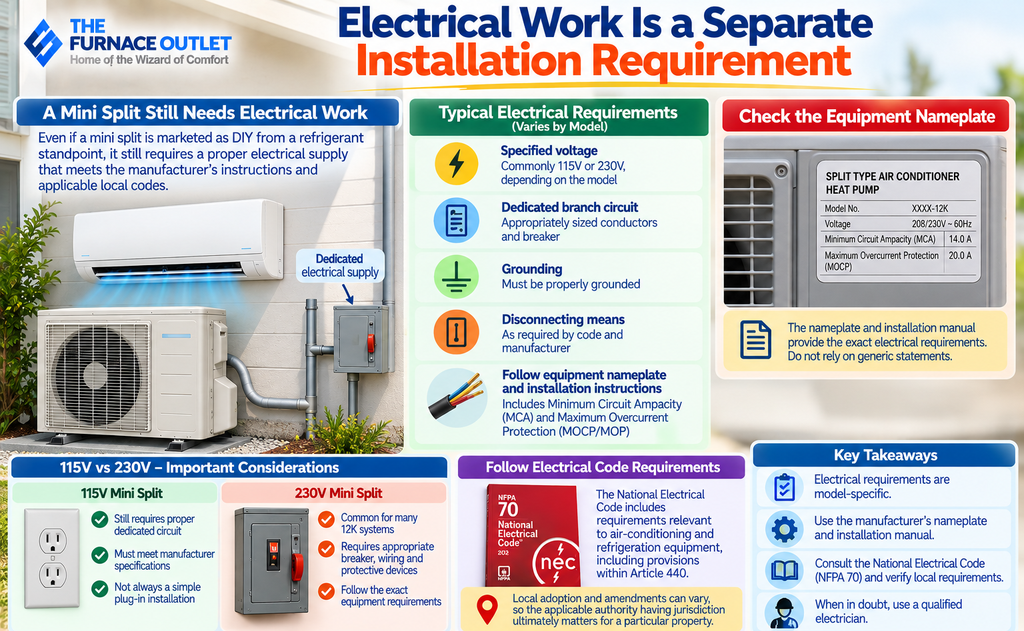
A mini split may be marketed as DIY from a refrigerant standpoint while still requiring electrical work that falls outside what a homeowner should or may legally perform.
Depending on the equipment, a 12K mini split may require a dedicated branch circuit, specified voltage, appropriately sized conductors, overcurrent protection, grounding and a disconnecting means. Requirements are model-specific, so a generic statement such as “12K systems need a particular breaker” should not be trusted.
The equipment nameplate and installation instructions typically provide electrical information such as voltage and may specify values including Minimum Circuit Ampacity (MCA) and Maximum Overcurrent Protection (MOCP/MOP). Those values need to be interpreted within the applicable electrical-code and installation requirements.
The National Electrical Code includes requirements relevant to air-conditioning and refrigeration equipment, including provisions within Article 440. Local adoption and amendments can vary, so the applicable authority having jurisdiction ultimately matters for a particular property.
For current electrical-code information, homeowners and installers can consult NFPA’s National Electrical Code resources and then verify local requirements.
I would never choose a 115V mini split simply because it sounds easier to install electrically. 115V does not automatically mean “plug it into a normal wall outlet,” and 230V does not automatically make a system unsuitable for a residential installation. Follow the exact equipment requirements.
The tool list depends heavily on the equipment and connection method. Basic mechanical installation can require common tools such as a drill, appropriate drill bits or hole saw, level, measuring tools, fasteners, wrenches and equipment needed to mount and support the indoor and outdoor units safely.
A conventional refrigerant installation can involve a substantially more specialized tool set. Depending on the equipment and installation procedure, technicians may use a vacuum pump, micron gauge, refrigerant gauges or service tools, leak-detection equipment, torque tools, tubing tools and other commissioning equipment.
The important point is not to create a shopping list that encourages an uncertified homeowner to perform regulated refrigerant work. Rather, it is to understand why a conventional mini split is not equivalent to mounting an appliance and switching it on.
Buying specialized HVAC tools for one installation can also narrow the apparent financial advantage of DIY work. More importantly, owning a vacuum pump or gauge set does not substitute for the certification, knowledge and experience needed to use those tools correctly.
A genuine DIY mini split can simplify the project substantially when its factory-designed connection system eliminates some conventional refrigerant-field procedures.
That may mean the homeowner does not need the same refrigerant-service tools used during a traditional installation. The exact procedure, however, is entirely product-specific. I would never assume that instructions from one DIY mini-split brand apply to another system.
You may still need ordinary installation equipment for mounting, drilling, measuring, drainage, line routing and weather sealing. Electrical work may still require a qualified electrician, depending on the installation and local requirements.
This creates what I consider a very practical hybrid DIY approach. The homeowner performs permitted mechanical preparation and mounting work, while a qualified electrician handles the electrical supply and, where applicable, a certified HVAC technician performs refrigerant-related work or commissioning.
DIY therefore does not have to mean doing 100 percent of the project personally.
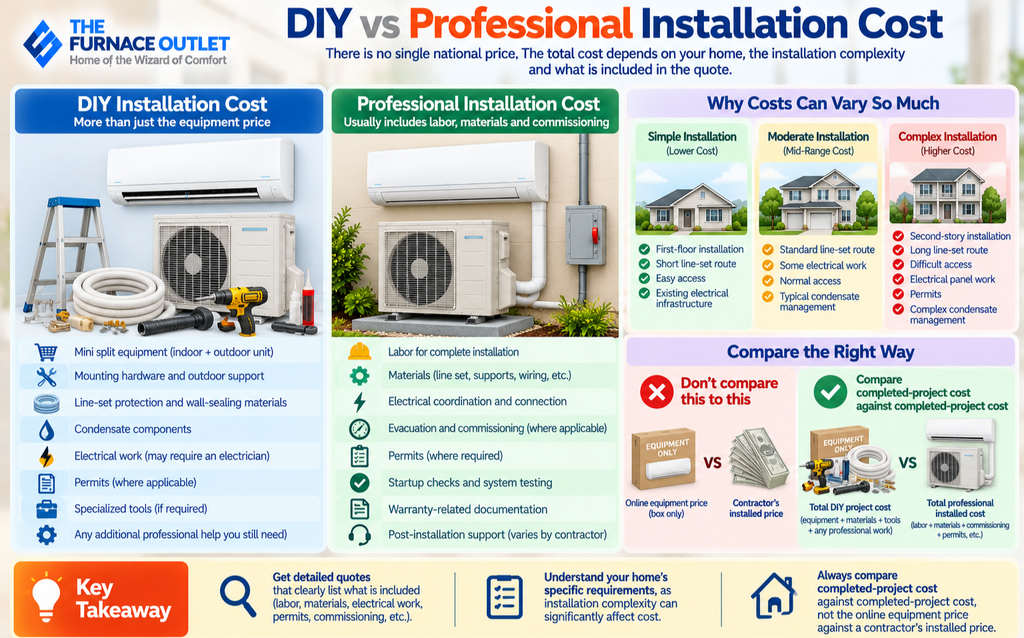
There is no credible single national price for installing every 12K mini split. Labor rates vary by region, and two installations of identical equipment can require very different amounts of work.
A simple first-floor installation with short, accessible routing and suitable existing electrical infrastructure is fundamentally different from a second-story installation requiring difficult access, a long line-set route, electrical-panel work, permits or substantial condensate-management planning.
For a DIY project, the cost calculation should include more than the box price. Consider mounting hardware, outdoor support, line-set protection, wall-sealing materials, condensate components, electrical work, permits where applicable, specialized tools that are legitimately required and any professional work you still need.
For a professional installation, the quotation may include labor, materials, electrical coordination, evacuation and commissioning where applicable, permits, startup checks and warranty-related documentation. Exactly what is included should be confirmed before comparing proposals.
I would therefore compare completed-project cost against completed-project cost, not online equipment price against a contractor’s installed price.
Professional installation includes expertise and responsibility that are easy to overlook when comparing only labor hours.
A competent installer needs to determine appropriate equipment placement, maintain required clearances, mount the system correctly, route and protect refrigerant lines, manage condensate drainage, meet electrical and mechanical requirements, commission the system and verify that it operates correctly.
For conventional equipment, proper evacuation is particularly important. The objective is not simply to “pull a vacuum” for an arbitrary amount of time but to prepare the refrigerant circuit according to the manufacturer’s procedure and verify installation integrity.
Professional installation also provides a clearer path for addressing problems discovered during commissioning. If operating pressures, temperatures, drainage, electrical behavior or controls do not appear correct, an experienced technician is better positioned to diagnose the cause.
You are therefore paying for more than physical installation. You are paying for knowledge, specialized equipment, compliance, commissioning and accountability.
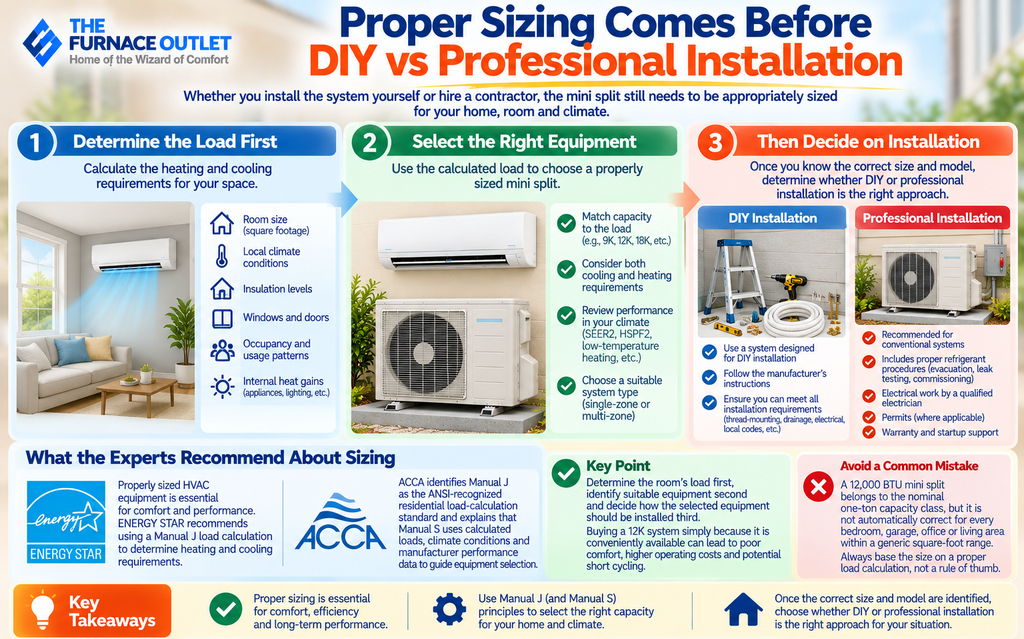
Whether you install the system yourself or hire a contractor, the equipment still needs to be appropriately sized.
A 12,000 BTU mini split belongs to the nominal one-ton capacity class, but that does not mean it is automatically correct for every bedroom, garage, office or living area within a generic square-foot range.
ENERGY STAR advises that properly sized HVAC equipment is essential for comfort and performance and points homeowners toward Manual J load calculations for determining heating and cooling requirements. ACCA identifies Manual J as the ANSI-recognized residential load-calculation standard, while Manual S uses calculated loads, climate conditions and manufacturer performance data to guide equipment selection.
That sequence matters. I would determine the room’s load first, identify suitable equipment second and decide how the selected equipment should be installed third.
Buying a DIY 12K system simply because 12K is conveniently available reverses that process.
A mini split’s published SEER2, EER2 and HSPF2 ratings do not compensate for a poor installation.
Indoor-unit placement affects airflow and comfort. Outdoor-unit placement affects airflow, service access and environmental exposure. Poor condensate routing can cause water problems. Improper line installation can create reliability issues, while mounting problems can contribute to vibration and noise.
Equipment selection matters just as much. ACCA’s Manual S guidance emphasizes matching equipment to calculated loads using manufacturer performance information and relevant design conditions rather than relying only on nominal capacity.
This is why I would never evaluate DIY solely by asking whether the equipment eventually turns on. A successful installation should deliver safe operation, drainage, comfort, efficiency, reliability and serviceability.

Warranty requirements deserve attention before the box is opened. Manufacturers can have different requirements regarding installation, registration, approved sales channels, commissioning and documentation. Requirements may also differ between parts coverage, compressor coverage and labor.
Do not assume that the words “DIY mini split” automatically guarantee identical warranty coverage regardless of how the system is installed. Likewise, do not assume professional installation automatically satisfies every warranty condition. I would download the current warranty document for the exact product family and read it alongside the installation manual. Keep model and serial numbers, invoices, registration confirmation and relevant installation records.
This can prevent an unpleasant discovery years later when a component needs warranty service.
I would consider DIY most seriously when the specific system is genuinely designed for homeowner installation, the installation manual clearly supports that method, local rules permit the work, the physical installation is straightforward and the homeowner is comfortable performing the permitted mechanical tasks accurately.
I would also want a clear plan for electrical work. If an electrician is required, I would arrange that before starting rather than improvising after the equipment is mounted.
A straightforward garage, workshop or accessible first-floor room may present a much more manageable DIY project than an upper-story bedroom with difficult line routing and condensate drainage.
The deciding factor should not be pride in completing everything personally. It should be whether the installation can be completed correctly, safely and in accordance with the equipment’s requirements.
I would lean strongly toward professional installation for a conventional mini split requiring refrigerant-circuit work, difficult line routing, challenging condensate management, complex electrical work, multi-story access or any project where local permits and inspection requirements are unfamiliar.
Professional installation also makes sense when the equipment represents a substantial investment and the homeowner wants one contractor responsible for installation and commissioning.
ENERGY STAR recommends working with a professional installer familiar with ductless or mini-split equipment and emphasizes correct sizing as part of achieving good performance.
There is also a middle ground. You may perform appropriate preparation yourself while leaving regulated or technically demanding work to qualified professionals.
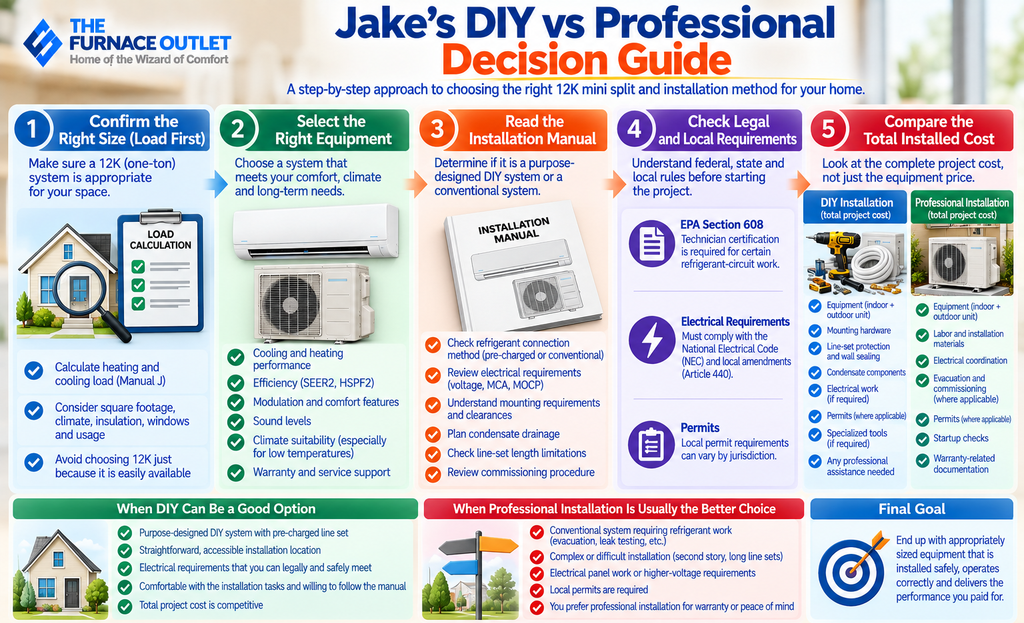
When evaluating a 12K mini split, I would begin with the equipment rather than the installation method. First, confirm through a proper load calculation that approximately one ton is suitable. Then select the system based on cooling and heating performance, efficiency, modulation, sound, climate suitability, warranty and service support.
Next, read the installation manual. Determine whether the product is specifically designed for DIY installation or uses conventional refrigerant procedures. Identify the electrical requirements, condensate plan, mounting requirements, line-set limitations, clearances and commissioning procedure.
Then investigate federal, state and local requirements. In the United States, EPA Section 608 rules create an important boundary around refrigerant-circuit work, while electrical and permit requirements can vary by jurisdiction.
Finally, compare the total installed cost, including tools, materials, permits, electrical work and any professional assistance. A genuine DIY system can be a practical solution for the right project, while a conventional mini split is usually a much stronger candidate for professional installation.
The objective is not to prove that a homeowner can install a mini split. The objective is to end up with appropriately sized equipment that is installed safely, operates correctly and delivers the performance you paid for.
Can I install a 12,000 BTU mini split myself?
Some systems are specifically designed to simplify homeowner installation, but conventional mini splits can involve refrigerant work, electrical work and local permit or code requirements. The manufacturer’s installation instructions and applicable regulations should determine what work can be performed.
Does “pre-charged” mean a mini split is DIY?
Not necessarily. A conventional condenser can contain a factory refrigerant charge while still requiring field refrigerant piping, evacuation and other procedures. Check the exact connection method and installation manual rather than relying on the phrase “pre-charged.”
Do I need EPA Section 608 certification for mini-split refrigerant work?
EPA states that Section 608 certification is required for activities reasonably expected to violate the integrity of the refrigerant circuit, including specified mini-split refrigerant installation activities.
Does a DIY mini split eliminate the need for an electrician?
Not necessarily. A system marketed for DIY mechanical installation can still have electrical requirements that call for professional work under local rules. Always use the equipment’s electrical specifications and applicable code requirements.
Is professional installation always more expensive?
The initial invoice is usually higher than performing permitted labor yourself, but meaningful comparisons should include the entire DIY project: equipment, tools, mounting materials, electrical work, permits and professional assistance. Installation complexity also varies considerably.
Should I choose 12,000 BTU because it is available in a DIY model?
No. Capacity should follow the building’s heating and cooling load. ACCA Manual J provides the recognized residential load-calculation methodology, and Manual S addresses equipment selection using load and manufacturer performance data.
The choice between DIY and professional installation is not simply a contest between saving money and paying someone else to do the work. A 12K mini split combines HVAC sizing, mechanical installation, condensate management, electrical requirements and, depending on the design, refrigerant work.
Purpose-designed DIY systems can make homeowner installation substantially more practical, particularly when the manufacturer has engineered the refrigerant connection process around that installation method. Conventional mini splits are different, and U.S. EPA refrigerant requirements must be respected.
Before buying, I would verify the load, equipment type, installation manual, warranty, electrical requirements and local rules. Useful authoritative resources include EPA Section 608 homeowner guidance, ENERGY STAR ductless heating and cooling guidance, ACCA Manual J, ACCA Manual S and NFPA National Electrical Code resources.
Editorial & HVAC Disclaimer: This article is for educational purposes only and is not a substitute for manufacturer instructions, permits, codes or professional advice. HVAC sizing, electrical requirements, refrigerant procedures, installation rules, costs and warranty conditions vary by equipment and jurisdiction. Refrigerant and electrical work may require certification, licensing or qualified professionals. The Furnace Outlet is not associated with, affiliated with, endorsed by, or sponsored by any manufacturer or brand mentioned and does not receive manufacturer compensation for inclusion or rankings. Verify current requirements and consult qualified HVAC and electrical professionals where appropriate
https://thefurnaceoutlet.com/best-12000-btu-mini-splits-of-2026-1-ton-systems-compared/