A Long-Form Installation Guide by Mike
Installing a PTAC isn’t hard—installing it right is where most homeowners and even junior techs struggle. The number one reason PTAC installations fail, vibrate, leak, underperform, or rip drywall apart over time isn’t the equipment.
It’s bad measurements.
Mike’s Wall-Truth Measurement System is the field-proven method he teaches apprentices, homeowners, and hotel facility teams who want a square, quiet, code-safe, no-surprises PTAC sleeve install—every single time.
Amana J-Series PTAC Model 15,000 BTU PTAC Unit with 3.5 kW Electric Heat
This guide walks you through how Mike evaluates walls, framing, obstacles, sleeve geometry, and electrical spacing so the PTAC fits like it grew out of the building itself.
🧭 1. The Origin of Wall-Truth: Why Measurements Fail in Real Homes
Most installation mistakes come from three false assumptions:
-
“The wall is straight.”
Many aren’t—even in new construction. -
“The studs line up where they should.”
Remodeling, patching, or poor framing throws off stud spacing by inches. -
“The sleeve dimensions on the box match the real world.”
They often don’t—manufacturers list nominal (not installed) dimensions.
Mike learned long ago that what’s printed on paper and what’s inside a wall rarely match. Wall-Truth isn’t about making assumptions—it’s about verifying the truth of the wall before a cut ever begins.
🛠️ 2. Mike’s Required Tools for Wall-Truth Measurements
Mike uses tools that guarantee accuracy even on irregular surfaces, warped studs, and out-of-square corners.
✔ Measuring Tools Mike Trusts
-
24" and 48" spirit levels
-
Self-leveling laser level
-
Deep-scan stud finder
-
Magnetic stud verification tool
-
Plunge-depth tape measure
-
Small angle square
✔ Job-Site Tools Mike Recommends (Amazon Source)
Many apprentices ask which tools to buy, It includes dependable measuring, cutting, and layout equipment suitable for PTAC framing and sleeve alignment.
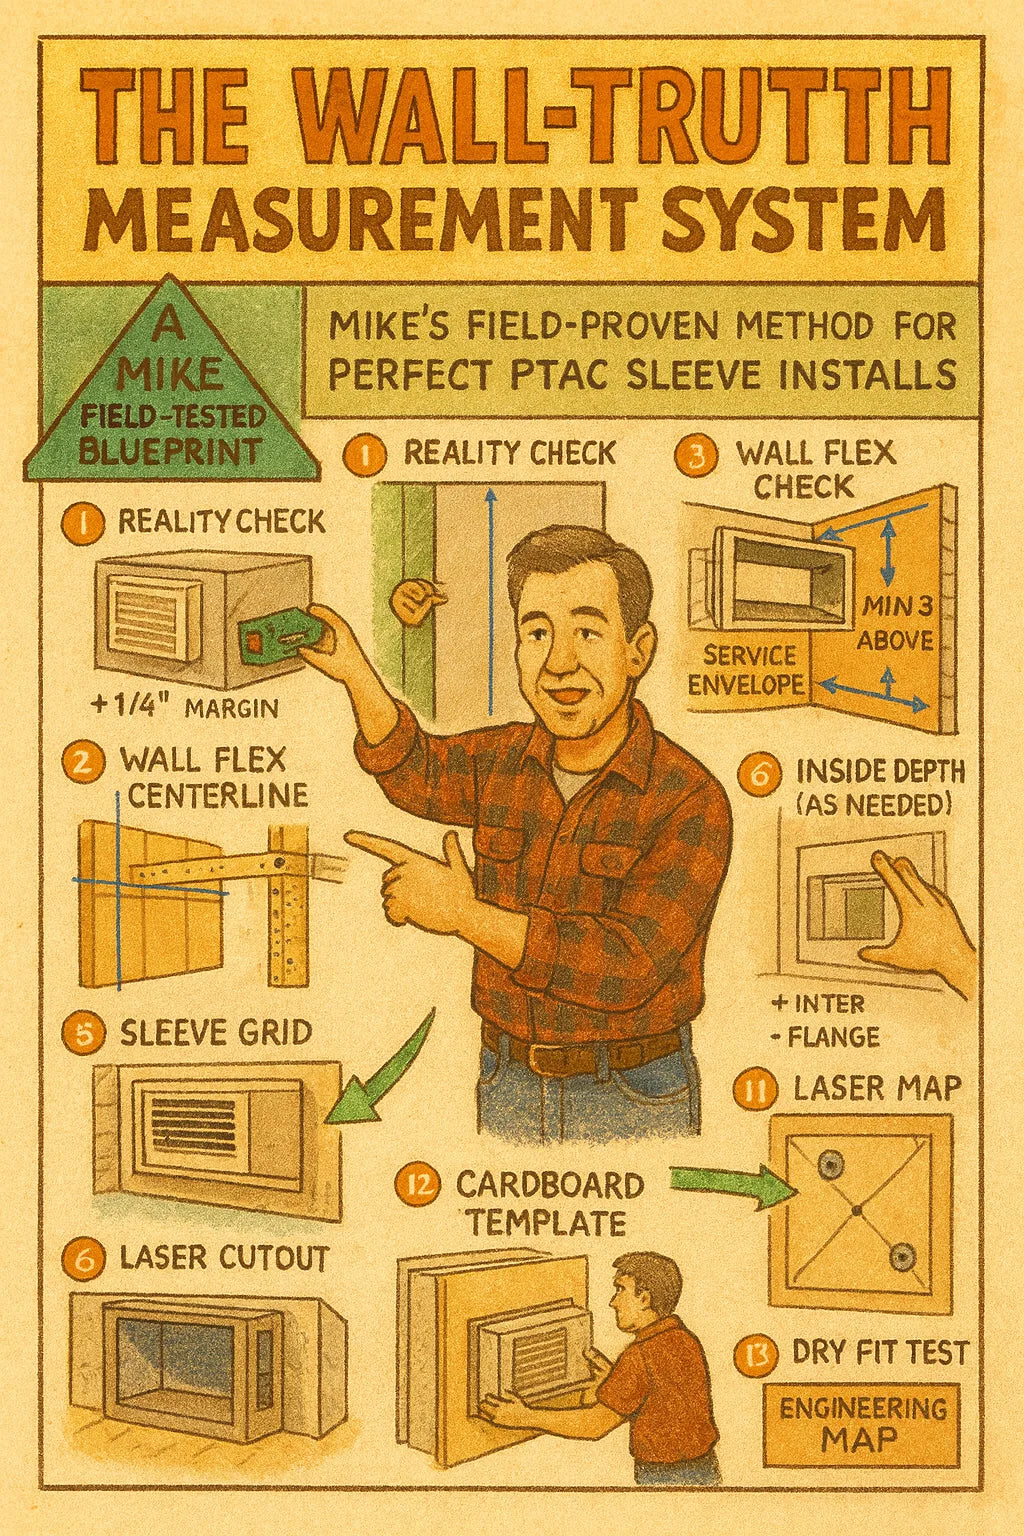
📏 3. Step One: The Sleeve Reality Check
Before measuring the wall, you verify the sleeve itself—because sleeve tolerances vary.
✔ Why the sleeve itself must be measured
-
Factory seams add ⅛–¼"
-
Insulation can slightly bulge
-
Mounting flanges change the opening
-
Some batches vary by ⅛–⅜"
🔍 Mike’s 3-Point Sleeve Verification
Measure:
-
Exterior width (flange to flange)
-
Interior depth (contact point to exterior trim ring)
-
Height at left, center & right
If any measurement differs by more than ⅛", Mike labels the sleeve “variable”, meaning the wall cutout needs an additional ¼" margin.
This prevents 90% of “the sleeve almost fits” installation disasters.
🧱 4. Step Two: The True-Wall Scan (Finding Hidden Problems Before They Find You)
🧲 A. Stud Mapping
A deep-scan stud finder gives location, but Mike never trusts it blindly.
He uses a magnetic finder to locate the actual fasteners.
This reveals:
-
Stud centers
-
Double studs
-
Missing studs (common in old motels)
-
Drywall patches or previous openings
🏚 B. Wall Bow & Flex Check
Place a 48" level vertically and horizontally across the wall.
If the bubble drifts:
-
< ⅛" → safe
-
⅛–¼" → mark as “compensate with shims”
-
¼" → Mike recommends pre-framing to square the cutout
🔦 C. Inside-the-Wall Depth Truth
Insert a tape measure probe into the test hole to check cavity depth.
This prevents:
-
Cutting into plumbing
-
Hitting electrical
-
Cutting too shallow for sleeve clearance
📐 5. Step Three: The Wall Grid (Mike’s Layout System for a Perfect Sleeve Centerline)
This is the heart of Wall-Truth—Mike’s geometric method for ensuring the PTAC sits exactly where airflow, safety, and structural stability demand.
🔥 Why Centerline Matters
-
Ensures balanced airflow
-
Prevents furniture conflicts
-
Reduces vibration transfer
-
Aligns with exterior trim aesthetics
Mike’s 4-Line Grid
-
Primary Centerline (vertical) — based on room layout, not wall symmetry.
-
Sleeve Top Line (horizontal) — determines cut height.
-
Stud Edge Lines — identifies safe cutting zones.
-
Depth-Limit Line — shows the sleeve’s exterior projection.
This grid ensures the PTAC:
-
Clears bed frames
-
Clears window curtains
-
Clears electrical outlets
-
Sits at optimal convection height (~12–18" above floor)
📦 6. Step Four: The Installation Envelope
Mike checks not just the hole, but the space the PTAC will occupy once installed.
This includes:
✔ Service Space
Amana recommends maintaining service clearance around PTAC units
Mike’s rule:
Leave 3–6 inches minimum above and around the sleeve inside the wall cavity for airflow + serviceability.
🪚 7. Step Five: The Cut-Zone Reality Check (Preventing Hidden Structural Damage)
Before committing to cutting, Mike verifies:
✔ Is the header sufficient?
If cutting through a load-bearing section:
Mike installs a micro-header (2×4 or 2×6) above the cutout to carry the load.
✔ Are there plumbing or electrical conflicts?
Mike drills two pilot holes:
-
One at sleeve top line
-
One at sleeve bottom line
A camera probe ensures no surprises.
✔ Exterior siding compatibility
Some sidings (like vinyl or stucco) require different cut techniques.
📏 8. Step Six: The 3D Depth Map (Mike’s Method for Getting Sleeve Projection Right)
One of the biggest installation mistakes is installing the sleeve:
-
Too deep → block airflow
-
Too shallow → exterior grille leaks
-
Too proud → noise + weather exposure
Mike’s 3D Depth Formula
Mike marks this measurement on the laser level so the sleeve lands exactly where it needs to sit.
🧰 9. Step Seven: Test-Fit Simulation (The Pre-Install That Saves the Install)
Before cutting, Mike uses cardboard or a template to simulate the sleeve footprint.
Why this step matters
-
Confirms the PTAC won’t hit furniture
-
Confirms airflow isn’t blocked by curtains
-
Confirms electrical cords reach cleanly
-
Confirms no trim or molding interference
Mike’s rule:
If the template touches anything, the real unit will too—adjust the centerline.
📐 10. Step Eight: The Squareness Guarantee (Laser-Level Method)
Mike sets up a cross-line laser to guarantee:
-
Square hole
-
Correct alignment with studs
-
Perfect level line for the sleeve
-
Straight airflow and grille alignment
If the laser reveals drift greater than ⅛", he adjusts the cutout or shims.
This single step prevents almost every crooked-sleeve complaint.
👷 11. Step Nine: Mike’s Pre-Cut Commitment Check
Right before cutting, he re-verifies:
✔ Sleeve dimensions
✔ Grid alignment
✔ Stud locations
✔ Exterior projection
✔ Electrical clearance (outlet not too close)
NEC clearances:
🔗 https://www.nfpa.org/codes-and-standards (National Electrical Code reference)
✔ Interior airflow clearance
Only when all five match does cutting begin.
🔨 12. Step Ten: The First Cut (Why Mike Starts Small, Never Full-Size)
Mike cuts inside the marked hole first.
Why:
-
Lets him inspect framing
-
Confirms wall thickness
-
Reveals obstacles early
-
Ensures the final cut is precise
He gradually expands the opening until the sleeve fits with ⅛–¼" total clearance.
🧊 13. Step Eleven: Dry-Fit & Correction Phase
Mike inserts the sleeve without foam, screws, or sealant to check:
-
Square
-
Projection
-
Level
-
Wall contact points
-
Vibration surfaces
If a correction is needed, the dry-fit reveals it.
No foam is wasted. No filler is needed. No mistakes get buried.
🔕 14. Step Twelve: Vibration Prevention Mapping
This is where Mike eliminates noise before the PTAC is even installed.
He checks for:
-
Contact points between sleeve & studs
-
Stud flex
-
Gaps that need shims
-
Loose drywall edges
-
Sleeve warp under pressure
Mike’s fix:
3–4 pressure-balanced shims, not one big shim that causes torque.
🔩 15. Step Thirteen: Final Mounting & Sleeve Stabilization
Once aligned, Mike:
-
Anchors sleeve using Opposed Corner Fastener Pattern
-
Re-checks depth
-
Re-checks square
-
Applies foam only after the sleeve is immovable
Mike never foams before anchoring—this is a top noise mistake he sees everywhere.
🧼 16. Step Fourteen: The Clean-Edge Standard (Why Mike’s Cutouts Look Professional)
Mike trims edges using:
-
Corner beads
-
Backer rod
-
Exterior flashing
-
Low-expansion foam
This ensures:
-
No airflow leaks
-
No insect intrusion
-
No drywall cracks
-
No moisture bypass
📘 Final Thoughts: What Makes Wall-Truth Different?
Wall-Truth is not a measuring routine—it’s a philosophy of installation accuracy.
Mike’s guiding belief:
“Every wall lies a little. It’s my job to find the truth before the saw does.”
By verifying the sleeve, the structure, the geometry, and the service space before cutting, Wall-Truth eliminates:
-
Crooked installs
-
Noise problems
-
Air leaks
-
Sleeve movement
-
Moisture issues
-
Long-term structural damage
This is how Mike delivers installs that last 10–15 years without callbacks.
Buy this on Amazon at: https://amzn.to/47cH9ut
In the next topic we will know more about: The Cutout Clean-Cut Protocol: Mike’s Method for Dust-Free, Centered & Load-Safe Wall Openings


