By Mark – homeowner, small business owner, and cautious DIYer who always double-checks fire safety
🏠 Introduction: Why I Installed the Daikin D4120
When I first started looking into fire safety for my HVAC system, I thought my regular smoke alarms would be enough. But then I discovered something I hadn’t considered: smoke can travel through your air ducts faster than you think.
That’s where a duct smoke detector comes in. These devices sit inside your HVAC ducts, detecting smoke in the air being moved by your system. If smoke is detected, they can shut down the fan and trigger alarms, stopping smoke from spreading to every corner of your building.
I decided to install the Daikin D4120 Duct Smoke Detector—a popular, code-compliant option that uses photoelectric technology. I’ll walk you through what I learned while setting mine up. This isn’t just about the nuts and bolts—it’s also about avoiding mistakes, staying safe, and knowing when to call a pro.
🛠️ Tools & Materials Checklist
Before I even touched the duct, I made a checklist. Trust me, you don’t want to be halfway through and realize you forgot a tool.
Here’s what I used:
-
Drill with hole saw attachment (for cutting duct openings).
-
Screwdrivers (flathead and Phillips).
-
Wire strippers and cutters (for electrical connections).
-
Sampling tubes (cut to duct width, both supply and exhaust).
-
End caps (for closing tube ends).
-
Foil HVAC tape (NOT duct tape—this seals properly).
-
Mounting screws.
-
Smoke detector test aerosol (for testing the unit).
-
Remote test/reset station (optional, but useful for accessible testing).
-
Safety gear: gloves, goggles, dust mask.
📌 Mark’s Tip: Lay out everything on a workbench before you start. I wasted 30 minutes running back and forth for missing items.
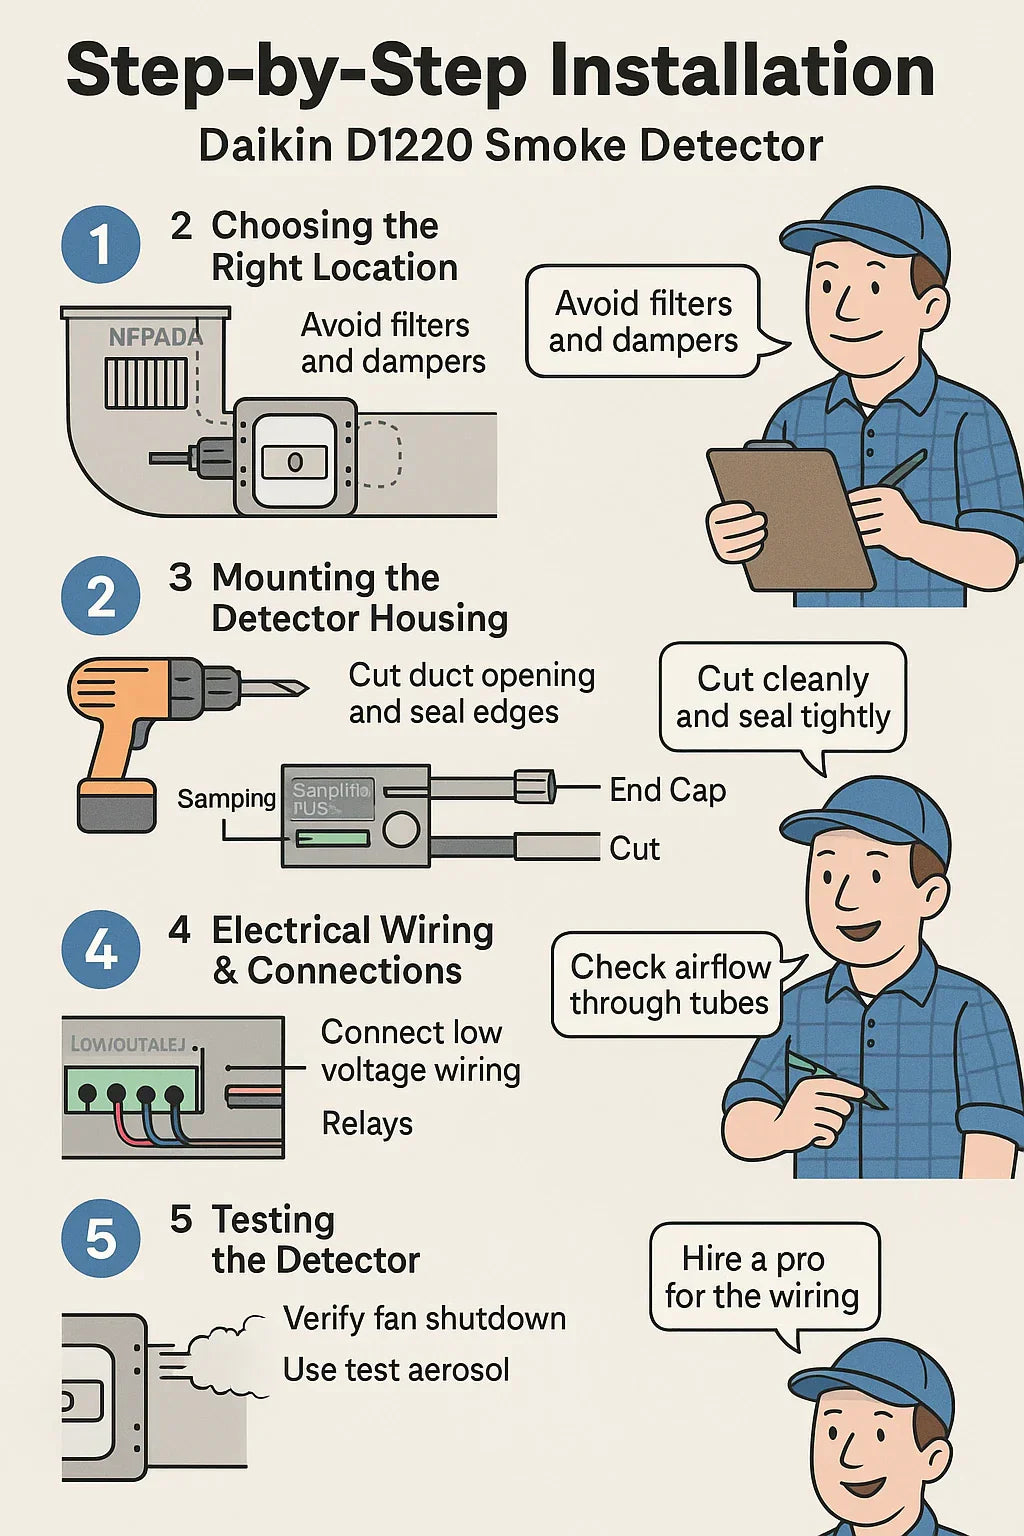
📍 Step 1 – Choosing the Right Location
Location is everything with a duct smoke detector. Install it wrong, and you risk false alarms—or worse, missing real smoke.
🔹 Code Requirements
According to NFPA 90A, duct smoke detectors must be installed:
-
On the return side of ducts, before the air handler or filters.
-
Where smoke is most likely to be drawn in first, but away from dead air zones.
-
With enough straight duct length to ensure proper airflow across the sampling tube.
🔹 My Experience
At first, I thought I could mount it right near my air filter housing. Bad idea. The turbulence there would have caused unreliable readings. I ended up moving it about 6 feet upstream on a straight section of duct.
📌 Mark’s Lesson: Avoid spots right after bends, dampers, or filters. Air turbulence messes with the readings.
🛠️ Step 2 – Mounting the Detector Housing
Once I had my spot, it was time to cut into the duct.
🔹 The Process
-
I traced the template from the D4120 manual onto the duct.
-
Used my drill with a hole saw attachment to cut out the sampling tube opening.
-
Cut a second, smaller hole for the exhaust tube.
-
Positioned the housing unit and secured it with sheet metal screws.
-
Sealed around the edges with foil HVAC tape.
🔹 My Takeaway
The first time, I made the hole slightly too small and had to grind it out wider. Not fun when you’re balancing on a ladder.
📌 Mark’s Tip: Cut carefully and double-check measurements before drilling.
🌬️ Step 3 – Installing Sampling Tubes
This step looks simple but can cause major problems if done wrong.
🔹 How It Works
-
The sampling tube goes into the duct, perpendicular to airflow.
-
It has holes drilled along its length that draw in air.
-
The exhaust tube returns the air back into the duct.
-
Both must be capped and aligned correctly.
🔹 My Process
-
I measured my duct width and cut the sampling tube to size.
-
Inserted it fully so holes faced into the airflow (critical!).
-
Attached the end cap securely.
-
Installed the exhaust tube on the opposite side.
🔹 My Mistake
I initially installed the sampling tube backwards—the holes were facing the wrong way. During testing, airflow readings were way off. Flipped it around, and everything worked.
📌 Mark’s Lesson: Always check that sampling tube holes face INTO the airflow.
⚡ Step 4 – Electrical Wiring & Connections
This is where I paused. Wiring into HVAC controls and fire alarm panels isn’t something you should improvise.
🔹 What’s Required
-
Low-voltage wiring connects the detector to power.
-
Relay contacts connect to HVAC fans or alarm panels.
-
Some setups also link to building automation systems.
🔹 My Decision
I handled the basic low-voltage wiring but called in a licensed electrician for the panel integration. Not only is this safer—it also ensures compliance with the NFPA Fire Alarm Code.
📌 Mark’s Tip: Don’t gamble with fire code compliance. Get a pro for wiring if you’re unsure.
🧪 Step 5 – Testing the Detector
After everything was wired and sealed, it was time to test.
🔹 The Process
-
Turned on the HVAC system.
-
Sprayed smoke detector test aerosol into the sampling tube.
-
Watched as the D4120 detected smoke and:
-
Triggered the alarm.
-
Shut down the HVAC fan.
-
-
Used the reset button to restore the system.
🔹 My Observations
The shutdown worked perfectly. But during the first test, I noticed airflow wasn’t strong enough through the sampling tube. Turns out, my duct section had some insulation partially blocking airflow. I fixed it, retested, and it passed.
📌 Mark’s Lesson: Testing isn’t just a formality—it’s how you find issues before an inspector does.
🧹 Step 6 – Labeling & Documentation
Once everything was tested, I labeled the detector with:
-
Install date.
-
Last test date.
-
Next inspection date.
I also recorded it in my HVAC maintenance log.
📌 Mark’s Tip: Future-you (or the next owner) will thank you for keeping records.
🧑🔧 DIY vs. Pro: Knowing Your Limits
Here’s the honest truth:
-
DIY-friendly parts: Mounting, cutting ducts, installing tubes, sealing.
-
Pro-required parts: Wiring into HVAC/fan relays, fire alarm panels, code verification.
I consider myself handy, but even I knew when to step aside. If you’re in a commercial setting, professional installation is non-negotiable.
💵 Cost & Time Breakdown
Here’s what it cost me:
-
Detector unit (Daikin D4120): ~$200.
-
Accessories (remote station, tubes, end caps): ~$100.
-
DIY supplies (screws, tape, test aerosol): ~$50.
-
Professional electrician (wiring & final inspection): $450.
Total: ~$800.
Time: About 6 hours DIY + 2 hours pro wiring.
📌 Mark’s Takeaway: A full day of work, but the peace of mind is worth every penny.
✅ Key Lessons I Learned
-
Location is everything. Avoid filters and turbulence.
-
Measure twice, cut once. Duct holes are unforgiving.
-
Sampling tube direction matters. Face into airflow.
-
Wiring = pro territory. Don’t risk compliance issues.
-
Testing finds problems early. Don’t skip it.
-
Label & log everything. Maintenance is just as important as installation.
🔗 Verified Resources
Here are some trusted resources I used while doing this project:
🎨 Infographic Suggestion
“Step-by-Step Installation with Mark”
-
Visual showing duct → housing → tubes → wiring → test.
-
Each step paired with Mark’s quick notes: “Cut cleanly,” “Check airflow,” “Hire a pro for wiring.”
📝 Final Word from Mark
Installing the Daikin D4120 wasn’t the easiest project I’ve done, but it was one of the most important. Fire safety in HVAC systems often goes overlooked, and yet it can make all the difference in an emergency.
If you’re considering it, my advice is simple: plan carefully, do what you can, and don’t be afraid to call in help for the rest.
Now, every time I hear my HVAC fan kick on, I know it’s not just keeping me comfortable—it’s keeping me safe.
In the next topic we will know more about: Maintenance Tips: How to Keep Your Daikin Duct Smoke Detector Working Properly


