If you’ve chosen the MRCOOL DIY Mini Split system, congratulations — you’re already on the path to saving big on installation costs while gaining year-round comfort. One of the biggest advantages of MRCOOL systems is their pre-charged linesets, which make DIY installation safe, simple, and efficient.
But what if your installation requires a little extra reach? That’s where the 50ft pre-charged lineset (DIY50-1412C-O) comes in. Whether you’re running lines to a detached garage, a basement conversion, or just need more flexibility in outdoor condenser placement, this longer option ensures you won’t come up short.
In this guide, I’ll walk you through everything you need to know to confidently connect your MRCOOL 50ft pre-charged lineset:
-
✅ Why the 50ft lineset is a game-changer
-
✅ Tools you’ll need
-
✅ Step-by-step installation process
-
✅ Safety tips and common mistakes to avoid
-
✅ How to test your system once it’s connected
Let’s dive in.
🏡 Why Choose the 50ft Pre-Charged Lineset?
Not every installation is straightforward. Some require longer runs because:
-
Your condenser is placed on the far side of your home for noise or clearance reasons.
-
You’re connecting a basement air handler with an outdoor unit across the yard.
-
You’re cooling a detached garage, guest house, or workshop.
-
Your floorplan demands flexibility with routing.
The 50ft lineset provides:
-
Extra reach without needing coupler kits.
-
Pre-charged refrigerant, sealed at the factory.
-
Quick-connect fittings for leak-free DIY installs.
-
Peace of mind — better to have extra than risk running short mid-install.
👉 According to HomeAdvisor, professional mini split installation costs can run from $2,000 to $14,500 depending on labor and complexity. Choosing the right lineset length upfront avoids mistakes that could eat into your savings.
📋 Tools & Materials You’ll Need
One of the best parts of the MRCOOL DIY system is that you don’t need specialized HVAC tools like vacuum pumps or gauges. Here’s what you will need:
-
🔧 Torque wrench – Ensures fittings are tightened to MRCOOL’s specs.
-
🔧 Adjustable wrenches – For securing connections.
-
🧰 Wall sleeve or protective cover – For clean wall penetration.
-
🪛 Mounting brackets or clamps – To secure the lineset along walls or surfaces.
-
🧵 Insulation tape – To protect connections and prevent condensation.
-
📏 Measuring tape – For planning your run.
-
🧤 Gloves & safety glasses – Always recommended for protection.
Energy Star also emphasizes the importance of proper installation practices to avoid long-term performance issues.
📐 Planning Your Route
Before you even uncoil that 50ft lineset, take the time to plan:
-
Measure carefully – Start at the indoor air handler location and trace the path to where your condenser will sit.
-
Include bends and routing obstacles – Don’t just measure a straight line; factor in turns and vertical rises.
-
Add 10–15% – Always give yourself some wiggle room for unexpected adjustments.
-
Avoid sharp bends – These can kink the tubing and reduce efficiency.
👉 Pro Tip: Use MRCOOL’s DIY installation videos to visualize your run before starting.
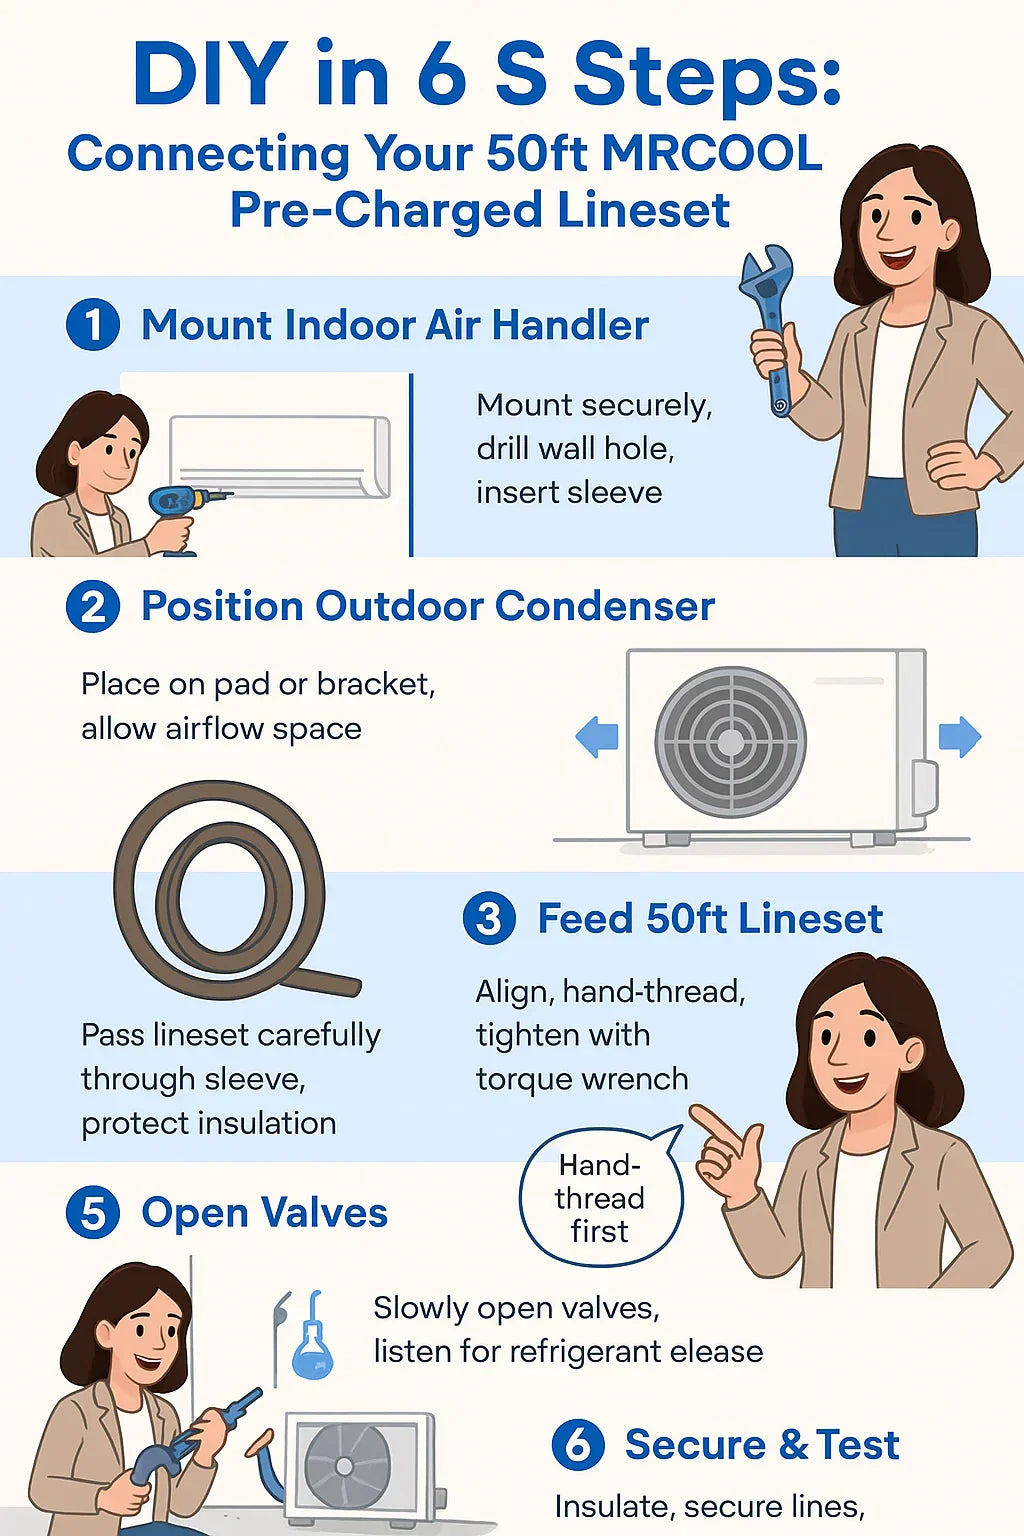
🔧 Step-by-Step Installation Process
Here’s where the fun begins! Let’s break it down into manageable steps:
Step 1: Mount the Indoor Air Handler 🖼️
-
Use the included wall bracket to mount the indoor unit.
-
Drill a hole through the wall (usually 3”–3.5”) for the lineset and condensate drain.
-
Insert a wall sleeve to protect the tubing and keep out pests or drafts.
Step 2: Position the Outdoor Condenser 🌳
-
Place the condenser on a level surface, such as a pad or wall bracket.
-
Leave clearance (12–24 inches) around the unit for airflow.
-
Avoid tight corners, fences, or obstructions.
According to the Department of Energy, proper placement of outdoor units significantly improves energy efficiency.
Step 3: Feed the 50ft Lineset Through 🌀
-
Carefully feed the pre-charged lineset through the wall sleeve.
-
Protect the insulation as it passes through.
-
If you have extra length, plan where to coil it near the condenser.
Step 4: Connect Quick-Connect Fittings 🔗
This is the magic of MRCOOL’s design.
-
Align the pre-charged fitting with the port on the indoor unit.
-
Hand-thread carefully — avoid cross-threading.
-
Use a torque wrench to tighten to MRCOOL’s specifications.
-
Repeat on the outdoor condenser side.
👉 Never overtighten! That’s one of the most common DIY mistakes.
Step 5: Open the Valves 🔓
-
Once fittings are secure, use a hex wrench to slowly open the valves on the outdoor condenser.
-
You’ll hear a pop or hiss — that’s the refrigerant releasing into the system.
-
Congratulations — your refrigerant circuit is now live!
Step 6: Secure and Insulate 🧵
-
Coil any extra tubing neatly behind the condenser.
-
Secure it with brackets or ties to prevent vibration noise.
-
Wrap all connections with insulation tape to prevent condensation and improve efficiency.
🧯 Safety Tips to Keep in Mind
Even though MRCOOL’s system is designed for DIYers, refrigerant is still under pressure. Keep these safety basics in mind:
-
Always wear gloves and safety glasses.
-
Never cut, puncture, or attempt to recharge the pre-charged lineset.
-
Keep the tubing away from sharp edges or hot surfaces.
-
Follow torque specs — over-tightening can damage seals.
The EPA Section 608 guidelines explain why refrigerant handling is regulated, but MRCOOL’s design keeps you within DIY-safe boundaries.
🚨 Common Mistakes to Avoid
I’ve seen DIYers (including friends of mine) make these errors — here’s how to dodge them:
-
❌ Cross-threading the quick-connect fittings → Always hand-thread first.
-
❌ Forgetting to open valves fully → Leads to “no cooling” complaints.
-
❌ Leaving extra tubing loose → Creates vibration noise against siding.
-
❌ Skipping a torque wrench → Too loose or too tight both cause leaks.
🔄 Testing Your System
Once everything is connected:
-
Turn on the power – Make sure your breaker and disconnect are properly wired.
-
Set the system to cool – Watch for cool air blowing within a few minutes.
-
Listen closely – No hissing or rattling should come from the connections.
-
Check the drain line – Ensure condensation flows outside properly.
-
Inspect for leaks – Use a leak detection spray on fittings if you suspect an issue.
👉 If the system isn’t performing as expected, MRCOOL provides technical support to troubleshoot.
🎯 Final Take: Savvy’s DIY Confidence
Here’s what I tell fellow homeowners:
-
If you can hang a wall-mounted TV and assemble IKEA furniture, you can install a MRCOOL system with a pre-charged lineset.
-
The 50ft option gives you maximum flexibility — no stress about running short.
-
By avoiding pro labor, you’re saving hundreds (even thousands) in costs.
For Savvy homeowners like you, the MRCOOL 50ft pre-charged lineset is the bridge between professional-grade HVAC and true DIY installation.
In the next topic we will know more about: Do You Need a Coupler Kit? Extending Your MRCOOL Lineset Explained


