By Alex Lane | Your Home Comfort Advocate
Installing a mini-split heat pump yourself can be a smart way to save money — but only if you’ve got the right gear. You don’t need a whole HVAC truck, but certain tools and materials are absolutely essential for getting the job done safely, efficiently, and in a way that protects your system (and your warranty).
In this guide, I’ll walk you through every must-have tool and material, why it matters, and what’s often missing from even the best DIY kits.
📘 New to DIY installs? Start with the Complete Guide to DIY Heat Pump Installation for a full step-by-step overview.
Why Having the Right Tools Matters
Let’s be blunt: cutting corners on tools can ruin your entire install.
I’ve seen homeowners torque flare nuts with pliers, skip the vacuum pump, or use the wrong hole saw for the wall sleeve — all of which lead to leaks, noise, or a failed compressor. Most of these mistakes are preventable with the right tools.
You don’t need the fanciest equipment — just what’s fit for the job. And if you’re not ready to buy, many of these can be rented from a local HVAC supply house or tool rental shop.
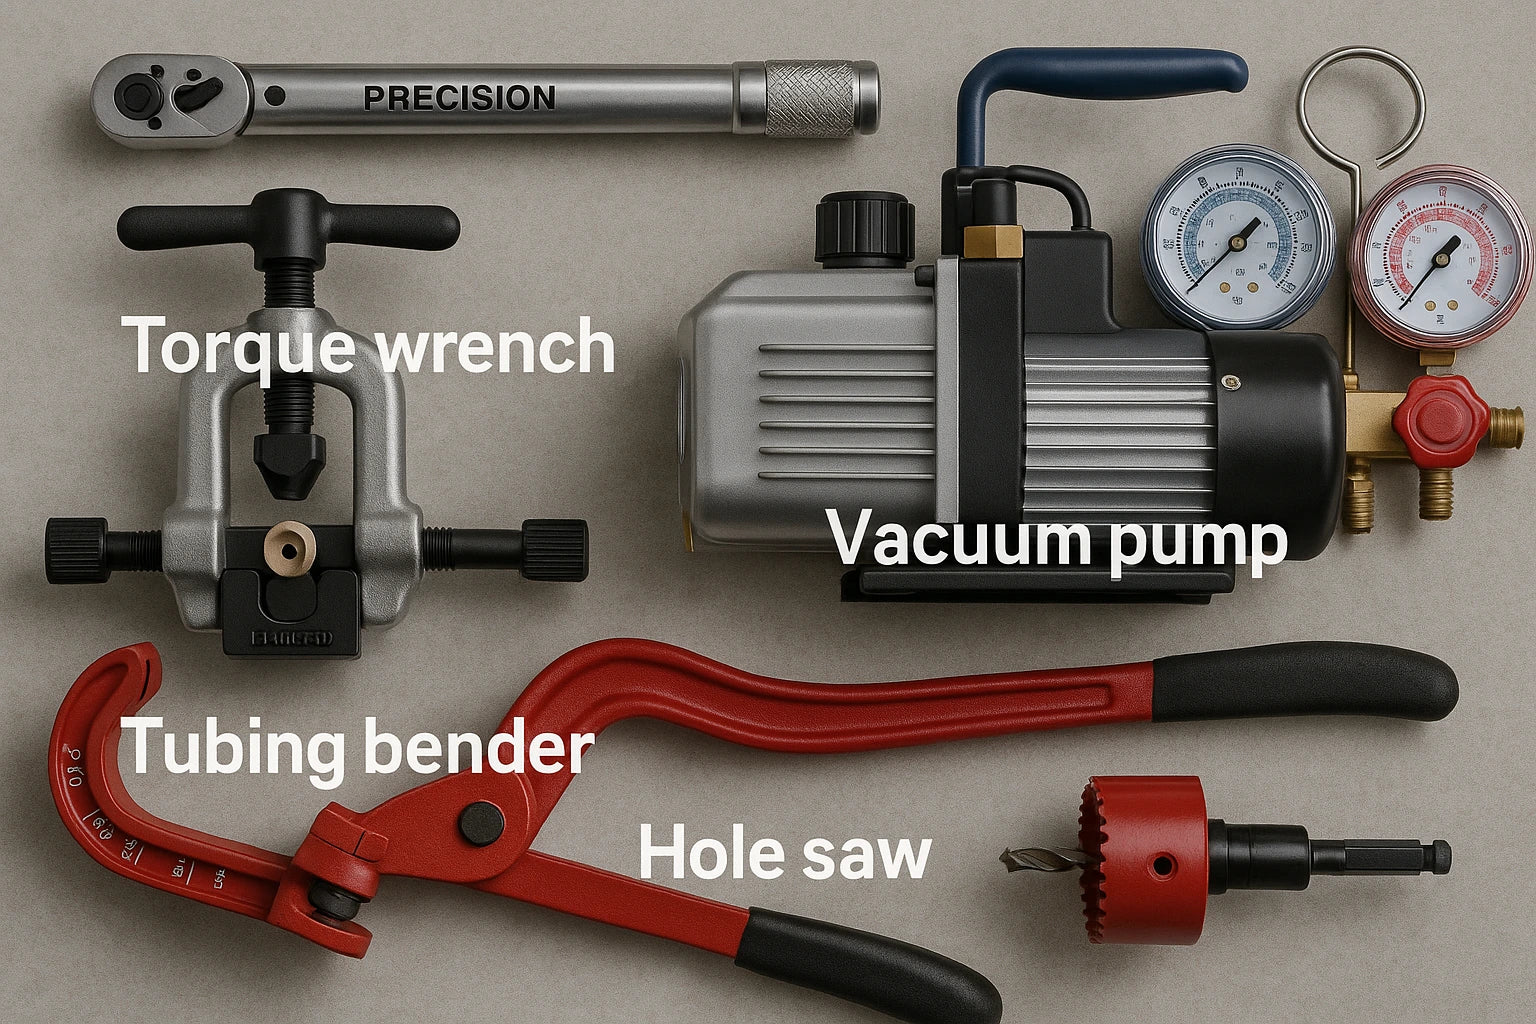
Essential Tools for a DIY Mini-Split Installation
🧰 Refrigerant & Vacuum Tools
These are mission-critical. Don’t install a mini-split without them.
✅ Vacuum Pump
You must evacuate the refrigerant lines to remove air and moisture before releasing the charge. Target 500 microns or lower. Moisture left in the system can cause acid formation and compressor failure.
📘 Learn the process from ESCO Institute’s best practices guide.
✅ Manifold Gauge Set (R-410A or R-32 compatible)
Lets you measure pressure while pulling vacuum or doing a decay test. Don’t use a set designed for automotive refrigerants.
✅ Digital Micron Gauge
Far more accurate than analog readings. Shows when your vacuum is holding — or if there’s a leak.
✅ Bubble Leak Detector / Soap Solution
Use this to check flare joints before releasing refrigerant. A single overlooked leak can ruin system efficiency.
🔧 Copper Line Tools
Mini-splits rely on precision copper work. Here’s what you’ll need:
✅ Flaring Tool
Choose one with a clutch or stop to avoid over-flaring. Look for R-410A or R-32 compatible flare specs — they require precise angles and surface finish.
✅ Tubing Bender
Prevents kinks in the line set. Kinked lines increase resistance and can damage compressors.
✅ Pipe Cutter
Clean, square cuts on copper pipe help form leak-free flares. Don’t use a hacksaw.
✅ Deburring Tool
Removes sharp edges from inside the pipe after cutting — a step many skip but critical for flare integrity.
📘 Browse professional flaring tools at Yellow Jacket
🔨 Mounting, Routing & Core Tools
These tools make the install physically possible:
✅ Hole Saw (2.5”–3”)
Used to drill through the wall for the line set and drain. Choose one with a long pilot bit to guide through thicker materials like stucco.
✅ Cordless Drill & Anchors
For securing indoor brackets and outdoor pads or wall-mounts. Use masonry anchors for concrete or brick.
✅ Level and Stud Finder
Ensure the indoor unit drains properly (slight pitch) and is mounted securely. A level also prevents noisy vibration issues down the road.
✅ Weatherproof Caulk or Putty
Seal the wall penetration against air, pests, and moisture.
⚡ Electrical & Safety Gear
Even if you're hiring a licensed electrician for the 240V work, you’ll still need some basics.
✅ Torque Wrench
For tightening flare nuts to the exact spec. Over- or under-torquing is one of the most common causes of refrigerant leaks.
✅ Multimeter and Voltage Tester
Used to confirm electrical connections are safe and match the system’s requirements.
✅ Wire Stripper & Conduit Tools
Handy if you're running or repairing control wire or flexible whip cable.
✅ PPE (Personal Protective Equipment)
Safety glasses, gloves, and hearing protection are always a good idea.
📘 Review OSHA’s guidelines on electrical safety
Optional But Recommended Tools & Accessories
These items aren’t always required, but they can make the install cleaner, safer, and longer-lasting:
-
Line Set Cover Kits – Protect and hide copper lines and drain from UV exposure and critters
-
Nitrogen Tank & Regulator – For pressure testing before vacuuming (ideal but not mandatory)
-
Condensate Pump – Needed if gravity drain isn’t possible
-
Disconnect Box (Weatherproof Rated) – Required by code for most installs
-
Surge Protector or Voltage Stabilizer – Protects electronics during brownouts or power surges
📘 For more on insulation and protecting your install from energy loss, check the U.S. Department of Energy’s Insulation Guide.
What’s in the Box — And What’s Not
Most DIY mini-split kits include:
-
Indoor and outdoor units
-
Pre-flared and insulated line set
-
Remote or thermostat
-
Mounting brackets and basic control wire
-
User and install manuals
What’s often not included:
-
Wall sleeve for the line set
-
Outdoor pad or wall bracket
-
High-voltage whip cable
-
Electrical disconnect box
-
Caulk or sealant
-
Anchors and hardware for your specific wall type
Having these items on hand before install day keeps things smooth and safe.
Tool Quality Matters — Don’t Skimp Where It Counts
Let me put it this way: a $35 torque wrench used correctly can save a $3,000 system from failure. That’s a good trade.
Rent what you can. Buy what you must. But don’t cut corners. If you’re unsure, ask your local HVAC supply shop what they recommend for DIYers — they’re usually happy to help.
Real-world issues I’ve seen caused by poor tools:
-
Crushed copper from an old flaring tool
-
Loose joints from skipped torque
-
Moisture inside because a weak vacuum pump couldn’t hold 500 microns
Final Checklist: What You Need Before Install Day
-
Vacuum Pump
-
Manifold Gauge Set
-
Digital Micron Gauge
-
Flaring Tool
-
Tubing Bender
-
Hole Saw
-
Cordless Drill + Anchors
-
Torque Wrench
-
Multimeter / Voltage Tester
-
Safety Gear (Glasses, Gloves, Ear Protection)
-
Wall Sleeve + Weatherproof Caulk
-
Disconnect Box + Electrical Whip
-
Line Set Cover (optional but recommended)
📘 Ready to get started? Check out the next article: Common Mistakes DIYers Make When Installing Heat Pumps (and How to Avoid Them)
Final Thoughts from Alex Lane
The difference between a smooth install and a frustrating one often comes down to preparation. With the right tools, you’re safer, faster, and far less likely to damage your system.
So build your checklist, gather your gear, and set yourself up for success. You’ve got this — just make sure your toolkit does too.
Alex Lane
Your Home Comfort Advocate


