A DIY heat pump installation can save you money upfront, but the job isn’t done once your system is running. Winterization is key to protecting your investment, maximizing efficiency, and ensuring reliable comfort when temperatures drop. Without proper preparation, snow, ice, and freezing rain can strain your unit, reduce efficiency, or even cause costly damage.
In this guide, I’ll walk you through step-by-step how to winterize your heat pump, common mistakes to avoid, and pro tips for homeowners who want safety and savings all season long.
Why Winterization Matters for DIY Heat Pumps
Protecting Your Investment
Your heat pump is one of the most expensive systems in your home. Winterization helps extend its lifespan by protecting components from ice buildup, corrosion, and wear.
Maintaining Efficiency
According to the U.S. Department of Energy, efficiency depends on clean airflow, proper insulation, and a system free of obstructions. Winter prep ensures your heat pump doesn’t work harder than it should, which lowers utility bills.
Preventing Repairs
Blocked coils, damaged insulation, and iced-over fans are among the most common winter issues. Proper winterization dramatically lowers the chance of emergency repairs in the middle of a snowstorm.
Key Steps to Winterize Your Heat Pump
Inspect and Clean the Outdoor Unit
-
Clear debris: Remove leaves, sticks, and dirt around the outdoor condenser.
-
Check coils: Use a hose (on gentle spray) to wash off dust and grime. Clean coils improve airflow and efficiency.
-
Look for damage: Corrosion or bent fins should be addressed before winter sets in.
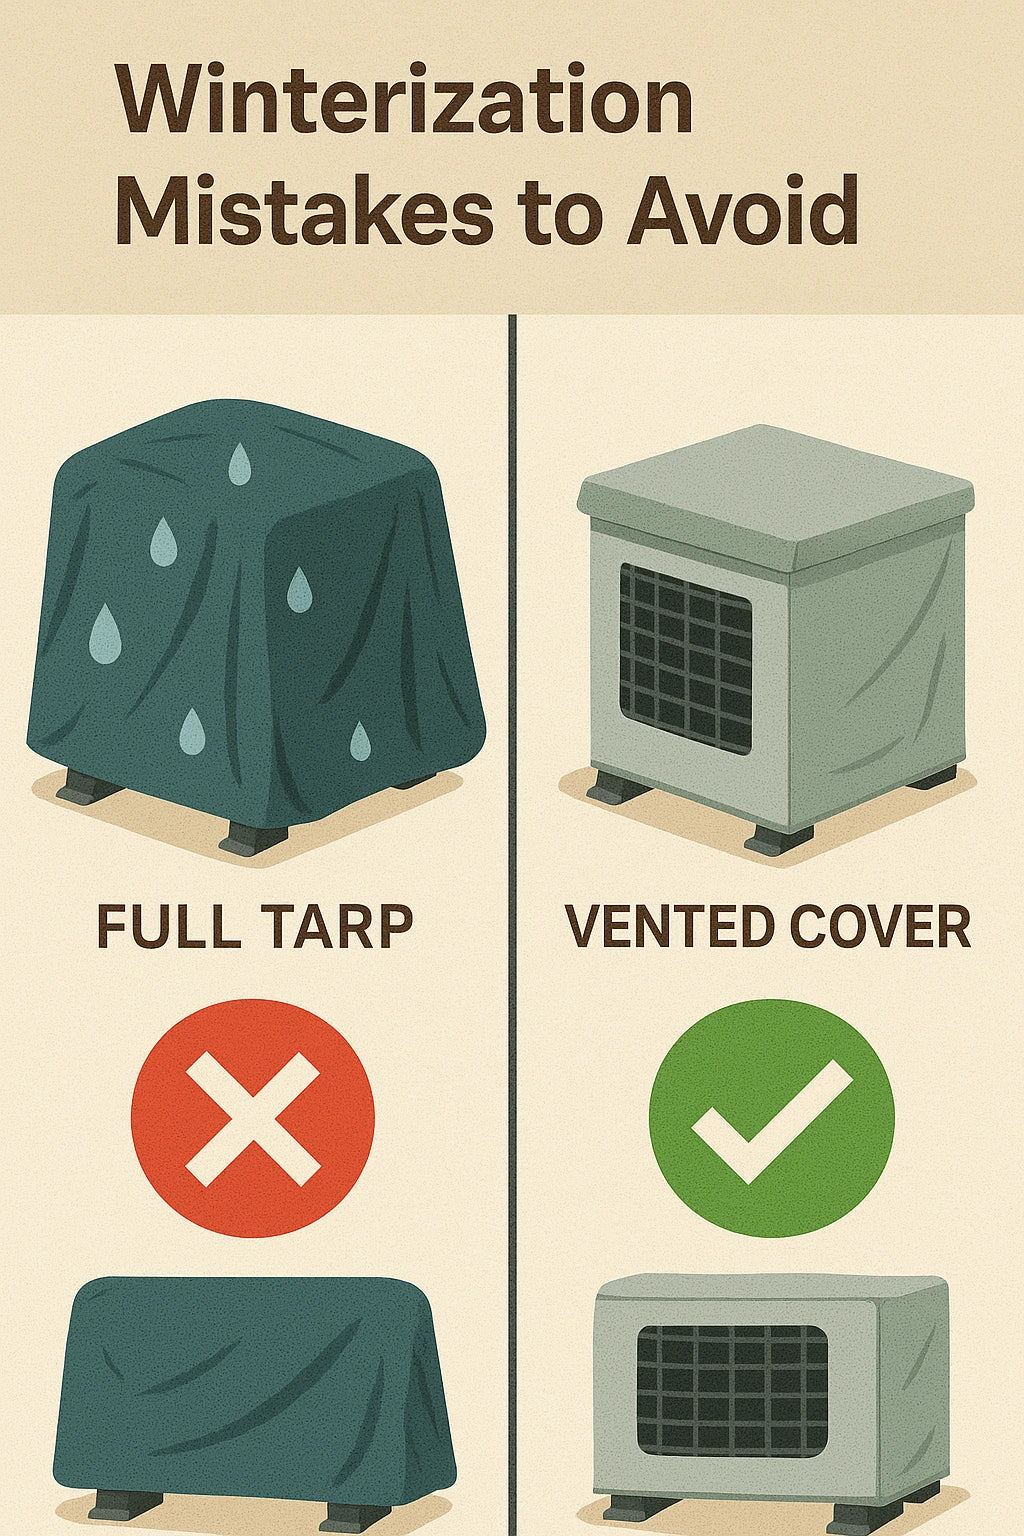
Protect the Outdoor Unit from Snow and Ice
-
Maintain clearance: Keep at least 2 feet of space around the unit for airflow and snow clearance.
-
Elevate if possible: A raised stand prevents snow drifts from blocking airflow.
-
Use a breathable cover: Install a cover designed for heat pumps. Avoid plastic tarps, which trap condensation and cause rust.
Check and Seal Line Sets and Insulation
-
Inspect insulation: Look for cracks, UV damage, or missing sections.
-
Replace damaged insulation: Heat loss from exposed copper can increase energy bills.
-
Upgrade protection: Consider weather-resistant insulation wraps for long-term durability.
The ENERGY STAR program recommends maintaining insulation and sealing gaps to optimize system performance year-round.
Verify Drainage and Defrost Function
-
Check drains: Ensure condensate lines are clear so melting frost drains properly.
-
Test defrost cycle: Run your system through a defrost cycle before winter begins. This prevents ice from encasing your coils.
-
Avoid blockages: Keep snow, mulch, or landscaping from covering drain paths.
The ASHRAE research community emphasizes proper drainage and defrost as critical to cold-climate system performance.
Electrical and Thermostat Checks
-
Inspect wiring: Look for worn or exposed connections. Winter moisture can worsen electrical hazards.
-
Check breakers: Ensure your heat pump has the correct breaker size for safe operation.
-
Smart thermostat: If you have one, program cold-weather schedules for efficiency and comfort.
The National Electrical Code (NEC) outlines safe practices for heat pump wiring and breaker compatibility.
Common Mistakes to Avoid When Winterizing
Even well-intentioned DIYers can make missteps that cost them efficiency and safety. Here are the big ones to avoid:
-
Wrapping in plastic tarps: This traps moisture, leading to mold and corrosion.
-
Neglecting snow clearance: Heat pumps need breathing room; snow piled against the unit suffocates airflow.
-
Ignoring small insulation cracks: Tiny gaps allow heat loss that adds up over the season.
-
Skipping maintenance: Annual maintenance (whether DIY or professional) prevents small issues from becoming big failures.
The EPA notes that routine maintenance is one of the simplest and most effective ways to maintain efficiency and extend equipment life.
Pro Tips for DIYers
-
Invest in a snow shield: Specialty covers allow airflow while protecting the top of the unit from heavy snow.
-
Trim landscaping back: Give your system space so airflow isn’t blocked when branches sag under snow.
-
Document your work: Keep receipts, photos, and notes. These can be useful for warranties and resale value.
-
Don’t skip inspections: Even if you DIY, schedule a professional tune-up every few years for peace of mind.
Final Thoughts: Protect Your System, Protect Your Savings
Winterizing your DIY heat pump is more than seasonal upkeep—it’s an investment in efficiency, safety, and long-term performance. Spending a few hours now can save you hundreds in repair costs and keep your family comfortable when it matters most.
👉 For a complete step-by-step overview of planning and installing your system, start with our Complete Guide to DIY Heat Pump Installation
👉 Next in this series: Best Backup Heat Sources to Pair with a DIY Heat Pump


