Most people size HVAC equipment using the simplest rule in the book:
“20 BTUs per square foot.”
That rule works okay for perfect rooms with perfect insulation, ideal ceilings, balanced geometry, and zero heat gain.
But here’s reality:
No room in a real house behaves like a perfect square box.
A 300 sq ft room with:
-
a vaulted ceiling
-
west-facing windows
-
an alcove
-
a hallway opening
-
or poor insulation
…will behave completely differently from a 300 sq ft room with none of those features.
That’s why I stopped using square footage alone decades ago.
Instead, I use something I call Thermal Footprint Planning — a method that matches BTU output to the actual geometry, design, airflow, and thermal behavior of the room.
If you want a PTAC, wall AC, heat pump, or mini split that cools and heats evenly, doesn’t short-cycle, and doesn’t blow your electric bill sky-high, then forget square footage.
Amana Distinctions Model 12,000 BTU PTAC Unit with 3.5 kW Electric Heat
You need to learn how the room behaves thermally — and size equipment to its footprint, not just its floor area.
Let me show you how I do it.
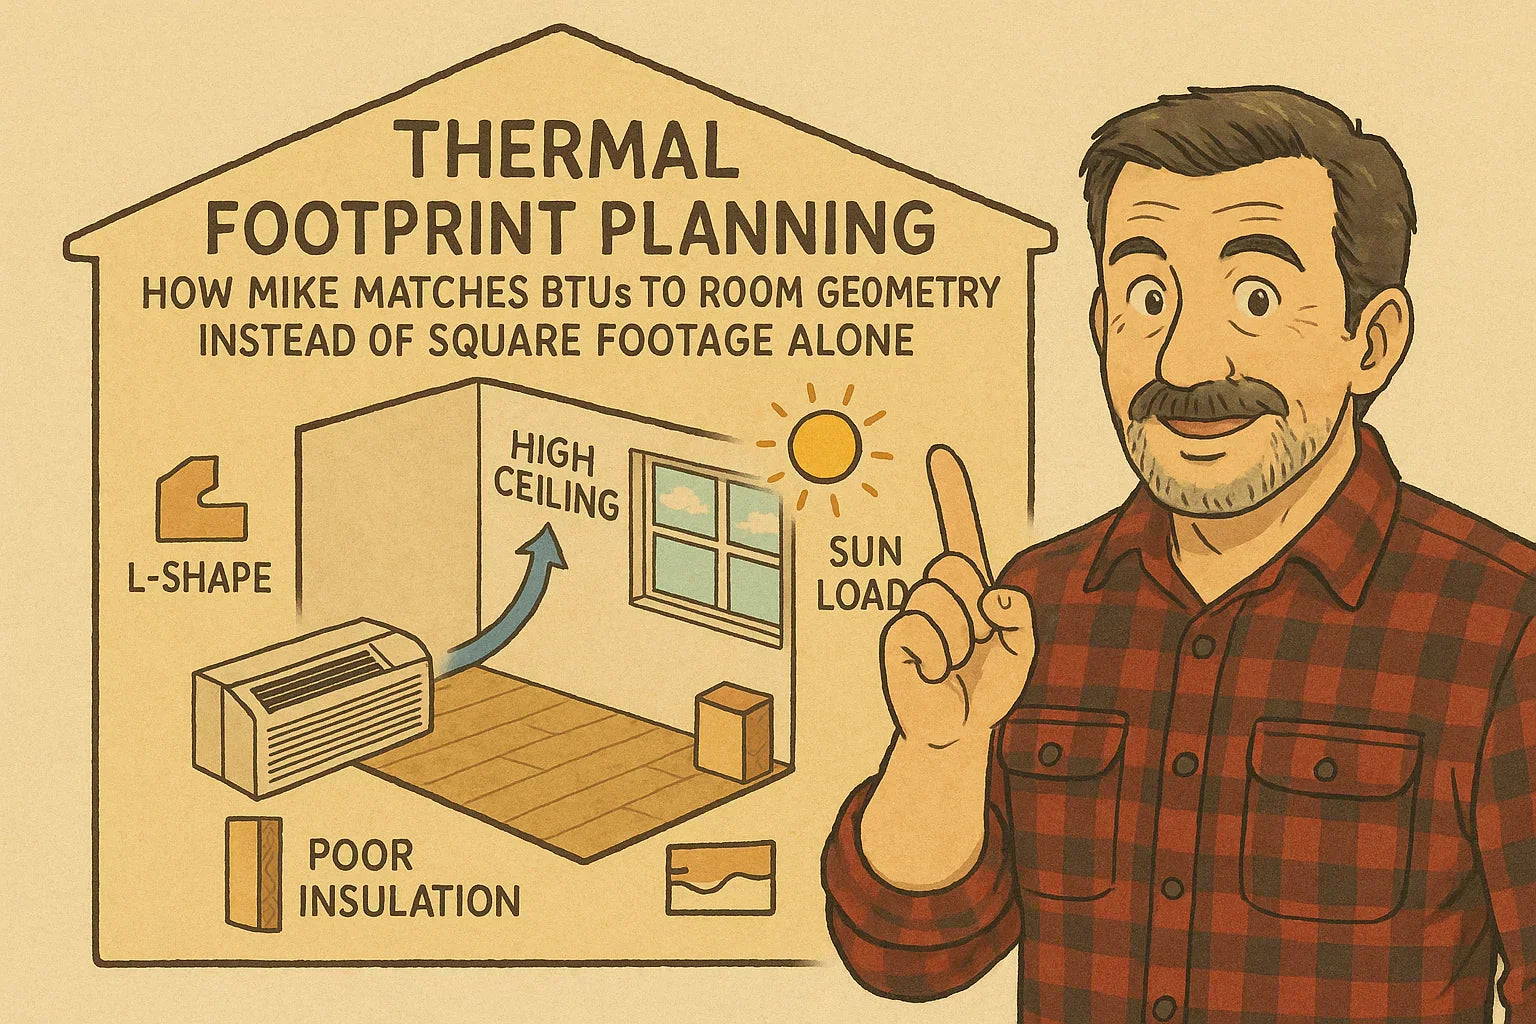
📐 1. What Is a “Thermal Footprint”? (Hint: It’s Not Square Footage)
A thermal footprint is the 3D heat behavior of a room.
It includes:
-
wall surface area
-
ceiling height
-
window load
-
airflow pathways
-
insulation quality
-
room shape & geometry
-
sun exposure
-
interior heat sources
Square footage only accounts for the floor.
Thermal footprint accounts for the entire envelope.
That’s why two rooms of identical size can require entirely different BTU loads.
🌡️ 2. The Big Problem With Square-Foot Sizing (And Why It Fails Most Rooms)
Standard sizing charts assume:
-
8-foot ceilings
-
no major windows
-
perfect insulation
-
rectangular room layout
-
one doorway
-
no alcoves or hallways
-
no vaulted ceilings
-
no heat-generating appliances
-
no sun load correction
This is outdated.
Even the U.S. Department of Energy warns that BTU calculations must consider sun exposure, climate, and insulation:
https://www.energy.gov/energysaver/room-air-conditioners
That’s why I use geometry, not just square footage.
🧭 3. Step One — Measure the Room’s True Thermal Volume
Square footage tells you area.
Thermal footprint tells you volume.
Room volume =
Length × Width × Height
Why this matters:
-
Higher ceilings make air stratify
-
Extra cubic footage increases heat load
-
Larger rooms take longer to mix conditioned air
Mike’s rule:
If the ceiling is higher than 8 ft, increase BTUs by 10% per additional foot.
Example:
12 ft ceiling → 40% more BTUs needed than the same footprint at 8 ft.
🌤️ 4. Step Two — Map All Sun-Loaded Surfaces
Windows aren’t just openings.
They are heat engines.
The direction they face changes everything:
🔥 South- & West-Facing Windows → High Heat Gain
Add 10–20% BTU per exposed wall.
🌤️ East-Facing → Morning load
Add 5–10% BTU.
❄️ North-Facing → Softest load
Generally no BTU increase.
To verify, use a thermal scanner or IR thermometer (your verified toolkit link):
You’ll watch the temperature spike on a west window starting around 2 PM.
🪟 5. Step Three — Account for Window Size, Type & Insulation
Not all windows are equal.
Large, single-pane windows can double your BTU requirement.
Add BTUs for:
-
Single-pane glass: +15%
-
Old aluminum frames: +10%
-
More than 15% window-to-wall ratio: +20%
-
Sliding glass doors: +25–35%
-
Skylights: +10–15%
DOE window performance guidelines
📏 6. Step Four — Adjust BTUs for Room Geometry (Corners, Alcoves & L-Shapes)
A simple square room behaves predictably.
But an L-shaped or broken layout? Completely different.
Mike’s Geometry Rules:
✔️ L-Shaped Rooms
Add 10–20% BTUs because airflow struggles to reach the hidden zone.
✔️ Rooms With Alcoves
Add 5–15% BTUs depending on alcove size.
✔️ Rooms With Hallway Openings
Add 7–12% BTUs because air escapes into adjoining areas.
✔️ Long, narrow rooms
Need higher CFM & stronger throw, not just BTUs.
While most installers ignore this, I’ve seen airflow die in rooms with odd geometry — even when BTUs were “correct.”
🧱 7. Step Five — Insulation Quality Changes Everything
Two rooms of the same size can have opposite BTU requirements if their insulation is different.
Add BTUs based on insulation quality (via wall inspection or IR thermometer):
❄️ Poor insulation (R-10 or below): +20–35%
😐 Average insulation (R-11 to R-15): Baseline
🔥 High insulation (R-19+): -10–15%
Heat loss reference calculator
🛏️ 8. Step Six — Internal Heat Sources: The Hidden BTU Killers
Rooms behave differently depending on what’s inside them.
Add BTUs for:
-
Computers / servers: +4,000–6,000 BTUs
-
Gaming setups: +2,000–4,000 BTUs
-
TV + sound systems: +500–1,000 BTUs
-
Workout equipment: +500–2,500 BTUs
-
Mini-fridges: +300–600 BTUs
-
Crowded occupancy: +300 BTU per person
Yes — people produce heat too.
🌀 9. Step Seven — Airflow Path & Throw Distance Matter As Much as BTUs
This is where Thermal Footprint Planning goes beyond “how much cooling“ and into “how well cooling spreads.”
You must consider:
-
Longest room dimension
-
Return pathway
-
Air mixing patterns
-
Obstacles
-
Throw distance (how far the air reaches)
-
Louver angle
-
Vertical vs. horizontal airflow
A PTAC blasting into the side of a bed or wall performs like a unit half its BTU rating.
🧊 10. Step Eight — Climate Zone Correction
Location matters.
In hot climates (FL, TX, AZ, NV), increase BTUs:
-
+10% for warm regions
-
+20% for hot regions
-
+30% for desert regions
In colder climates, heating load matters more — especially for PTACs with heat kits or heat pumps.
📊 11. Mike’s Thermal Footprint Formula (Full Calculation Method)
Here’s the complete sizing formula I use in the field:
Base BTU
20 BTU × square footage
(From DOE guidelines)
Ceiling Height Factor
+10% per foot above 8 ft
Sun Exposure Factor
South/west walls: +10–20%
Large windows: +20–35%
Insulation Factor
Poor insulation: +20–35%
High insulation: –10–15%
Room Geometry Factor
L-shaped: +10–20%
Alcoves: +5–15%
Hallways: +7–12%
Internal Load Factor
Computers/electronics: +500–6,000 BTUs
People: +300 BTU per extra person
Climate Zone Factor
Warm: +10%
Hot: +20%
Desert: +30%
The Final Formula
This method never fails.
🔍 12. Real Examples (How Mike Sizes Rooms Others Get Wrong)
Example 1 — 300 sq ft office with gaming PC
-
Base: 6,000 BTU
-
High sun load: +20%
-
Poor insulation: +25%
-
Alcove: +10%
-
Gaming PC: +3,000 BTU
Final: 10,500–12,000 BTU
A 6k BTU unit would’ve failed instantly.
Example 2 — 280 sq ft master with 12-ft ceilings
-
Base: 5,600 BTU
-
Ceiling increase: +40%
-
West-facing windows: +20%
Final: ~9,500–10,000 BTU
Example 3 — 200 sq ft basement bedroom
-
Base: 4,000 BTU
-
Low sun load: -10%
-
Excellent insulation: -10%
Final: 3,000–3,200 BTU
A huge unit would overcool and short-cycle.
📋 13. Mike’s Thermal Footprint Checklist (Print This Before Buying Any Unit)
Room Metrics
-
☐ Square footage measured
-
☐ Ceiling height measured
-
☐ Room shape mapped
Heat Gain Sources
-
☐ Windows sized & direction assessed
-
☐ Sun exposure measured
-
☐ Electronics listed
Insulation
-
☐ Walls, ceiling, windows inspected
Airflow Path
-
☐ Longest path mapped
-
☐ Return airflow planned
Climate Zone
-
☐ Local climate load factored
Final BTU
-
☐ Calculated using full formula
If all these are checked, your BTU choice will be correct — for both comfort and efficiency.
🎯 Conclusion: Square Footage Gives You a Starting Point — Thermal Footprint Gives You the Truth
If you size by square footage alone, you get lucky maybe 60% of the time.
But by using Thermal Footprint Planning, you get:
✔️ Perfect room comfort
✔️ Longer unit lifespan
✔️ Stronger airflow performance
✔️ Better energy efficiency
✔️ No dead zones
✔️ No oversizing
✔️ No short cycling
This is Mike’s way — sizing HVAC systems the right way, not the fast way.
Buy this on Amazon at: https://amzn.to/3WuhnM7
In the next topic we will know more about: Dead Zone Elimination Plan: Mike’s Tricks for Turning Awkward Rooms Into Even-Temp Spaces


