🌿 Introduction: A Quiet System Starts at the Ground, Not the Equipment
Homeowners often assume noise comes from the condenser fan, the compressor, or loose panels. But Savvy knows the truth:
Noise begins at the base.
And so does vibration.
And so does long-term efficiency.
If your Goodman condenser — whether it’s the 3-ton GLXS4BA3610 or a similar model — sits on a poorly engineered pad, you’re guaranteed:
-
Excess vibration
-
Louder operation
-
Misaligned refrigerant lines
-
Premature copper fatigue
-
Settling and tilting
-
Increased compressor workload
-
Lower SEER2 performance
A condenser is only as stable as the surface beneath it.
A whisper-quiet, high-efficiency system requires a vibration-smart foundation.
This is Landing Pad Logic — Savvy-style.
🧱 1. Why Condenser Pads Matter — The Physics Behind Quiet HVAC
Icon: ⚙️
Your outdoor unit contains components that generate vibration:
-
Compressor: The main source
-
Fan motor: Secondary source
-
Refrigerant flow: Especially at high startup torque
-
Wind resonance: External force
When these vibrations transfer into:
-
The ground
-
The structure
-
The copper line set
-
The wall penetrations
They amplify noise, reduce mechanical stability, and introduce wear points.
🌀 How a Bad Landing Pad Affects System Performance
-
Tilted condensers cause oil migration issues
-
Vibration wears out electrical connections
-
Excess movement stresses line sets
-
Uneven weight distribution increases compressor strain
-
Noise echoes into living spaces
-
Pad movement can break condensate drainage paths
A high-efficiency Goodman condenser deserves a high-efficiency foundation.
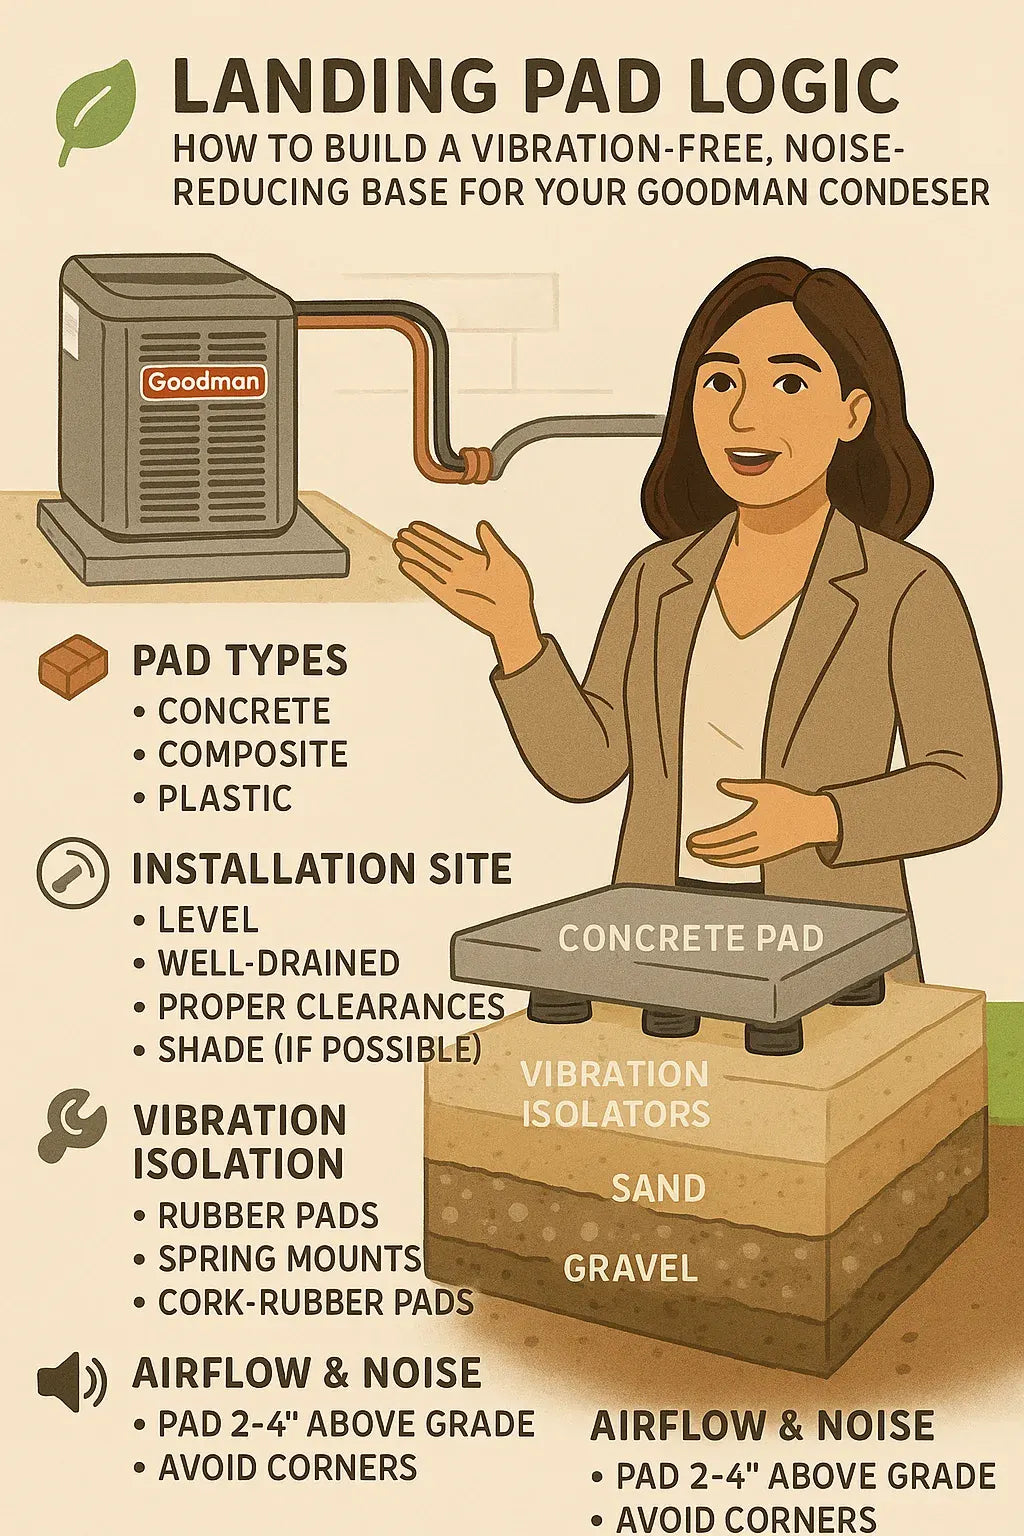
🧊 2. Pad Types — Which Base Belongs Under a Goodman System?
Icon: 🧱
Not all pads are created equal. Savvy breaks them down:
1. Lightweight Plastic Pads (Easiest, but Not the Best)
Pros:
-
Easy to transport
-
UV resistant
-
Affordable
Cons:
-
Transfer vibration
-
Can warp in sun
-
May settle unevenly
-
Not ideal for 3-ton+ units
2. Composite Condenser Pads (Savvy’s Mid-Range Choice)
Pros:
-
Lightweight but strong
-
Good vibration absorption
-
Weather resistant
-
Stable for most 2–5 ton systems
Cons:
-
Must be installed on level soil
-
Can still transmit vibration if not isolated
3. Concrete Pads (The Gold Standard for Stability)
Pros:
-
Extremely stable
-
Best long-term durability
-
Excellent vibration dampening
-
Ideal for hot climates
Cons:
-
Heavy
-
Requires proper grading
-
Can crack if soil shifts
4. Elevated Stands (For Flood Zones or Heavy Snow Areas)
Pros:
-
Prevents snow/flood damage
-
Provides airflow beneath the unit
-
Reduces pest infiltration
Cons:
-
MUST have vibration isolators
-
Improper installation becomes noisy
-
Requires strong anchoring
Savvy’s Preferred Setup:
Concrete pad + rubber vibration isolators + perfectly leveled aggregate base.
This creates a quiet, stable, long-life foundation.
🔍 3. Soil & Groundwork — The Step Most Installers Ignore
Icon: 🌎
Before the pad touches the ground, the earth must be prepared for decades of stability.
Step 1 — Choose the Location Wisely
A condenser should be placed:
-
12–24 inches away from the wall
-
In a shaded area when possible
-
Away from bedrooms
-
On the downwind side of the house
-
With unobstructed airflow (18–24 inches clearance on all sides)
Step 2 — Remove Organic Material
Grass, roots, topsoil, and mulch all decompose and shift.
Savvy removes at least 4–6 inches of organic matter before starting the base.
Step 3 — Install a Compacted Gravel Base
Use:
-
¾” crushed stone
-
2–4 inches deep
-
Compact it with a tamper
-
Create a perfectly level surface
Compaction prevents:
-
Settling
-
Tilting
-
Rock shifting
-
Water pooling
This is where long-term quiet operation begins.
Step 4 — Add a Sand Layer for Micro-Leveling
A thin ½–1 inch layer of sand smooths the imperfections.
Sand + gravel = a self-adjusting foundation under load.
🛋️ 4. Setting the Pad — Precision Makes Perfect
Icon: 📐
The pad must be:
-
Level
-
Stable
-
Uniformly supported
-
Not directly touching soil
✔️ Savvy’s Pad-Setting Rules
Rule 1: Use a 4-Foot Level
Short levels lie.
Use a long level for accuracy across surface area.
Rule 2: Slight Rearward Pitch (Optional)
Some installers add a 1° tilt away from the house to encourage:
-
Water drainage
-
Snowmelt flow
-
Reduction of puddle-freezing under the unit
Rule 3: Confirm No “Rocking”
Press down on all corners.
If it moves, relevel the base.
Rule 4: Pad Should Be Bigger Than the Condenser
Most 3-ton Goodman units work best with:
-
32×32 inch pad minimum
-
36×36 inch preferred
This reduces edge load stress.
🔇 5. Vibration Isolation — The Heart of Noise Reduction
Icon: 🔧
Condenser vibration is natural.
Condenser noise is optional.
Adding vibration isolation transforms performance.
Option 1 — Rubber Vibration Pads (Savvy-Approved)
Place between condenser feet and the pad.
Benefits:
-
Reduces structure-borne noise
-
Eliminates “buzzing” sounds
-
Increases compressor lifespan
Option 2 — Spring Mounts (For Elevated Stands or Metal Frames)
Best for:
-
Roof installations
-
Multi-unit platforms
-
High vibration zones
Springs decouple the system from the structure — dramatically reducing noise.
Option 3 — Cork-and-Rubber Hybrid Pads
Used in commercial HVAC.
Adds:
-
Extra sound dampening
-
Greater durability
-
Less compression over time
Savvy’s 4 Isolation Rules
-
Never let metal feet touch the pad directly.
-
Tighten bolts only to manufacturer torque specs.
-
Do not overtighten or “pinch” isolation pads.
-
Re-check isolators after system startup.
🔥 6. Condenser Mounting & Anchoring — Safety Meets Quiet Operation
Icon: 🛠️
Improper anchoring = vibration amplifier.
✔️ Use Anti-Vibration Bolts
These allow small flex movements without transferring noise.
✔️ Avoid Hard Metal-to-Pad Contact
Use neoprene washers between metal fasteners.
✔️ In Hurricane Zones
Strap the condenser using:
-
Approved hurricane tie-down kits
-
Stainless hardware
-
Elevated pad if required
✔️ For Stand Installations
Ensure:
-
Rubber isolators under each leg
-
Cross-bracing for stability
-
Uniform load distribution
🌬️ 7. Airflow, Noise & Pad Height — The Triangle of Quiet Comfort
Icon: 🌀
The pad height affects airflow, snow exposure, and noise reflection.
Higher Pad = Better Airflow but More Exposure
Good for:
-
Snow-prone areas
-
Dense vegetation zones
-
Low airflow locations
Lower Pad = Quieter Operation
Ground-level pads reduce the “echo chamber” effect between wall and condenser.
Savvy’s Rule of Thumb:
Pad height of 2–4 inches above grade for the quietest operation unless snow or flood risk requires elevation.
🔧 8. Line Set Support — Protecting Copper from Vibration Fatigue
Icon: 🔩
Copper line sets transmit vibration into the home.
A high-quality pad reduces this, but line set supports finalize the noise control.
✔️ Use Line Set Clamps with Rubber Inserts
They:
-
Absorb vibration
-
Prevent copper-on-metal contact
-
Reduce “ticking” noises
-
Extend copper lifespan
✔️ Avoid Sharp Bends Near the Condenser
Tight radius bends act like tuning forks.
✔️ Use a Proper Wall Sleeve
Insulated penetrations prevent:
-
Rattling
-
Condensation drip noise
-
Copper abrasion
🌧️ 9. Weather & Moisture Considerations — The Pad Must Work All Year
Icon: 🌦️
Your condenser pad faces:
-
Rain
-
Freeze-thaw cycles
-
UV exposure
-
Settling soil
-
Pest activity
✔️ Storm-Proofing the Pad
-
Use UV-resistant pads
-
Grade soil away from the pad
-
Create drainage channels
-
Avoid mulch contact
-
Raise the pad if snow regularly exceeds 8–12 inches
✔️ Pest Control
Rabbits, rodents, and insects love warm condenser areas.
Use gravel, not mulch, immediately around the pad.
🏡 10. Sound Reflection & Placement — Even the Best Pad Can’t Fix a Bad Location
Icon: 🔊
Sound bounces off:
-
Walls
-
Fences
-
Decks
-
Concrete surfaces
This amplifies noise.
✔️ Place Condenser Away From Acoustic Reflectors
Minimum:
-
18–24 inches clearance
-
Preferably 4 feet in noisy installations
✔️ Use Shrubs or Acoustic Fencing (But Don’t Block Airflow)
Absorbs sound waves naturally.
✔️ Avoid Corner Installations
Corners multiply noise through reverberation.
🧭 11. Final Commissioning — The Quietness Test
Icon: 📋
After installing the pad and condenser, Savvy performs this final checklist:
🔍 Startup Test
-
No rocking
-
No rattling
-
No panel vibration
-
No copper movement
-
No excessive fan wobble
📐 Level Test
Unit must remain within 1° of level.
🔧 Vibration Test
Place a screwdriver on the condenser and rest the handle against your ear.
If you hear buzzing, adjustment is needed.
🔉 Sound Meter Check
Goodman condensers typically run at:
-
~55–70 dB depending on model
Anything above +5 dB indicates vibration transfer.
🌍 12. Why a Good Pad Is a Sustainability Tool
Icon: ♻️
This is where Savvy gets passionate.
A vibration-free, noise-controlled condenser pad contributes to:
🌱 1. Lower Energy Use
Reduced mechanical-resistance = reduced wattage draw.
🌱 2. Longer Compressor Life
Vibration = wear.
Less vibration = fewer replacements.
🌱 3. Reduced Refrigerant Leakage
Copper fatigue from vibration is a major leak source.
🌱 4. A Quieter, More Livable Neighborhood
Noise pollution matters.
🌱 5. Higher Real-World SEER2 Efficiency
Stable systems chill better.
A landing pad is more than concrete.
It’s climate efficiency, comfort, and longevity — all in one foundation.
🔗 Final Verified Resources (Maximum 6)
-
ACCA Installation Best Practices
https://www.acca.org -
EnergyStar Outdoor Unit Installation Guide
https://www.energystar.gov -
ASHRAE Noise & Vibration Control Standards
https://www.ashrae.org -
Building Science Corporation – Mechanical Systems & Noise Guidance
https://buildingscience.com -
EPA Outdoor Noise & Environmental Impact Resources
https://www.epa.gov
🌟 Closing: A Quiet System Isn’t an Accident — It’s an Engineered Experience
Your Goodman condenser is designed to operate efficiently, quietly, and reliably — but only if the landing pad beneath it is installed with intention.
When you craft a vibration-smart base with the right:
-
Groundwork
-
Pad type
-
Isolation materials
-
Anchoring
-
Airflow planning
-
Line set protection
…your system transforms from loud machinery into a quiet sustainability engine.
A well-built landing pad isn’t just a foundation.
It’s a promise — of longevity, efficiency, and the kind of comfort Savvy stands for.
Buy this on Amazon at: https://amzn.to/4hyDyKH
In the next topic we will know more about: Refrigerant as a Climate Asset — Charging, Vacuuming & Protecting Your System Without Wasting a Single Gram


