When it’s time to replace a furnace in a mobile or manufactured home, most homeowners ask the same question:
👉 Can I save money by doing it myself, or should I hire a pro?
The truth is, mobile home furnaces — like the Revolv 80 AFUE 56,000 BTU Downflow MG1E — are built a little differently from standard residential furnaces. They have unique installation requirements, safety codes, and space limitations that make the DIY decision a big deal.
In this guide, I’ll break down what’s really involved in installing a mobile home furnace, the risks of going DIY, the benefits of hiring a licensed pro, and how to decide which path is right for you.
🔧 What Makes Mobile Home Furnace Installs Different
Installing a furnace in a mobile home is not the same as in a traditional house. Here’s why:
1. Downflow Design
Most mobile homes use downflow furnaces, meaning heated air is pushed down into ducts in the floor. A regular “upflow” furnace for stick-built houses won’t work in a mobile home.
2. Tight Spaces
Mobile homes often have utility closets with limited clearance. Furnaces like the Revolv MG1E are designed with smaller footprints to fit in these spaces.
3. HUD Codes
The U.S. Department of Housing and Urban Development (HUD) sets specific standards for manufactured housing HVAC systems. You can’t just pop in any furnace — it must be HUD-approved.
4. Venting Differences
An 80 AFUE furnace requires proper venting (usually through the roof). If this isn’t done right, you risk dangerous gas buildup.
👉 In short: Mobile home furnace installs are specialized. That’s why you’ll often see the words “Mobile Home Approved” on products like Revolv.
HUD Manufactured Housing Standards.
🪛 DIY Installation: What’s Involved
If you’re handy and thinking about installing your own furnace, here’s a step-by-step overview of what’s involved:
Step 1: Remove the Old Furnace
-
Disconnect gas, power, and venting.
-
Remove screws, brackets, and duct attachments.
-
Carefully pull the old unit out of the closet.
Step 2: Prep the Space
-
Clean the duct opening.
-
Check for rot, leaks, or damage in the closet.
-
Ensure flooring and framing can support the new furnace.
Step 3: Set the New Furnace
-
Level the new unit.
-
Align it with the duct connection below.
-
Secure it to the floor framing.
Step 4: Connect Ductwork
-
Seal with mastic or foil tape.
-
Ensure no leaks around the plenum.
Step 5: Hook Up Utilities
-
Gas line connection (requires pipe fitting and leak testing).
-
Electrical wiring (120V/240V depending on the model).
-
Thermostat wiring.
Step 6: Venting
-
Attach flue pipe through the roof.
-
Seal all penetrations.
-
Check for proper draft.
Step 7: Test the System
-
Check for gas leaks with soapy water.
-
Verify airflow in all registers.
-
Test thermostat operation.
👉 Sounds doable? It is for some. But as you’ll see next, there are major risks.
⚠️ Risks of Going DIY
DIY can save money, but when it comes to furnaces — especially gas furnaces — the risks are real.
1. Gas Leaks
Improper pipe connections can lead to natural gas leaks, which are dangerous and can cause explosions.
2. Carbon Monoxide Poisoning
Poor venting can allow carbon monoxide (CO) into your home — a colorless, odorless gas that can be fatal.
3. Voided Warranty
Most manufacturers (including Revolv) require licensed professional installation for warranty coverage. If you install it yourself, the warranty may be void.
4. Failed Inspections
Local building codes often require a permit and inspection. If you DIY and fail inspection, you’ll have to redo the work or pay a pro anyway.
5. Hidden Damage
Mobile home duct systems are notorious for leaks. Without pro testing, you may not know if your ducts are robbing you of efficiency.
👉 In short: Saving $1,000 on labor could cost you much more in mistakes.
👨🔧 Why Calling a Pro Makes Sense
Hiring a licensed HVAC pro has clear advantages:
-
✅ Gas Safety: Proper leak testing and pressure regulation.
-
✅ Venting Done Right: Prevents backdrafting and CO buildup.
-
✅ Code Compliance: Pros know HUD and local codes.
-
✅ Warranty Protection: Keeps manufacturer coverage intact.
-
✅ Speed: A job that might take you 3 days could take a pro 6 hours.
-
✅ Peace of Mind: You won’t second-guess whether your furnace is safe.
👉 Think of it like brakes on your car — you could do it yourself, but pros have the tools and training to make sure it’s done right.
Better Business Bureau HVAC hiring guide.
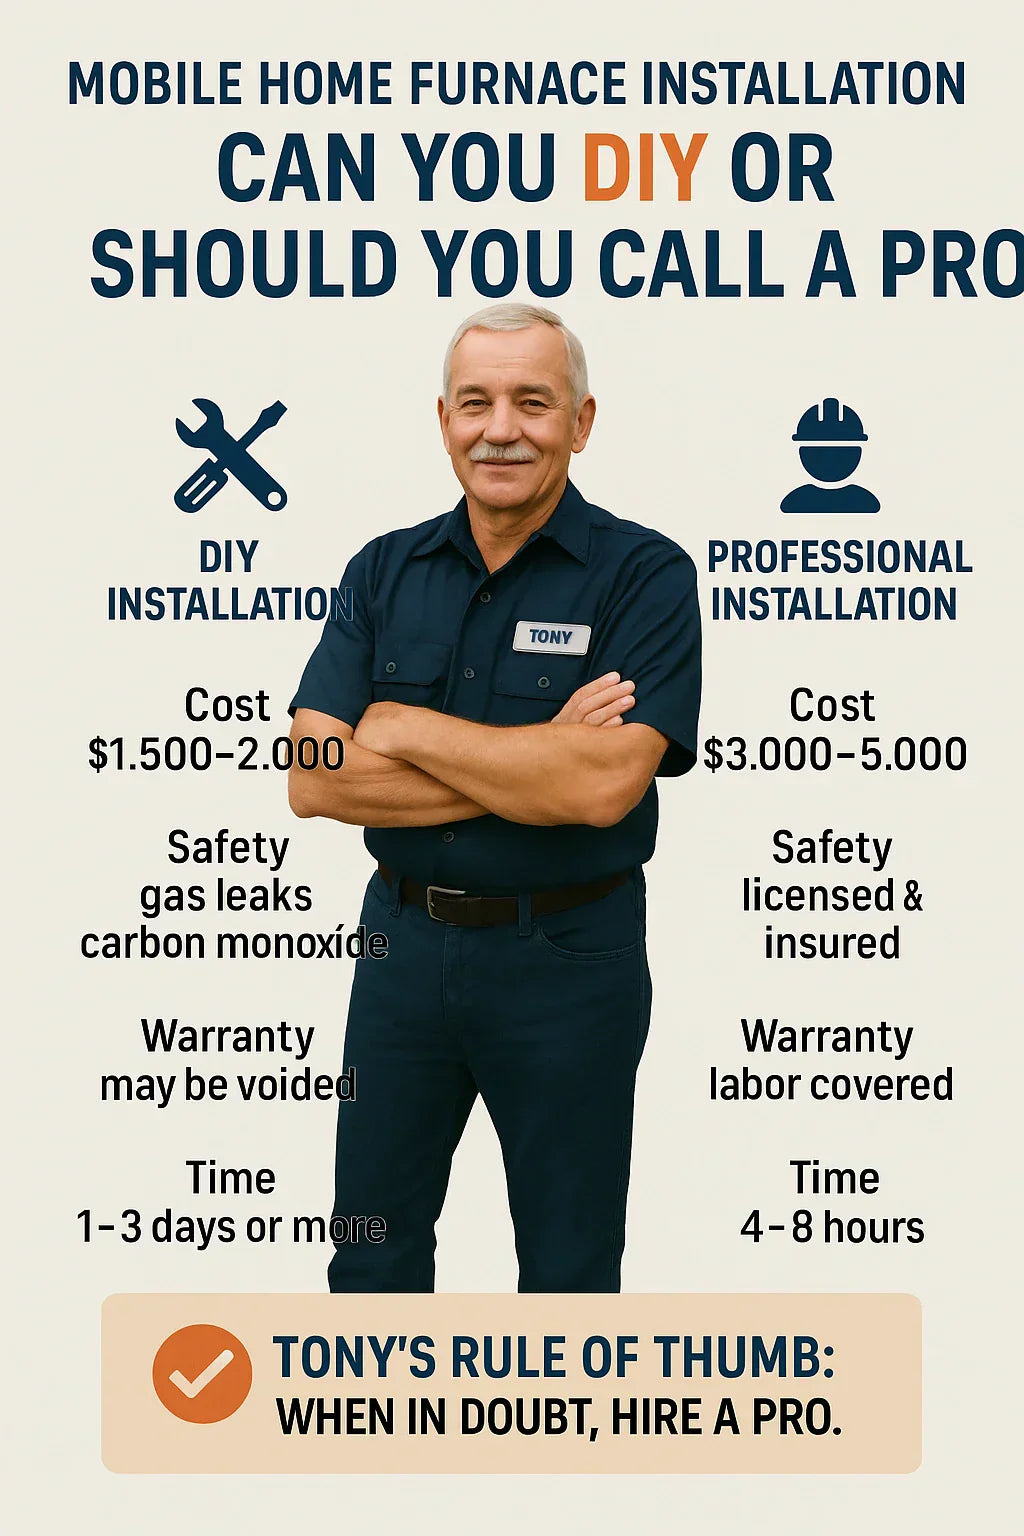
💰 Cost Breakdown: DIY vs. Pro
Here’s what the cost difference looks like:
| Option | Cost of Furnace | Labor/Install | Total Cost |
|---|---|---|---|
| DIY | $1,500–$2,000 | $0 (your labor) | $1,500–$2,000 |
| Pro Install | $1,500–$2,000 | $1,500–$3,000 | $3,000–$5,000 |
On paper, DIY saves thousands. But add these risks:
-
Fixing mistakes ($500–$1,000).
-
Code fines ($250+).
-
Shortened furnace lifespan (cost of replacement).
-
Safety risks (priceless).
👉 For most homeowners, pro installation is the safer long-term bet.
📋 Tony’s Real-World Advice
Tony says:
“If you’re handy, you might be able to handle some parts of the job — like removing the old furnace, prepping the space, or sealing ducts. But when it comes to gas lines and venting, don’t mess around. That’s pro territory.”
DIY-friendly tasks:
-
Clearing the space.
-
Removing old unit.
-
Sealing ducts and insulation.
-
Installing thermostat.
Pro-only tasks:
-
Gas hookup.
-
Venting.
-
Electrical wiring.
-
Final safety checks.
👉 A hybrid approach can save money while still keeping your system safe.
✅ Decision Guide: DIY or Pro?
Here’s a simple breakdown to help you decide:
-
Gas Furnace (like Revolv 80 AFUE MG1E) → Always hire a pro.
-
Electric Furnace → Possible DIY if you’re confident with electrical work.
-
Unsure about permits or HUD codes → Call a pro.
-
Want full warranty protection → Call a pro.
-
Tight budget but handy → Do prep work, then hire a pro for hookups.
🔑 Key Takeaways
-
Mobile home furnaces are different from standard furnaces — downflow design, tight spaces, and HUD codes.
-
DIY is possible for prep and certain tasks, but gas hookups and venting should be left to pros.
-
Pros ensure safety, warranty coverage, and code compliance.
-
DIY saves upfront money but can cost more if mistakes happen.
-
Tony’s advice: Do what you can safely, but don’t gamble with gas and CO.
👉 For most mobile home owners, hiring a pro for installation is the smart move — but doing your own prep can still help cut costs.
In the next topic we will read more about: Downflow Design Explained: Why It Matters in Mobile Home Heating


