Why Mike protects the wall cavity like it’s the front door of your home.
Most homeowners think the biggest risk with a through-the-wall AC install is cutting a hole.
Mike knows better.
The real danger is what gets into that hole after the install:
-
Cold wind
-
Hot drafts
-
Humidity
-
Water
-
Bugs
-
Dust
-
Freezing air
-
Odors from the exterior
A through-the-wall AC sleeve—especially for a model like the Amana 11,900 BTU PBE123J35AA—is essentially a permanent opening to the outdoors.
If it isn’t sealed with a structured, multi-layer defense, it becomes:
❌ A wind tunnel
❌ A bug passageway
❌ A moisture trap
❌ A noise amplifier
❌ A heat-loss liability
❌ A pathway for polluted air
That’s why Mike created his signature airtight system:
The Weather Lock Strategy: A 4-Layer Structural Seal
It’s not caulk.
It’s not foam.
It’s a complete building envelope repair system that restores the wall’s integrity even though a giant hole now lives in it.
This strategy is used on every premium through-the-wall install Mike performs.
Homeowners who skip these steps end up with air leaks, mold, sleeve corrosion, or rebuilding their opening later.
Let’s break down Mike’s four layers—each with a different purpose and different materials.
🧰 SECTION 1 — Why Through-the-Wall AC Installs Need a Weather Lock
Icon: 🚪
Mike explains this in one sentence:
“You just cut through insulation, sheathing, drywall, siding, and a pressure-balanced air cavity. Now you have to rebuild the weather barrier.”
A normal wall has multiple protective layers:
-
Interior air barrier
-
Insulation
-
Sheathing air barrier
-
Weather-resistive barrier (WRB)
-
Siding
-
Exterior trim and flashing
Once you cut a hole for a sleeve, these layers are compromised.
So Mike reconstructs them—one by one—around the sleeve.
That’s the Weather Lock.
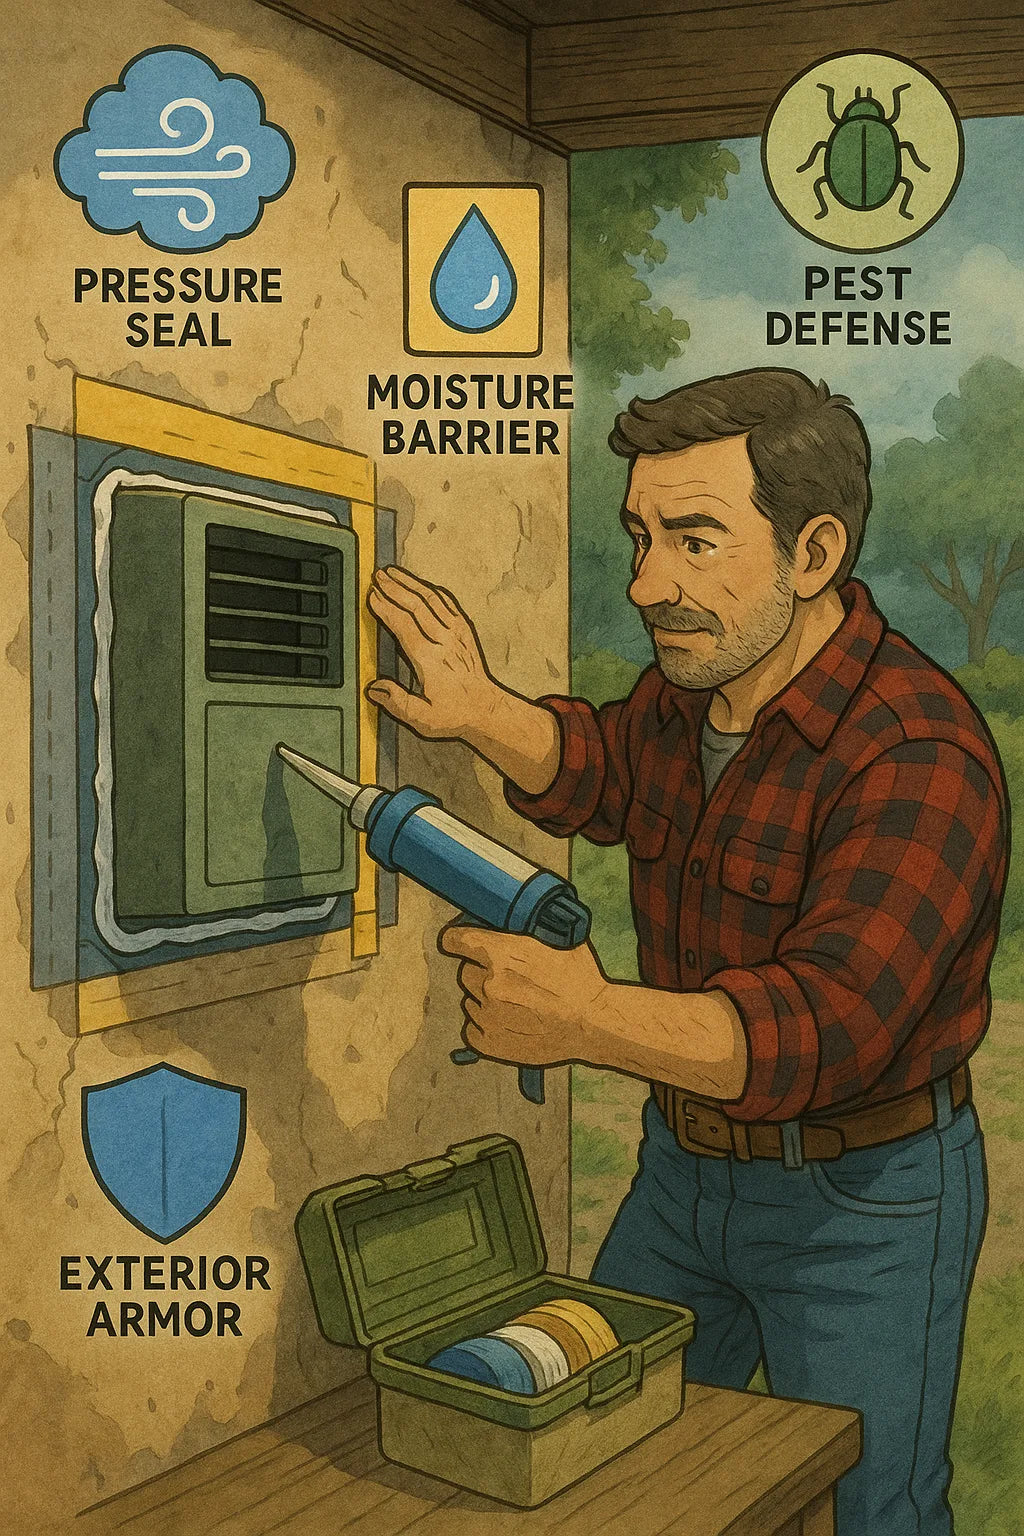
🧱 SECTION 2 — The 4-Layer Weather Lock (Overview)
Icon: 🧩
Mike’s Weather Lock Strategy consists of four independent but complementary layers:
Layer 1 — Pressure Seal Layer
Stops wind, cold drafts, and backdrafts.
Layer 2 — Moisture Barrier Layer
Prevents rain, condensation, and humidity infiltration.
Layer 3 — Pest & Particulate Shield Layer
Blocks bugs, insects, spiders, pollen, and dust.
Layer 4 — Exterior Armor Layer
Seals the sleeve against wind shear, UV exposure, and siding movement.
Each layer uses a different technique and different materials.
Together they rebuild the wall’s envelope around the sleeve.
🌬️ SECTION 3 — Layer 1: The Pressure Seal (Airflow Barrier)
Icon: 💨
This is the most important layer for comfort and energy efficiency.
Without a pressure seal, you'll feel:
-
Cold drafts in winter
-
Hot drafts in summer
-
Weird temperature fluctuations
-
Inefficient heating & cooling
-
High utility bills
-
Backdrafting (air reversing direction)
🧪 Mike’s Pressure-Seal Materials
Mike uses:
-
High-density foam backer rods
-
Low-expansion polyurethane foam
-
Silicone air-seal caulk
-
Neoprene gasket strips
-
Sleeve perimeter weatherstripping
🔧 Mike’s Airflow-Sealing Process
Step 1 — Backer rod placement
Mike places foam backer rods in the interior perimeter gap.
This does not seal the gap—
It shapes the gap so sealant sits correctly and doesn’t fall through.
Step 2 — Low-expansion foam injection
He uses foam specifically labeled:
“Low expansion” or “Window and Door safe.”
High-expansion foam will warp the sleeve or twist the framing.
He applies foam:
-
Along the left and right cavity gaps
-
Beneath the sleeve bottom
-
Around the upper cavity edge
Step 3 — Interior silicone sealing
Once the foam cures, Mike locks it with a continuous silicone bead.
Silicone = flexibility
Latex caulk = cracks within months
Silicone never cracks, even with temperature changes.
This creates a complete air seal.
🌧️ SECTION 4 — Layer 2: The Moisture Barrier
Icon: 💧
Through-the-wall ACs face three moisture threats:
-
Exterior rain
-
Wind-driven moisture
-
Interior condensation dripping down the sleeve
If moisture infiltrates the wall cavity, it causes:
-
Mold
-
Mildew
-
Rot
-
Termite attraction
-
Insulation degradation
-
Odors
-
Siding blistering
Mike treats moisture like the enemy it is.
🧰 Moisture Barrier Materials
-
Exterior-grade flashing tape
-
WRB-compatible sealant
-
Acrylic flashing caulk
-
Bottom-side drip channel
-
End-grain wood sealant (if applicable)
🔨 Mike’s Moisture-Sealing Steps
Step 1 — Exterior flashing tape
Mike applies waterproof flashing around:
-
Top edge
-
Side edges
-
Bottom exterior edge
He extends tape at least 4–6 inches past the sleeve perimeter to tie into the home’s WRB.
This ensures water doesn’t sneak behind the sleeve.
Step 2 — Bottom drip channel
Mike cuts or installs a tiny drip ledge (1/8–1/4") under the sleeve exterior.
This protects siding from long-term saturation.
Step 3 — Sill sealing
Mike seals any exposed end-grain wood where the opening was cut.
Unsealed wood = sponge for moisture.
Step 4 — Upper water-header flashing
He adds a final cap flashing above the sleeve—
just like window installers do.
It diverts rain away from the sleeve, not onto it.
🐞 SECTION 5 — Layer 3: Pest & Particulate Defense
Icon: 🐜
If you’ve ever seen:
-
Beetles
-
Ants
-
Spiders
-
Stinkbugs
-
Wasps
-
Mosquitos
…crawl through a wall unit, you know why this layer exists.
An AC sleeve is warm in winter and moist in summer—
Perfect for pests.
🧱 Mike’s Pest-Defense Materials
-
Stainless-steel mesh screen
-
Silicone gap barrier
-
PVC corner shields
-
Bug-resistant foam strips
-
Anti-insect flashing caps
🛡️ How Mike Builds Pest Defense
Step 1 — Mesh installation
Mike places stainless steel mesh behind the exterior grille—
not visible, but blocks pests.
Plastic mesh breaks down in UV.
Stainless lasts decades.
Step 2 — Gap sealing
Any remaining micro gaps get silicone.
Mike never uses caulk here—it cracks.
Step 3 — Insect-resistant foam
Installed along the interior corners.
Step 4 — Exterior grille check
Mike ensures:
-
No cracks
-
No missing louvers
-
No oversized airflow holes
If the grille has wide slats, he upgrades to a tighter pattern.
🪨 SECTION 6 — Layer 4: The Exterior Armor
Icon: 🛡️
This layer protects the sleeve against:
-
UV damage
-
Wind pressure
-
Siding expansion
-
Freeze/thaw cycles
-
Dust storms
-
Driving rain
-
Snow buildup
-
Tree pollen and debris
💼 Exterior Armor Materials
-
Exterior-grade silicone
-
Plastic or aluminum trim rings
-
Vinyl siding blocks
-
UV-stabilized sealing strips
-
Exterior-grade screws with neoprene washers
🔧 How Mike Builds Exterior Armor
Step 1 — Exterior trim ring installation
This strengthens the sleeve structure and blends the opening into the siding.
Step 2 — Wind shear reinforcement
Mike adds small neoprene washers to prevent wind rattle.
Step 3 — UV shield application
He uses a UV-stable silicone bead along the exposed seams.
UV destroys cheap caulks—
Silicone survives.
Step 4 — Siding gap stabilization
If the siding flares outward around the sleeve, Mike installs siding blocks or trim to prevent water intrusion.
🌬️ SECTION 7 — Why the Weather Lock Strategy Prevents Backdrafts
Icon: 🔄
Backdrafts happen when wind pushes through the sleeve or the house is under negative pressure.
Mike’s Layer 1 & 4 seal system stops air from:
-
Reversing direction
-
Whistling around the flange
-
Entering the wall cavity
-
Creating pressure pockets
The result?
A completely stable thermal boundary.
🌡️ SECTION 8 — Climate Benefits of the Weather Lock
Icon: 🌎
Mike’s seal method drastically improves HVAC performance.
Benefit 1 — Higher cooling efficiency
No hot air leaking in.
Benefit 2 — Stronger heating performance
No cold air infiltration.
Benefit 3 — Quieter operation
No wind noise.
Benefit 4 — Longer AC lifespan
Sleeves and units stay dry and stable.
Benefit 5 — Better indoor air quality
No pollen or pollutants sneaking in.
🔧 SECTION 9 — How Most DIY Installs Fail
Icon: ⚠️
Mike sees the same problems over and over:
❌ Using GREAT STUFF high-expansion foam
(ruins sleeves, twists framing)
❌ Not sealing the exterior sheathing
(allows water to bypass siding)
❌ Ignoring the bottom edge
(water sits and rots the sill plate)
❌ Using latex caulk outside
(cracks within one year)
❌ Leaving mesh out
(bugs enter instantly)
❌ Relying on the AC’s internal flaps
(these are NOT weather barriers)
❌ Not installing a drip channel
(water runs backward)
Mike says:
“Your AC unit shouldn’t fight the weather.
The wall should.”
🛡️ SECTION 10 — Why the 4-Layer Weather Lock Delivers a 20+ Year Seal
Icon: 🔒
Each layer has a different job.
Together, they create a system that:
-
Moves with thermal expansion
-
Stays flexible
-
Blocks air
-
Resists water
-
Resists insects
-
Maintains pressure balance
-
Protects framing
-
Supports long-term AC performance
This is why Mike’s installs do not require seasonal maintenance, patching, or resealing.
🔗 SECTION 11 — Verified External References
These links support best practices Mike uses:
-
Building Science Corporation – Wall Moisture & Cavity Pressure
https://www.buildingscience.com/ -
U.S. Department of Energy – Moisture Management & Wall Integrity
https://www.energy.gov/ -
NFPA – Electrical Requirements for Room Air Conditioners
https://www.nfpa.org/ -
Family Handyman – Understanding Stud Walls & Hidden Utilities
https://www.familyhandyman.com/ -
HUD Residential Construction Guide – Structural Load Path Basics
https://www.huduser.gov/ -
EPA Indoor Moisture & Ventilation Guide
https://www.epa.gov/
🏁 Conclusion — The Weather Lock Strategy Is the Difference Between “Installed” and “Protected”
A through-the-wall AC sleeve is only as good as the wall it sits in.
If the wall is vulnerable, the unit will struggle.
Wind, pests, water, and drafts will eventually force repairs.
But Mike’s Weather Lock Strategy gives homeowners a 4-layer structural defense, ensuring:
-
No wind infiltration
-
No bug intrusion
-
No water entry
-
No mold risk
-
No air leakage
-
No long-term damage
This strategy restores the wall’s original weather barrier—and often makes it better than before the hole was cut.


