🏠 1. Introduction — The Uneven Heat Dilemma
You can buy the best furnace on the market… but if your home wasn’t designed for even airflow, no amount of BTUs will fix uneven heating.
Many homeowners experience this every winter:
-
The upstairs is stifling.
-
The basement feels like a walk-in freezer.
-
The main level can’t decide which side to join.
It’s not your imagination. It’s physics.
Heat rises, airflow follows the path of least resistance, and every home has its own thermal fingerprint.
Most builders size furnaces based on square footage, not airflow paths or vertical layout. The result? Homes that are too warm on one level and too cold on another — no matter how expensive the furnace.
80,000 BTU 96% AFUE Upflow/Horizontal Two Stage Goodman Gas Furnace - GR9T960804CN
That’s where Samantha’s 3-Zone Strategy comes in.
It’s a proven sizing framework that helps homeowners balance uneven layouts by combining zoning logic, sensor data, and two-stage furnace behavior.
Instead of fighting the imbalance, this strategy works with the way heat actually moves through your home.
⚙️ 2. Why Two-Stage Furnaces Change the Sizing Rules
Before two-stage technology, furnaces were either on or off. They heated at full capacity all the time, overshooting comfort on mild days and short-cycling in shoulder seasons.
A two-stage furnace has two distinct firing levels:
-
Stage 1: Low heat (≈ 60–70% capacity) for normal days.
-
Stage 2: Full output for extreme cold.
This flexibility means your furnace can match real-time heating demand instead of constantly overpowering it.
It also allows homeowners — and pros like Samantha — to “right-size” more confidently. With Stage 1 doing 80–90% of the work, the system avoids the biggest problem in heating: oversizing.
🔗 Learn more about how two-stage efficiency is calculated: Energy.gov – Furnaces and Boilers
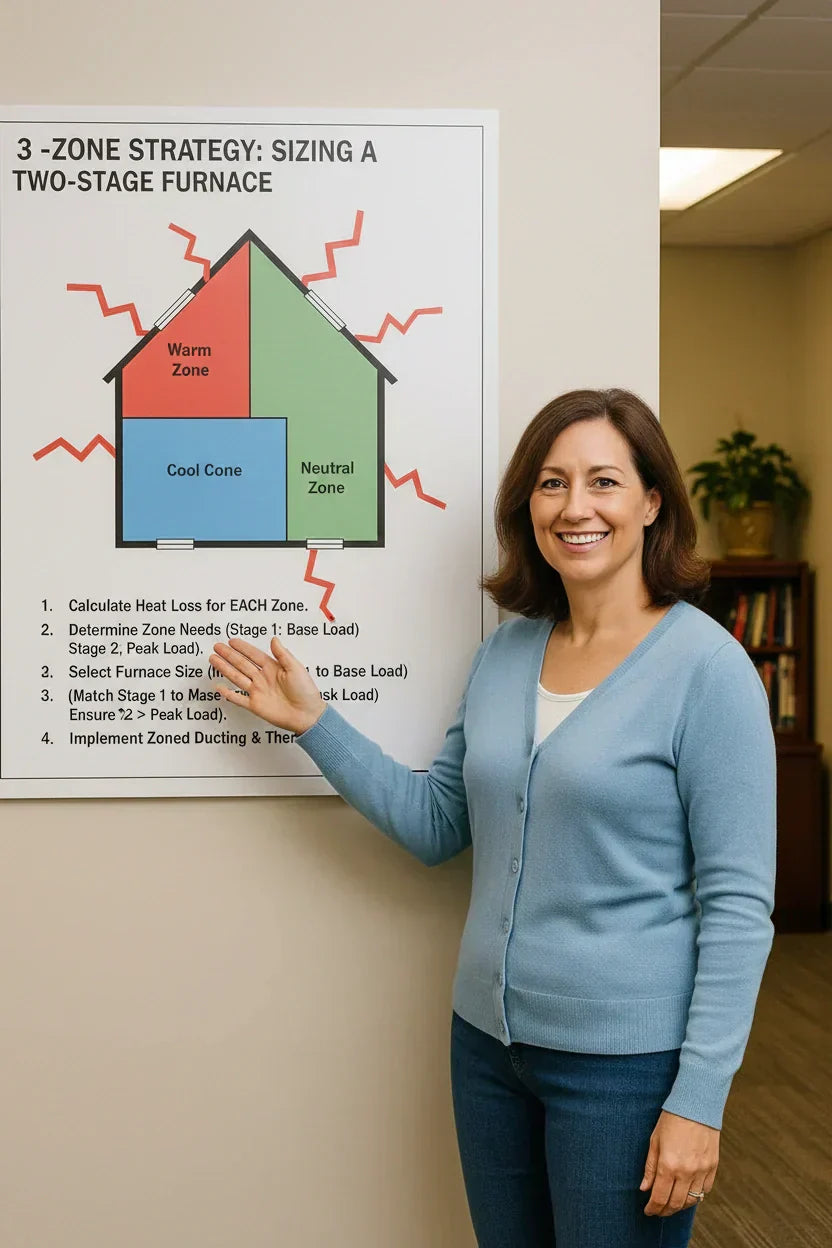
🌡️ 3. Samantha’s 3-Zone Home Model
Every house, regardless of layout, can be divided into three temperature zones based on thermal load behavior.
| Zone | Description | Typical Problem | Heat Demand Share |
|---|---|---|---|
| Zone A – The Core | The main living area where the thermostat usually sits. | Often comfortable, but overheats first. | ≈ 40–50 % |
| Zone B – The Extremes | Farther rooms, upstairs, or basements away from the thermostat. | Under-heating or lag behind Stage 1. | ≈ 30–40 % |
| Zone C – The Envelope | Entryways, attics, bonus rooms, over-garage spaces. | Rapid heat loss during cold snaps. | ≈ 10–20 % |
This 3-zone map forms the backbone of Samantha’s sizing strategy.
Instead of treating your home as one thermal mass, she treats it like three interacting environments with unique BTU needs.
📏 4. Step 1 – Measure Real-World Temperature Drift
Before running calculations, Samantha always starts with data — because sizing without measurement is guesswork.
How to do it
-
Set your thermostat to 65 °F overnight.
-
Record the indoor low temperature by morning.
-
Note the outdoor low from a weather app or sensor.
-
The difference equals your home’s heat-loss rate overnight.
| Drift | Meaning |
|---|---|
| 1–3 °F drop | Tight, efficient envelope |
| 4–6 °F drop | Moderate loss |
| 7–10 °F drop | Significant leakage |
| 10 °F + | Severe heat loss |
This drift test helps identify whether uneven heating is caused by load imbalance (zone issue) or envelope leakage (insulation/air sealing).
📡 5. Step 2 – Deploy Smart Sensors for Each Zone
Smart temperature sensors are the secret weapon of modern sizing.
They show what the thermostat can’t see — the real performance in remote rooms.
Samantha typically recommends placing one sensor in each zone:
-
Zone A: main hallway or living area
-
Zone B: coldest room or upstairs bedroom
-
Zone C: basement or bonus room
After a week, export the temperature graphs and identify average differences between zones.
If the difference between Zone A and Zone B exceeds 3 °F during normal operation, you’re not facing a thermostat issue — you’re facing a zonal sizing problem.
🧮 6. Step 3 – Estimate Each Zone’s Heat Load Share
Using the data, Samantha allocates heating demand percentages:
| Zone | Floor Area | Load Share | Notes |
|---|---|---|---|
| A – Core | 1,000 sq ft | 45 % | Closest to thermostat |
| B – Extremes | 900 sq ft | 35 % | Far rooms, upstairs |
| C – Envelope | 500 sq ft | 20 % | Basement, entry, attic |
Total = 2,400 sq ft → 100 % load
If the total required output for the home is 95,000 BTU/hr, she divides it:
-
Zone A ≈ 43,000 BTU
-
Zone B ≈ 33,000 BTU
-
Zone C ≈ 19,000 BTU
This simple distribution ensures your two-stage furnace can meet the sum of all zones without oversizing.
⚡ 7. Step 4 – Convert Heating Load to Furnace Input
Furnaces are rated by input BTUs, but what matters is output (after efficiency losses).
Formula:
Output = Input × AFUE (%)
If you need 95,000 BTU output and choose a 96% AFUE furnace:
95,000 ÷ 0.96 = ≈ 99,000 BTU input
So a 100 k two-stage furnace is ideal — the low stage delivers ~65 k BTUs (covering Zones A + B most days), and the high stage covers Zone C during cold extremes.
🌬️ 8. Step 5 – Verify Duct Capacity per Zone
Sizing the furnace correctly doesn’t matter if your ducts choke airflow.
Samantha checks whether each zone can deliver the cubic feet per minute (CFM) required.
Rule of thumb: ~400 CFM per 12,000 BTUs of heat output.
Using the earlier example:
95,000 BTUs ÷ 12,000 = ≈ 7.9 “tons” → 7.9 × 400 = 3,160 CFM total.
If Zone B only gets 800 CFM instead of 1,100 CFM, that zone will always lag.
🔗 For detailed duct guidelines, see:
ACCA Manual D – Residential Duct Design
🧊 9. Step 6 – Balance Staging Logic with Thermostat Programming
Two-stage furnaces don’t automatically fix uneven heating — the thermostat’s staging logic matters just as much.
Samantha’s rule of thumb:
-
Stage 1 runtime target: ≈ 15–25 minutes
-
Stage 2 trigger: when indoor temp drifts > 2 °F below setpoint or runtime > 30 min
Many modern thermostats allow you to fine-tune these thresholds. Setting them properly prevents the furnace from jumping to Stage 2 too early — which causes overshoot and energy waste.
📉 10. Step 7 – Fine-Tune Airflow Dampers by Zone
After confirming duct CFM, Samantha fine-tunes the manual dampers or zoning controls feeding each area.
Typical adjustments:
-
Slightly close supplies to Zone A (core) to push more air to B and C.
-
Keep return paths unrestricted.
-
Balance until each zone maintains ± 2 °F of difference under Stage 1 operation.
These tweaks often deliver > 90 % of comfort improvement without changing equipment.
🧠 11. Common Sizing Mistakes in Uneven Homes
Even experienced homeowners fall into these traps:
❌ Oversizing “to reach upstairs faster”
Result: short-cycling, hot blasts, humidity loss.
❌ Ignoring return air upstairs
Without returns, pressure blocks warm air from circulating.
❌ Forgetting the basement’s load
Basements leak heat slowly; when ignored, they steal airflow from upper levels.
❌ Misusing thermostats in separate zones
If two thermostats compete (one per floor) without synchronized staging, they cancel each other out.
❌ Not adjusting blower speed after install
Many two-stage furnaces ship with “factory high” blower settings tuned for AC, not heating. Lowering speed on Stage 1 smooths out comfort dramatically.
🧾 12. Samantha’s 3-Zone Diagnostic Table
| Zone | Sensor Trend | Likely Issue | Recommended Fix |
|---|---|---|---|
| A – Core | Short cycles < 10 min | Oversized stage 1 capacity | Increase stage-switch delay |
| B – Extremes | 3–5 °F below Zone A | Airflow imbalance | Adjust dampers / add return |
| C – Envelope | > 8 °F swing day-night | Envelope leakage or duct loss | Seal ducts, insulate, use Stage 2 more selectively |
🌎 13. Environmental and Efficiency Benefits
Balancing your zones doesn’t just improve comfort — it reduces emissions and fuel waste.
According to ENERGY STAR, a properly sized and balanced heating system can save up to 20 % on annual energy use by eliminating cycling losses and temperature overshoot.
🔗 Reference:
ENERGY STAR – Home Heating Efficiency Basics
🔧 14. Samantha’s Field Example
Case Study: 2,400-sq-ft colonial, Michigan
-
Original furnace: 100 k BTU single-stage
-
Problem: Basement cold, upstairs sweltering
-
Sensors: Zone A 69 °F, Zone B 65 °F, Zone C 58 °F
-
Airflow: 1,800 CFM instead of 3,000
Solution
-
Installed 96 % AFUE two-stage (100 k input)
-
Rebalanced ducts to 3,100 CFM total
-
Stage 1 handles ≈ 90 % of season load
-
Basement sealed rim joists and added return
Result:
-
Runtime Stage 1 = 22 min average
-
Temperature spread = 1.8 °F
-
Gas use down 18 % year-over-year
That’s the 3-Zone Strategy at work.
💡 15. When to Upgrade vs. When to Tune
When tuning is enough:
-
Stage 1 handles ≥ 80 % of demand
-
Zones within ± 3 °F of each other
-
Short-cycling rare
When upgrading makes sense:
-
Furnace > 25 % oversized or undersized
-
Frequent Stage 2 runtime > 50 % of heating season
-
Noisy duct pressure or airflow > target CFM
Remember: upgrading ducts or airflow components is sometimes cheaper and more effective than changing the furnace.
🧩 16. Samantha’s Simplified Load Re-Check Formula
After adjustments, Samantha verifies the final load using this simple field formula:
Where:
-
CFM = measured airflow per zone
-
ΔT = temperature rise (supply – return)
If your two-stage furnace’s Stage 1 output equals or slightly exceeds the measured load at design conditions, sizing is perfect.
🔒 17. Air Quality and Comfort Gains
Proper zoning and sizing also improve air quality and noise control.
-
Longer Stage 1 cycles filter air more effectively.
-
Even airflow reduces hot-cold convection that stirs up dust.
-
Lower blower speeds cut mechanical noise by up to 5 dB.
🔗 Learn more about IAQ and duct impacts:
EPA – Indoor Air Quality Basics
🧭 18. Samantha’s 3-Zone Strategy in Action — Your DIY Checklist
✅ Step 1 – Map your zones
Sketch a floor plan and mark A, B, C zones based on comfort.
✅ Step 2 – Install three sensors
Log 7 days of temperature data.
✅ Step 3 – Run the drift test
Identify envelope leaks before blaming your furnace.
✅ Step 4 – Measure vent ΔT and estimate CFM
Cheap anemometers or pro audits work fine.
✅ Step 5 – Re-balance dampers and returns
Target ± 2 °F difference between zones.
✅ Step 6 – Review staging logic
Delay Stage 2 engagement until it’s actually needed.
✅ Step 7 – Confirm total runtime per stage
Stage 1 should run 80–90 % of the time.
✅ Step 8 – Document improvements
Compare gas bills and comfort after changes.
📊 19. Quick Reference Chart — Samantha’s Sizing Targets
| Home Size | Climate Zone | Typical Output Furnace | Stage 1 Runtime | Expected Savings |
|---|---|---|---|---|
| 1,800–2,200 sq ft | Mild (Zone 3–4) | 70–80 k BTU output | 20 min | 15 % |
| 2,200–2,800 sq ft | Cold (Zone 5–6) | 90–100 k BTU output | 22 min | 18 % |
| 3,000 sq ft + | Very Cold (Zone 7) | 110–120 k BTU output | 25 min | 20–25 % |
🧰 20. Pro Tips from Samantha’s Field Notes
-
Don’t oversize to heat that one cold room — fix its duct instead.
-
Add zoning dampers if the home is > 2 stories or > 2,500 sq ft.
-
Seal ducts in unconditioned spaces. Up to 20 % of air is lost otherwise.
-
Check blower tables when adjusting CFM.
-
Use smart thermostats capable of adaptive staging.
🔗 Technical airflow standards:
Building Performance Institute – HVAC Performance Standards
🎯 21. Conclusion — Size Smart, Not Big
When your home isn’t naturally balanced, it’s tempting to buy a bigger furnace and hope brute force fixes the problem. It won’t.
Samantha’s 3-Zone Strategy shows that the key to comfort lies in precision, not power.
By dividing your home into zones, using sensors for data, tuning airflow, and leveraging two-stage technology, you can:
-
Eliminate temperature swings
-
Reduce gas consumption
-
Extend equipment life
-
Enjoy even, quiet comfort on every level
As Samantha puts it:
“You don’t heat a house with horsepower — you heat it with harmony.”
With a balanced 3-Zone approach, your furnace finally stops fighting your home’s design and starts working with it.
Buy this on Amazon at: https://amzn.to/4hJt23t
In the next topic we will know more about: Is 80,000 BTUs Too Much? Samantha’s Load-Math Framework for Homes from 1,200–2,400 Sq Ft


