🛠️ Why Maintenance Matters More Than You Think
Your MRCOOL DIY system may be self-installed, but it’s not maintenance-free. Just like a car needs oil changes, a mini split needs:
-
✅ Clean filters
-
✅ Clear condensate lines
-
✅ Safe, dry electronics
-
✅ Seasonal coil cleanings
If ignored, even a new system can suffer from:
-
Poor airflow
-
Higher energy bills
-
Compressor stress
-
Shortened system lifespan
In this guide, Mark walks through his DIY maintenance plan for his MRCOOL 48k 4-zone system — so you can keep yours running like new.
📋 Supplies You’ll Need
Here’s what Mark keeps in his HVAC maintenance tote:
| Tool / Supply | Use Case |
|---|---|
| Microfiber cloth | Dusting vents and panels |
| Foaming coil cleaner | Indoor & outdoor coil cleaning |
| Garden sprayer or hose | Outdoor condenser rinse |
| Wet/dry vacuum (or turkey baster) | Cleaning condensate drain line |
| Soft bristle brush | Removing lint from filters |
| HVAC fin comb (optional) | Straightening bent fins |
| Flashlight | Inspecting line sets and coils |
| Gloves and goggles | Safety during chemical cleaning |
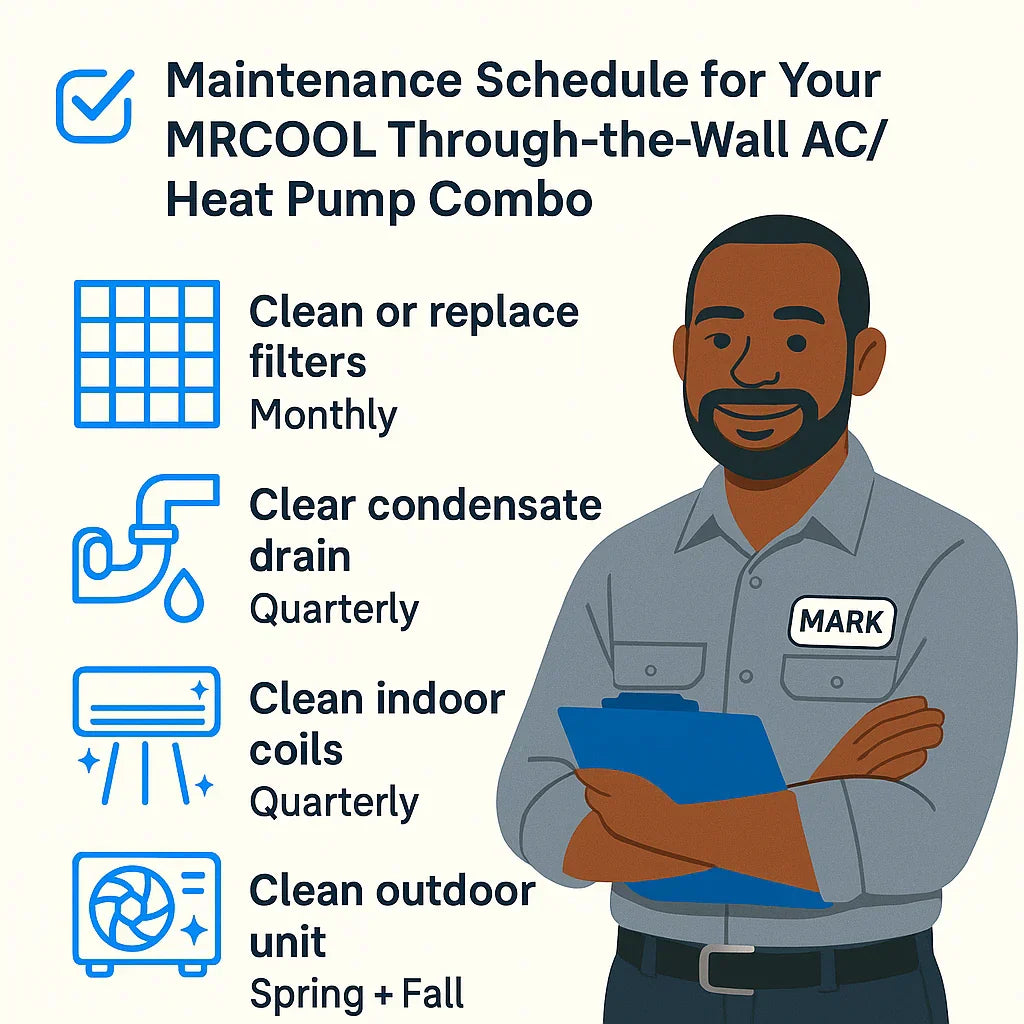
📅 Mark’s Maintenance Schedule
| Task | Frequency |
|---|---|
| Clean air filters | Monthly |
| Inspect & clear drain lines | Quarterly |
| Rinse indoor coils | Quarterly |
| Clean condenser (outdoor unit) | Semiannually |
| Check line set insulation | Annually |
| Verify app and firmware | Annually |
| Clear leaves/debris from around condenser | As needed |
🧽 Step 1: Clean or Replace Air Filters (Monthly)
Each indoor wall unit includes reusable mesh filters behind the front panel.
How Mark Cleans Filters:
-
Turn off unit and unplug (for safety).
-
Flip open front panel — gently remove both filters.
-
Rinse under warm water with light soap.
-
Air dry completely before reinstalling.
-
Wipe down vent louvers with microfiber cloth.
📎 Important: Never use bleach or harsh solvents, which can degrade plastic and mesh.
💧 Step 2: Clear the Condensate Drain Line (Quarterly)
The drain line routes condensation away from each indoor unit. If clogged, you could get:
-
Water leaks
-
Moldy smells
-
Wall staining
How Mark Clears Drain Lines:
-
Connect a wet/dry vac to the end of the exterior drain hose
-
Turn on for 30–60 seconds
-
Add 1/4 cup of vinegar to the indoor drain tray to disinfect
🛠️ Tip: If you hear gurgling, your drain line might be partially blocked.
🌀 Step 3: Clean the Indoor Coils (Quarterly)
Dust and pet dander can coat the evaporator coils behind your filters, reducing cooling power and encouraging mold.
Tools:
-
No-rinse foam coil cleaner
-
Soft brush
-
Paper towels or microfiber cloth
How Mark Does It:
-
Power off system.
-
Remove front panel and filters.
-
Spray coil cleaner directly on fins — allow to foam and drip.
-
Wipe or brush off debris after 15–20 mins.
-
Let dry fully before restarting unit.
🌿 Step 4: Clean the Outdoor Condenser (Spring + Fall)
The condenser coil is exposed to leaves, bugs, pollen, and more. If clogged, your unit will:
-
Run hotter
-
Use more electricity
-
Overwork the compressor
Mark’s Cleaning Routine:
-
Power off system at disconnect box.
-
Use soft brush or leaf blower to remove debris.
-
Rinse coils gently with garden hose (or coil cleaner + rinse).
-
Straighten any bent fins with a fin comb.
-
Ensure 2–3 feet clearance around unit.
🧊 Step 5: Inspect Line Sets and Insulation (Annually)
Line sets deliver refrigerant from your outdoor unit to your zones. Over time:
-
UV exposure can crack insulation
-
Moisture can enter couplers
-
Rodents may chew through foam wrap
Inspection Points:
-
Check for exposed copper or frayed insulation
-
Ensure couplers are tightly sealed (no oily residue)
-
Verify line set covers are secure and sealed at wall entries
If damaged:
-
Re-wrap with UV-rated insulation tape
-
Replace coupler insulation sleeves
🧠 Step 6: Verify Firmware, App, and Thermostat Settings
Mark’s MRCOOL system uses the SmartHVAC app, which gets updates throughout the year.
Annual Tasks:
-
Check app store for SmartHVAC updates
-
Re-pair if experiencing lag or dropped connection
-
Update zone names for clarity (e.g., "Guest Room" vs. "Zone 3")
-
Refresh geofencing or schedules if routines change
🛡️ Bonus: Preventative Maintenance Tips
✅ Use These:
-
Surge protector for the outdoor condenser
-
Weatherproof caulk around wall penetrations
-
UV-protective line set covers
❌ Avoid These:
-
Running system during construction/drywall work
-
Covering outdoor unit with tarps (traps moisture)
-
Using bleach inside drain trays
📎 Maintenance Log Template
| Date | Task | Notes |
|---|---|---|
| Jan 15 | Filter clean, drain flush | All zones OK |
| Apr 20 | Condenser rinse, filter swap | Light dust on coil 2 |
| Jul 10 | App update + new schedule | Added guest room use |
| Oct 1 | Drain flush, fin comb | Slight blockage cleared |
✅ Final Thoughts: Mark’s Maintenance Motto
“Don’t wait until it breaks. 15 minutes a month keeps your system quiet, clean, and efficient.”
By following this simple maintenance plan, you can:
-
Extend your MRCOOL system’s lifespan
-
Avoid preventable breakdowns
-
Lower your energy bills
-
Keep every room comfortable all year
In the next topic we will read more about: Troubleshooting Guide: What to Do If Your Wall Unit Isn’t Heating or Cooling Properly


