🏡 Introduction: Why Maintenance Matters More Than You Think
When I first installed my Goodman 3 Ton 15.2 SEER2 R-32 Dual-Fuel System, I was excited about its high efficiency and the promise of lower utility bills. For the first few months, everything ran perfectly — quiet, steady, and powerful.
Then summer rolled around. My home didn’t cool quite as fast as before, and the electric bill ticked up just a little. I figured it was normal — until I opened the outdoor condenser and saw it coated in dust and pollen.
That’s when I realized: even the best equipment needs regular care.
Maintenance isn’t just for when something breaks — it’s how you keep your system efficient, reliable, and long-lasting.
Whether you’re running a Goodman R-32 system or another high-efficiency unit, this step-by-step guide covers everything I’ve learned about keeping it running smooth all year round.
🔄 1. The Annual Maintenance Mindset
Every HVAC system has two sides: heating and cooling. Both need seasonal attention.
Skipping maintenance even for one year can cause:
-
Reduced efficiency (higher bills)
-
Dirty coils that trap heat
-
Refrigerant imbalance
-
Early compressor or blower failure
Think of it like your car — if you never change the oil, performance declines long before the engine fails.
🧰 What a Professional Tune-Up Includes
Even if you prefer DIY, it helps to know what pros check during an annual service:
-
Coil and blower cleaning
-
Filter replacement
-
Refrigerant level verification
-
Electrical connection tightening
-
Combustion analysis (for furnaces)
-
Safety and control checks
🌸 2. Spring: Cooling Prep & Coil Cleaning
Icon: 🌤️
When spring hits, it’s time to get your air conditioning ready for summer’s demands.
Here’s my Spring Start-Up Checklist:
✅ Clean the Outdoor Condenser Coils
-
Turn off power at the disconnect.
-
Remove debris and leaves from around the unit (keep 2 feet clearance).
-
Gently spray coils from top to bottom with a garden hose.
-
For tough grime, use a foaming coil cleaner rated for aluminum fins.
Dirty coils reduce your SEER2 efficiency by up to 15%.
✅ Inspect Refrigerant Lines
-
Look for cracks in the insulation on the larger suction line.
-
Replace damaged insulation with R-32-compatible tubing.
✅ Change Filters
Replace filters every 1–3 months. I use MERV 8 pleated filters — good balance of filtration and airflow.
✅ Flush the Condensate Drain
-
Mix 1 cup of white vinegar with 1 gallon of warm water.
-
Pour slowly into the condensate line to prevent algae buildup.
✅ Check Electrical Components
-
Inspect contactor for pitting or corrosion.
-
Verify that all terminals are tight.
-
Replace worn wire connectors or cracked conduit.
☀️ 3. Summer: Airflow & Efficiency Maintenance
Icon: 🌬️
Once temperatures climb, your system runs almost daily — making summer the most important time for airflow and efficiency checks.
🧾 Filter Routine
-
Replace every 30 days during high-use months.
-
Mark a reminder on your phone or thermostat app.
Clogged filters make your blower motor work harder, raising your electric bill and reducing cooling capacity.
🧊 Check the Temperature Split
-
Run the AC for 15 minutes.
-
Measure return air temperature and supply air temperature.
-
The difference should be 18–22°F.
If the split is smaller, you may have:
-
Low refrigerant
-
Dirty coil
-
Restricted airflow
🔇 Listen for Unusual Sounds
Rattling or hissing noises can signal loose panels, duct leaks, or pressure issues.
🌳 Maintain Clearance Around the Condenser
Keep at least 2 feet of clearance around the outdoor unit and 5 feet above it.
🍂 4. Fall: Furnace Prep & System Switchover
Icon: 🔥
When cooling season ends, it’s time to prepare for heating. The dual-fuel system’s gas furnace now takes over.
Here’s how I transition mine each fall:
✅ Clean Burners and Flame Sensor
-
Turn off power and gas.
-
Gently clean burners with compressed air or a soft brush.
-
Use fine steel wool on the flame sensor to remove oxidation.
A dirty flame sensor is one of the most common causes of furnace shutdowns.
✅ Inspect Exhaust Venting
-
Make sure PVC vent pipes are clear and properly sealed.
-
Check for moisture buildup at joints (sign of improper vent slope).
✅ Check Ignition System
-
Watch ignition cycle: the flame should be blue and steady.
-
Yellow or flickering flames may indicate poor combustion or dirty burners.
✅ Lubricate the Blower Motor (if applicable)
Some older models have oil ports on the blower — use a few drops of non-detergent motor oil.
✅ Change Filters Again
Before heating season starts, install a fresh filter to keep the heat exchanger clean.
🔗 National Comfort Institute – Importance of Combustion Testing
❄️ 5. Winter: Comfort & Performance Tune-Up
Icon: 🏠
Winter maintenance ensures your Goodman system stays reliable during freezing temperatures.
🔎 Check Thermostat Accuracy
Compare the reading with a portable thermometer. If there’s a difference of more than 2°F, recalibrate or replace the thermostat batteries.
🧯 Carbon Monoxide (CO) Safety
-
Install a CO detector near sleeping areas and near the furnace.
-
Test it monthly. Replace batteries every year.
🔄 Cycle the System
Run through heat, fan, and cool modes briefly to ensure switching functions properly — especially for dual-fuel setups that alternate between electric cooling and gas heating.
🚪 Check Vents and Returns
Ensure all vents are open and unobstructed by rugs or furniture. Blocked vents restrict airflow and cause uneven temperatures.
🧹 6. Deep Cleaning: Coils, Drains & Blower Assembly
Icon: 🧽
Even with good filters, dust still finds its way inside your system. Once or twice a year, I do a more thorough cleaning.
🌀 Evaporator Coil
-
Turn off power.
-
Remove coil access panel.
-
Use a no-rinse coil cleaner designed for aluminum.
-
Let dry completely before reassembling.
💧 Condensate Drain Pan
-
Flush with warm soapy water.
-
Pour diluted bleach solution (1:10 ratio) through the line to disinfect.
🌫️ Blower Assembly
-
Vacuum dust from blower wheel and housing.
-
Inspect for wobbling or uneven blades.
If you see oily residue or black soot, call a pro — it could indicate motor bearing failure.
⚡ 7. Safety & Electrical Inspection
Icon: ⚙️
Before touching anything electrical, turn off power at the disconnect or breaker panel.
⚡ Electrical Safety Steps
-
Tighten all terminal screws.
-
Inspect wires for cracking, fraying, or discoloration.
-
Check the run capacitor (a bulging top means it’s time for replacement).
-
Test breakers and fuses for continuity.
-
Confirm that the outdoor disconnect box is sealed from moisture.
If you’re not comfortable with electrical testing, schedule a licensed technician annually.
🧪 8. Refrigerant & System Performance
Icon: 🧊
R-32 refrigerant is highly efficient, but it operates under higher pressure than older R-410A. That means checking charge levels requires care.
Why Refrigerant Balance Matters
-
Too little refrigerant = poor cooling, frozen coils
-
Too much refrigerant = high pressure, compressor stress
Leave this one to the pros.
A licensed HVAC technician will:
-
Connect gauges to measure system pressure.
-
Check superheat and subcooling levels.
-
Ensure the charge matches factory specs.
🧯 9. Pro Maintenance vs. DIY: Finding the Balance
Some tasks are perfect for homeowners; others need professional tools and safety training.
| Task | DIY-Friendly | Hire a Pro |
|---|---|---|
| Filter replacement | ✅ | — |
| Cleaning condenser coils | ✅ | — |
| Electrical inspection | ⚠️ Basic visual only | ✅ Detailed |
| Refrigerant check | ❌ | ✅ Required by law |
| Combustion testing | ❌ | ✅ |
| Blower motor lubrication | ✅ | — |
| Duct sealing & balancing | ⚠️ Basic | ✅ Full pressure test |
If you like to stay hands-on, you can do 60–70% of maintenance yourself. But always schedule one professional inspection a year — especially for safety and refrigerant checks.
💡 10. Mike’s Takeaway: Maintenance Is Cheaper Than Repair
Maintenance might not be glamorous, but it’s powerful. A little time each season keeps your home comfortable and your system efficient for years.
Here’s what I’ve learned firsthand:
-
My system runs smoother when filters are clean.
-
My utility bills drop when coils and ducts stay clear.
-
And I haven’t had a single breakdown since I started regular seasonal care.
Preventive maintenance costs far less than repairs — a $100 tune-up now can prevent a $1,000 compressor failure later.
“Maintenance isn’t fixing what’s broken — it’s making sure it never breaks down when you need it most.”
Goodman builds solid systems, but consistent care keeps them great for decades.
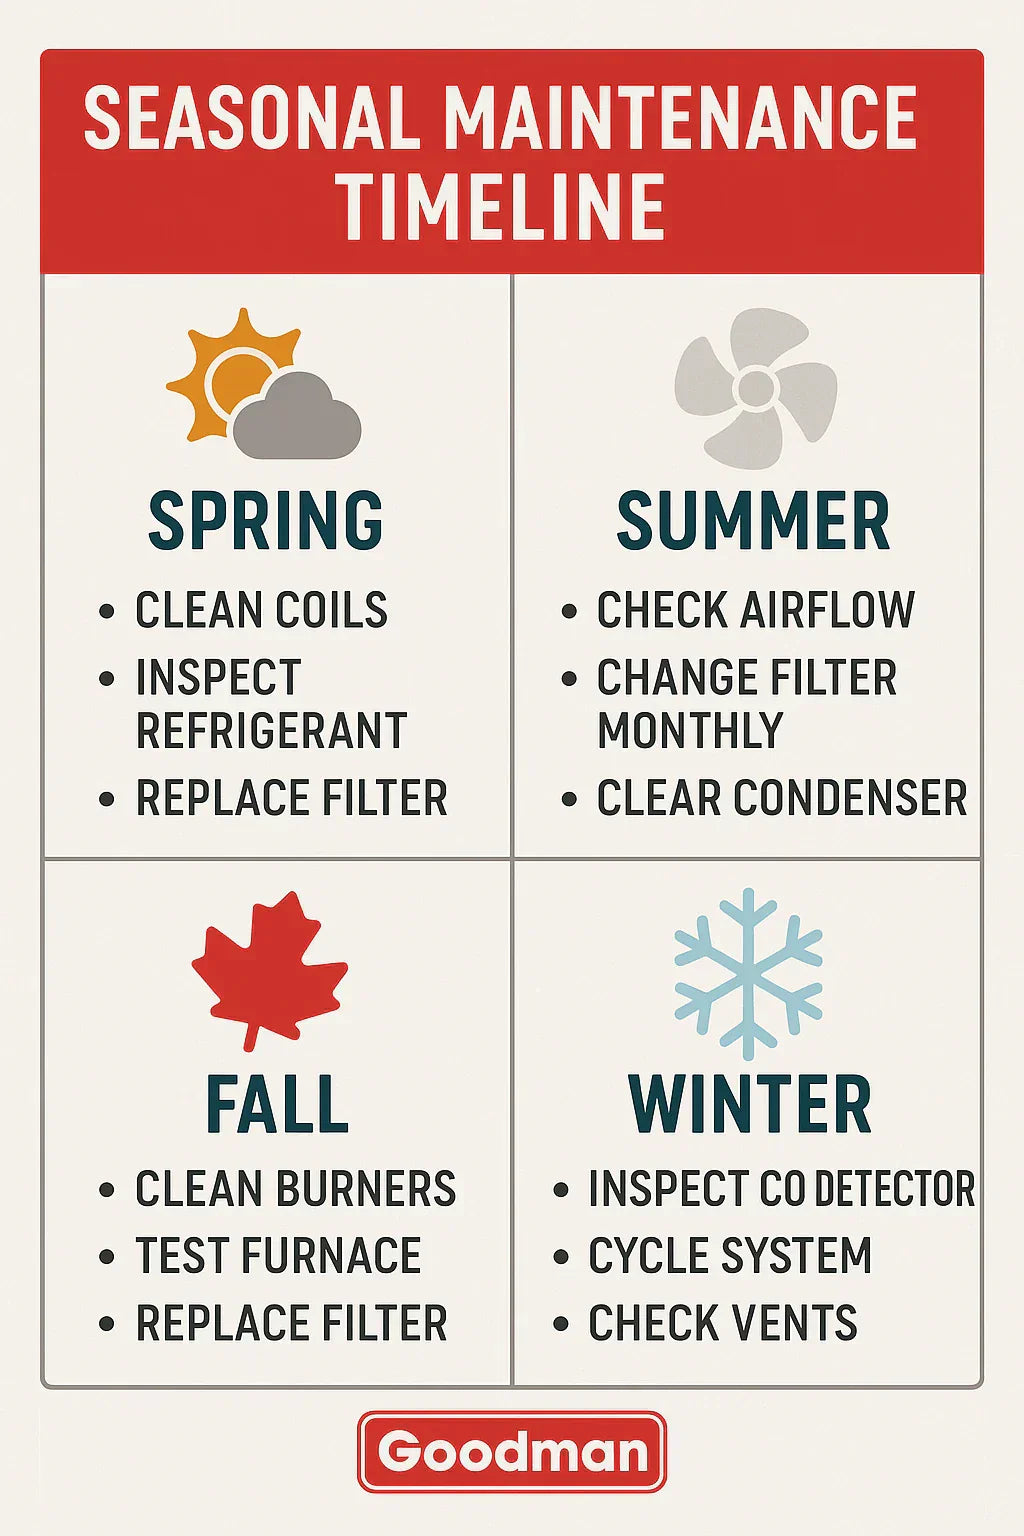
🗓️ Seasonal Maintenance Summary
| Season | Key Tasks | Why It Matters |
|---|---|---|
| Spring | Clean coils, replace filters, inspect drains | Prepares for cooling efficiency |
| Summer | Test temp split, monitor airflow, clear condenser | Maintains SEER2 performance |
| Fall | Clean burners, test furnace, replace filters | Ensures safe heating |
| Winter | Inspect CO detector, cycle system, check vents | Keeps dual-fuel balance steady |
🧩 Infographic: Seasonal Maintenance Timeline
Sections:
-
Spring: Coil cleaning, refrigerant inspection
-
Summer: Airflow & filter routine
-
Fall: Furnace prep, ignition checks
-
Winter: Comfort testing, CO safety
Design: Goodman red-gray-white palette, icons (leaf, sun, flame, snowflake), clean homeowner-style layout.
In the next topic we will know more about: What Mike Did When His System Stopped Cooling: A Troubleshooting Guide


