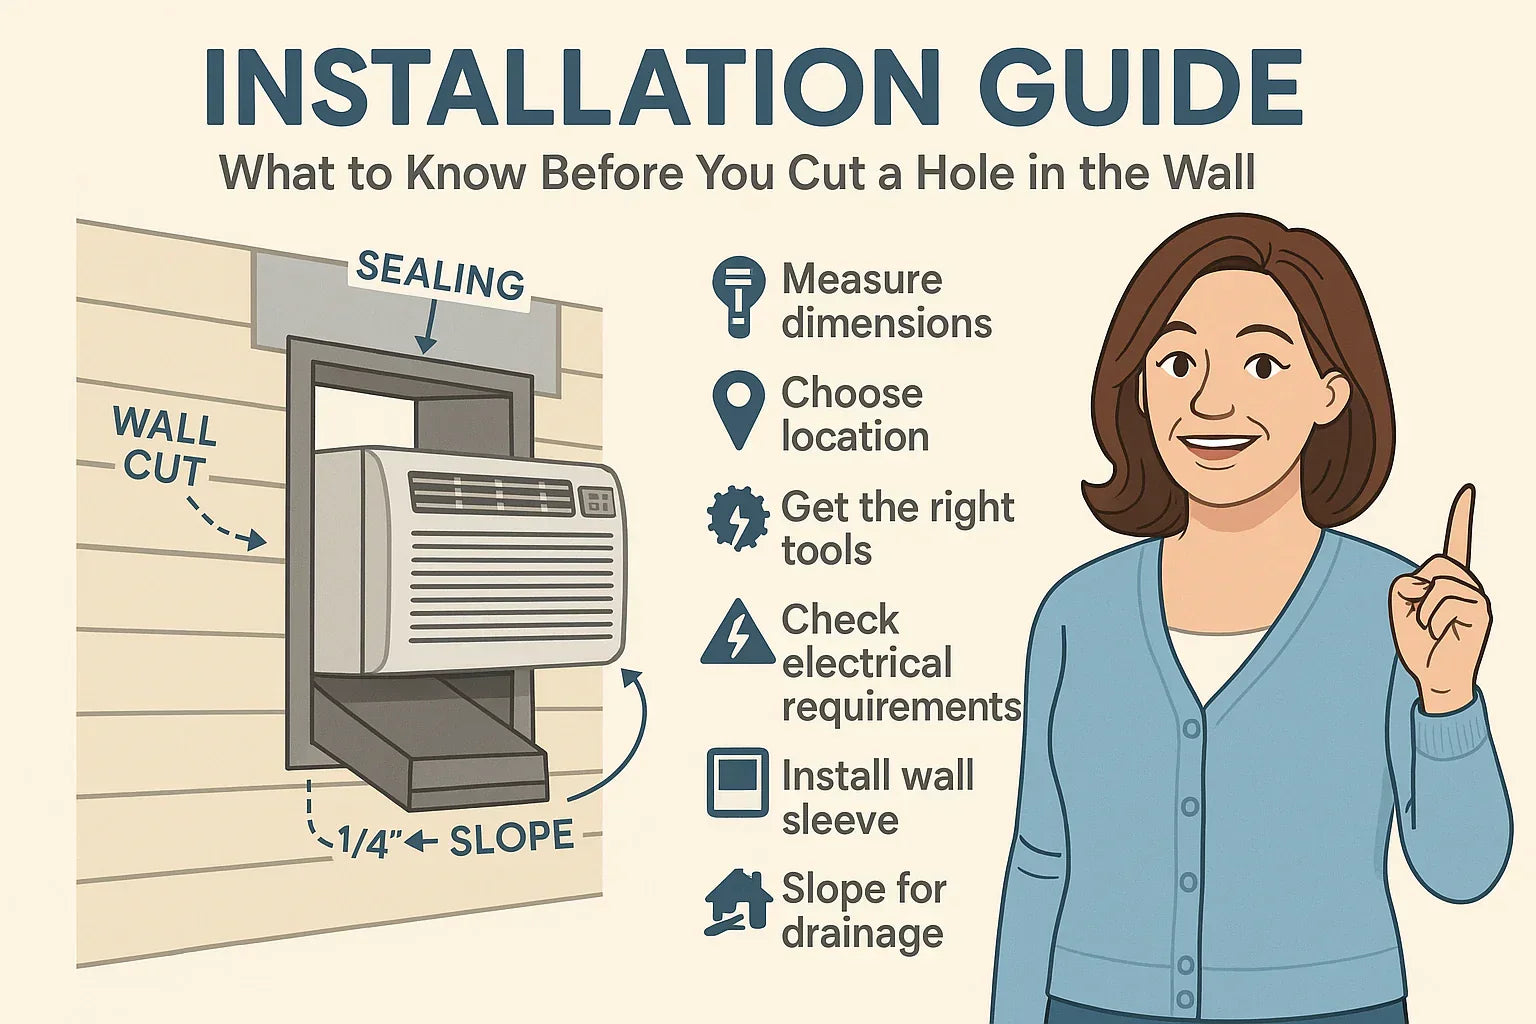
🧱 Installation Guide — What to Know Before You Cut a Hole in the Wall
When I decided to install my Amana 11,800 BTU Through-the-Wall Air Conditioner, I’ll admit — the idea of cutting a hole in my house made me nervous.
It’s not like hanging a picture or changing a filter. Once you cut, there’s no going back. But here’s the good news: with the right preparation, tools, and planning, installing a through-the-wall AC can be one of the most rewarding home upgrades you’ll ever do.
This guide walks you through everything you need to know before you start cutting, including what tools you’ll need, where to position the unit, and how to avoid costly mistakes.
🏠 1. Why Preparation Matters Before You Cut
Installing a through-the-wall air conditioner isn’t a quick Saturday afternoon project. You’re creating a permanent opening in your home’s exterior, which means you need to think about structure, insulation, and weatherproofing — not just cooling power.
I like to say:
“You can fix a crooked picture frame. You can’t fix a crooked wall cutout.”
Proper preparation means you’ll end up with:
-
A snug fit that seals properly
-
Lower noise and vibration
-
Higher energy efficiency
-
A longer-lasting unit
So, before you plug in the saw, take a breath — and take these next steps seriously.
📘 Reference: Energy.gov – Room Air Conditioners
📐 2. Step 1 — Measure Twice, Cut Once (and Then Measure Again)
Through-the-wall air conditioners like the Amana 11,800 BTU 115V model require precise openings. If the cutout is off by even half an inch, your unit may not slide in properly, or worse — your wall could lose structural integrity.
🔢 Start With the Wall Sleeve Dimensions
Your Amana AC will sit inside a wall sleeve, which acts as both a support bracket and weather barrier.
Most standard sleeves measure around 26 inches wide x 15.5 inches high, but always check your unit’s specification sheet for the exact cutout.
🧰 What to Measure:
-
Wall thickness: Most units work with walls up to 16 inches thick.
-
Stud spacing: Use a stud finder to identify where the studs are — and never cut directly through one.
-
Clearance: Ensure at least 4–6 inches of clearance on all sides for airflow.
Pro Tip 💡
Tape the outline on the wall using painter’s tape to visualize the cut. It’s easier to adjust tape than drywall.
🧱 3. Step 2 — Choosing the Right Wall and Location
Not every wall is created equal. Picking the right location is one of the most important decisions you’ll make.
The wall you cut into must be:
-
An exterior wall (never interior)
-
Free of plumbing and wiring
-
Non-load-bearing, if possible
| Location Factor | Why It Matters |
|---|---|
| Exterior wall | Allows venting of hot exhaust air |
| Shaded area | Improves cooling efficiency |
| Near an outlet | Reduces need for extension cords |
| Far from furniture | Ensures good airflow |
| Avoid direct sunlight | Keeps unit from overworking |
🏡 Where I Installed Mine
I chose a north-facing wall in my bedroom — shaded most of the day and close to an existing outlet. The difference in cooling performance was immediate.
📘 Reference: The Furnace Outlet Wall Sleeve Guide
🧰 4. Step 3 — Tools & Materials Checklist
Before you start, gather everything you’ll need for a clean, accurate installation.
🔧 Tools:
-
🪚 Circular or reciprocating saw
-
🧱 Drill with bits
-
🪵 Level and measuring tape
-
🔎 Stud finder
-
🧰 Screwdrivers and socket set
-
🧴 Exterior-grade caulk or sealant
-
⚙️ Foam insulation
🧩 Materials:
-
Wall sleeve (Amana or universal model)
-
Trim kit for a finished interior look
-
Exterior weather grille
-
GFCI-protected 115V outlet
💡 Pro Tip: Always verify compatibility between your Amana unit and the wall sleeve. Amana’s 11,800 BTU model typically fits standard 26" sleeves, but check before buying.
📘 Reference: Amana Installation Manual
⚡ 5. Step 4 — Electrical & Safety Considerations
Before you even plug anything in, make sure your electrical setup can safely handle the AC load.
The Amana 11,800 BTU unit operates on 115 volts and typically requires a 15-amp dedicated circuit. Using a shared outlet could cause tripping or overheating.
⚡ Electrical Rules of Thumb:
-
Never use an extension cord — plug directly into the outlet.
-
If your outlet isn’t grounded, call an electrician to install a GFCI outlet.
-
Keep cords clear of moisture and heat sources.
-
Double-check local building codes if you’re drilling through masonry or siding.
⚠️ Safety Reminder: Always turn off the breaker before handling wiring.
If you’re uncomfortable working with electrical systems, it’s worth hiring a professional for this part.
📘 Reference: Electrical Safety Foundation International
🧩 6. Step 5 — Understanding Wall Sleeves (and Why They’re Non-Negotiable)
A wall sleeve is more than just a frame. It’s the backbone of a through-the-wall installation — providing structural stability, weather protection, and vibration control.
| Feature | Benefit |
|---|---|
| Support | Keeps unit secure and level |
| Insulation | Prevents air and water leaks |
| Noise reduction | Absorbs vibration |
| Durability | Extends AC lifespan |
| Ease of service | Lets you slide the AC out for maintenance |
Without a proper sleeve, the unit could sag, leak, or even pull away from the wall over time.
Most manufacturers — including Amana — require a sleeve for warranty coverage, so skipping it can void your protection.
🧯 7. Step 6 — Avoiding Common DIY Mistakes
Even confident DIYers make mistakes. Before you cut, learn from others’ missteps — and avoid expensive do-overs.
❌ Top 5 Installation Mistakes:
-
Cutting into load-bearing studs — weakens the structure.
-
Skipping the wall sleeve — leads to leaks and vibration.
-
Incorrect slope — water should drain outside, not in.
-
Poor sealing — allows hot air, bugs, and moisture inside.
-
No weatherproofing — causes mold or insulation damage.
✅ Samantha’s Quick Fix Tips:
-
Use a level to ensure perfect alignment.
-
Double-check sleeve slope (¼ inch downward) outdoors.
-
Use high-quality silicone caulk rated for outdoor use.
-
Always wear eye protection when cutting or drilling.
📘 Reference: Consumer Reports – Air Conditioner Installation Tips
🧊 8. Step 7 — Ventilation, Drainage & Weatherproofing
Once your hole is cut and sleeve installed, it’s time to make sure your setup can handle weather and condensation year-round.
💧 Drainage:
Your sleeve should tilt slightly downward (¼ inch) toward the exterior so water exits freely.
Never block or plug drain holes — they’re designed to prevent overflow during heavy humidity.
🌬️ Ventilation:
-
Ensure at least 12 inches of clearance outside for proper exhaust.
-
Avoid enclosing the rear grille behind bushes or fencing.
-
Maintain a tight interior seal to stop hot air infiltration.
🧱 Weatherproofing:
-
Apply caulk or foam insulation around sleeve edges.
-
Install drip cap flashing above the sleeve to divert rain.
-
Add a plastic weather grille for added protection.
💡 Pro Tip: In humid regions like mine, consider checking drainage monthly during summer to prevent mildew or moisture buildup.
📘 Reference: EPA – Indoor Air Quality & Moisture Control
🧼 9. Step 8 — Post-Installation Maintenance Planning
Once installed, your through-the-wall AC should serve you well for a decade or more — but it needs light seasonal care.
🧽 Maintenance Checklist:
-
Clean filter every 30–45 days during cooling season.
-
Vacuum intake vents to remove dust.
-
Inspect sleeve for rust or corrosion annually.
-
Reapply exterior caulk every 2–3 years.
-
Check electrical cords for wear.
Amana’s washable filter design makes this process easy — no need to buy replacements frequently.
📘 Reference: EnergyStar.gov – Tips for Efficient Room Air Conditioning
🛠️ 10. Optional: When to Hire a Professional
Even if you’re a confident DIYer, some installations require help. Consider hiring a pro if:
-
You’re cutting through brick or stucco.
-
Your wall is load-bearing.
-
Electrical work feels intimidating.
-
You live in a condo or HOA with modification rules.
A licensed HVAC technician can complete installation in 3–4 hours, and while it costs $250–$400, it ensures a sealed, code-compliant result.
🏁 11. Samantha’s Reflection — “Preparation Saved My Drywall!”
When I first looked at the empty wall and the cardboard box labeled Amana 11,800 BTU, I hesitated.
But by the time I finished measuring, marking, and sealing everything, I realized — cutting a hole wasn’t scary. It was empowering.
“Doing the prep first made all the difference. When my Amana unit slid perfectly into the sleeve, I actually smiled. And when I turned it on, it cooled quietly — no rattles, no leaks, no regrets.”
A little extra time planning upfront can save hundreds in repairs later.
💡 Final Takeaways Before You Cut
-
✅ Measure three times — the sleeve must fit snugly.
-
✅ Choose your wall wisely — avoid load-bearing sections.
-
✅ Plan your electrical source — use a dedicated outlet.
-
✅ Always use a wall sleeve — for safety and efficiency.
-
✅ Weatherproof thoroughly — your wall’s integrity depends on it.
-
✅ When in doubt, hire a pro.
Installing a through-the-wall air conditioner is one of those rare projects that pays off every single summer — quiet comfort, efficient cooling, and no more blocking your windows.
In the next topic we will know more about: How to Choose the Right Sleeve for Your Amana AC


