🏡 1. Introduction — Why Coil Sizing Isn’t One-Size-Fits-All
When you think about upgrading or repairing your air conditioning or heat pump system, the evaporator coil usually isn’t the first thing that comes to mind. It’s hidden inside your furnace or air handler—quietly doing its job, out of sight and out of mind.
But here’s the truth: your evaporator coil plays just as big a role in your comfort and energy efficiency as your outdoor unit. If it’s not properly sized and matched to your air conditioner or heat pump, you could be throwing money away every month in wasted energy—and even shortening the lifespan of your HVAC system.
I’m Samantha Reyes, a homeowner who’s learned that the small details make the biggest difference when it comes to HVAC performance. In this guide, I’ll walk you through:
-
What “coil size” really means
-
Why matching tonnage, airflow, and refrigerant type matters
-
How to calculate or verify the right coil size for your home
-
Common mistakes homeowners make when replacing or upgrading systems
-
Real-world examples of how a properly matched coil saves energy and prevents breakdowns
📎 Before we dive in, HVAC.com’s evaporator coil overview offers a good primer if you’d like a quick refresher on how coils work.
🧊 2. What Does “Coil Size” Actually Mean?
“Size” doesn’t refer to how big your coil looks—it’s about capacity, or how much heat it can absorb from your home’s air. HVAC professionals measure this capacity in tons.
-
1 ton = 12,000 BTUs (British Thermal Units) of cooling per hour.
-
Residential systems typically range from 1.5 to 5 tons, depending on square footage and climate.
So when someone says you have a “3-ton system,” they mean your system can remove 36,000 BTUs of heat from your home each hour.
Your evaporator coil should closely match this capacity—too small, and your system can’t cool efficiently; too large, and it may cool too fast without properly removing humidity.
According to Energy.gov, a properly sized HVAC system can save 10–20% on annual energy costs compared to an oversized or undersized one.
🔄 3. Why Coil Matching Matters So Much
Your air conditioner or heat pump system is a closed refrigerant loop made of two main coils:
-
The evaporator coil (inside) — absorbs heat from indoor air.
-
The condenser coil (outside) — releases that heat outdoors.
These two components rely on each other. They’re designed, tested, and optimized to work as a pair—especially in high-efficiency SEER2-rated systems.
When one is replaced or mismatched:
-
The refrigerant pressures may not align.
-
The system may short-cycle (turn on and off too frequently).
-
You may lose SEER2 efficiency points you paid for.
-
It could void your manufacturer’s warranty.
Carrier’s SEER2 efficiency overview notes that a system’s published SEER2 rating is only valid when factory-matched components are used together.
⚙️ 4. The 3 Golden Rules of Coil Sizing
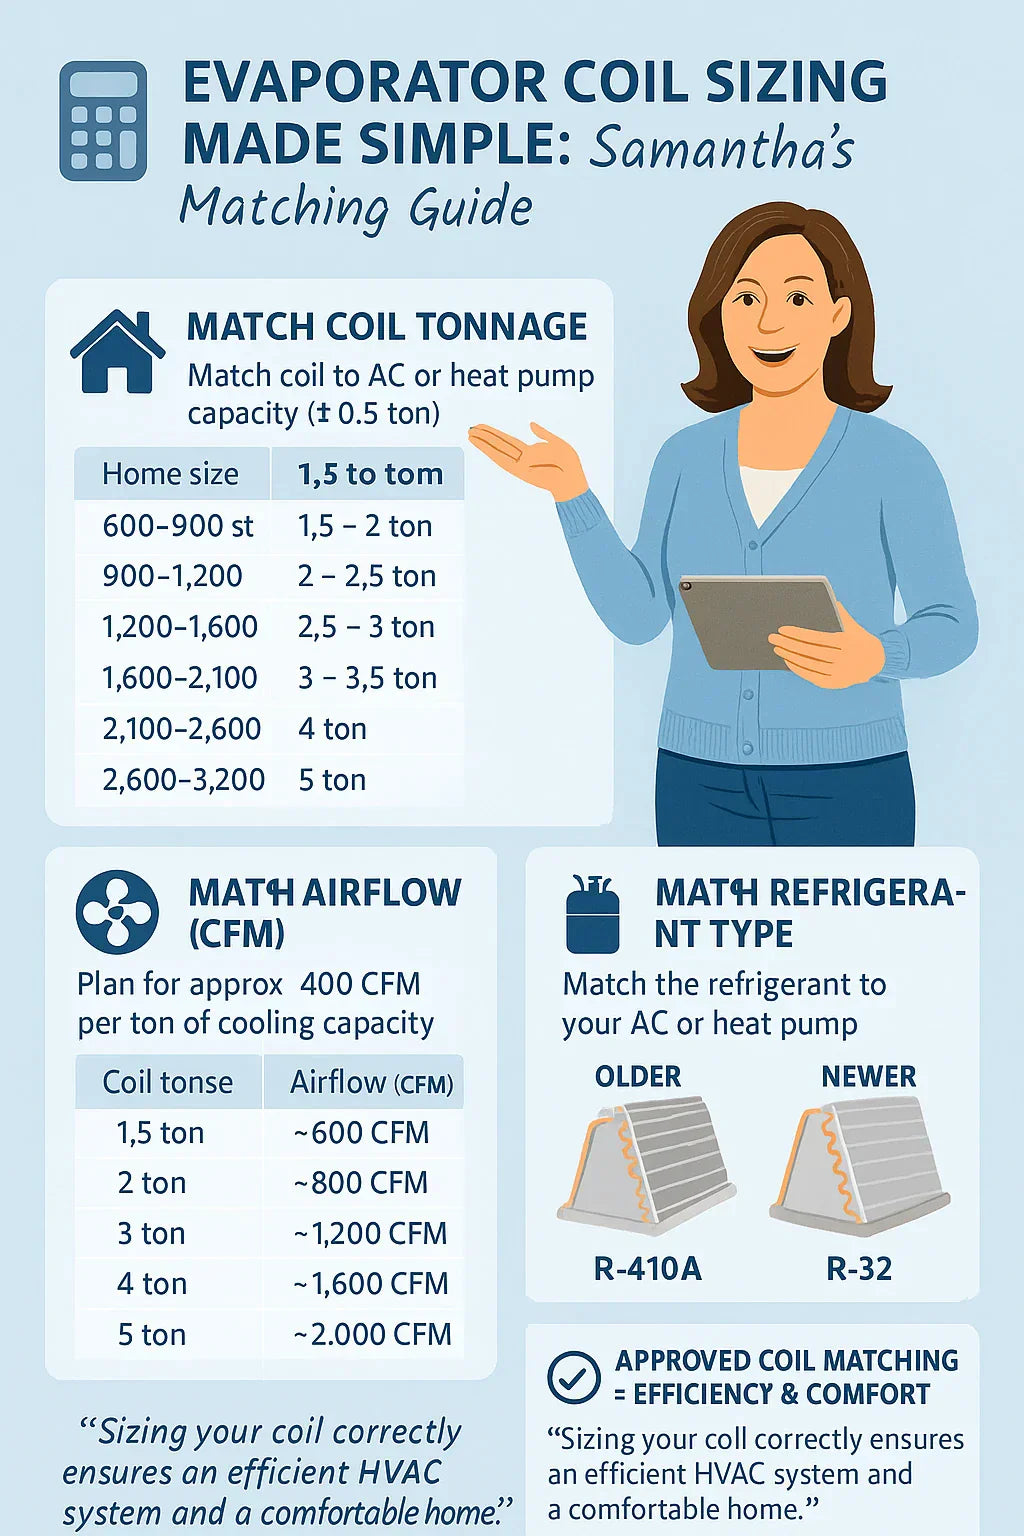
When matching your evaporator coil to your AC or heat pump, three elements must align:
1️⃣ Capacity Match
Match the coil tonnage to the outdoor condenser tonnage.
-
A 3-ton condenser → 3-ton coil.
-
A 2.5-ton condenser → 2.5-ton coil.
Some manufacturers allow for slight variations (±0.5 ton), but only if specifically approved.
2️⃣ Airflow Balance
Your indoor blower must move enough air across the coil to absorb heat effectively. A good rule of thumb is:
400 CFM (Cubic Feet per Minute) per ton of cooling.
| System Size | Required Airflow (CFM) |
|---|---|
| 1.5 ton | 600 CFM |
| 2 ton | 800 CFM |
| 2.5 ton | 1,000 CFM |
| 3 ton | 1,200 CFM |
| 4 ton | 1,600 CFM |
| 5 ton | 2,000 CFM |
If airflow is too low, the coil may freeze over. If it’s too high, the system won’t dehumidify properly.
3️⃣ Refrigerant Type
Your coil must use the same refrigerant as your outdoor unit:
| Refrigerant | Description | Used In |
|---|---|---|
| R-410A | Older, widely used refrigerant | Systems before 2025 |
| R-32 | New, eco-friendly refrigerant with higher efficiency | 2025 and newer systems |
EPA’s AIM Act mandates the phasedown of R-410A starting in 2025, making R-32 the new standard.
🚫 5. The Risks of a Mismatched Coil
It might be tempting to reuse an old coil when upgrading your condenser, but mismatching can cause serious issues.
❄️ Undersized Coil
-
Can’t absorb enough heat from your home’s air.
-
Causes low refrigerant pressure, leading to coil freezing.
-
Reduces efficiency by up to 25%.
🔥 Oversized Coil
-
Removes heat too quickly but doesn’t dehumidify properly.
-
Causes short-cycling (constant on/off operation).
-
Leads to inconsistent temperatures and higher bills.
⚠️ Wrong Refrigerant or Pressure Rating
-
Incompatible refrigerants can corrode coil tubing.
-
System may over-pressurize, triggering safety shutdowns.
HVAC Know It All notes that mismatched coils can “reduce total system output by 30% or more and void most compressor warranties.”
🧮 6. How to Determine the Correct Coil Size for Your System
You don’t need to be an HVAC technician to check coil compatibility. Here’s how to do it step-by-step:
Step 1. Identify Your Current System’s Capacity
Locate the model number on your outdoor unit’s nameplate.
Look for a three-digit number such as 018, 024, 036, or 048—divide by 12 to find the tonnage.
-
018 = 1.5 tons
-
024 = 2 tons
-
036 = 3 tons
-
048 = 4 tons
Step 2. Check the Furnace or Air Handler Orientation
Determine how air flows through your indoor unit:
-
Upflow: air moves up through the coil.
-
Downflow: air moves down through the coil.
-
Horizontal: air moves sideways.
The coil’s orientation must match this airflow direction.
Step 3. Verify Refrigerant Type
Confirm whether your condenser uses R-410A or R-32. Never mix refrigerants—each runs at different pressures and requires unique coil designs.
Step 4. Decide Between Cased or Uncased Coils
-
Cased coils are ideal for new installations or brand-matched systems.
-
Uncased coils are better for older systems or tight retrofits.
Step 5. Use Manufacturer Matching Guides
Manufacturers like Goodman, Amana, and Rheem provide compatibility charts showing which coils pair with which outdoor units.
🏠 7. Home Size and Climate: How Tonnage Translates
You can estimate coil and system tonnage based on home size, insulation, and climate zone.
| Home Size (sq. ft.) | Typical System Size | Climate Type |
|---|---|---|
| 600–900 | 1.5 – 2 tons | Cooler / Northern |
| 900–1,200 | 2 – 2.5 tons | Mild |
| 1,200–1,600 | 2.5 – 3 tons | Mild to warm |
| 1,600–2,100 | 3 – 3.5 tons | Warm |
| 2,100–2,600 | 4 tons | Hot / humid |
| 2,600–3,200 | 5 tons | Very hot / large home |
💸 8. How Much Does Coil Replacement Cost in 2025?
Coil costs depend on tonnage, type (cased vs. uncased), refrigerant, and labor.
| Coil Size (Tons) | Typical Equipment Cost | Installed Cost (2025 Avg.) |
|---|---|---|
| 1.5 – 2 Ton | $350 – $500 | $900 – $1,200 |
| 2.5 – 3 Ton | $450 – $650 | $1,100 – $1,500 |
| 3.5 – 4 Ton | $600 – $850 | $1,400 – $1,800 |
| 5 Ton | $700 – $1,000 | $1,700 – $2,200 |
Labor and refrigerant handling make up roughly 60% of the total cost.
🌡️ 9. Matching Coils for Heat Pump Systems
If you own a heat pump instead of a traditional AC, your evaporator coil works year-round, serving as both a heat absorber (in cooling mode) and a heat emitter (in heating mode).
That means matching is even more critical. Heat pumps require coils designed to handle reverse refrigerant flow and defrost cycles.
Trane’s guide to heat pump coil design notes that “improper coil pairing can cause winter performance drops of up to 15% due to reduced heat exchange area.”
So, when replacing your coil for a heat pump system, confirm that it’s labeled “heat pump compatible” or bi-directional.
💧 10. Coil Size and Humidity Control
In humid climates, coil sizing affects comfort just as much as cooling power.
-
A slightly smaller coil (within ½ ton) can improve dehumidification, since it runs longer cycles and removes more moisture from the air.
-
An oversized coil cools fast but leaves humidity behind—making rooms feel clammy.
If you live in the South or Midwest, consider this “dehumidification balance” when choosing your coil.
Lennox’s humidity control research shows that humidity levels above 60% can reduce perceived comfort even when temperature is ideal.
🧠 11. Real-World Story — Samantha’s 2.5-Ton Upgrade
Last year, my 12-year-old air conditioner finally gave out in the middle of a June heatwave. I decided to upgrade to a Goodman 2.5-ton 14.5 SEER2 heat pump system.
The HVAC installer made sure to match it with a vertical cased R-32 evaporator coil—and that decision paid off:
-
My summer electric bills dropped 15%.
-
Cooling felt more even throughout the house.
-
The system ran quieter with fewer start-ups.
When I asked about the difference, he said, “Matching the coil is like putting the right tires on your car—it makes everything run smoother and last longer.”
Now I always tell friends: Don’t let anyone replace your outdoor unit without checking the coil match.
🧼 12. Maintenance Tips to Protect Your Coil Investment
Even the perfect coil can’t perform if it’s neglected. Here’s how I keep mine running smoothly:
-
Replace air filters every 30–60 days.
Clogged filters restrict airflow, reducing cooling efficiency. -
Have your HVAC tech clean the coil annually.
A dirty coil can increase energy use by up to 30%. -
Check for refrigerant leaks.
Look for oily residue around the coil or line set connections. -
Inspect the drain line and pan.
Standing water can cause mold growth and corrosion. -
Keep return air vents clear.
Blocked vents reduce airflow and can lead to coil icing.
Energy.gov’s annual maintenance checklist recommends professional service each spring to extend equipment lifespan.
🧾 13. Warranty and Efficiency Implications
Most manufacturers—including Goodman, Amana, and Rheem—require matched system registration to maintain full 10-year warranties. Installing a mismatched coil or different refrigerant type could void coverage entirely.
Also, your HVAC system’s SEER2 efficiency rating is certified based on a tested combination of coil + condenser + air handler. Changing any one of those parts changes the performance—and your utility bills.
🌟 14. Samantha’s Final Sizing Checklist
Before you buy or replace your coil, go down this list:
✅ Match tonnage (cooling capacity) within ±0.5 ton of your condenser.
✅ Confirm refrigerant type (R-410A or R-32).
✅ Match airflow direction (upflow, downflow, or horizontal).
✅ Verify blower CFM matches coil tonnage.
✅ Choose cased for new installs; uncased for retrofits.
✅ Always check manufacturer pairing charts for SEER2 compliance.
✅ Schedule annual maintenance to protect efficiency and warranty.
“Sizing your coil correctly isn’t just about compatibility—it’s about comfort, cost savings, and peace of mind. When you get this part right, everything else in your HVAC system works better.”
In the next topic we will know more about: How to Spot a Bad Evaporator Coil: Early Warning Signs and Fixes


