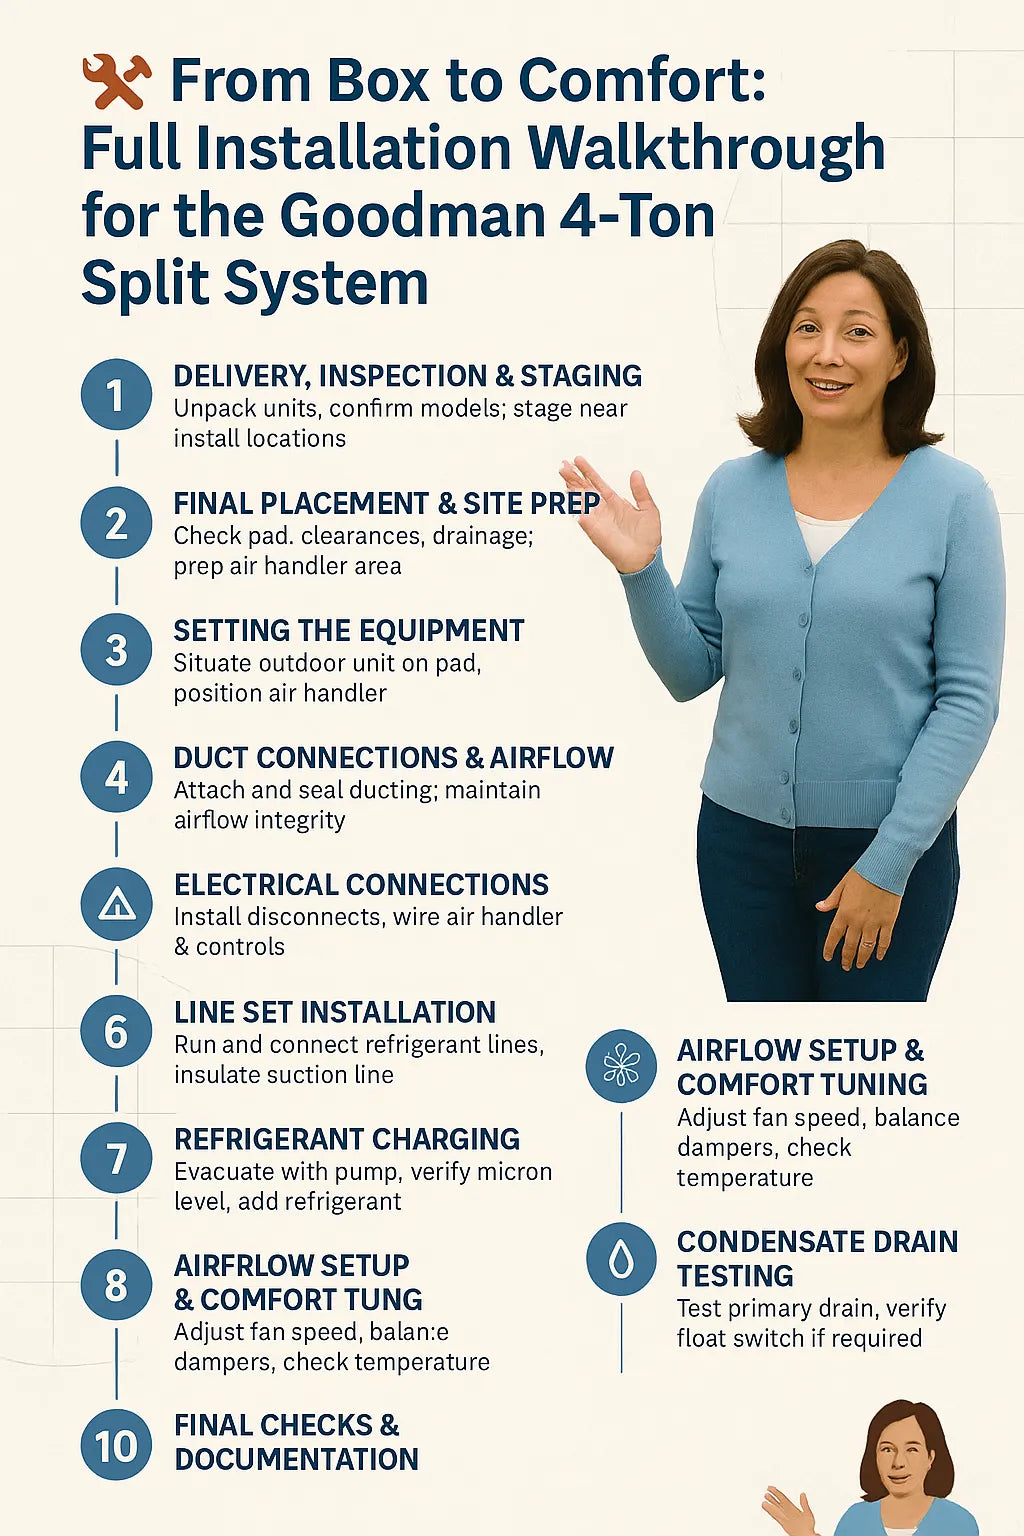
Installing a Goodman 4-ton 14.5 SEER2 split system isn’t a single task—it’s a sequence of decisions and checkpoints that begin the moment the boxes arrive and end only after the system proves it can run correctly under real conditions.
I’ve learned that most homeowner frustration doesn’t come from bad equipment—it comes from installs that skip steps, rush transitions, or assume “close enough” is good enough. This walkthrough exists to make the process transparent, so you know what should happen, in what order, and why each step matters.
Whether you’re supervising an install, comparing contractor quotes, or just want peace of mind, this is the full journey from box to comfort.
📦 Step 1: Delivery, Inspection & Staging (Before Anything Is Installed)
The installation starts before tools are even unpacked.
What Should Happen on Delivery Day
-
Boxes inspected for visible damage
-
Model numbers confirmed (condenser + air handler match)
-
Accessories verified (pad, line set, disconnect, thermostat, drain components)
-
Equipment staged near install locations—but not opened yet
This is also the moment to confirm you received the correct configuration listed on your invoice or product page. For the Goodman 4-ton SEER2 system, that means verifying condenser and air handler pairing.
Samantha tip: Once a unit is installed, correcting a wrong model becomes much harder—this is the easiest checkpoint to stop a mistake.
🧭 Step 2: Final Placement & Site Prep
Outdoor Condenser
Before setting the unit:
-
Pad is level, stable, and above grade
-
Clearances meet manufacturer requirements
-
Drainage won’t pool water around the base
-
Noise impact on living spaces is considered
Indoor Air Handler
Before mounting:
-
Access panels are reachable
-
Condensate drain routing is planned
-
Return and supply connections are aligned
-
Electrical access is safe and code-compliant
Manufacturer installation instructions define minimum clearances and placement rules that protect airflow, efficiency, and serviceability.
👉 https://www.goodmanmfg.com/resources
🔩 Step 3: Setting the Equipment (No Connections Yet)
This is a dry fit stage—positioning without final connections.
Outdoor Unit
-
Set square on the pad
-
Verified level front-to-back and side-to-side
-
Vibration isolation addressed if needed
Indoor Unit
-
Mounted or positioned securely
-
Orientation confirmed (upflow, downflow, horizontal)
-
Cabinet sealed where it meets ductwork
Nothing is powered. Nothing is charged. This step ensures alignment before permanent connections lock everything in place.
🌀 Step 4: Duct Connections & Airflow Integrity
This is where many installs quietly lose efficiency.
What a Proper Duct Connection Includes
-
Mechanical fastening (not just tape)
-
Mastic or approved sealant on all joints
-
Insulation maintained at connections
-
No crushed or undersized transitions
Leaky ducts don’t just waste energy—they disrupt airflow balance and reduce system capacity.
The U.S. Department of Energy highlights duct sealing as one of the most effective ways to preserve HVAC efficiency.
https://www.energy.gov/energysaver/minimizing-energy-losses-ducts
Samantha reality check: A high-efficiency system connected to poor ductwork will perform like a mediocre one.
⚡ Step 5: Electrical Connections & Safety Checks
Outdoor Electrical
-
Correct breaker size installed
-
Outdoor disconnect mounted and accessible
-
Proper grounding and bonding verified
Indoor Electrical & Controls
-
Air handler power wired per code
-
Thermostat wiring routed cleanly
-
Control connections double-checked
All electrical work should comply with the National Electrical Code (NEC) and local amendments.
At this stage, power may be temporarily energized only to verify correct wiring—not to run the system.
🧪 Step 6: Line Set Installation & Refrigerant Preparation
Line Set Best Practices
-
Proper diameter per system requirements
-
Gentle bends (no kinks)
-
Insulated suction line fully covered
-
Line set secured to reduce vibration
Before Refrigerant Is Released
-
Connections torqued correctly
-
System evacuated using a vacuum pump
-
Micron levels verified with a gauge
Proper evacuation removes moisture and non-condensables—two things that can quietly destroy compressors over time.
Industry quality-installation standards emphasize evacuation and verification as non-negotiable steps.
👉 https://www.acca.org/standards
❄️ Step 7: Refrigerant Charging & Initial Startup
Only after evacuation is confirmed should refrigerant be introduced.
Charging the System
-
Factory charge accounted for
-
Adjustments made for actual line-set length
-
Pressures and temperatures monitored
First Power-Up
-
System started in cooling mode
-
Fan operation confirmed
-
Compressor operation verified
-
Unusual noises addressed immediately
This is a controlled startup—not a “flip it on and walk away” moment.
🌡️ Step 8: Airflow Setup, Fan Speed & Comfort Tuning
This step separates installs that work from installs that feel right.
What Should Be Adjusted
-
Blower speed set for correct airflow
-
Temperature split measured
-
Return air restrictions checked
-
Supply airflow balanced if possible
Correct airflow ensures:
-
Proper humidity removal
-
Stable runtimes
-
Reduced noise
-
Longer equipment life
The Department of Energy notes that airflow and system setup heavily influence real-world efficiency.
👉 https://www.energy.gov/energysaver/central-air-conditioning
💧 Step 9: Condensate Drain Testing
Before walking away:
-
Drain line is flushed
-
Traps (if required) are verified
-
Secondary pan and safety switch tested
Condensate problems don’t show up on day one—they show up weeks later as ceiling stains or musty odors. Testing now prevents callbacks later.
🧾 Step 10: Final Checks, Documentation & Homeowner Walkthrough
What a Complete Install Wrap-Up Includes
-
Thermostat operation explained
-
Filter location and replacement schedule reviewed
-
Startup readings documented
-
Warranty and registration info provided
-
Permit inspection scheduled (if applicable)
Building permits and inspections exist to confirm that safety and installation standards were met—not to slow things down.
Samantha tip: If no one explains how to operate or maintain your new system, the job isn’t finished.
🚩 Common Installation Shortcuts (And Why They Backfire)
Be cautious if you see:
-
No vacuum gauge used
-
“We don’t need permits for replacements”
-
Duct leaks ignored
-
No startup measurements taken
-
System left running without observation
These shortcuts rarely cause instant failure—but they always reduce long-term performance.
✅ Samantha’s “From Box to Comfort” Checklist
A proper Goodman 4-ton install should include:
-
✔ Verified equipment match
-
✔ Correct placement and clearances
-
✔ Sealed, supported duct connections
-
✔ Code-compliant electrical work
-
✔ Verified evacuation and refrigerant charge
-
✔ Airflow and comfort tuning
-
✔ Drain testing and safety checks
-
✔ Clear homeowner education
If every box is checked, comfort isn’t a gamble—it’s the expected outcome.
🏁 Final Thought: Comfort Is Built, Not Turned On
A Goodman 4-ton split system is capable equipment—but installation quality determines whether it reaches that potential.
When each step is done in order, with intention, the system runs quieter, lasts longer, and delivers comfort that feels effortless. That’s the difference between “it works” and “I don’t think about it anymore.”
Buy this on Amazon at: https://amzn.to/47usZUk
In the next topic we will know more about: Air Handler Installation Inside Your Home: Tips for Tight Spaces


