If you own an Amana 11,600 BTU 115V Through-the-Wall Air Conditioner with Remote (Model PBC122J00AA), this guide walks you through simple steps to keep it running smoothly, quietly, and efficiently — all in under 10 minutes.
🧊 1. Why Quick Maintenance Matters
You don’t need a toolbox or an HVAC technician to keep your Amana wall unit performing like new.
Just 10 minutes once a month can:
✅ Keep energy costs down by 10–15%.
✅ Prevent early compressor failure.
✅ Improve indoor air quality.
✅ Reduce noise and uneven cooling.
📎 According to the U.S. Department of Energy, neglecting filter and coil care can raise energy use by up to 15% — the equivalent of running your AC an extra week each summer.
💬 Savvy Tip: Think of it like brushing your AC’s teeth — quick upkeep now saves you a lot of “dentist bills” later.
🧼 2. Your 10-Minute Maintenance Toolkit
You probably already have everything you need:
🪣 A small bucket — for warm soapy water.
🧽 A soft sponge or microfiber cloth.
🪶 A soft-bristled brush (like a paintbrush).
💨 A handheld vacuum (optional but handy).
🌬️ A coil cleaner spray (optional for deeper cleaning).
💬 Savvy Tip: Keep these tools together in a labeled box near your utility closet — it’ll make future maintenance effortless.
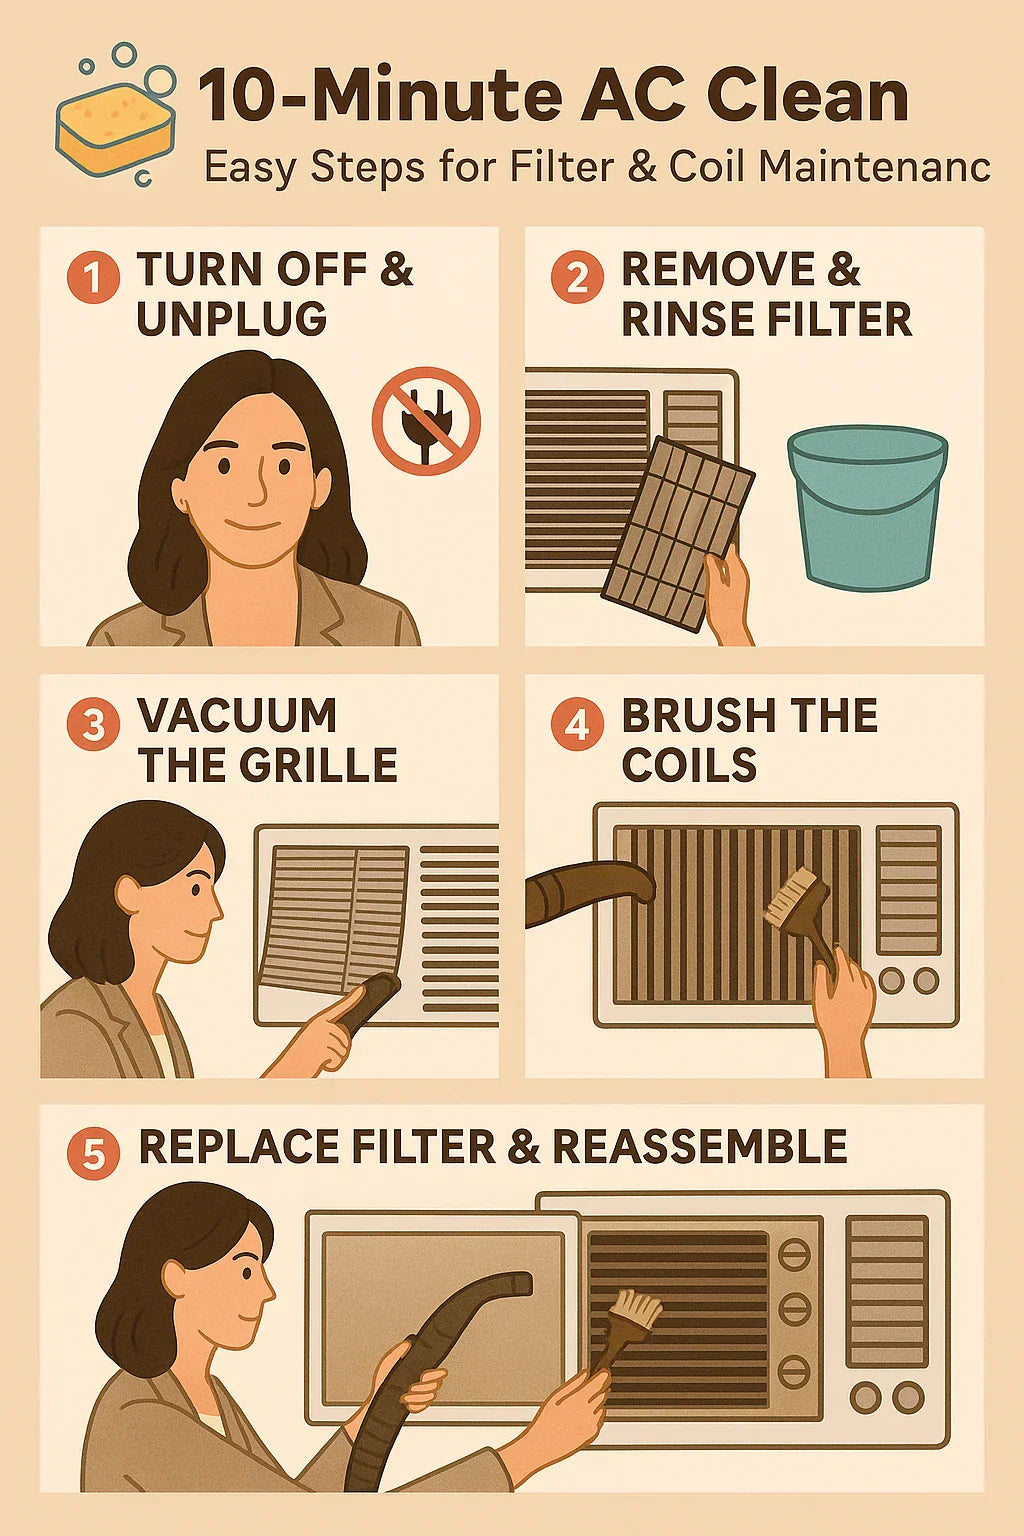
🪶 3. Step One: Turn Off and Unplug the Unit
Before you do anything, power down the system completely.
Unplugging ensures:
-
No accidental fan startup.
-
No risk of electric shock.
-
A safe environment for coil cleaning and wiping.
📎 The Electrical Safety Foundation International reminds homeowners that cleaning plugged-in appliances is one of the top causes of preventable electrical injuries.
💬 Savvy Tip: Wait five minutes after unplugging — this allows any stored power in the capacitor to fully discharge.
🧊 4. Step Two: Remove and Rinse the Air Filter
Your filter is the AC’s first line of defense — and it collects everything from dust and pet dander to pollen.
🪞 Here’s how to clean it:
-
Lift or pop off the front grille.
-
Slide out the filter — it should come out easily.
-
Rinse under warm, not hot, running water.
-
Add a drop of mild dish soap if it’s greasy or smoky.
-
Shake off excess water and air dry completely before reinstalling.
💬 Savvy Tip: Never use a hairdryer or direct sunlight to speed-dry filters — heat can warp the mesh.
📎 The ENERGY STAR maintenance guide notes that keeping your AC filter clean ensures 5–10% better energy performance.
💨 5. Step Three: Vacuum the Front Grille and Louvers
While the filter is drying, grab your handheld vacuum or soft brush attachment.
Gently vacuum the grille slats and louvers where dust accumulates.
You’ll instantly notice:
-
Better airflow,
-
Reduced noise, and
-
Less “musty” odor during cooling.
💬 Savvy Tip: If you see lint buildup in the corners, use a soft paintbrush to dislodge it before vacuuming.
🧽 6. Step Four: Wipe Down the Exterior
Use a damp (not wet) microfiber cloth with a little mild detergent.
Wipe:
-
The front panel
-
Side edges
-
Control buttons or display
Avoid spraying cleaner directly on the unit — moisture can enter air vents.
💬 Savvy Tip: Use distilled water for fewer streaks and no residue buildup on glossy panels.
🌀 7. Step Five: Clean the Evaporator Coil (Indoor Coil)
The evaporator coil sits just behind the filter and is responsible for absorbing heat from your room. Dust or grime on these fins can drastically reduce cooling efficiency.
How to do it:
-
Shine a flashlight through the grille — you’ll see the metal fins.
-
Use a coil brush or coil cleaner spray.
-
Gently brush in the direction of the fins (never sideways).
-
Let dry naturally for 5 minutes before replacing the filter.
💬 Savvy Tip: Always brush lightly — the fins bend easily. If you accidentally bend a few, straighten them gently using a fin comb or a dull butter knife.
📎 The EPA’s HVAC maintenance guide emphasizes regular coil care to prevent reduced heat transfer and bacterial growth.
🌬️ 8. Step Six: Don’t Forget the Condenser Coil (Outside Wall)
Step outside and inspect the portion of your AC exposed to outdoor air.
This condenser coil releases heat — and if it’s blocked, the unit works twice as hard.
Quick fix:
-
Remove leaves, debris, or spider webs.
-
Wipe the grill with a damp cloth.
-
Keep at least 12 inches of clearance around the outside vent.
💬 Savvy Tip: If you live near trees or pollen-heavy areas, clean this section monthly during summer.
📎 Home Depot’s outdoor AC cleaning guide shows safe outdoor coil cleaning steps with visual examples.
🧴 9. Step Seven: Reassemble and Power Up
Once everything is clean and dry:
-
Slide the filter back in place.
-
Snap the grille securely.
-
Plug the unit back in.
-
Run it on Fan Mode for 5 minutes to dry any residual moisture.
This step helps clear dust you might’ve loosened during cleaning.
💬 Savvy Tip: Add a few drops of essential oil on a paper towel behind the grille for a fresh scent while air circulates (just don’t apply directly to the filter).
📅 10. Your Quick Maintenance Calendar
| Task | Frequency | Duration |
|---|---|---|
| Clean Filter | Monthly | 5 min |
| Wipe Grille/Exterior | Monthly | 2 min |
| Vacuum Louvers | Monthly | 2 min |
| Coil Cleaning | Every 2–3 months | 10 min |
| Outdoor Coil Check | Monthly | 3 min |
💬 Savvy Tip: Set a phone reminder every first Sunday of the month — a few minutes of cleaning keeps your energy bill low all season long.
📎 Energy.gov reports that consistent minor maintenance adds years to an air conditioner’s life expectancy.
⚠️ 11. Warning Signs You’ve Waited Too Long
If you notice any of these, your AC is overdue for maintenance:
🚫 Weak airflow — clogged filter or dirty coil.
🌫️ Musty odor — mold buildup inside fins.
💧 Dripping water indoors — blocked condensate line.
🔊 Louder hum or vibration — restricted airflow.
⚡ Higher electric bill — overworked compressor.
💬 Savvy Tip: Don’t panic — 90% of these issues resolve after cleaning the filter and coils.
🛠️ 12. Quick Troubleshooting Between Cleanings
| Symptom | Likely Cause | Simple Fix |
|---|---|---|
| Airflow feels warm | Dirty evaporator coil | Clean and let dry |
| Loud fan noise | Loose grille or dusty blades | Tighten screws, clean fan |
| Unit short-cycles | Blocked outdoor vent | Clear obstructions |
| Musty smell | Mold on fins or filter | Wash with mild vinegar solution |
📎 The Bob Vila AC troubleshooting guide offers additional quick checks for residential ACs.
🌿 13. Pro Maintenance vs. DIY: Know When to Call Help
DIY covers 90% of what you need — but if you notice:
-
Persistent musty odors,
-
Leaks behind the wall,
-
Cooling loss even after cleaning, or
-
Frozen coils —
It’s time to call an HVAC technician.
💬 Savvy Tip: Think of a yearly professional checkup as your unit’s “spa day.” You handle the daily care; let the pros do the deep clean.
🌞 14. Extra Credit: Keeping It Clean Between Uses
Even between major cleanings, you can:
-
Run Fan Mode for 10 minutes weekly to dry moisture.
-
Keep curtains slightly open to avoid mildew from trapped humidity.
-
Dust the nearby wall area to prevent recirculating dirt.
💬 Savvy Tip: Avoid scented aerosol sprays near your AC — they cling to filters and form grime faster.
💡 15. The Payoff: 10 Minutes That Pay You Back All Year
Keeping your Amana wall unit clean:
✅ Saves $50–$100/year in power costs.
✅ Extends its lifespan by up to 3 years.
✅ Keeps air fresher and quieter.
And it all takes less time than your morning coffee routine.
💬 Savvy’s Closing Thought:
“Your Amana wall unit is small but mighty. A few minutes of care keeps it that way — efficient, reliable, and ready for every heatwave.”
In the next topic we will know more about: Wall Sleeve Wisdom — Ensuring a Perfect Fit for Your 11,600 BTU Amana


