When I decided to install my Goodman 3-Ton 15 SEER2 Heat Pump System, I faced a big question every hands-on homeowner eventually asks:
Should I install it myself or hire a professional?
At first, I figured I could handle it solo. After all, I’ve done plenty of wiring, plumbing, and small-scale HVAC maintenance before. But as I dug into the manuals and code requirements, it became clear that “easy-to-install” doesn’t mean “no expertise needed.”
In this article, I’ll walk you through exactly what I learned comparing both routes — DIY, professional, and even a hybrid of the two — so you can decide which makes sense for your Goodman system.
🏁 1. Jake’s Installation Dilemma
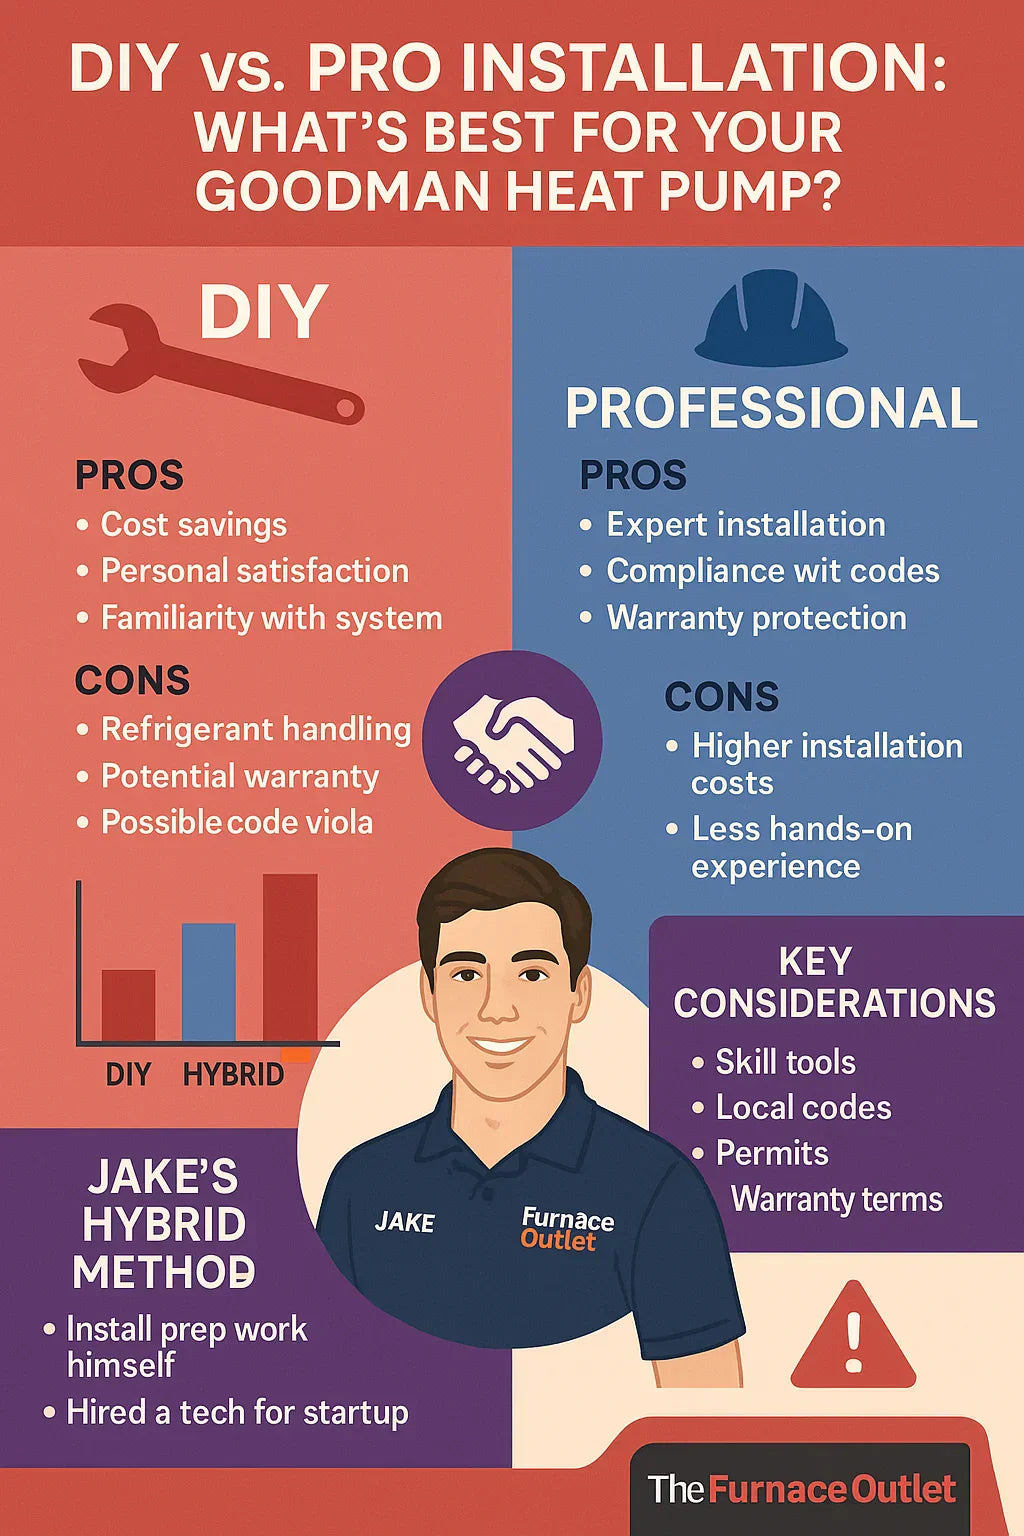
My Goodman system (the GLZS4BA3610 condenser and AMST36CU1300 vertical air handler) came packaged beautifully. The manuals looked clear, and the online installation videos made it seem straightforward.
But when I laid out the steps, I realized:
Installing a heat pump isn’t like swapping out a thermostat or water heater. It’s a precision system that combines electrical, mechanical, and refrigerant work — all of which have to meet code.
Here’s the truth I found:
“DIY installation can save you thousands, but one wrong connection can cost you the same in repairs or lost efficiency.”
So, I spent two weeks researching both options before making my final decision.
⚙️ 2. What Installing a Goodman Heat Pump Actually Involves
Whether you do it yourself or hire a pro, the process has several critical stages. Here’s what I discovered step-by-step.
🔹 1. Site Prep and Pad Installation
You’ll need a level, vibration-dampened surface for the outdoor condenser. Most pros use a pre-cast composite pad elevated 4–8 inches above grade to prevent snow or water accumulation.
🔹 2. Air Handler Mounting and Duct Connections
For my vertical setup, the air handler needed to be anchored, leveled, and sealed to both supply and return plenums. Even a ⅛-inch air leak can reduce efficiency by up to 10 %.
🔹 3. Electrical Connections
Heat pumps run on 240 V circuits. That means:
-
A disconnect box outdoors.
-
Proper gauge wire and breaker sizing per NEC.
-
Low-voltage thermostat wiring between the air handler and condenser.
🔹 4. Refrigerant Line Set Installation
Here’s where things get technical: cutting, flaring, or brazing copper lines that carry R-410A refrigerant. Any contamination or leak can ruin a compressor fast.
🔹 5. Evacuation and Charging
After connecting the lines, the system must be vacuumed to 500 microns or less, then charged according to factory specs. This requires manifold gauges, a vacuum pump, and a micron gauge — tools most homeowners don’t own.
🔹 6. Startup and Testing
Finally, verify correct airflow, thermostat control, refrigerant pressures, and temperature splits.
That’s the difference between a “connected system” and an efficient, long-lasting system.
🔧 3. What You Can (and Can’t) Do Yourself
| Task | DIY Possible? | Notes |
|---|---|---|
| Site prep and pad install | ✅ Yes | Straightforward if ground is level |
| Air handler mounting | ✅ Yes | Follow spacing & level specs |
| Duct connections & sealing | ✅ Yes | Use mastic, not duct tape |
| Electrical conduit setup | ⚠️ Maybe | Must comply with NEC 240 V standards |
| Refrigerant line connection | ❌ No | EPA 608 certification required |
| Vacuum and charge | ❌ No | Requires specialized tools |
| Thermostat wiring & setup | ✅ Yes | Color-coded per Goodman manual |
You can physically install most components, but you cannot legally handle refrigerant without EPA certification.
That’s where a hybrid install — DIY prep plus pro startup — becomes attractive.
💰 4. Cost Breakdown: DIY vs. Pro
| Option | Labor Cost | Tools & Extras | Total Cost Range |
|---|---|---|---|
| DIY (Full Self-Install) | $0 | $400–$700 (vacuum pump, gauges, wiring, mastic, PVC) | $400–$700 |
| Professional Installation | $2,500–$4,000 | Included | $2,500–$4,000 |
| Hybrid (Jake’s Method) | $500–$1,000 | $500–$800 (prep materials) | ~$1,500–$1,800 |
Jake’s savings: about $2,000 by doing mechanical prep, electrical conduit, and duct sealing myself — then hiring a certified HVAC tech for refrigerant evacuation, charging, and startup verification.
⚠️ 5. Permits, Codes & Warranty Rules
🧾 Permits
Most municipalities require a mechanical and electrical permit for new HVAC installs. Skipping it can cause inspection failures or fines.
📜 Electrical Code
All wiring must meet National Electrical Code (NEC) standards — including breaker sizing, wire gauge, and disconnect placement.
♻️ EPA Refrigerant Rule
Handling refrigerant requires EPA Section 608 certification. Non-certified work isn’t just risky; it’s illegal.
🧩 Warranty Coverage
Goodman warranties are generous (10 years parts, lifetime compressor on select models), but they require installation by a licensed HVAC contractor to remain valid.
👉 Source: Goodman Manufacturing Warranty Terms
Jake’s solution: I kept receipts and documented that a licensed tech performed final startup — satisfying warranty requirements even though I did most prep myself.
🧰 6. Tools Needed for DIY Prep
If you decide to go partial-DIY, here’s what you’ll need:
Basic Tools:
-
Drill + hole saw set
-
Level and torque wrench
-
Wire strippers & multimeter
-
PVC pipe, elbows, and glue for condensate drain
-
Mastic, foil tape, and insulation sleeves
Advanced/Optional Tools (for serious DIYers):
-
Vacuum pump (5 CFM minimum)
-
Manifold gauge set (R-410A compatible)
-
Micron gauge
-
Nitrogen regulator for brazing purge
-
Tubing cutter and flaring tool
💡 Jake’s Tip: Rent specialty tools instead of buying — especially the vacuum pump and gauges.
🧠 7. How to Decide if You’re DIY-Ready
Ask yourself honestly:
-
Do you understand 240-volt wiring and breaker sizing?
-
Can you read a wiring schematic confidently?
-
Do you know how to calculate refrigerant line length and slope?
-
Have you used a vacuum pump or manifold gauges before?
-
Do you have someone to help lift and position the equipment safely?
If you answered “no” to more than one, you’ll likely save time (and money) by hiring a professional or hybrid installer.
💡 8. The Case for Professional Installation
Here’s why many homeowners still go the professional route, even if they’re capable DIYers.
✅ Proper Refrigerant Charging
Pros measure superheat and subcooling to fine-tune refrigerant charge. An incorrect charge can cut efficiency by up to 30 % and shorten compressor life.
✅ Warranty Protection
Professional documentation keeps your warranty valid and simplifies claims later.
✅ Code Compliance
Technicians ensure NEC and local codes are met, including grounding and service clearances.
✅ Advanced Diagnostics
Pros use digital gauges, clamp meters, and psychrometers to test airflow, amperage, and delta-T accuracy.
✅ Long-Term Peace of Mind
Most contractors include 1-year labor warranties and optional maintenance plans.
Typical full professional install timeline: 1–2 days, including permits and testing.
🔨 9. The Case for DIY (with Caution)
Advantages
-
Cost savings: Up to $2,500 saved on labor.
-
Learning experience: You’ll understand your system inside-out.
-
Control: You can choose materials, route lines neatly, and ensure quality yourself.
Risks
-
Voiding your warranty.
-
Safety hazards from 240 V electricity or pressurized refrigerant.
-
Code violations that may complicate resale.
-
Incorrect installation = poor efficiency and premature failure.
Jake’s takeaway:
“I love DIY projects, but this one humbled me. Installing ducts and wiring? Fine. Pulling a vacuum and balancing refrigerant? Not without help.”
🤝 10. The Hybrid Approach — The Best of Both Worlds
After comparing all options, I landed on the hybrid route:
My Split of Labor
-
DIY: Pad setup, conduit runs, air handler install, drain lines, duct sealing, thermostat wiring.
-
Professional: Vacuum, refrigerant charge, and system tuning.
Why It Worked
-
Saved about 40 % overall compared to full pro installation.
-
Still maintained warranty coverage.
-
Learned enough to handle future maintenance myself.
How to Find a Partner Technician
Many pros are happy to do startup only. Search local listings or try Energy Star’s HVAC Contractor Locator and ask about “owner-assisted installs.”
⚒️ 11. Common DIY Mistakes (and How to Avoid Them)
-
Skipping permits. Even if you’re handy, inspectors can require you to redo wiring or refrigerant routing if unapproved.
-
Using undersized electrical wire. Always match gauge to load (8 AWG for 30 A circuits in most 3-ton units).
-
Poor drain slope. Condensate backflow can flood your air handler closet.
-
Forgetting line-set insulation. Bare copper lines cause efficiency loss and condensation.
-
No nitrogen purge while brazing. Internal oxidation reduces coil life.
-
Not torqueing flare fittings correctly. Leads to slow leaks and poor performance.
Jake’s fix: Label every connection, torque every fitting to spec, and keep a checklist as you go.
💸 12. Long-Term Value Comparison
| Option | Upfront Cost | Warranty Coverage | Efficiency | Risk Level | Lifetime Value |
|---|---|---|---|---|---|
| Full DIY | Low | Limited | Moderate | High | Medium |
| Hybrid (DIY + Pro) | Medium | Full | High | Low | High |
| Full Professional | High | Full | Highest | Very Low | High |
The hybrid approach clearly wins for capable homeowners — combining savings with reliability.
🧾 13. Jake’s Professional Install Experience
Once I’d finished mounting everything, I called a certified HVAC tech for the startup. He spent about 90 minutes on:
-
Pulling a vacuum to 450 microns.
-
Weighing in the exact refrigerant charge.
-
Checking superheat/subcooling.
-
Verifying airflow and delta-T (16.8 °F).
He charged me $300, handed me a signed startup sheet, and wished me luck.
That document preserved my Goodman warranty and gave me confidence the system was running at full 15 SEER2 efficiency.
🔋 14. Post-Install Lessons & Real-World ROI
🔹 Power Bills
My first month’s bill dropped by about 25 % compared to the old 13 SEER system — proof the installation was solid.
🔹 Noise Level
Because I leveled the pad properly and used vibration pads, the condenser runs whisper-quiet (~55 dB).
🔹 Service Access
Doing it myself helped me understand where every wire and fitting runs — making maintenance easier down the line.
🧩 15. Jake’s Top Tips for Any Installation
-
Read the manual cover-to-cover before touching anything.
-
Photograph every connection — invaluable for future troubleshooting.
-
Label both ends of every wire.
-
Check airflow direction twice before sealing ducts.
-
Seal every duct seam with mastic, not tape.
-
Leave service clearances: 24 inches minimum around the condenser.
-
Always perform a voltage drop test before startup.
-
Document your installation — include invoices and startup sheets.
⚙️ 16. Why Code Compliance & Safety Matter
It’s tempting to skip “bureaucratic” steps like permits or licensed inspection. But in HVAC work, codes exist for safety and efficiency:
-
NEC Article 440 covers HVAC circuit sizing and grounding.
-
IMC (International Mechanical Code) dictates refrigerant line support and spacing.
-
EPA 608 ensures refrigerant is handled safely and recycled properly.
Even if you install 90 % of the system yourself, a final inspection protects your home value and insurance coverage.
Reference: National Electrical Code (NFPA 70)
💬 17. What Homeowners Are Saying (and What I Learned)
After posting my results online, I heard from dozens of homeowners:
-
DIYers loved the cost savings but admitted the refrigerant step was stressful.
-
Pros emphasized that half their repair calls stem from poor DIY brazing or vacuuming.
-
Hybrid installers (like me) said it offered the perfect balance of cost and confidence.
The consensus: do what you’re comfortable with, but respect the complexity of modern HVAC systems.
🧠 18. Efficiency Depends on Installation Quality
Even the best 15 SEER2 Goodman system will underperform if installed poorly.
According to Energy Star, 30–40 % of residential systems are either over- or under-charged with refrigerant, leading to wasted energy.
Proper installation ensures:
-
Correct refrigerant pressure (critical for compressor life).
-
Balanced airflow across coils.
-
Accurate thermostat response.
-
Reduced cycling and noise.
Resource: U.S. Department of Energy – Heat Pump Installation Guidance
🏁 19. Final Verdict: Which Path Should You Choose?
| If You’re… | Best Option | Why |
|---|---|---|
| Experienced DIYer comfortable with wiring, carpentry, and code research | Hybrid Install | Save thousands while keeping warranty coverage |
| First-time homeowner or limited tools | Professional Install | Fast, code-compliant, risk-free |
| Licensed tradesperson (electrical or mechanical) | Full DIY (Certified) | You can legally handle all steps |
| Budget-focused but safety-conscious | DIY + Pro Startup | The “Jake Method” |
Jake’s closing thoughts:
“I’d absolutely do it again — but not alone. Having a pro handle the final vacuum and charge made all the difference. DIY where you can, but never guess when it comes to refrigerant or power.”
In the next topic we will know more about: Troubleshooting Guide: What to Do If Your Goodman Heat Pump Isn’t Cooling or Heating


