If you’ve been thinking about installing a DIY mini split system, the first big question is: How many BTUs do I need?
When I first started looking into mini splits, I thought it was simple—just buy the biggest one I could afford and call it a day. But as I quickly learned, sizing is everything. Get it wrong, and you’ll either be sweating in July, shivering in January, or wasting money on a system that’s too big for your home.
In this guide, I’ll break down exactly how I figured out the right BTUs for each room in my house, step by step. You’ll see the formulas, charts, adjustments for climate, and real-world examples that made the difference.
By the end, you’ll know how to size a DIY mini split the same way I did—without guesswork.
❓ Why Sizing Matters for DIY Mini Splits
Before we crunch numbers, let’s talk about why BTU sizing is such a big deal.
-
Undersized systems can’t keep up. They run nonstop, your rooms never feel fully cool or warm, and your electric bill climbs higher than expected.
-
Oversized systems short-cycle—turning on and off too often. This wastes energy, wears out parts faster, and leaves your air clammy because humidity doesn’t get removed properly.
-
The right size means balanced comfort, efficiency, and a system that lasts for 15–20 years.
The U.S. Department of Energy points out that proper sizing is one of the most important steps in choosing a ductless mini split. Too small or too large, and you’ll lose the benefits these systems are designed to deliver.
🔥 What Are BTUs and How Do They Work?
So, what exactly is a BTU?
BTU stands for British Thermal Unit—the amount of energy it takes to raise the temperature of one pound of water by one degree Fahrenheit.
For HVAC, BTUs tell us how much cooling or heating power a system can deliver. A 12,000 BTU mini split can remove or add 12,000 BTUs of heat per hour.
-
Cooling efficiency is measured with SEER2 ratings.
-
Heating efficiency is measured with HSPF2 ratings.
When I shopped for mine, I looked at both BTUs and efficiency ratings. A properly sized mini split with a high SEER2 saves way more money than a bigger unit running inefficiently.
For a quick refresher, ENERGY STAR has an excellent explainer on how ductless mini splits use BTUs to heat and cool.
🏠 Mike’s Step-by-Step Sizing Method
Here’s exactly how I sized each room in my home.
1. 📐 Measure Room Square Footage
Start with the basics. Multiply length × width to get square footage.
-
My living room: 15 ft × 20 ft = 300 sq. ft.
-
My bedroom: 12 ft × 12 ft = 144 sq. ft.
-
My basement: 25 ft × 30 ft = 750 sq. ft.
Write these numbers down—you’ll use them in the next step.
2. 🔢 Apply BTU Per Sq. Ft. Rule of Thumb
The general rule is:
-
20–25 BTUs per sq. ft. for cooling.
So, my 300 sq. ft. living room × 25 BTUs = 7,500 BTUs.
My 144 sq. ft. bedroom × 25 = 3,600 BTUs (but since most systems start at 6,000 BTUs, that’s the minimum size I’d choose).
3. 🏗️ Adjust for Ceilings, Insulation & Sun Exposure
This is where most people go wrong—they stop at square footage. But other factors matter:
-
Ceiling height: If it’s over 9 ft, add 10–20%.
-
Insulation quality: Poor insulation = add 10–15%.
-
Sun exposure: South-facing or large windows = add 10–20%.
Example: My living room has cathedral ceilings at 12 ft, so instead of 7,500 BTUs, I added 20% → 9,000 BTUs.
4. 👨👩👧 Factor in Occupancy & Appliances
Every person and appliance adds heat.
-
Add 600 BTUs per extra person beyond 2 occupants.
-
Add 4,000 BTUs for kitchens (cooking generates a ton of heat).
My kitchen/dining combo (350 sq. ft.) needed 9,000 BTUs, plus 4,000 for cooking heat → 13,000 BTUs total.
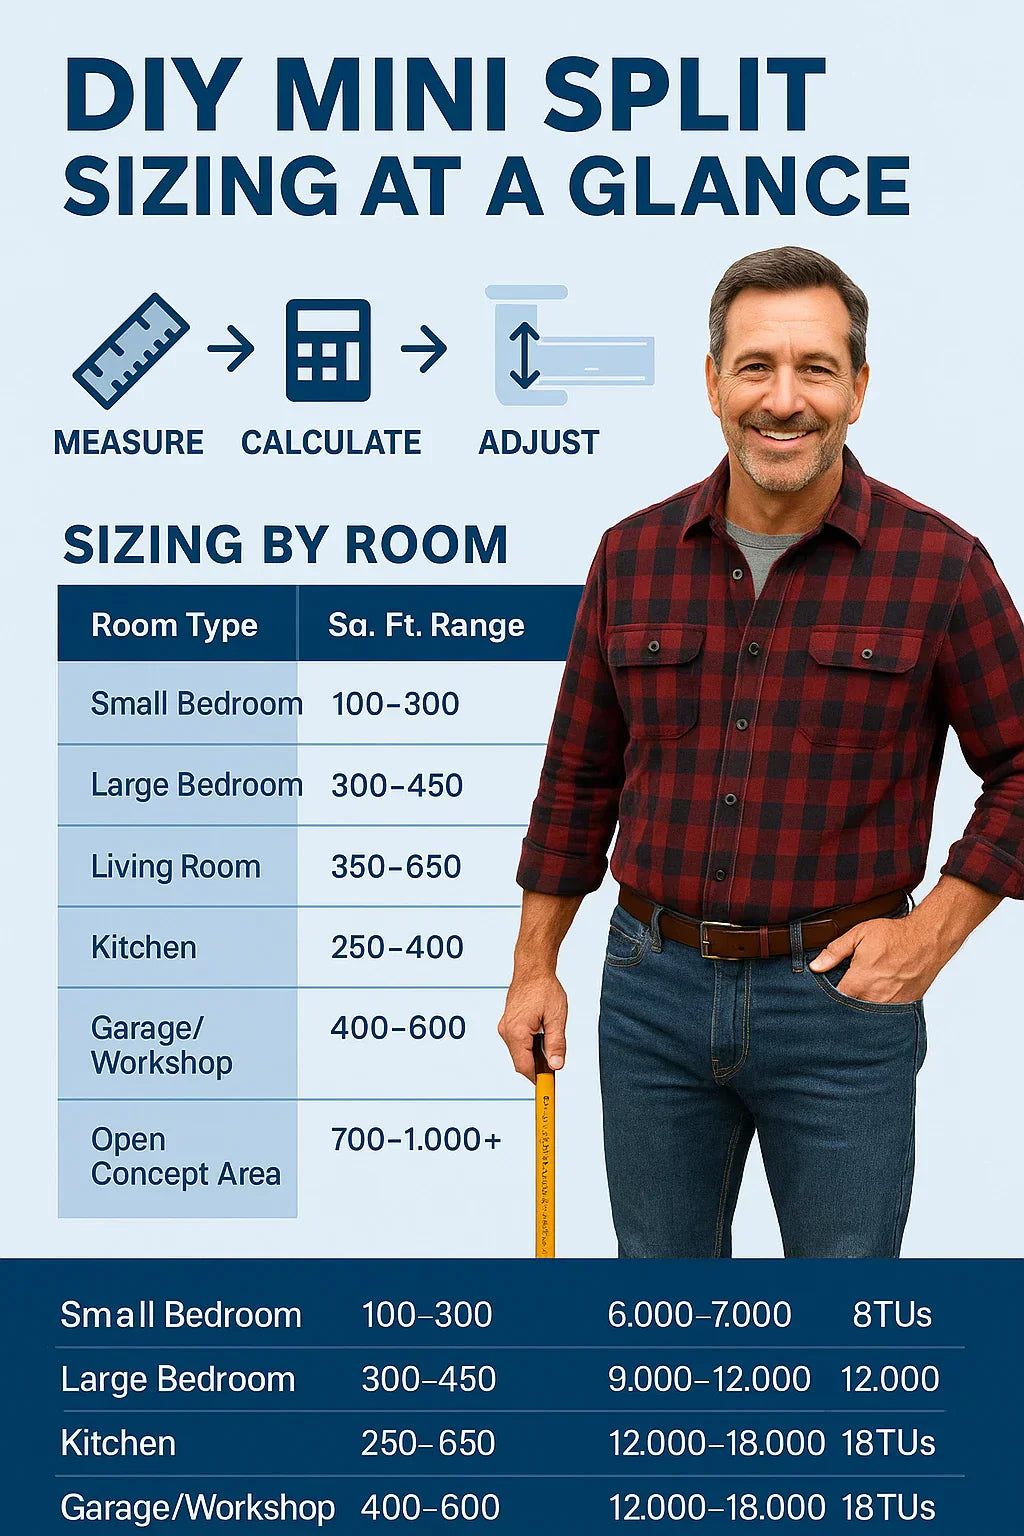
📊 DIY Sizing Chart by Room Type
Here’s a quick cheat sheet I built based on DOE guidelines and my own calculations:
| Room Type | Sq. Ft. Range | Recommended BTUs |
|---|---|---|
| Small Bedroom | 100–300 | 6,000–7,000 |
| Large Bedroom | 300–450 | 9,000–12,000 |
| Living Room | 350–650 | 12,000–18,000 |
| Kitchen | 250–400 | 10,000–14,000 |
| Garage/Workshop | 400–600 | 12,000–18,000 |
| Open Concept Area | 700–1,000+ | 18,000–24,000+ |
🌡️ Don’t Forget Climate Adjustments
Your climate matters as much as your room size.
-
Hot, humid regions (like Texas or Florida) → Add 10–20%.
-
Cold northern winters → Make sure the unit has a strong HSPF2 rating for heating.
-
Mild coastal climates → You may be fine on the lower end of the BTU range.
When I sized my basement, I added 15% since winters here dip into the 20s. That bumped my 18,000 BTU estimate to 24,000 BTUs, which was the right call.
The Fujitsu General guide explains how different models handle extreme climates.
⚠️ Common Sizing Mistakes Mike Sees
I’ve helped neighbors with mini splits, and here are the biggest errors I see:
-
Buying the biggest system available (“bigger is better” is false in HVAC).
-
Ignoring ceiling height—a tall great room needs more cooling than a flat-ceiling bedroom of the same size.
-
Forgetting insulation—older homes with poor insulation need higher BTUs.
-
Skipping solar gain—south-facing rooms with big windows always need extra capacity.
-
Not accounting for multi-zone balance—you can’t put a 24,000 BTU head in a 200 sq. ft. bedroom and expect efficiency.
For more details, Energy.gov has a great section on what to avoid when sizing systems.
🛠️ Single-Zone vs. Multi-Zone BTU Matching
If you’re installing a single-zone system, the BTUs just need to match that room. Easy.
But with multi-zone systems, each air handler needs to be sized to its room, and the outdoor condenser must handle the combined load.
Here’s how I split mine:
-
Bedroom (144 sq. ft.) → 9,000 BTU head (smallest available).
-
Living room (300 sq. ft. w/ high ceiling) → 12,000 BTU head.
-
Basement (750 sq. ft., cold winters) → 18,000 BTU head (upgraded to 24,000 for climate).
My outdoor unit was rated for 36,000 BTUs, enough to handle all three zones running at once.
📅 Longevity & Maintenance Depend on Proper Sizing
One last note: a system that’s the right size doesn’t just save energy—it also lasts longer. Oversized units short-cycle and wear out, while undersized units run themselves into the ground.
According to Energy.gov’s maintenance guide, keeping filters and coils clean is crucial, but it all starts with having the proper size from day one.
✅ Mike’s Final Takeaway
Here’s my bottom line after doing the math, shopping around, and living with my DIY mini split system:
-
Don’t guess on BTUs. Measure, calculate, and adjust for real-world conditions.
-
Plan room by room. Each zone needs to match its own space, not just the whole house.
-
Think long-term. A right-sized system runs quieter, lasts longer, and keeps your bills down.
For me, dialing in the right BTUs made all the difference. My basement stays warm in January, my living room cools off fast in August, and I know I didn’t overspend on equipment that’s too big for the job.
If you’re going the DIY route, this step is non-negotiable: match the BTUs to your room size—just like I did.
In the next topic we will know more about: Installation Guide: Mike’s Step-by-Step Walkthrough for a DIY Mini Split


