By Savvy Mavi — Your Eco-Modern HVAC Designer & Comfort Strategist
Here’s the truth no one tells homeowners:
Most PTAC setups are designed for today — not tomorrow.
They’re installed to fix a comfort problem fast:
-
that too-warm bedroom
-
that stuffy bonus room
-
that under-conditioned basement office
-
that converted garage with its own personality
-
that ADU you’re trying to get Airbnb-ready
But homes evolve. Floorplans change. Rooms get repurposed. Families grow. And if your PTAC layout isn’t engineered with future upgrades in mind, you’ll eventually face:
-
expensive rewiring
-
relocations
-
airflow redesign
-
mismatched BTUs
-
blown circuits
-
clogged sleeves
-
overshoot or short-cycling
-
loud airflow right where you sleep
Future-proof design is the only design that actually saves money in the long run.
This is the guide that hotel engineers, commercial HVAC designers, and sustainability consultants (aka me 💁♀️) use to create PTAC layouts that stay efficient, quiet, and scalable for 10–20 years.
Amana J-Series PTAC Model 17,000 BTU PTAC Unit with 5 kW Electric Heat
Let’s build comfort that grows with your home — not against it.
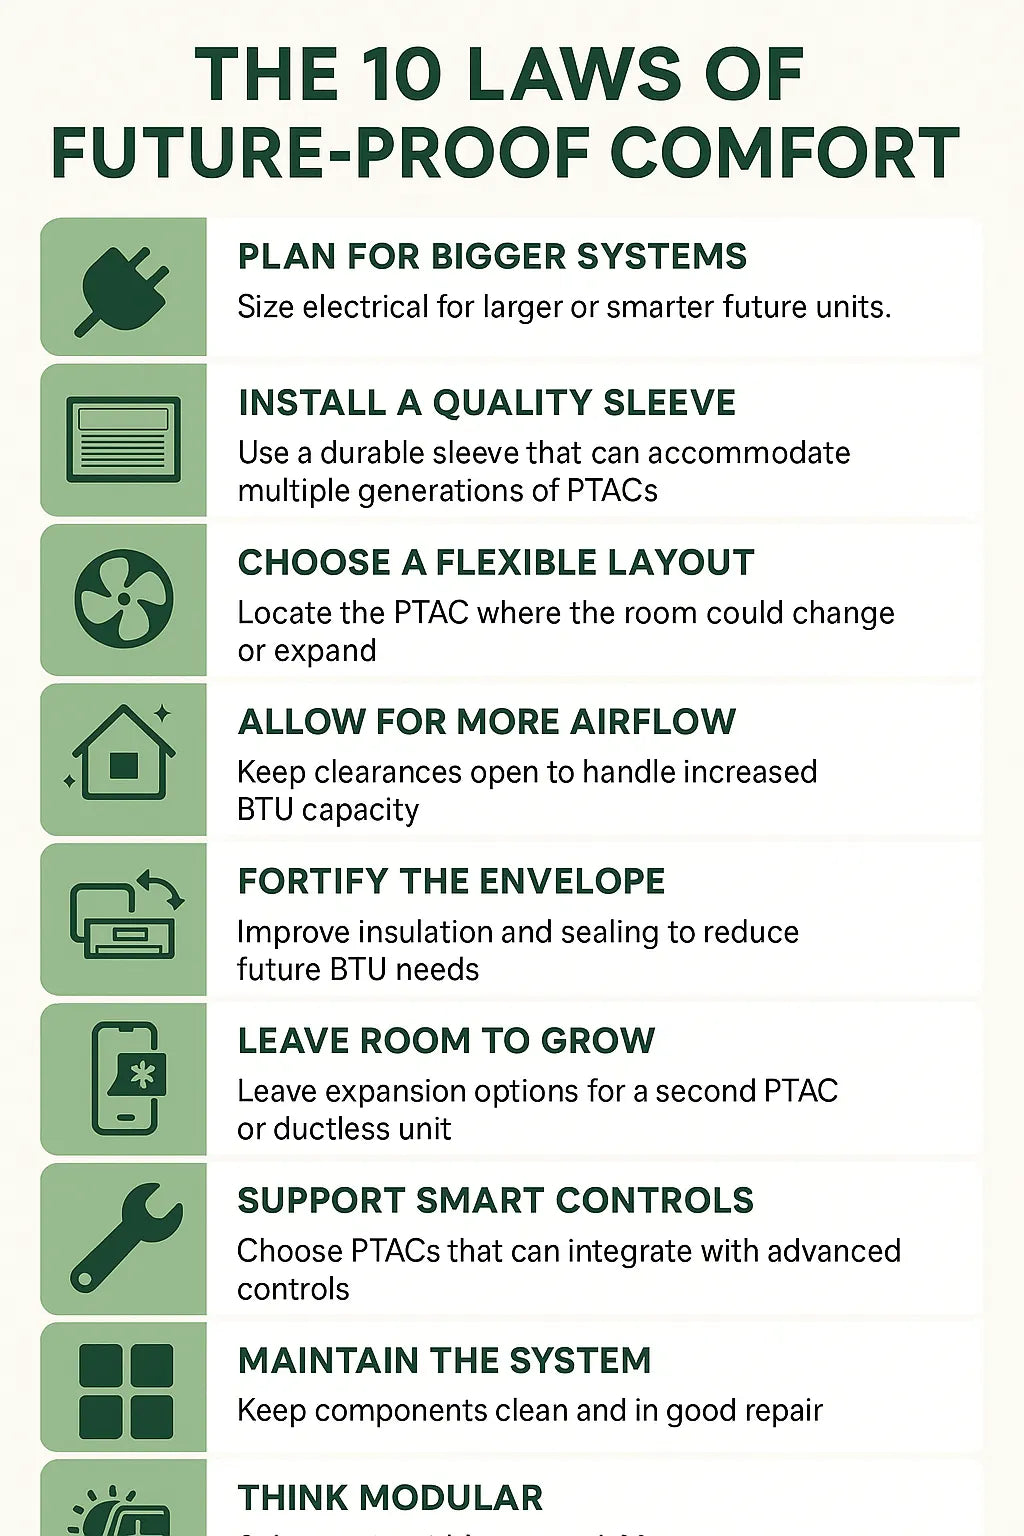
🧭 1. What Does It Mean to “Future-Proof” a PTAC Layout?
Future-proofing means designing the infrastructure, airflow, electrical load, structural support, and layout so your PTAC system can:
-
upgrade from 7k → 9k → 12k → 15k BTU
-
add heat pump support
-
expand into adjacent rooms
-
relocate without major construction
-
support smart controls
-
integrate with solar or battery systems
-
maintain efficiency as your home’s use changes
Instead of being a fixed appliance, a future-proofed PTAC becomes part of a modular comfort system.
🔌 2. Step One: Electrical Planning That Allows for Larger or Smarter Units
Electrical mistakes are the #1 reason PTAC upgrades become expensive.
Here’s the Savvy rule:
Always install electrical infrastructure for the next size up, not the current one.
For example:
If you’re installing a 12,000 BTU PTAC today:
📌 Install wiring & breaker sized for 15,000–17,000 BTUs (208/230V, 20–30A)
If you’re adding a heat strip (3.5 kW, 5 kW):
📌 Design the circuit for the largest strip your model line supports.
Future-Proofed Electrical Checklist:
-
✓ dedicated circuit
-
✓ proper NEMA plug type (6-20P, 6-30P)
-
✓ breaker sized at 125% of max load
-
✓ wiring gauge sized for future amperage
-
✓ outlet placed where the unit might move later
-
✓ surge protection (future heat pumps are sensitive!)
Verified Link
DOE electrical safety & load planning
🧊🌡 3. Step Two: Choose a Wall Sleeve That Supports Multiple Generations
The wall sleeve is the forever part of a PTAC installation.
A good wall sleeve can last:
-
20+ years
-
through multiple PTAC upgrades
-
through refrigerant transitions
-
through capacity changes
A cheap sleeve?
You’ll rip it out. And the drywall with it.
Future-Ready Sleeve Features:
-
✔ universal dimensions (42"x16" is standard)
-
✔ proper insulation
-
✔ room for deeper or taller chassis
-
✔ sealed exterior grille
-
✔ water channeling for future drain configurations
-
✔ ability to add sleeve baffles for quieter units
Why this matters:
Future PTACs may use:
-
R-32
-
inverter compressors
-
smart sensors
-
quieter cross-flow blowers
-
deeper coil assemblies
Your sleeve must accommodate all of these without remodeling.
Verified Link
EPA guidance on sealing penetrations (applies to sleeves too):
https://www.epa.gov/indoor-air-quality-iaq
🛋 4. Step Three: Layout the Room for 5–10 Years of Flexibility
This part is where the real eco-design magic happens.
Your PTAC layout shouldn’t only suit what your room looks like today.
It should anticipate:
-
new furniture
-
changing traffic flow
-
potential bed relocation
-
converting the room into a nursery
-
turning the space into a home office
-
adding a second PTAC in the future
-
expanding airflow to the next room over
The Savvy “Future Layout Grid”:
Create a grid with two PTAC-friendly walls:
-
Wall A: primary PTAC location
-
Wall B: secondary PTAC location (future option)
This lets you:
-
move the unit without new wiring
-
change room purpose without airflow chaos
-
avoid redesign when BTU needs change
Avoid:
❌ placing PTACs behind beds
❌ installing under drapes
❌ blocking return airflow
❌ placing in narrow alcoves
❌ installing near closet doors
Future flexibility requires breathable, open airflow space.
🌬 5. Step Four: Airflow Planning That Scales With BTUs
Future PTACs may:
-
blow harder
-
use inverter ramps
-
modulate airflow
-
support increased CFM
You need an airflow corridor that won’t break when capacity changes.
✔ Build a “Wind Path”
Air should travel the room’s longest dimension.
✔ Maintain 12–18 inches clear space in front
All future units need it.
✔ Avoid furniture zones that trap future airflow
Especially:
-
tall bookcases
-
bed footboards
-
media centers
-
high-back chairs
✔ Include ceiling fan support
Future PTACs + ceiling fans = smooth temperature curves + less overshoot.
Verified Link
ASHRAE airflow fundamentals:
https://www.ashrae.org/technical-resources
🧱 6. Step Five: Build the Thermal Envelope for the Worst-Case Future System
Your PTAC shouldn’t have to work harder later.
If you refine the envelope today, your future BTU needs drop automatically.
Must-Do Envelope Work:
-
air seal windows
-
foam seal the sleeve
-
insulate exterior walls
-
upgrade attic insulation
-
install low-E curtains or film
-
seal baseboards and trim gaps
Why this is future-proofing:
A tight envelope allows you to:
-
downsize or right-size future PTACs
-
reduce compressor wear
-
decrease cycling
-
avoid needing higher BTU units later
-
support heat pump upgrades that require tight conditions
A PTAC grows best in a healthy envelope.
🔄 7. Step Six: Plan for Multi-Zone or Add-On Capability
Future homeowners often want:
-
a second PTAC
-
a PTAC + ductless mini split combo
-
a PTAC to condition an adjacent room
-
a PTAC-assisted whole-house layout
Plan for this now by:
-
installing a second wall sleeve location
-
leaving conduit paths open
-
ensuring electrical panel has spare capacity
-
placing PTAC near shared wall for airflow expansion
-
allowing for future thermostatic integration
Hotels design PTAC rooms with expansion in mind.
Homes should do the same.
Verified Link
DOE zoning strategies (applies to room-based PTAC zoning)
📱 8. Step Seven: Smart Controls That Adapt Over Time
Your PTAC’s controls should evolve with your home.
Choose systems that support:
-
external thermostats
-
WiFi or app control
-
occupancy sensing
-
API integration
-
smart cycling
-
energy monitoring
-
staged heating logic
-
lockout settings
-
humidity control
Even if your PTAC doesn’t need these now, your future PTAC might.
Verified Link
EnergyStar smart thermostat guidance:
https://www.energystar.gov/products/smart_thermostats
🛠 9. Step Eight: Maintenance That Keeps Future Options Open
Future upgrades work best when the existing system ages gracefully.
Do these yearly:
-
clean blower wheel
-
vacuum return path
-
reseal sleeve edges
-
inspect electrical contacts
-
check drain pan
-
clean coils
-
refresh external grille seal
Good maintenance prevents the need for premature replacements — giving you time to plan upgrades on your terms, not emergency terms.
🔍 10. Step Nine: Build With Modular Components
Hotel designers do this.
Commercial engineers do this.
Smart homeowners should too.
Modular components include:
-
removable grilles
-
replaceable drain pans
-
universal thermostats
-
upgrade-friendly sleeves
-
standardized plug types
-
reversible louvers
-
detachable front panels
-
swappable filters
A modular PTAC ecosystem means you only replace what’s needed — not the entire installation.
🔋 11. Step Ten: Plan for Solar, Battery, or Grid-Support Features
Future HVAC = less grid dependency.
Design so your PTAC can eventually be supported by:
-
rooftop solar
-
battery storage systems
-
smart load controllers
-
demand-response programs
-
variable-power inverters
Future-ready electrical planning reduces peak loads and helps your PTAC run on cleaner energy.
🧠 12. Final Thoughts — The Future Loves a Flexible Home
Designing for future upgrades is not about predicting the future.
It’s about removing limitations.
A PTAC layout that grows with your home is:
-
flexible
-
modular
-
quiet
-
efficient
-
envelope-optimized
-
airflow-friendly
-
scalable
-
sustainable
And most importantly — it prevents you from spending thousands on redesigns years down the line.
Design for the room you have now.
Prepare for the home you’ll have next.
Future-proofing = sustainability, comfort, and savings in one beautiful package.
Stay future-ready.
Stay efficient.
Stay Savvy. 🌿✨
Buy this on Amazon at: https://amzn.to/434DIng
In the next topic we will know more about: Wall Thickness & Real-World Noise — The Architectural Secret Behind PTAC Comfort


