A through-the-wall air conditioner is only as good as the seal around it. That’s why the GE Wall Sleeve Trim Kit (RAK27) exists — to close gaps, block drafts, and provide a clean, professional finish. But what happens if your trim kit isn’t sealing the way it should?
For Mike — a practical homeowner who likes to solve problems himself — this situation hit close to home:
“After installing my AC and trim kit, I thought I was good to go. But then I noticed a draft on windy nights. Turns out, my trim wasn’t sealing correctly. I had to go back, troubleshoot the problem, and fix it.”
If you’ve noticed drafts, leaks, or bugs sneaking past your trim kit, this guide will walk you through what’s wrong, how to fix it, and how to prevent it from happening again.
GE Wall Sleeve Trim Kit for 26" Through-the-Wall Units RAK27
🔍 Signs Your Trim Kit Isn’t Sealing Properly
Before diving into fixes, confirm you actually have a sealing issue. Common symptoms include:
-
Drafts: You feel cold or hot air coming in around the AC.
-
High energy bills: Your system works harder to compensate for leaks.
-
Visible gaps: Edges of the trim don’t sit flush against the wall.
-
Water stains or moisture: Condensation or leaks on drywall near the unit.
-
Insects or pests: Bugs find their way in through tiny cracks.
-
Noise: Outdoor sounds are louder than they should be.
Mike’s Check:
“I held a candle next to the trim — when the flame flickered, I knew air was sneaking in.”
🔗 Reference: DOE – Air Sealing Basics
🧱 Common Causes of Poor Sealing
A trim kit like the RAK27 is designed for precision, but a few issues can keep it from doing its job:
-
Misaligned installation – If the trim kit isn’t square or level, gaps appear.
-
Old or cracked caulk – Sealant breaks down over time, especially outdoors.
-
Warped or damaged wall sleeve – A bent sleeve prevents the trim from sitting flush.
-
Wrong sleeve size – RAK27 only fits GE 26-inch sleeves; smaller or universal sleeves leave gaps.
-
Loose screws or hardware – Trim can shift if not properly secured.
-
Settling of the wall or frame – Older homes may have shifted slightly, leaving uneven edges.
Mike’s Mistake:
“I reused an old sleeve that wasn’t level. The trim never sat right until I replaced it.”
🔗 Reference: Family Handyman – Through-the-Wall AC Installation Tips
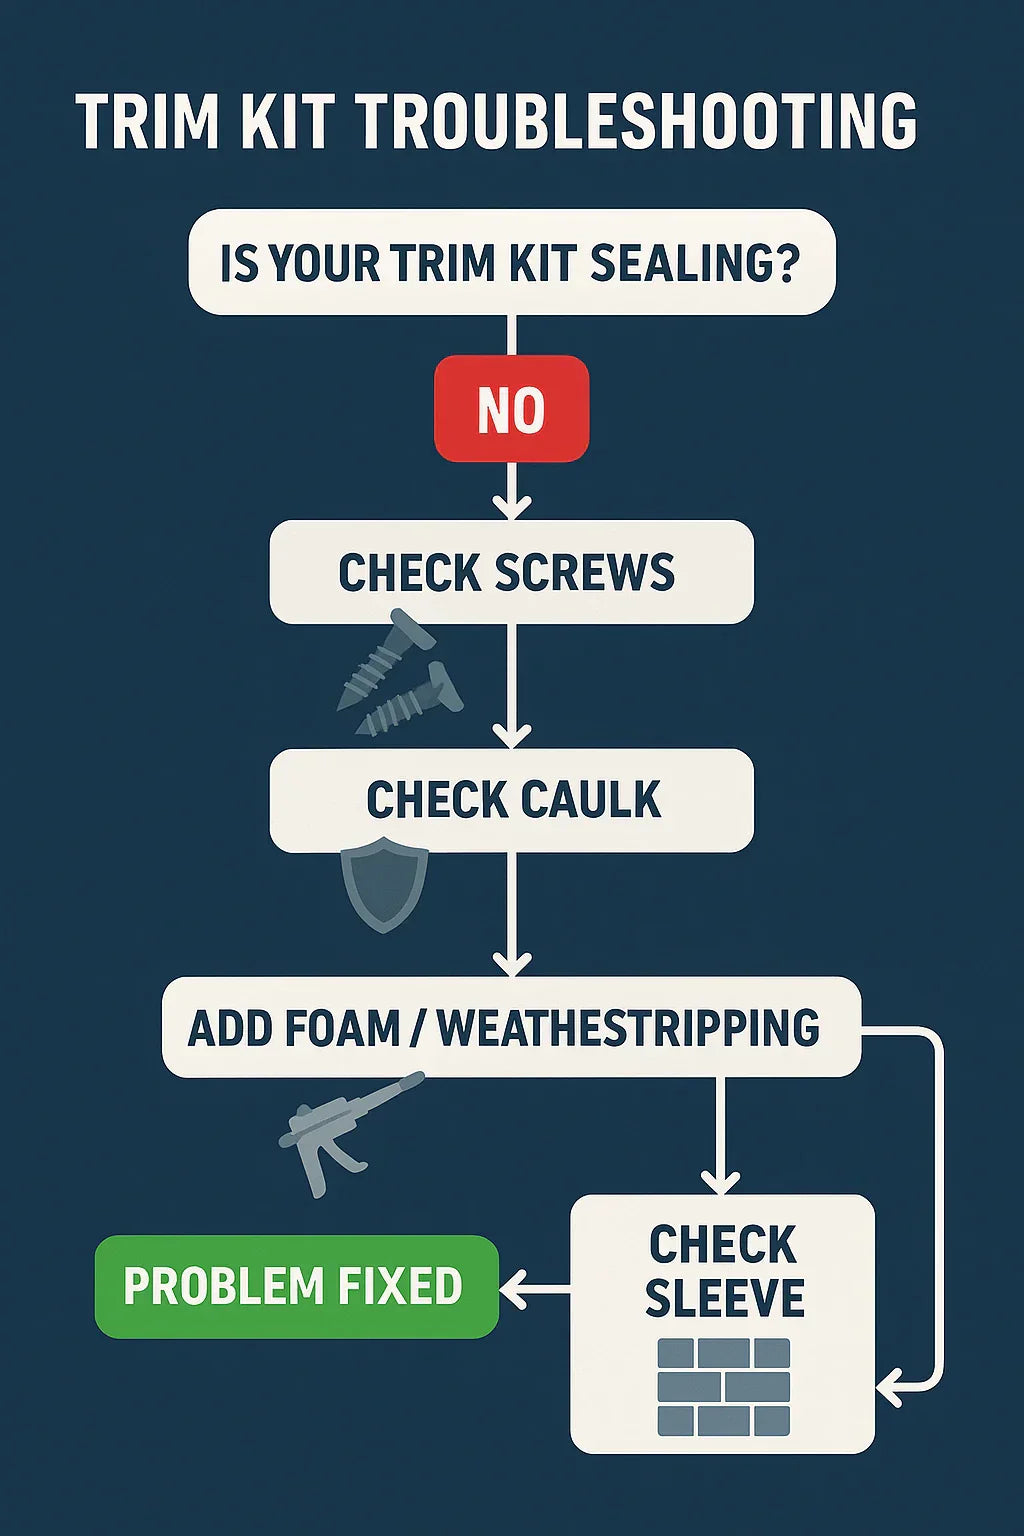
🛠️ Step-by-Step Troubleshooting Guide
Follow this process to diagnose and fix sealing problems:
1. Inspect Visually
-
Look closely at the trim edges.
-
Shine a flashlight to spot hairline gaps.
2. Check Screws & Hardware 🔩
-
Tighten any loose screws holding the sleeve and trim.
-
Replace stripped or missing screws.
3. Perform the Draft Test 💨
-
Use a candle, lighter, or incense stick.
-
Move it around the edges of the trim — flickering smoke = air leak.
4. Remove Old Caulk 🛡️
-
Scrape away cracked or peeling caulk with a utility knife.
-
Clean surfaces before resealing.
5. Reapply Exterior-Grade Caulk
-
Run a thin, even bead around all trim edges.
-
Smooth it with a caulk tool or damp finger.
-
Let it cure for 24 hours.
6. Add Weatherstripping or Foam Sealant 🧰
-
For stubborn gaps, add thin weatherstripping or low-expansion foam sealant.
-
Be careful not to block drainage or airflow.
7. Confirm Sleeve Alignment 🧱
-
Use a level to check the sleeve.
-
If the sleeve is warped, bent, or too small, replacement may be the only solution.
Mike’s DIY Fix:
“After re-caulking, I still had a small gap. A strip of weatherstripping solved it in minutes.”
🔗 Reference: Home Depot – How to Apply Caulk
⚠️ When the Problem Is the Sleeve
Sometimes the trim kit isn’t the problem at all — it’s the sleeve underneath.
-
If the sleeve is rusted, bent, or warped, the trim can’t sit flush.
-
If the sleeve is the wrong size (not GE 26-inch), the RAK27 won’t fit properly.
-
If the sleeve is misaligned during installation, the trim kit will never seal evenly.
In these cases, replacing the sleeve is the only long-term fix.
🔗 Reference: GE Appliances – Room AC Accessories
🌧️ Preventing Future Seal Issues
Once you’ve fixed the problem, keep it from coming back with simple maintenance:
-
Inspect seasonally: Look for cracks, gaps, or loose screws.
-
Reseal annually: Apply fresh caulk to keep the edges weatherproof.
-
Clean trim and sleeve: Dirt buildup can push the trim out of alignment.
-
Check after storms: Heavy wind and rain can reveal sealing problems.
Mike’s Routine:
“Every spring, before turning on the AC, I run through a five-minute trim check. It’s easier than dealing with leaks in July.”
🔗 Reference: ENERGY STAR – Room AC Installation & Maintenance
🏢 Multi-Unit Property Consideration
In hotels, apartments, or condos, sealing problems multiply fast:
-
Drafts in 100 rooms = huge energy losses.
-
Leaks in multiple units = major repair bills.
-
Guests or tenants complaining = bad reviews or turnover.
That’s why property managers schedule regular sleeve and trim inspections — catching small issues before they scale into costly building-wide problems.
🔗 Reference: FacilitiesNet – HVAC Maintenance in Hotels
📊 Troubleshooting Chart
| Problem | Cause | Fix |
|---|---|---|
| Drafts | Loose screws, misalignment | Tighten hardware, reseal with caulk |
| Water leaks | Cracked caulk | Remove & reapply exterior caulk |
| Visible gaps | Wrong sleeve size | Replace with GE 26” sleeve |
| Pest entry | Seal failure | Add foam or weatherstripping |
| Noise intrusion | Sleeve gaps | Tighten, reseal, or replace sleeve |
💡 Mike’s Pro Tip
“Don’t ignore a draft or small leak. A $5 tube of caulk today saves you from $500 in drywall repairs tomorrow.”
✅ Conclusion
A trim kit that isn’t sealing properly is more than just an annoyance — it’s a risk to your comfort, energy bills, and even your home’s structure.
The good news? With some basic troubleshooting steps, most issues can be fixed in under an hour. And with regular seasonal maintenance, you can prevent sealing problems altogether.
For Mike, the lesson is simple:
“If something feels off with your trim kit, don’t wait. Fix it now, and your AC will thank you later.”
In the next topic we will know more about: Installation Guide: How to Install the GE Wall Sleeve Trim Kit (RAK27) Step by Step


