Last summer, I walked into my living room on a blazing hot afternoon only to find warm air blowing from my vents. My Goodman system was running, but my 4.5 Ton Horizontal Cased Painted A-Coil with Built-In TXV (Model CHPTA6030D3, R-32 Ready) wasn’t cooling at all.
Like many homeowners, my first instinct was to panic—and call an HVAC technician immediately. Later, I learned that many A-coil problems can be traced back to simple issues I could have checked myself first.
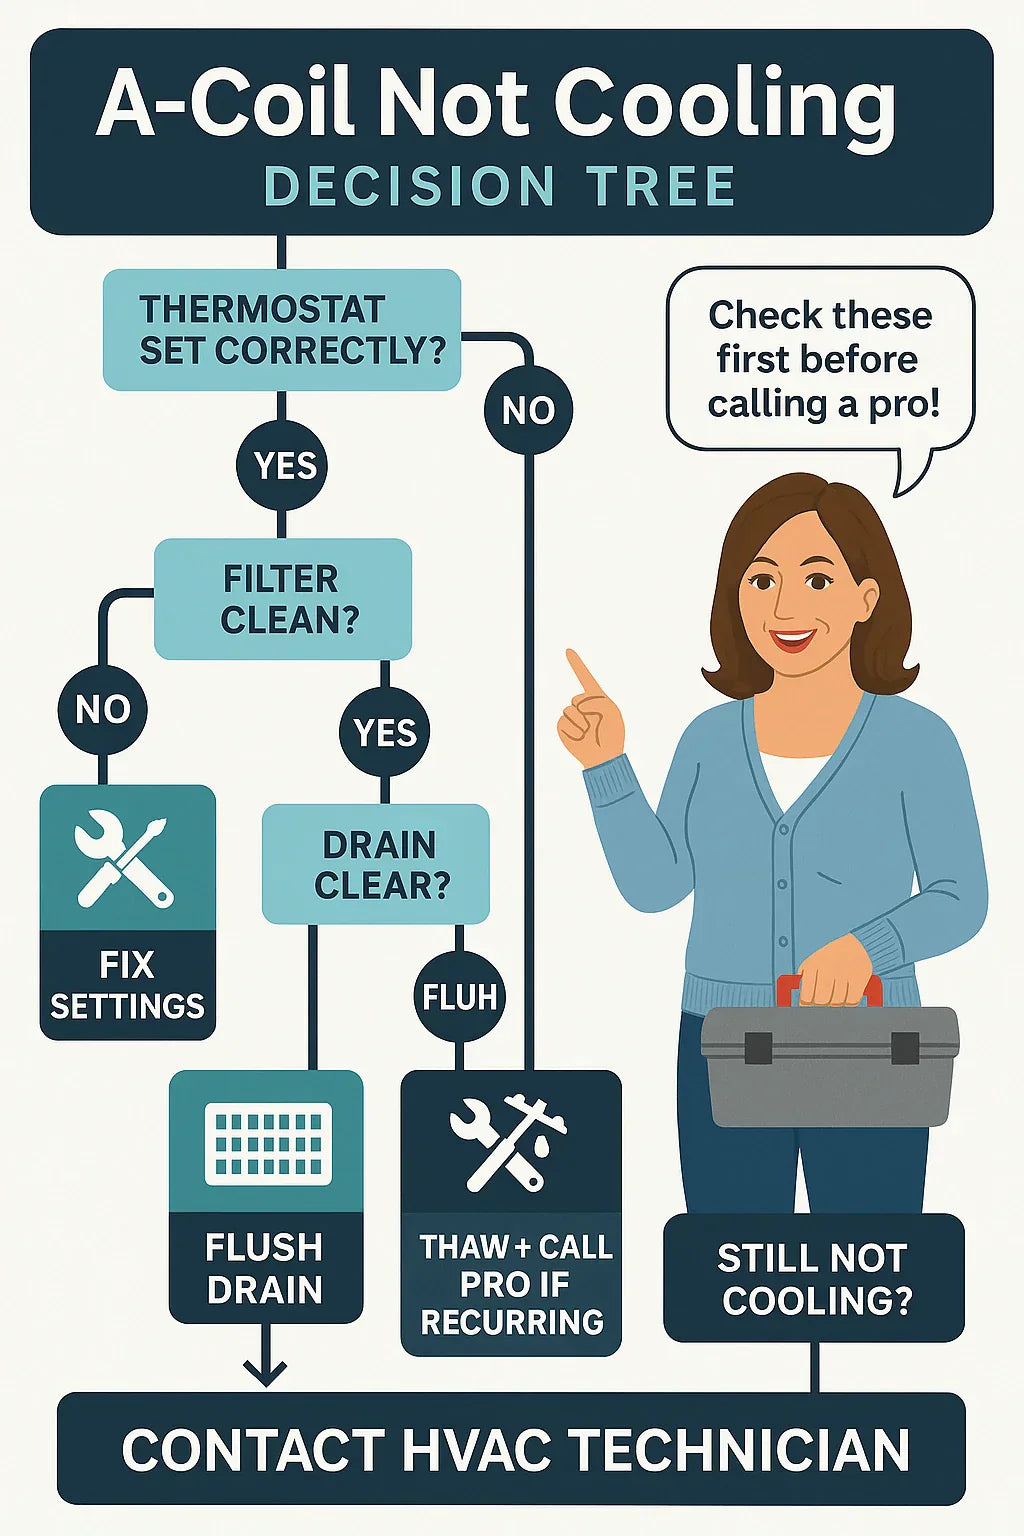
In this guide, I’ll walk you step by step through the most common reasons your Goodman A-Coil isn’t cooling properly, what you can fix on your own, and when it’s time to call in a pro.
❓ Symptoms: How Do You Know Something’s Wrong?
If your A-coil isn’t cooling, you’ll usually notice one or more of these signs:
-
Weak or warm airflow: Air is moving through the vents, but it’s not cold.
-
Ice or frost: The coil or refrigerant lines may freeze up.
-
High indoor humidity: Air feels sticky or clammy, even if the system is running.
-
Water leaks: Drain pan or line may be clogged.
-
Strange noises: Hissing, bubbling, or gurgling from refrigerant issues.
👉 These are warning signs that something’s interfering with the coil’s ability to absorb heat.
🔍 Step 1: Check the Thermostat
This sounds basic, but you’d be surprised how often the thermostat is the culprit.
-
Make sure it’s set to “Cool” mode.
-
Verify the set temperature is at least 3–5°F below the room temperature.
-
If it’s digital, replace the batteries.
-
For smart thermostats, check the app settings—sometimes a schedule overrides your manual setting.
👉 I once thought my coil had failed, only to find my thermostat was set to “Fan Only.”
🍃 Step 2: Inspect the Air Filter
A dirty or clogged filter is the #1 cause of coil issues. Why? Because it restricts airflow, causing the coil to get too cold and eventually freeze over.
-
Remove your filter and hold it up to the light. If you can’t see through it, replace it.
-
Check the filter size (commonly 16x25x1, 20x25x1, etc.).
-
Replace filters every 1–3 months, depending on dust and pets.
🔗 ENERGY STAR stresses filter maintenance as the simplest and most effective way to keep coils efficient.
💧 Step 3: Check the Drain Line & Pan
Your coil doesn’t just cool—it also removes humidity. That water drains through a condensate line into a pan. If the line clogs:
-
Water can back up and trigger a float switch, shutting the system off.
-
You may notice standing water in the secondary drain pan.
-
In worst cases, you’ll see water dripping onto ceilings or floors.
👉 Use a wet/dry vacuum on the outdoor drain line or pour 1 cup of vinegar into the line to clear algae.
❄️ Step 4: Look for Ice or Frost on the Coil
If your coil is frozen, it can’t absorb heat properly. Causes include:
-
Restricted airflow (dirty filter, blocked return vents).
-
Low refrigerant charge.
-
Faulty TXV or metering device.
What to do if you see ice:
-
Turn the thermostat to Off.
-
Turn the fan to On to help thaw the coil.
-
Wait several hours for the ice to melt before restarting cooling.
👉 If freezing happens more than once, you’ll need a pro to check refrigerant or TXV function.
⚡ Step 5: Inspect the Outdoor Unit
Your coil can’t work without help from the condenser outside. If it’s dirty or not running properly, cooling stops.
-
Make sure the unit has 2–3 feet of clearance from shrubs, fences, or debris.
-
Remove grass clippings and leaves stuck to the fins.
-
Check the breaker or fuse box—sometimes a tripped breaker is the only issue.
🔗 The DOE recommends keeping outdoor units clean for maximum efficiency.
🔧 Step 6: Consider Refrigerant or TXV Issues
If you’ve checked filters, drains, and outdoor clearance but cooling still isn’t happening, the problem may be refrigerant-related.
-
Low refrigerant charge: A leak could reduce system pressure.
-
Faulty TXV (Thermostatic Expansion Valve): If the built-in TXV sticks open or closed, it won’t regulate refrigerant flow correctly.
⚠️ These issues require an EPA Section 608 certified technician (EPA 608 Info). Do not attempt to handle refrigerant yourself.
🛠️ Step 7: When to Call a Professional
DIY can only go so far. Call an HVAC technician if you notice:
-
Ice buildup returning even after filter replacement.
-
Persistent warm air despite clean filters and drains.
-
Hissing or bubbling noises (signs of refrigerant leaks).
-
Oil spots on or around the coil (indicating refrigerant leaks).
-
System short cycling (turning on and off quickly).
👉 In my case, the issue turned out to be a refrigerant leak in a line set. A professional recharge and repair fixed it.
💡 Samantha’s Prevention Tips
After dealing with my first coil scare, I made prevention a priority:
-
Change filters every 60 days.
-
Flush drains with vinegar every spring and fall.
-
Inspect coil cabinet twice a year for dirt or leaks.
-
Schedule an annual service visit to check refrigerant charge and TXV.
🔗 The Air Conditioning Contractors of America (ACCA) recommends yearly maintenance for warranty protection.
📊 How Much Do Repairs Cost?
Here’s what I learned from my technician:
-
Filter replacement: $20–$50 (DIY).
-
Drain cleaning service: $75–$150.
-
Coil cleaning: $200–$400.
-
Refrigerant recharge: $200–$600, depending on leak size.
-
TXV replacement: $400–$800.
-
Full coil replacement: $1,200–$2,500.
👉 Catching problems early saves you from big-ticket repairs.
✅ Final Takeaway
If your Goodman A-Coil isn’t cooling, don’t panic. Start with simple checks:
-
Thermostat settings.
-
Air filter condition.
-
Drain line and pan.
-
Signs of ice or frost.
-
Outdoor condenser clearance.
If those don’t fix it, call a professional to check refrigerant and TXV operation.
My lesson learned: Knowing these basics helped me save money on unnecessary service calls and gave me peace of mind when real issues came up.
In the next topic we will know more about: Single vs. Multi-Position Coils: Why Choose a Horizontal Cased Goodman A-Coil?


