If you’ve ever had your thermostat suddenly go dark, your air conditioner refuse to turn on during a heat wave, or your furnace just sit silently in the dead of winter—you know how frustrating HVAC issues can be.
One of the most common culprits? A failed 120V to 24V transformer.
Goodman 120V to 24V Transformer 0130M00140S
This small box is one of the hardest-working (yet least understood) parts of your HVAC system. Without it, the system can’t communicate with the thermostat or run its safety controls. The good news? Unlike many HVAC repairs, replacing a transformer is often a DIY project that doesn’t require specialized HVAC licenses.
I’m Mark, a hands-on homeowner who has tackled this exact repair. In this guide, I’ll walk you through everything you need to know: what the transformer does, how to test it, and how to replace it safely.
🧾 Table of Contents
-
🔎 What a Transformer Does in Your HVAC System
-
⚠️ Safety First: Precautions Before You Begin
-
🛠️ Tools and Materials You’ll Need
-
🧰 Step 1: Turn Off Power to the System
-
🧰 Step 2: Locate the Old Transformer
-
🧰 Step 3: Test and Confirm the Transformer Is Bad
-
🧰 Step 4: Remove the Old Transformer
-
🧰 Step 5: Mount the New Transformer
-
🧰 Step 6: Wire the Primary (120V Side)
-
🧰 Step 7: Wire the Secondary (24V Side)
-
🧰 Step 8: Double-Check and Power Up
-
✅ Step 9: Test Your System and Thermostat
-
🔄 Optional Upgrades: Higher VA Transformers
-
🛡 Troubleshooting After Installation
-
💲 DIY vs. Hiring a Pro: Cost Breakdown
-
🧹 Maintenance and Longevity Tips
-
❓ FAQs About HVAC Transformers
-
📚 Final Thoughts
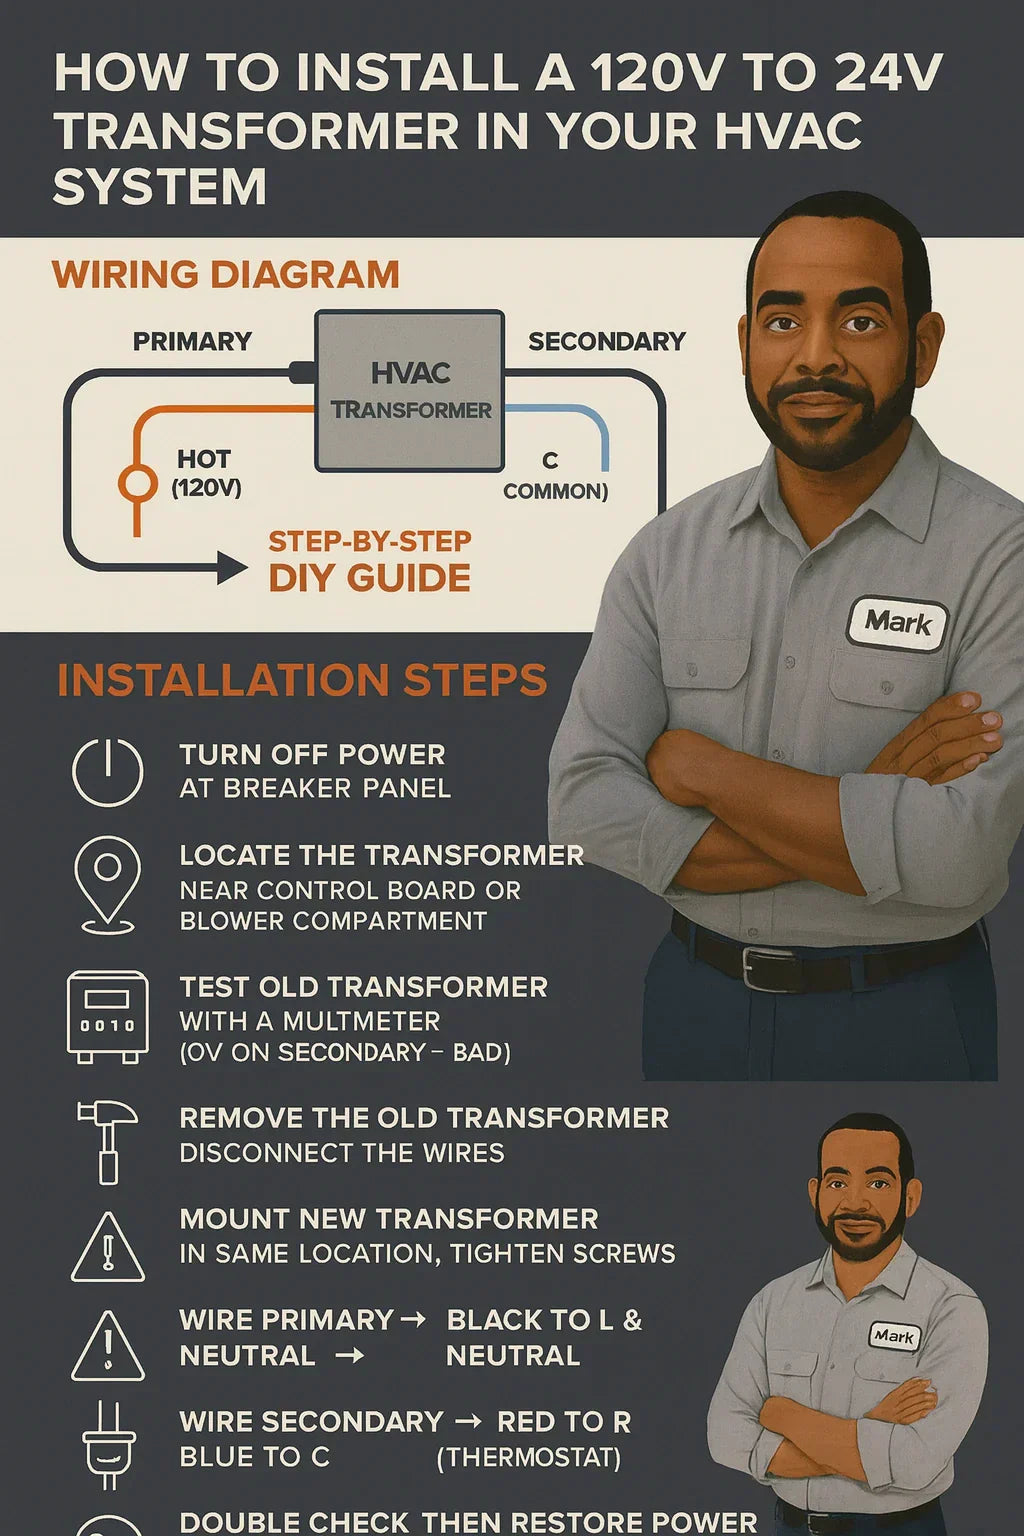
🔎 1. What a Transformer Does in Your HVAC System
Think of the transformer as the middleman between high-voltage power and low-voltage control.
-
Your furnace, blower motor, and AC compressor run on line voltage (120V or 240V).
-
Your thermostat, relays, and safety switches use low voltage (24V).
The transformer steps down that 120V supply to 24V, which is much safer and more efficient for control circuits.
Without it:
-
The thermostat wouldn’t light up.
-
The contactor in your outdoor AC unit wouldn’t engage.
-
Safety switches (like flame rollout sensors) wouldn’t work.
👉 Transformer basics explained
⚠️ 2. Safety First: Precautions Before You Begin
This is not a job to rush. Even though the secondary side is just 24V, the primary side is 120V, which can shock or injure you if mishandled.
My golden rules (learned the hard way):
-
Always cut power at the breaker panel before touching anything.
-
Test wires with a non-contact voltage tester before assuming they’re safe.
-
Take a photo of the wiring before disconnecting anything.
-
If the furnace or AC is still under warranty, check if DIY replacement voids coverage.
👉 OSHA’s electrical safety guide
🛠️ 3. Tools and Materials You’ll Need
Here’s a complete list (many you may already own):
-
Replacement transformer (Goodman 120V to 24V, or equivalent with proper VA rating)
-
Screwdrivers (Phillips + flathead)
-
Wire strippers and cutters
-
Multimeter (digital preferred)
-
Non-contact voltage tester
-
Wire nuts or crimp connectors
-
Electrical tape
-
Drill/screws (if mounting new hardware)
-
Flashlight or headlamp
-
Zip ties (to keep wiring neat)
🧰 4. Step 1: Turn Off Power to the System
Don’t skip this. Go to your breaker panel and flip the switch labeled “HVAC,” “Furnace,” or “AC.”
Once the panel is off, open your furnace’s service door. Use a non-contact voltage tester near the incoming power lines. If it beeps or lights up—stop. The breaker might be mislabeled.
👉 Tip: I once discovered a mislabeled breaker in my 1970s ranch. Always double-check.
🧰 5. Step 2: Locate the Old Transformer
The transformer is usually:
-
Near the blower compartment in furnaces.
-
On or near the control board.
-
A small metal box with wires coming out of both sides.
Look for two groups of wires:
-
Primary (120V): often black/white.
-
Secondary (24V): often red/blue or red/yellow.
If you smell burnt plastic or see discoloration, that’s a big clue it’s failed.
🧰 6. Step 3: Test and Confirm the Transformer Is Bad
Before replacing, confirm it’s not something else (like a tripped fuse).
-
Set your multimeter to AC voltage.
-
Test the primary input → should read ~120V.
-
Test the secondary output → should read ~24V.
If input is good but output is zero, the transformer is toast.
👉 How to test an HVAC transformer
🧰 7. Step 4: Remove the Old Transformer
-
Take a clear photo of the wiring connections (trust me, you’ll thank yourself later).
-
Disconnect the secondary wires (low voltage).
-
Disconnect the primary wires (line voltage).
-
Remove any mounting screws or bracket holding the transformer in place.
Pro tip: If wires are brittle, cut back to fresh copper.
🧰 8. Step 5: Mount the New Transformer
Mount the new transformer exactly where the old one was. Keep it tight against the frame or bracket.
Some units have multi-tap transformers (for 120V or 240V input). Make sure you’re wiring the correct tap for your system (most Goodman units use 120V).
🧰 9. Step 6: Wire the Primary (120V Side)
-
Black = hot line.
-
White = neutral.
Use proper connectors and tug-test the wires to ensure they’re snug.
🧰 10. Step 7: Wire the Secondary (24V Side)
This is where your thermostat gets its power.
-
Red wire = R (thermostat power).
-
Blue (or sometimes yellow) wire = C (common).
Make sure connections are tight and insulated.
👉 Tip: If you’re adding a smart thermostat, make sure you connect the C wire.
🧰 11. Step 8: Double-Check and Power Up
-
Check that all connections are correct.
-
Ensure no bare wires are exposed.
-
Replace the service panel.
-
Flip the breaker back on.
Stand by the furnace for a few seconds and listen—if you hear the control board click or the thermostat lights up, you’re in business.
✅ 12. Step 9: Test Your System and Thermostat
-
Set thermostat to Cool or Heat.
-
Wait for the blower or outdoor unit to respond.
-
Verify the system cycles on and off correctly.
-
Use your multimeter to confirm ~24V output if needed.
🔄 13. Optional Upgrades: Higher VA Transformers
A standard Goodman transformer is usually 40VA. But if you’ve added accessories like:
-
Wi-Fi thermostat
-
UV light system
-
Zoning control boards
-
Humidifiers
…your old transformer might be underpowered.
Rule of thumb: Add up the VA requirements of all devices. If it exceeds 75% of transformer capacity, upgrade to a larger one.
👉 Honeywell transformer sizing guide
🛡 14. Troubleshooting After Installation
Still no power? Try these:
-
Check the furnace fuse (often 3–5 amps on the control board).
-
Inspect thermostat wiring for shorts (look for bare spots).
-
Confirm contactor coil isn’t shorted in the outdoor unit.
-
Double-check that you wired the correct primary input (120V vs. 240V).
💲 15. DIY vs. Hiring a Pro: Cost Breakdown
DIY:
-
Transformer: $20–$40
-
Tools: $30–$60 (if you don’t already own them)
-
Total: $50–$100
Hiring a Pro:
-
Transformer: $20–$40
-
Labor: $150–$300
-
Total: $200–$350
For me, DIYing saved about $250 in labor.
🧹 16. Maintenance and Longevity Tips
Transformers can last decades—but only if the system wiring is in good shape.
-
Fix shorted thermostat wires quickly.
-
Keep control board fuses in place.
-
Replace faulty relays or contactors before they burn the transformer.
-
Keep wiring neat and away from sharp metal.
❓ 17. FAQs About HVAC Transformers
Q: Can I use a 240V to 24V transformer instead of 120V?
A: Only if your furnace is wired for 240V input. Most residential U.S. furnaces are 120V.
Q: Do smart thermostats need a stronger transformer?
A: Sometimes. Many require a solid C-wire connection and may need 40VA+ capacity.
Q: How long do transformers last?
A: Typically 15–20 years, unless overloaded or exposed to wiring faults.
Q: Why did my transformer blow again after replacement?
A: Likely a short circuit, bad contactor, or thermostat wire pinch.
📚 18. Final Thoughts
Replacing a 120V to 24V transformer in your HVAC system is one of those rare DIY projects where the cost savings are big and the skill barrier isn’t too high.
When my furnace went out one winter, a simple $25 part and about 45 minutes of careful work got my house warm again—without waiting for a technician.
If you take your time, follow the steps, and respect electricity, you’ll be able to do the same.
And remember: if at any point it feels overwhelming, there’s no shame in calling in a pro. Your HVAC comfort is too important to gamble with.
In the next topic we will know more about: What to Do If Your 24V Transformer Keeps Blowing—Mark’s Troubleshooting Guide


