Key Takeaways
-
Pick a safe wall – Avoid wires/pipes; keep structure strong.
-
Measure twice – Trace the sleeve, not just the box diagram.
-
Use the right saw – Diamond blade for masonry; reciprocating saw for wood.
-
Reinforce framing – Add header/studs if you cut a load-bearing stud.
-
Slope outward – ¼" per foot for proper condensate drainage.
-
Seal & flash – Backer rod + exterior caulk for a lasting, flexible seal.
Wall Cutting Best Practices for a Window/Wall AC (U.S. Homeowner Guide)

Cutting an exterior wall for a through-the-wall AC isn’t hard if you plan well and use the right steps. This guide covers safe, code-aware methods so you can make a clean opening, protect the structure, and keep water and air out. It’s written in simple language, but it includes expert tips you won’t find in a quick forum post. If you’re browsing for /window-wall-ac-installation-guide/wall-cutting-best-practices, you’re in the right place. We’ll walk through location, measuring, tools, cutting, reinforcement, sleeve install, waterproofing, and finishing. Along the way, you’ll find helpful links to The Furnace Outlet’s products and practical articles, including the HVAC Tips hub and a detailed PTAC sizing chart. If any step seems over your head—especially electrical or load-bearing questions—call a licensed pro.
Pick the Right Wall and Spot (Structure + Utilities)

Start with a wall that is not packed with plumbing, major wiring, or complex framing. Use a multi-scanner to locate studs, wires, and pipes. Most studs in U.S. homes are 16" on-center; aim for a bay where the sleeve will fit without chopping a stud. Avoid load-bearing segments when possible; if you must cut one, plan for a header. Outside, check for obstructions like decks, gas meters, or tight eaves. Inside, make sure you have working space and a clear path to a dedicated electrical outlet sized to the unit’s nameplate (often 120V or 208/230V—confirm before you buy). For alternatives, compare through-the-wall air conditioners with window units or even DIY ductless mini-splits if you prefer no cutting. When in doubt about utilities, review house plans or consult an electrician/plumber.
Measure Twice: Sleeve, Wall Thickness, and Clearances

Measure total wall thickness: drywall + sheathing + siding (or brick). Your sleeve must match this depth so it sits flush and stable. Trace the actual sleeve outline on painter’s tape; manufacturer templates can be off by a hair. Level your lines horizontally and vertically. Leave the clearances the manual calls for on all sides to allow airflow and fasteners. For drainage, plan a slight outward tilt of about ¼ inch per foot. Note interior obstacles like baseboards that could shift the cut height. Outside, confirm there’s safe ladder access and a good drip path below the unit. If you’re unsure about selecting the right capacity, check The Furnace Outlet’s Sizing Guide or compare choices like through-the-wall heat pumps when you also need heat. Careful measuring now prevents a day of patching later.
Tools You’ll Need (Matched to Wall Type)

Wood-framed walls: use a reciprocating saw for the main cut, and a circular saw set to sheathing depth for straight runs. An oscillating multi-tool helps clean corners without over-cutting. For masonry or brick, you’ll need a circular saw or grinder with a diamond blade, plus a masonry chisel for cleanup. Always start with corner pilot holes from the inside so you can connect clean lines outside. Have PPE ready: eye protection, hearing protection, dust mask/respirator, and gloves. Keep a vacuum handy to control dust. Mark blade depth with tape so you don’t plunge into wires. Set up drop cloths inside and outside. For install hardware and supplies, see Accessories and Line Sets & parts if your model uses separate refrigerant lines. Good tools and preparation keep the cut square, the edges clean, and your nerves calm.
Check for Wires, Pipes, and Hidden Hazards

Before any cut, scan the area carefully. Look for outlets, switches, or plumbing fixtures near your layout—these are clues that wires or pipes may cross your cut. Use a quality stud/voltage/pipe detector and scan from both sides if possible. Turn off power to nearby circuits while cutting. Drill a few small exploratory holes at the corners and inspect with a borescope or flashlight. Outside, confirm you’re not near sprinkler lines or low-voltage lighting cables. If the unit needs a new circuit, have a licensed electrician pull it and install the receptacle per code. When cutting masonry, beware of steel lintels, rebar, or wall ties. If you hit something unexpected, stop and reassess—don’t force the blade. For more homeowner how-tos, browse the HVAC Tips library; for model-specific videos, the HVAC video library is a good visual reference.
Make the Cut: Clean, Square, and Controlled

Score your layout lines first. On wood siding, a shallow pass with a circular saw reduces splintering; finish with a reciprocating saw. On brick or block, dry-cut with a diamond blade, then gently chisel to the line—don’t hammer hard or you’ll crack beyond the opening. Use short strokes near the corners to avoid over-cutting. Keep the saw shoe flat against the wall for a square edge. As the cutout loosens, support it so it doesn’t tear the sheathing or drywall. If you accidentally oversize the opening, don’t panic; you can shim the sleeve and air-seal later. Vacuum dust as you go for better visibility. Remember: a square, level opening makes the sleeve sit right, drain right, and seal right. If you’re comparing equipment choices before committing to the cut, check through-the-wall units (R-32 options).
Frame and Reinforce (Header, Jacks, and Cripples)

If your opening crosses a stud in a load-bearing wall, add a header sized per local code (common rule of thumb: two 2x members with a spacer, but verify). Install king studs full height and jack studs under the header ends. Add a sill at the base of the opening and short cripple studs as needed to restore rigidity. In non-bearing walls, you may only need to box out the opening with clean 2x framing to match the sleeve. Keep the interior edges flush and square; shims are your friend. Fasten with structural screws or nails to meet shear and withdrawal requirements. This reinforcement keeps the wall from sagging over time and prevents racking during storms. If you’re unsure whether the wall is bearing, consult a contractor. Need model guidance while planning? Compare packaged room options like PTACs and review this helpful Install the Sleeve: Level, Slope, and Support

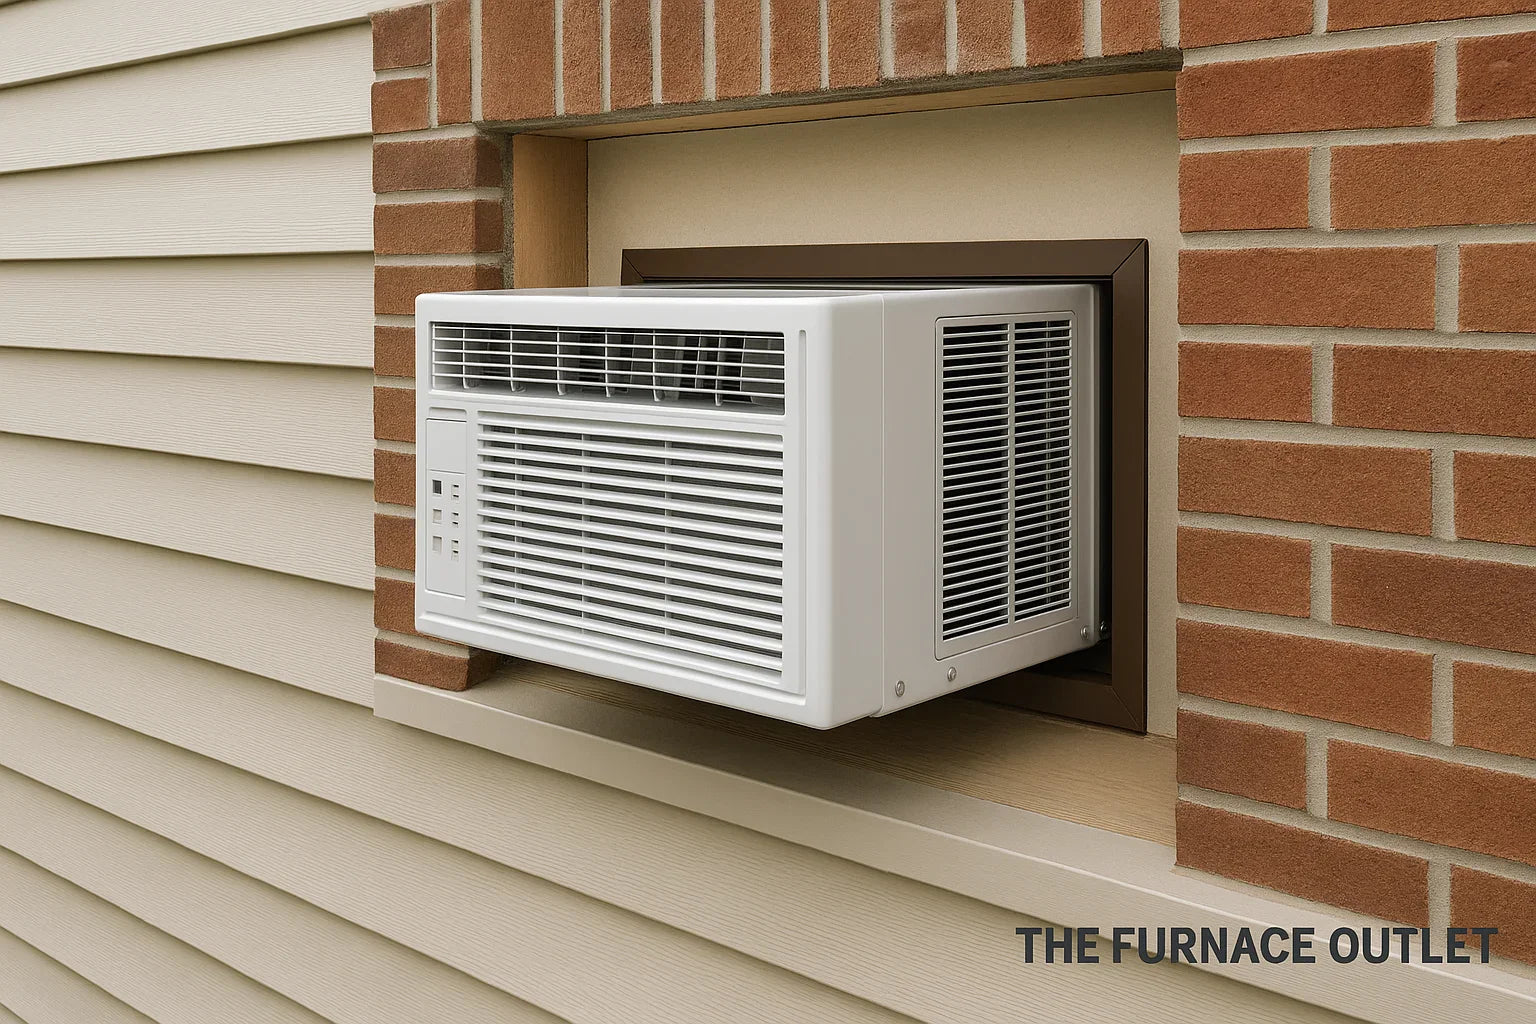
Dry-fit the sleeve in the framed opening. Check level side-to-side and set a ¼" per foot outward slope front-to-back so condensate drains outside. Use corrosion-resistant screws through pre-punched sleeve holes into framing. If the unit is heavy, add rated support brackets under the exterior edge per the manual. Confirm the sleeve is square by measuring both diagonals; they should match. Seal small gaps with backer rod where joints are wider than ¼". For larger gaps, insert shims first, then foam. Don’t twist the sleeve with uneven screw torque; snug it evenly. If your system uses separate components (some thru-the-wall heat pumps do), plan line-set routing and condensate discharge now; see Accessories for drain kits and wall caps. A correct sleeve set makes the final chassis slide-in smooth and rattle-free.
Air-Seal, Insulate, Flash, and Weatherproof

Air sealing is what keeps comfort in and water out. From the interior, fill small gaps with low-expansion, closed-cell foam. Don’t over-foam; too much pressure can bow the sleeve. On the exterior, install flashing tape that shingle-laps with your housewrap or siding (bottom first, then sides, then top). Where the sleeve meets cladding, use a foam backer rod and exterior-grade, paintable sealant. On masonry, use compatible masonry sealants. Add trim or a metal flashing kit to cover seams and direct water away. If you’re in a rainy or coastal climate, consider a drip cap above the sleeve. Paint any exposed wood for UV and moisture protection. Proper weatherproofing prevents hidden rot, mold, and drafts—issues that cost far more than a tube of sealant. For general maintenance tips that extend equipment life, scan the HVAC Tips section.
Final Fit, Power, and Start-Up Checks

Slide the AC chassis into the sleeve per the manual. Verify the tilt and confirm the condensate path is clear. Tighten mounting screws, attach the exterior grille, and install filters. Inside, check the circuit: correct voltage, breaker size, and receptacle type. Many wall units need their own dedicated circuit—an electrician can confirm. Power on and test modes: cool, fan speeds, and thermostat. Listen for vibration; if you hear rattles, add foam pads or adjust screws slightly. Measure supply air temperature drop (a quick expert check: usually 15–20°F lower than return air on a healthy system in cool mode). Log model/serial numbers and take photos of the install for future service. If you want help choosing replacement units later, browse Through-the-Wall Air Conditioners
FAQs: Wall Cutting Best Practices for Window/Wall AC
Do I need a permit to cut an exterior wall?
Often yes, especially if the wall is load-bearing or you’re adding a new electrical circuit. Check your local building department.
How do I know if a wall is load-bearing?
Look at the framing direction in the attic or basement. Walls that run perpendicular to joists are often bearing. When unsure, ask a contractor.
What slope should the sleeve have?
About ¼" per foot outward so condensate drains outside. Use a level to verify before fastening.
Can I install a wall unit in brick?
Yes. Use a diamond blade and add proper flashing and sealant. The process is dusty and slower, but common.
How do I avoid hitting wires or pipes?
Scan with a multi-detector, drill small pilot holes, and cut in shallow passes. Turn off nearby circuits while cutting.
Foam first or flashing first?
Flash outside first to shed water, then air-seal and foam inside. Finish with backer rod and exterior caulk at the cladding joint.
When should I call a pro?
Anytime you face a load-bearing change, unknown utilities, masonry cutting you’re not equipped for, or electrical work beyond your comfort level.


