Key takeaways:
-
Indoor unit nameplate + wide shots → confirm model/age/power.
-
Outdoor condenser all sides → check clearance, pad, line set.
-
Electrical panel & disconnect → verify breaker size/safety.
-
Line set, ducts, thermostat → show condition & controls.
-
Context: home size/goals/access → accurate quote.
Step-by-Step Photo Checklist for Remote HVAC Quotes

Getting a fast, accurate HVAC estimate without a house visit is possible—if your photos tell the full story. When you use The Furnace Outlet’s Quote by Photo, the right images help a technician confirm your current system, measure space and clearances, and spot any issues that change cost. In this guide, you’ll learn exactly what to photograph, why each image matters, and how to avoid common mistakes. We’ll also point you to helpful resources like our sizing guide and product pages so you can compare options later.
Problem: “Why do contractors keep asking for more photos?”
Most follow-up questions come from missing details: a hidden nameplate, unclear breaker size, or a cropped shot that hides a vent pipe. Without those details, techs must guess at equipment capacity, electrical needs, or installation access. Guessing can cause wrong equipment recommendations, unexpected add-ons, or a quote that has to be rewritten on install day. That slows you down and can increase costs. Clear photos fix this. Think of each image as a puzzle piece: model/serial confirms what you own; wide shots show space; close-ups capture labels and connections; panel shots verify power and safety. When all pieces are included, most standard systems can be quoted with high accuracy the first time, and you can quickly move to comparing options or planning upgrades through
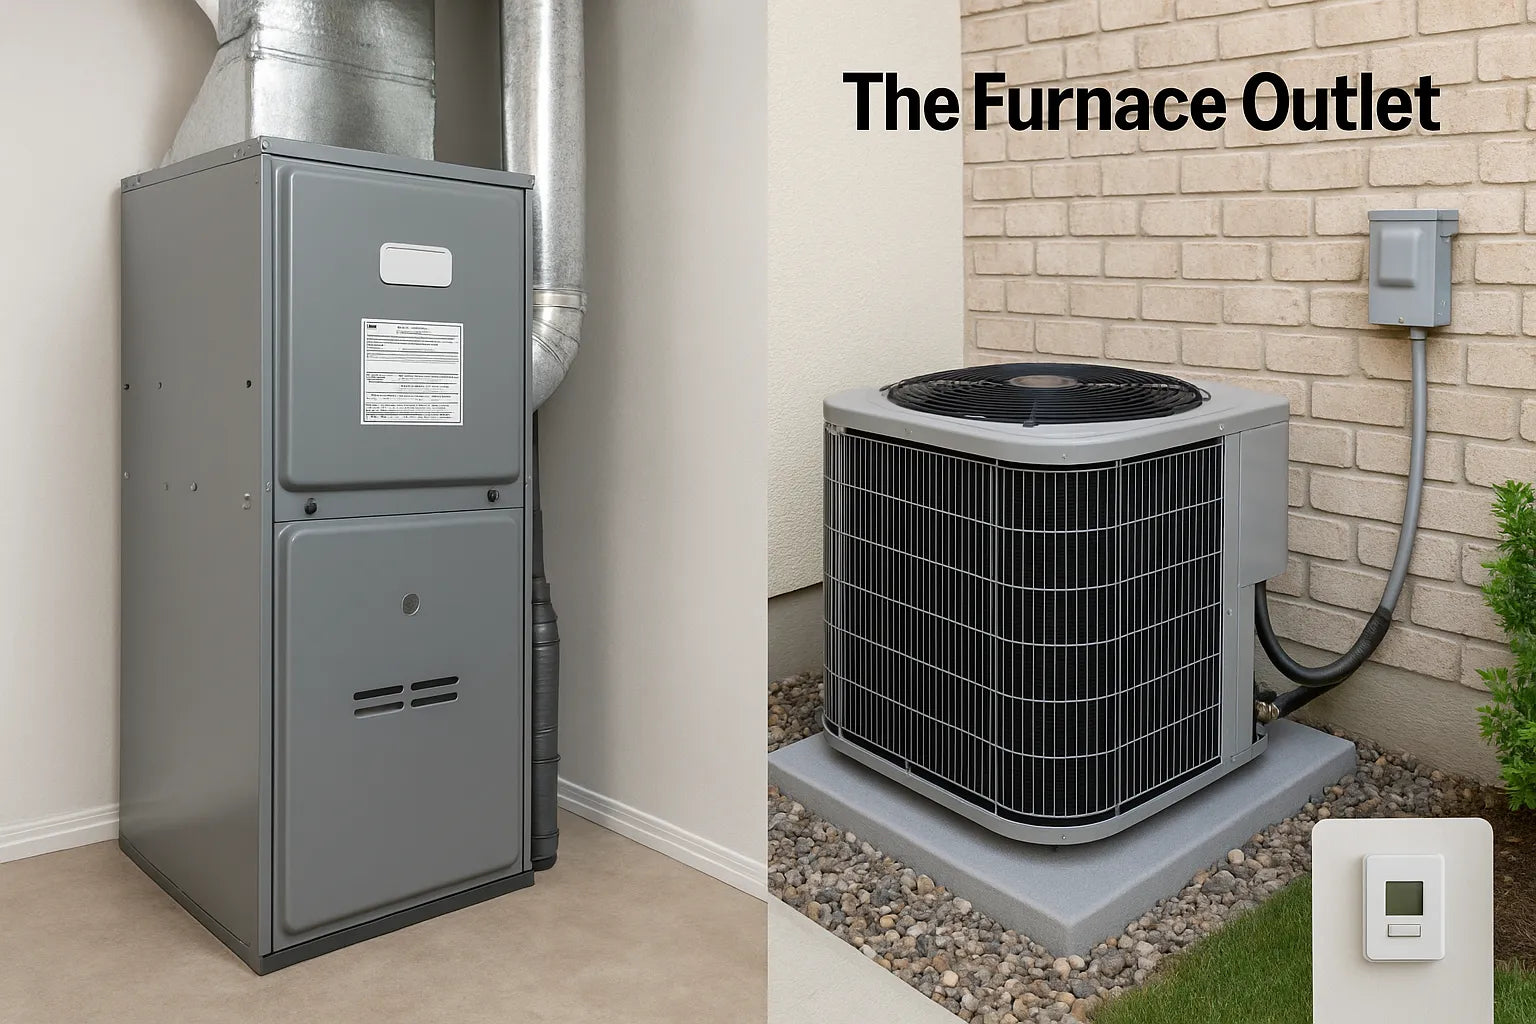
Indoor Unit (Furnace or Air Handler): wide shots + nameplate

Take two types of photos:
Wide shots (at least 2): show the entire unit and surrounding area. Include floor to ceiling if possible so we can see clearances, vent pipes, drain lines, filter slot, and the service panel. If the unit sits in a closet, attic, or basement, step back to capture access space and any tight corners or obstructions.
Close-ups (3–4): focus on the nameplate (model, serial, BTU capacity, voltage), energy labels, and any service tags. Nameplates tell us age and exact specifications, which drive sizing and compatibility. If you’re considering upgrades, browse air handlers or furnaces to see what modern units look like and which features matter. Pro tip: take one extra photo from a different angle in case glare hides a digit on the serial number—those digits often unlock warranty and parts info.
Outdoor Condenser or Heat Pump: location, clearances, and ID
Start with a wide shot showing the unit in relation to walls, fencing, or plants. We’re checking airflow clearance and whether the pad is level and solid. Then take close-ups of the nameplate, refrigerant line connections, and any visible service labels. If you’re replacing or upgrading, clear photos help us recommend the right match, including efficient R-32 heat pump systems, R-32 condensers, or matched AC + air handler systems. Also include the pad surface (concrete/composite/gravel) and any slope or drainage concerns—standing water or tilting pads can shorten equipment life. If landscaping crowds the unit, note it; installers may plan minor relocation, pad replacement, or clearance trimming.
Electrical Panel & Outdoor Disconnect: breakers and safety

Open the main electrical panel and take a clear photo of all breakers with labels readable—especially those marked “AC,” “Furnace,” or “Air Handler.” This confirms amperage and whether your current breaker size matches equipment requirements. Next, photograph the outdoor disconnect near the condenser/heat pump. Capture its location, amp rating, and accessibility. U.S. code requires the disconnect to be within sight of the equipment and mounted so the handle is reachable; your photos let us confirm compliance and plan corrections if needed. If you spot burn marks, melted insulation, or loose conduit, include a close-up. These safety checks are why panel and disconnect photos are more than “nice to have.” They prevent surprises and help us suggest appropriate accessories from our Accessories collection when needed.
Line Set & Ductwork: sizes, condition, and air path
Your line set (the copper tubing between indoor and outdoor units) carries refrigerant. Photograph where it connects on both ends, and try to capture pipe sizes and insulation condition. Cracked or missing insulation can hurt efficiency; dents or kinks may require replacement—see line sets for what a new set looks like. For ductwork, take wide photos in the attic, basement, or mechanical closet showing supply/return plenums, major joints, and any flex duct runs. Close-ups should show tape/mastic, insulation, and filter locations/sizes. These images tell us if your ducts can support a higher-efficiency system or if small fixes (like sealing or adding a return) will improve comfort and noise. If ducts are hidden, mention that in your notes; we’ll plan around it or flag where an in-person look may be smart.
Thermostat & Controls: wiring and upgrade readiness
![]()
Take a straight-on photo of the thermostat with the screen lit (if digital) and, if possible, remove the faceplate for a quick shot of the wire terminals. This shows whether you have a C-wire, which many smart thermostats require. If your home uses zoning (multiple thermostats or a control panel), include those devices too. These photos help us confirm compatibility and discuss upgrade paths, including options often paired with ductless mini-splits or PTAC units for specific rooms.
Photo Quality: lighting, framing, and common mistakes
Good photos are simple: stand back first, then move in for labels. Use natural light or your phone’s flash. Wipe the lens. Keep hands steady and take two of important labels in case one blurs. Avoid:
-
Cropped images that cut off venting or drain lines
-
Shadows/glare over the nameplate (change angle)
-
Screenshots or compressed images that hide small text
-
Skipping the outdoor unit entirely
If you can, upload photos in the same order as this checklist. Add short notes like “basement access,” “attic crawlspace,” or “room over garage is hot.” That context gives us a head start. If you need ideas for what good photos look like, scroll our HVAC Tips blog for visual examples and step-by-steps.
What to Include in Your Message: details that boost accuracy
Along with photos, include: home square footage, number of stories, year built (if known), and your goals (replace vs. upgrade, better efficiency, quieter operation, fix hot/cold spots). Note any access constraints (narrow stairs, low attic clearance) and list comfort issues (upstairs too warm, basement cold, humidity swings). If you’re open to options, say so; we can price a like-for-like replacement and a higher-efficiency alternative, such as R-32 packaged systems or room-by-room through-the-wall units. Planning a phased approach? Mention that too. The more we know, the fewer follow-ups you’ll get, and the faster you’ll receive a clear, line-item quote you can compare.
How clear photos improve pricing and equipment choices
![]()
Detailed photos let us:
-
Identify exact specs from nameplates to match capacity and airflow.
-
Verify electrical so breaker and wire size aren’t a surprise on install day.
-
Assess ducts and space to plan transitions, returns, or minor modifications.
-
Estimate labor accurately based on real-world access and complexity.
The result is a quote that fits your home and budget, often avoiding change orders. With complete info, we can also compare solutions: a standard split system, a packaged unit, or ductless options
When photo quotes need a follow-up (and your next steps)
Photo quotes cover most homes well. Still, we may suggest a quick call or site visit if: multi-zone layouts need room-by-room load checks, your home is over ~4,000 sq ft, your system is heavily customized, or ductwork is mostly hidden. That protects you from under- or over-sizing. Ready to go? Upload your photos through Quote by Photo, then review our sizing guide
Frequently Asked Questions (FAQ)
How many photos should I send?
Aim for 12–20: wide and close-ups for indoor/outdoor units, panel, disconnect, line set, ducts, and thermostat.
What if my nameplate is hard to read?
Take two angled photos with flash, and type the model/serial in your message.
Do I need measurements?
Photos usually suffice. If space looks tight, add rough width/height of the closet or platform.
Can I still get a remote quote if my ducts are hidden?
Yes. We may flag a quick site check before final install to confirm duct condition.
Will I get options to compare?
Usually yes—like a like-for-like replacement and an efficiency upgrade (see Room AC and Ductless Mini-Splits).
Where can I learn more?
Browse HVAC Tips and the PTAC sizing chart for examples and how-tos.


