🧊 1. What Exactly Is a Wall Sleeve?
When I installed my first through-the-wall air conditioner, I figured the wall sleeve was just “a fancy mounting box.” I almost skipped it. Big mistake.
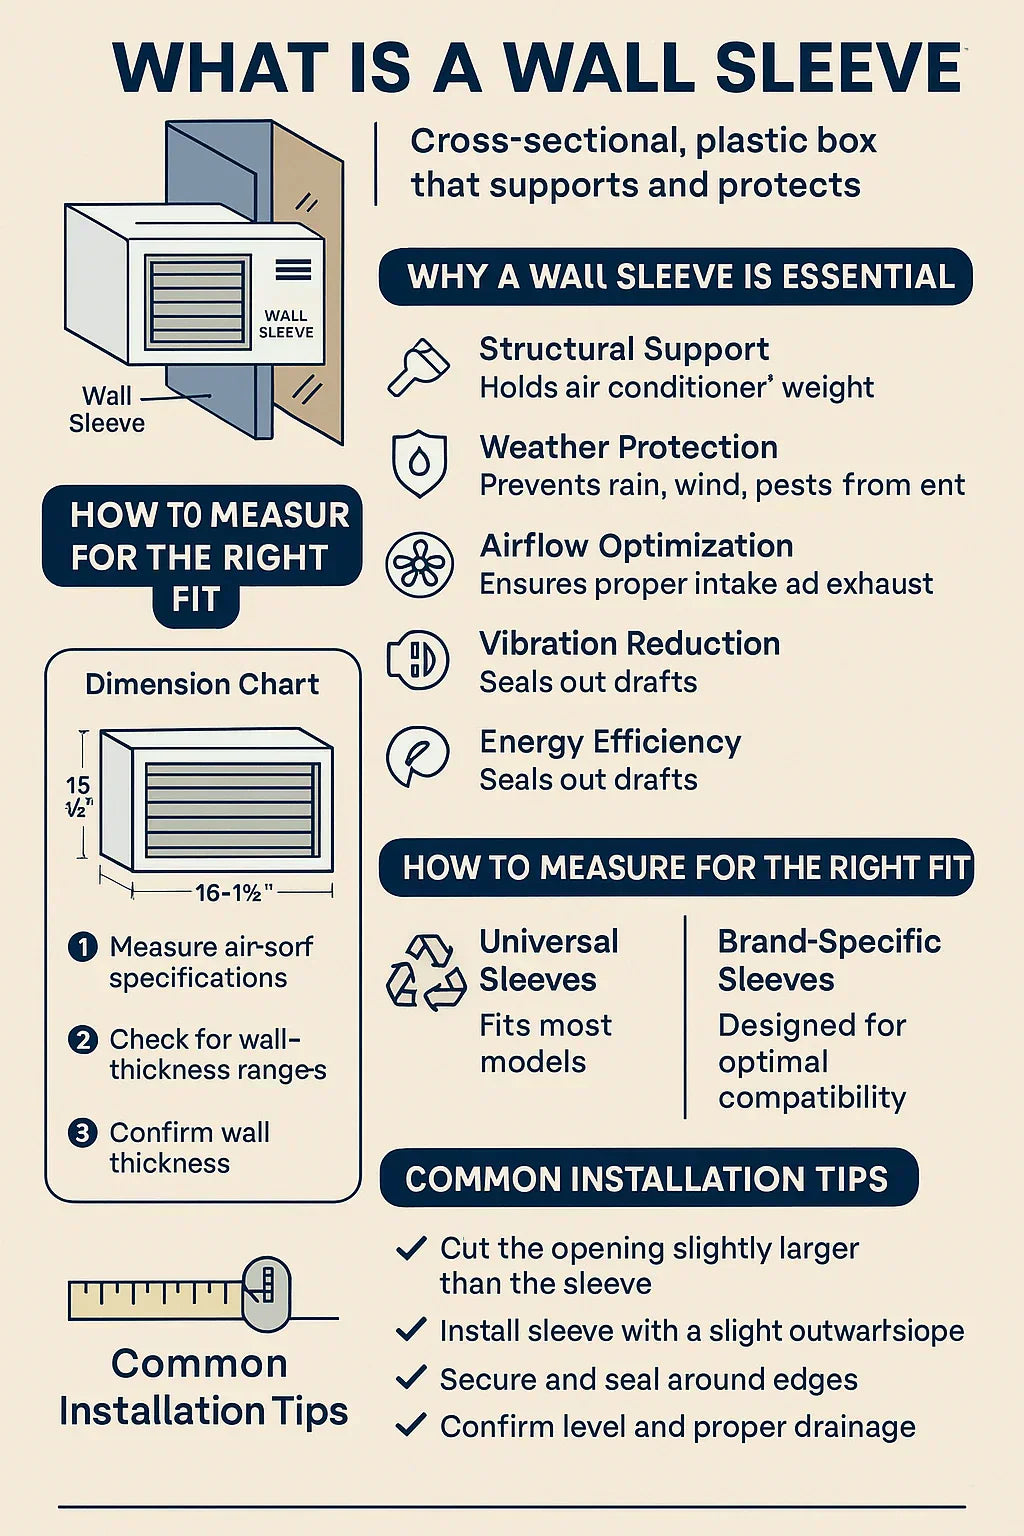
Here’s what I learned: the wall sleeve is the backbone of your through-the-wall AC system. It’s a durable metal or polymer casing that slides into the wall and holds your air conditioner securely in place.
Think of it as the foundation for your cooling system — it carries the unit’s weight, seals out air leaks, prevents vibration, and protects your wall from weather damage.
Without a sleeve, you’re asking your drywall and insulation to do a job they weren’t built for.
A proper wall sleeve:
-
Keeps your installation airtight and watertight
-
Prevents noise transfer through the wall
-
Directs airflow correctly
-
Protects your investment
And unlike window units, through-the-wall systems are permanent fixtures. Once that hole’s cut, the sleeve makes sure everything fits perfectly and performs efficiently for years.
⚙️ 2. Why a Wall Sleeve Is Absolutely Essential
If you’re wondering, “Can’t I just cut a hole and stick the AC in the wall?” — technically yes, but you’ll regret it.
Here’s why the wall sleeve is non-negotiable:
🧱 Structural Support
Through-the-wall air conditioners weigh anywhere from 60 to 120 pounds. The sleeve supports that weight evenly, preventing sagging or warping in your wall. It’s anchored between wall studs for a tight, secure fit.
🌦️ Weather & Moisture Protection
The sleeve acts like armor against rain, snow, wind, and pests. It creates a continuous barrier from the inside of your wall to the outside grille, keeping insulation dry and mold-free.
🔇 Noise & Vibration Control
Without a sleeve, every compressor vibration transfers straight into your drywall. A properly installed sleeve isolates the unit from your wall, reducing hums and rattles.
🌬️ Airflow Efficiency
Sleeves are designed with airflow channels and vent cutouts that match the condenser’s exhaust path. Improper airflow = reduced cooling efficiency and higher energy use.
💰 Energy Efficiency
A sealed sleeve prevents outside air infiltration — meaning your AC doesn’t have to fight hot, humid air sneaking in. That translates to lower electric bills.
“When I first tried to retrofit an AC into my wall without a sleeve, I lost 20% efficiency. Once I added the right sleeve, my cooling felt stronger — and quieter.”
📏 3. How to Measure and Choose the Right Fit
Getting the correct sleeve size is key to performance and compatibility.
Here’s how to do it:
📐 Step 1: Measure Your Existing Sleeve (If Replacing)
If you’re upgrading your old through-the-wall AC, remove the existing unit and measure:
-
Width (side to side inside opening)
-
Height (top to bottom inside opening)
-
Depth (front to back)
Write these down in inches. Most sleeves are around 26" wide × 15.5" tall × 16"–18.5" deep, but always check.
🧰 Step 2: Identify Brand & Model
Look inside the sleeve for a stamped model number — it’s often on the top or inside lip. Matching your sleeve brand to your AC brand makes installation much easier.
🧮 Step 3: For New Installations
If you’re starting from scratch:
-
Measure your wall thickness. Standard drywall + siding setups are 6–8" thick; brick or concrete walls can be 12–18".
-
Choose a sleeve that matches both your AC’s required depth and wall thickness.
Pro Tip: Always allow for a slight outward tilt (about ¼ inch) when installing the sleeve so condensation drains outside.
Visual Prompt → “Standard Wall Sleeve Dimensions Chart.”
External Resource:
🔗 GE Appliances – Through-the-Wall Sleeve Specifications
⚖️ 4. Universal vs. Brand-Specific Sleeves
Not all sleeves are created equal. You’ll see both universal and brand-specific options on the market. Here’s how to decide which one fits your project best.
🔧 Universal Sleeves
-
Designed to fit most major brands (GE, LG, Amana, Friedrich).
-
Great for replacements or older installations where the original brand is discontinued.
-
Usually come with adjustable side seals or trim kits.
Pros:
-
More flexibility across brands
-
Lower cost (~$120–$150)
-
Easy to find online
Cons:
-
May not align perfectly with every unit’s drain ports or vents
-
Slightly higher noise or airflow loss if not sealed perfectly
🏷️ Brand-Specific Sleeves
Each manufacturer designs their sleeves for optimal fit and performance:
-
GE: AKJ/AKE series (26" width)
-
LG: AXSVA1 / AXSVA4
-
Friedrich: USC or Uni-Fit series
-
Amana: WS900 series
Pros:
-
Perfect airflow alignment
-
Required for many warranties
-
Pre-fitted insulation and hardware
Cons:
-
Slightly higher cost (~$150–$200)
-
Must match model exactly
Jake’s note:
“My Friedrich Uni-Fit worked in a universal sleeve — but the drain didn’t line up perfectly. After swapping to the brand sleeve, the humidity issues disappeared.”
External Resource:
🔗 Friedrich Uni-Fit Installation Manual
🧰 5. How to Install a Wall Sleeve the Right Way
Installing a sleeve sounds intimidating, but it’s pretty straightforward with the right prep.
🪚 Tools You’ll Need:
-
Stud finder
-
Measuring tape
-
Level
-
Reciprocating saw or oscillating tool
-
Caulk gun & silicone sealant
-
Mounting brackets or screws
🧱 Steps:
-
Mark the Wall Opening
Use your AC’s spec sheet to mark the correct size opening between wall studs. -
Cut the Opening
Start small and expand gradually. If you hit a stud, reinforce with cross-bracing. -
Insert the Sleeve
Slide the sleeve into place from inside, tilting it slightly downward toward the exterior (about ¼ inch). -
Secure the Sleeve
Screw or bracket it to framing studs. Make sure it’s level side-to-side. -
Seal the Edges
Apply silicone caulk around the perimeter inside and out to block air and water leaks. -
Add Insulation
Use foam strips or gasket material between sleeve and AC chassis for a snug fit. -
Slide the Unit In
Once sealed, insert the AC and lock it into position per the manufacturer’s instructions.
Jake’s checklist before finishing:
✅ Tilted for drainage
✅ Caulked edges sealed
✅ No gaps in insulation
✅ Level bubble dead center
🧩 6. Avoiding Leaks, Noise, and Air Gaps
Most of the “problems” homeowners report after installing a through-the-wall unit trace back to the sleeve, not the AC itself.
Here’s what to look out for:
-
Condensation pooling inside: Your sleeve isn’t sloped outward enough.
-
Whistling or rattling: Loose screws or missing foam insulation.
-
Cold drafts: Seal any exterior gaps with caulk or weatherproof tape.
-
Water entering wall cavity: Recheck caulking around the outside grille.
“After my first DIY install, I had a faint whistle every time the compressor started. Turns out, I forgot one screw in the rear bracket. Lesson learned.”
🧱 7. Choosing Materials: Steel vs. Polymer Sleeves
There’s no single “best” sleeve — it depends on your priorities: strength, weight, or longevity.
| Material | Pros | Cons |
|---|---|---|
| Galvanized Steel | Extremely durable, supports heavy units, sound-dampening | Prone to rust if coating chips |
| ABS Polymer | Lightweight, corrosion-proof, easier to handle | Slightly less rigid |
| Aluminum Hybrid | Great mix of lightness and strength | More expensive |
Jake’s experience:
“I picked a powder-coated steel sleeve — heavier, yes, but solid. My unit runs whisper-quiet and I expect it to last decades.”
External Resource:
🔗 LG Wall Sleeve Installation Guide (AXSVA4)
🌦️ 8. Drainage, Airflow & Exterior Grilles
The sleeve isn’t just a box — it’s a carefully engineered part of the cooling system.
💧 Drainage
Most sleeves include a built-in channel or drain hole at the bottom. The slight tilt you set during installation lets condensation flow outside rather than pooling indoors.
🌬️ Airflow
Wall sleeves direct exhaust air away from intake vents, preventing recirculation. Always pair your sleeve with the correct rear grille — it controls airflow and protects your condenser.
🛡️ Grille Styles
-
Rear-Vent Grille: For standard back exhaust.
-
Angled Grille: For downward exhaust to protect from rain.
External Resource:
🔗 Amana PTAC Wall Sleeve and Grille Specification Sheet
🧾 9. Replacing an Old Sleeve
If your old AC sleeve is over a decade old, rusted, or cracked, it’s worth replacing.
Signs It’s Time for a New Sleeve:
-
Visible rust or corrosion inside
-
Water damage or mold smell
-
Poor fit with new unit
-
Rattling or vibration during operation
To replace:
-
Remove the old AC unit.
-
Detach the sleeve from framing screws or adhesive.
-
Clean the wall cavity before inserting the new one.
-
Reseal everything properly — including exterior grille.
Jake’s tip:
“Replacing my old sleeve was like upgrading from a rusty window frame to a brand-new one. The unit fit tighter, quieter, and cooled better.”
🧠 10. Common Mistakes (and How to Avoid Them)
Even pros slip up occasionally. Avoid these pitfalls to save time and money:
-
Cutting the wrong size hole. Always double-check your unit’s manual before cutting.
-
Forgetting to slope for drainage. This leads to leaks and mildew.
-
Mixing incompatible brands. GE units don’t always fit LG sleeves.
-
Skipping insulation. Causes noise and air leaks.
-
Blocking outdoor airflow. Keep at least 20" of clearance around the rear grille.
Visual Prompt → “Jake’s 5 Common Sleeve Mistakes” Checklist.
🧩 11. When to Use a Sleeve Adapter Kit
If you’re upgrading an older wall AC, you might not need to replace the sleeve entirely — an adapter can bridge the gap.
Adapter Use Cases:
-
Replacing old Friedrich or GE units with new Uni-Fit models.
-
Installing a slightly smaller modern unit in an older, larger sleeve.
Example:
The Friedrich EA108T Adapter Kit allows new Uni-Fit units to fit older sleeve openings perfectly — no new cutting required.
Jake’s note:
“I saved an entire afternoon using an adapter kit instead of cutting new drywall. It fit like a glove.”
🧮 12. Wall Sleeve Buying Checklist
Here’s my personal quick-reference checklist before buying:
| ✅ | Check This | Why It Matters |
|---|---|---|
| 🧱 | Sleeve dimensions match unit spec | Ensures perfect fit |
| 🔩 | Brand compatibility confirmed | Avoids drain/vent misalignment |
| 🌧️ | Material rated for weather exposure | Extends lifespan |
| 🪟 | Grille style matches exhaust direction | Optimizes airflow |
| 🔧 | Installation hardware included | Saves extra trips to the store |
(Internal link cue → “Energy Efficiency & Tax Credits: Do Wall Units Qualify in 2025?”)
🧼 13. Maintenance Tips for Long-Term Performance
-
Clean annually: Remove the AC each spring and vacuum the sleeve interior.
-
Check drainage: Ensure the slope still allows proper water runoff.
-
Inspect for rust or cracks: Early fixes prevent wall damage later.
-
Re-caulk edges: UV exposure can dry out sealant over time.
Jake’s habit:
“Every spring, I pull the unit out, vacuum the sleeve, and check for leaks. Takes 10 minutes, saves headaches.”
🧩 14. Wall Sleeve FAQs
Q: Can I reuse my old wall sleeve?
Yes, if it’s structurally sound, rust-free, and compatible with your new unit.
Q: Do I need insulation around my sleeve?
Absolutely. Use foam or gasket material to eliminate air leaks.
Q: How long does a sleeve last?
Most steel or polymer sleeves last 15–20 years with minimal upkeep.
Q: Can I install it myself?
Yes, if you’re comfortable cutting drywall and using power tools. Otherwise, hire a pro for the opening — you can handle the rest.
In the next topic we will know more about: Installation Guide: Important Information to Know Before Making a Wall Hole
🏁 15. Final Thoughts: Build It Right, Enjoy It Longer
Installing a through-the-wall AC is one of the best upgrades I’ve ever made — but I only got professional results once I understood how vital the wall sleeve was.
This simple box:
-
Supports the system
-
Seals your home from the elements
-
Cuts noise
-
Extends your unit’s lifespan
So whether you’re installing your first wall unit or upgrading an old one, don’t skimp on the sleeve. Choose the right fit, install it carefully, and your AC will reward you with years of quiet, efficient comfort.


