🏡 From Box to Comfort — Your Goodman Installation Journey
You’ve chosen the perfect heat pump system — the 2-ton Goodman 15.2 SEER2. Now it’s time to make it part of your home.
For most homeowners, installation day can feel like a mix of excitement and uncertainty. What happens first? How long will it take? What should you look for before your installer drives away?
Savvy, who recently installed her Goodman system, remembers that feeling well:
“When my new Goodman heat pump arrived, I couldn’t wait to ditch my old system. But I quickly learned that a little preparation made the process smoother and more rewarding.”
This guide walks you through every stage of the installation — from pre-install planning to that first moment you feel quiet, balanced air flow through your vents.
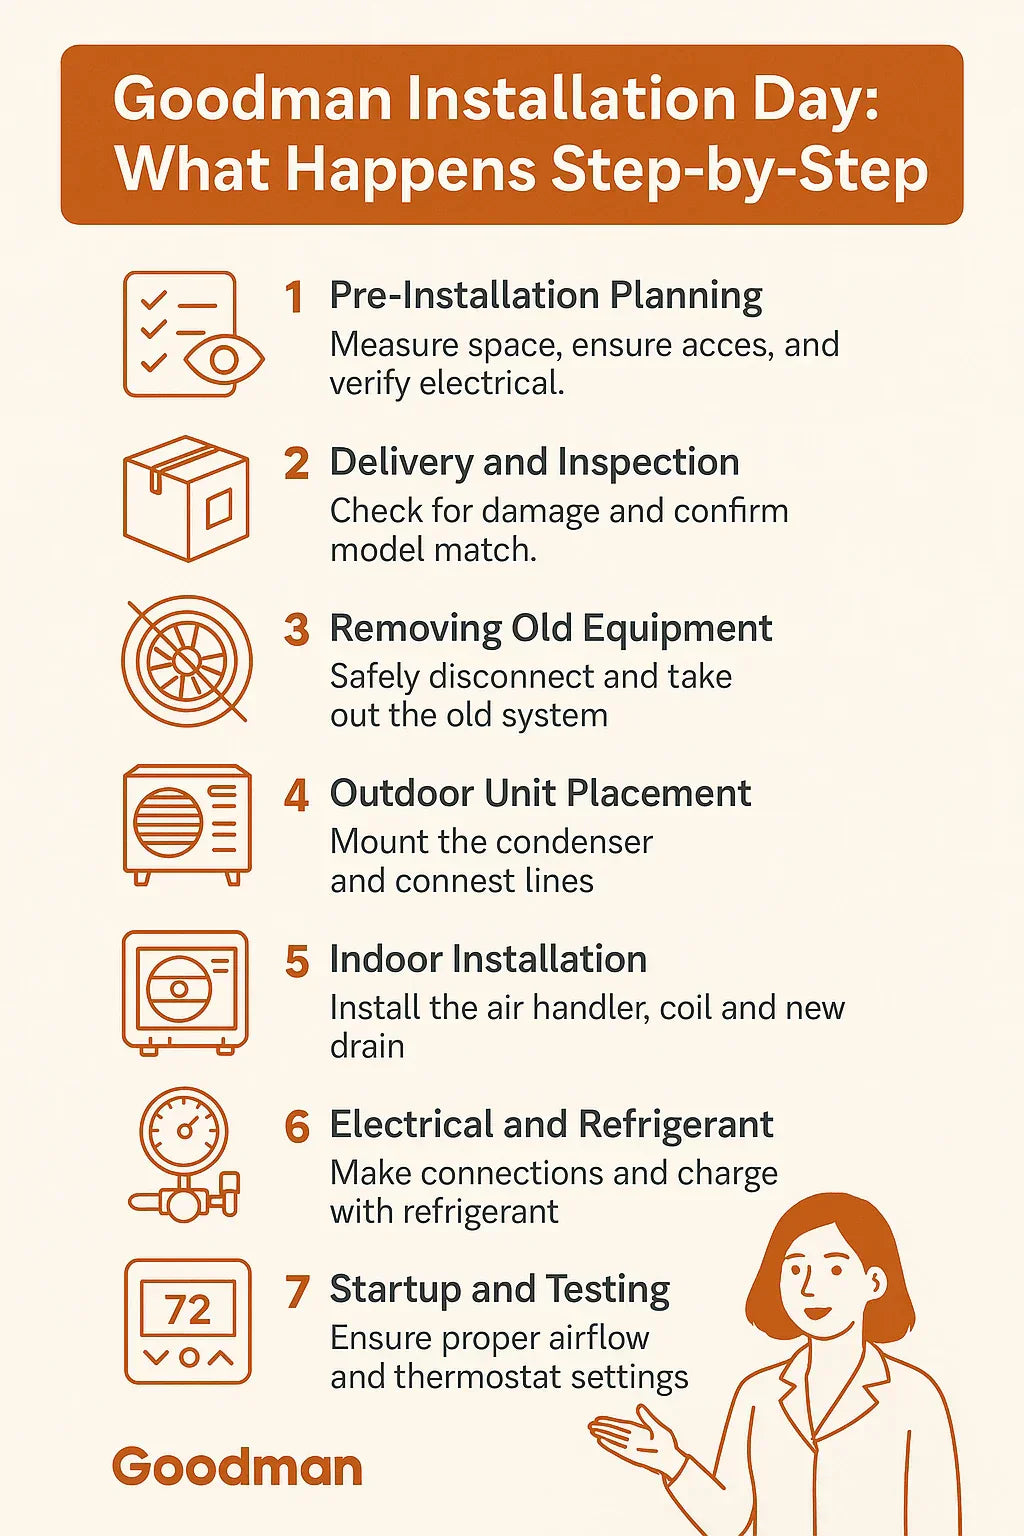
📦 Step 1: Pre-Installation Planning — Setting the Stage for Success
Before a single tool is lifted, planning is key.
A professional installation starts with evaluating your home’s layout and existing HVAC setup. Your contractor will:
-
Measure available space for both the indoor air handler and outdoor heat pump unit.
-
Verify the electrical supply matches Goodman’s voltage requirements.
-
Inspect ductwork, insulation, and drainage for any issues that could affect performance.
One of the most important pre-install steps is the Manual J load calculation, which determines the correct system capacity for your home. This ensures your 2-ton Goodman unit is properly matched to your square footage, ceiling height, insulation, and regional climate.
According to ACCA’s Manual J guidelines, skipping this step can lead to oversizing or undersizing — both of which reduce comfort and efficiency.
Savvy’s tip:
“My installer ran a load calculation before ordering parts. Knowing the system was a perfect fit gave me confidence I’d made the right choice.”
⚙️ Step 2: Delivery and Unboxing — What Comes With Your Goodman System
When your new Goodman system arrives, it’s worth taking a few minutes to verify everything.
Here’s what’s typically included:
-
Outdoor condenser unit (GLZS4BA2410) — the heart of your heat pump.
-
Indoor air handler with CHPTA2426B3 horizontal coil — compact and ideal for low-clearance areas.
-
Variable-speed MBVB12BP1X00 blower motor — for smooth, quiet airflow.
-
Thermostat and control wiring (if included in your package).
Check the shipment for:
✅ Damage to the cabinet or fins.
✅ Matching serial and model numbers across components.
✅ Sealed refrigerant lines (Goodman’s units are factory pre-charged with R-32 refrigerant).
If everything looks good, you’re ready for install day.
Savvy says:
“When my system arrived, I inspected the boxes and took photos. It was reassuring to see everything labeled and damage-free before the work started.”
🔧 Step 3: Installation Day — What Really Happens
Installation typically takes 4 to 8 hours, depending on your home layout and whether existing ductwork or electrical connections need modification.
Here’s how the process unfolds:
1️⃣ Removal of Old Equipment
Your installer will safely recover and dispose of refrigerant from your old system, then remove the furnace or air handler and outdoor condenser.
2️⃣ Outdoor Unit Placement
The Goodman condenser is mounted on a level pad or secured to wall brackets for stability. Proper clearance is crucial — at least 18 inches on all sides and 5 feet above to ensure efficient airflow.
3️⃣ Indoor Coil and Blower Setup
The CHPTA2426B3 coil and MBVB12BP1X00 blower are installed in your air handler. If space is tight, Goodman’s horizontal coil makes installation much easier than a vertical setup.
4️⃣ Electrical and Refrigerant Connections
Refrigerant lines and electrical wiring are connected between the indoor and outdoor units. Goodman’s pre-charged R-32 system simplifies this process.
5️⃣ Leak Testing and Charging
The system is pressure-tested for leaks and vacuum-sealed before refrigerant is released into circulation.
The ENERGY STAR installation guide emphasizes the importance of proper refrigerant charge and airflow testing to preserve your system’s rated efficiency.
Savvy’s insight:
“The install team explained every step, from line flushing to thermostat setup. It made me feel like I was part of the process.”
🧰 Step 4: Ductwork, Electrical, and Drainage — The Hidden Heroes
The performance of your Goodman heat pump depends on more than just the equipment — it’s also about what surrounds it.
Ductwork
Ducts should be inspected for leaks, insulation quality, and size compatibility. Poor duct design can waste up to 30% of conditioned air,
Electrical
Installers will confirm that your electrical panel has the proper breaker rating and grounding for the new system.
Condensate Drainage
Goodman’s air handlers include a built-in condensate drain pan. Your installer connects this to a drain line that removes moisture safely — an essential detail that prevents water damage.
Savvy tip:
“Don’t skip the duct inspection. I didn’t realize a small gap in my old return duct was wasting energy until my installer sealed it.”
🔋 Step 5: System Startup and Testing — The Big Moment
After wiring, refrigerant charging, and final inspections, your installer will power up the system. This is known as commissioning — a critical step that ensures every component operates as intended.
What they’ll check:
-
Refrigerant pressure and temperature differentials
-
Voltage readings and blower amperage
-
Thermostat calibration and sensor accuracy
-
Airflow balance across supply and return vents
Goodman’s diagnostic control board simplifies this process by displaying operational data and alerts during testing.
The U.S. Department of Energy recommends commissioning after every installation to verify manufacturer specifications and warranty compliance.
Savvy remembers the moment her system started running:
“The technician handed me the thermostat and said, ‘Go ahead, turn it on.’ The air was cool, steady, and quiet — exactly what I wanted.”
🌡️ Step 6: Comfort Calibration — Fine-Tuning Your System
Even a perfectly installed system benefits from fine-tuning.
Your installer will make adjustments to:
-
Blower speed to optimize airflow for your home layout.
-
Thermostat settings for best efficiency and comfort.
-
Refrigerant subcooling or superheat to fine-tune system performance.
Goodman’s variable-speed blower allows customization — slower speeds improve humidity control, while higher speeds enhance cooling for open-concept layouts.
Savvy tip:
“My installer tweaked the blower speed slightly for quieter operation. I noticed the difference immediately — no more sudden bursts of air.”
💡 Step 7: Understanding Your Warranty and Documentation
Goodman stands behind its products with a 10-year limited parts warranty, but registration is required.
Here’s what you need to do:
-
Register your system online within 60 days of installation at the Goodman warranty page.
-
Keep a copy of your invoice, permit (if required), and warranty certificate.
-
Schedule regular maintenance to maintain coverage.
Savvy tip:
“It took me five minutes to register online — totally worth it for ten years of peace of mind.”
🧠 Step 8: Post-Installation Checks — What Homeowners Should Verify
Before your installer leaves, do a quick walk-through together:
✅ Air is flowing smoothly through all vents.
✅ The thermostat responds accurately to adjustments.
✅ The outdoor unit runs quietly and drains condensation properly.
✅ Circuit breakers are labeled for easy access.
✅ You’ve received manuals and maintenance recommendations.
Savvy suggests keeping a quick video or note of how the system sounds when new — a great reference point for future maintenance.
🌿 Step 9: Maintenance and First-Year Tips
Your new Goodman system is built for longevity — but regular upkeep ensures it stays efficient.
Homeowner Routine
-
Change filters every 1–3 months.
-
Clear debris around the outdoor unit.
-
Flush drain lines seasonally.
-
Check thermostat batteries annually.
Professional Tune-Up
At least once per year, schedule a certified technician to inspect coils, refrigerant charge, and electrical components.
The DOE maintenance guide notes that regular service can preserve up to 95% of your system’s rated efficiency.
Savvy’s habit:
“I set a calendar reminder every spring and fall for a quick check. It keeps my Goodman system running like new.”
💬 Step 10: Realistic Costs — And Why They’re Worth It
A professional Goodman installation typically costs between $3,500 and $5,000, depending on your home’s size, local labor rates, and any duct or electrical upgrades.
Here’s a simple breakdown:
| Component | Typical Cost |
|---|---|
| Goodman 2 Ton System | $2,000–$2,400 |
| Labor & Materials | $1,500–$2,500 |
| Upgrades (Smart Thermostat, Pad, Surge Protector) | $200–$500 |
That investment pays off through lower energy bills, reduced maintenance, and increased home value.
The DOE cost estimator suggests modern heat pumps can cut energy use by up to 40% compared to outdated systems.
Savvy says:
“I saved about $40 a month on electricity after my first season. That’s $480 a year — it adds up fast.”
🏁 From Delivery to Comfort — What Makes Goodman Installations Stand Out
By the end of installation day, your Goodman 15.2 SEER2 system will be quietly delivering consistent comfort — heating in winter, cooling in summer, and saving energy year-round.
Your key takeaways:
-
Plan ahead for smooth installation.
-
Verify every step — airflow, wiring, refrigerant, and calibration.
-
Register your warranty promptly.
-
Maintain your system regularly for long-term performance.
Savvy sums it up:
“Goodman made the installation process simple and stress-free. Knowing what to expect helped me enjoy my new system from day one — and every season since.”
In the next topic we will know more about: Real-World Savings: How Savvy Cut Her Electric Bill with a Goodman 15.2 SEER2 System


