If there’s one maintenance task that sounds simple—but causes the most accidental damage—it’s cleaning the outdoor condenser coil.
I’ve seen homeowners with the best intentions bend fins flat, flood electrical components, or strip coil coatings… all while trying to “help” their Goodman system run better.
Goodman 3.5 Ton 15.2 SEER2 System: R32 Air Conditioner Condenser model GLXS4BA4210,
The good news?
You can clean your condenser coil safely and effectively—if you know where the danger lines are.
This guide walks you through:
-
What the condenser coil actually does
-
When cleaning is necessary (and when it isn’t)
-
Exactly how to clean it safely
-
Common mistakes that cause expensive damage
-
When it’s time to stop and call a professional
Let’s do this the smart way.
🌬️ What the Condenser Coil Does (And Why Cleanliness Matters)
Your outdoor condenser coil is where heat leaves your home.
Here’s the simple version:
-
Indoor air absorbs heat
-
Refrigerant carries that heat outside
-
The condenser coil releases it into outdoor air
When the coil is dirty:
-
Heat can’t escape efficiently
-
Refrigerant pressures rise
-
The compressor works harder
-
Energy use increases
Left unchecked, dirty coils lead to:
-
Reduced cooling capacity
-
Higher electric bills
-
Shortened compressor life
Verified reference:
ENERGY STAR – Why Coil Cleaning Matters
https://www.energystar.gov/saveathome/heating-cooling/maintenance-checklist
🧠 How Dirty Is “Too Dirty”?
This is where most homeowners overdo it.
❌ You Don’t Need to Clean If:
-
Fins are visibly clean
-
Light dust is present but airflow is unobstructed
-
Unit was cleaned within the last year
✅ You Should Clean If:
-
Fins are visibly clogged with dirt or pollen
-
Grass clippings or cottonwood are stuck
-
Airflow feels weak despite a clean filter
-
The unit hasn’t been cleaned in over a year
Over-cleaning causes just as many problems as neglect.
⚠️ Biggest Mistakes Homeowners Make (Please Avoid These)
Before we talk about the right way, let’s talk about what not to do.
🚫 Pressure Washers
These:
-
Flatten delicate aluminum fins
-
Push debris deeper into the coil
-
Damage protective coatings
Once fins are bent, airflow suffers permanently.
🚫 Harsh Chemical Cleaners
Many store-bought coil cleaners:
-
Are acidic or alkaline
-
Strip corrosion-resistant coatings
-
Damage nearby landscaping
Verified reference:
EPA – Household Chemical Safety
https://www.epa.gov/saferchoice
🚫 Cleaning with the Power On
This risks:
-
Electrical shock
-
Control board damage
-
Short circuits
Always disconnect power first.
🧰 Tools You Actually Need (Keep It Simple)
You don’t need special equipment.
✔️ Safe Cleaning Tools
-
Garden hose with gentle spray
-
Soft-bristle brush (optional)
-
Gloves
-
Screwdriver (for panel removal, if needed)
If a tool feels aggressive, it probably is.
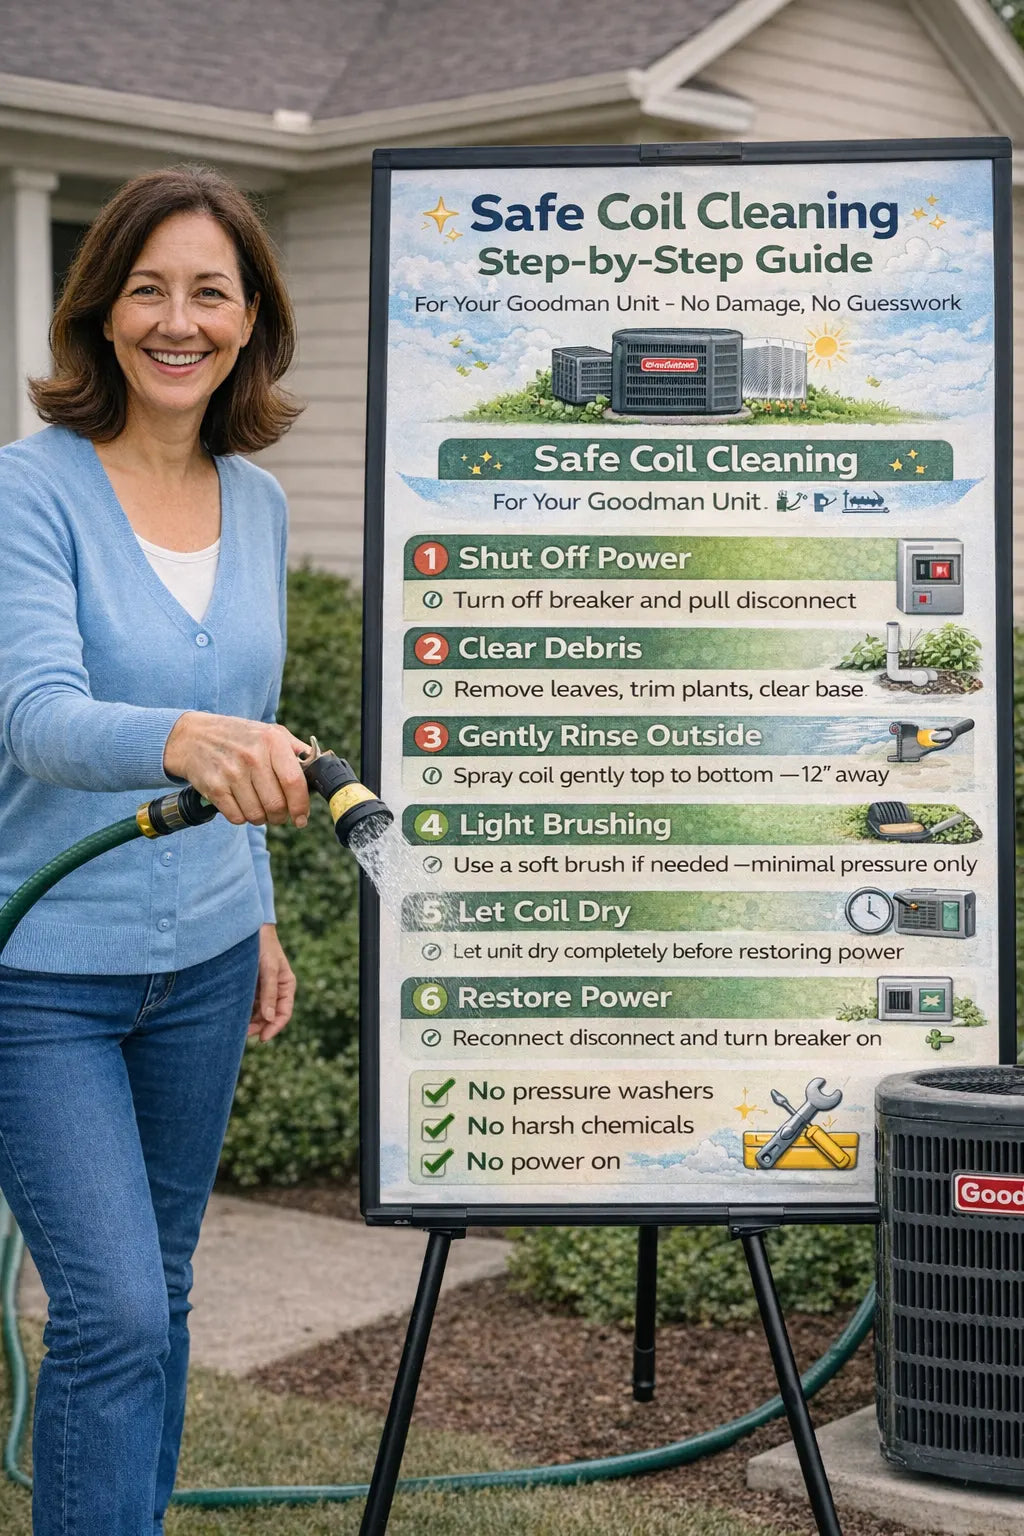
🔌 Step 1: Shut Off Power (Non-Negotiable)
Safety comes first.
🔒 How to Do It
-
Turn off the breaker feeding the condenser
-
Pull the outdoor disconnect if present
-
Confirm the unit is fully off
Verified reference:
U.S. Consumer Product Safety Commission – Electrical Safety
https://www.cpsc.gov/safety-education/safety-guides/home/electrical-safety
Never rely on the thermostat alone.
🌿 Step 2: Clear Debris Around the Unit
Before touching the coil itself:
-
Remove leaves, mulch, and trash
-
Trim plants back 24–36 inches
-
Clear the base of the unit
This alone improves airflow dramatically.
🌀 Step 3: Gentle Exterior Rinse (The Safe Way)
This is the core of DIY coil cleaning.
🚿 How to Rinse Properly
-
Use a gentle hose spray
-
Spray from top to bottom
-
Keep the nozzle at least 12 inches away
-
Let water carry debris out naturally
Do not force debris through the coil.
Verified reference:
Department of Energy – Outdoor Unit Care
https://www.energy.gov/energysaver/air-conditioner-maintenance
🧽 Step 4: Light Brushing (Only If Necessary)
If debris won’t rinse away:
🪥 Safe Brushing Tips
-
Use a soft-bristle brush only
-
Brush in the direction of the fins
-
Apply almost no pressure
If debris resists gentle brushing—stop. That’s a pro-level cleaning.
🧊 Step 5: Let the Unit Dry Completely
Before restoring power:
-
Allow coils to air-dry
-
Inspect for bent fins or loose panels
-
Reinstall any panels you removed
Never restart the unit while wet.
🔄 Step 6: Restore Power & Test Operation
Once dry:
-
Reinsert the disconnect
-
Turn the breaker back on
-
Set thermostat to cooling
Listen for:
-
Smooth startup
-
Normal fan operation
-
No unusual noises
📆 How Often Should You Clean the Condenser Coil?
For most homes:
-
Once per year is sufficient
-
Twice per year in dusty, pollen-heavy, or high-pollution areas
If filters are changed regularly and landscaping is maintained, annual cleaning is usually enough.
🧑🔧 When DIY Stops and Professionals Take Over
Some situations require professional tools and training.
🚨 Call a Pro If:
-
Fins are badly bent
-
Coil is greasy or oily
-
Unit overheats or shuts down
-
You suspect refrigerant issues
Professional coil cleaning includes:
-
Inside-out rinsing
-
Fin straightening
-
Coil-safe cleaners
-
Electrical protection
Verified reference:
ENERGY STAR – Professional HVAC Maintenance
https://www.energystar.gov/saveathome/heating-cooling/maintenance-checklist
🌱 Special Notes for Goodman High-Efficiency & R-32 Systems
Modern Goodman systems are more sensitive to airflow restrictions.
Dirty coils affect:
-
SEER2 efficiency
-
Compressor longevity
-
Refrigerant pressure balance
That makes gentle, correct cleaning more important than ever.
Verified reference:
ASHRAE – Residential Cooling System Design
https://www.ashrae.org/technical-resources
📝 Samantha’s Safe Coil-Cleaning Checklist
Before you start:
-
✅ Power disconnected
-
✅ Debris cleared
-
✅ Gentle water only
-
✅ No chemicals or pressure
If any step feels questionable—pause.
🌬️ Final Thoughts from Samantha
Cleaning your Goodman condenser coil doesn’t require force—it requires restraint.
When done correctly, coil cleaning:
-
Improves efficiency
-
Reduces strain on the compressor
-
Lowers energy bills
-
Extends system life
When done aggressively, it does the opposite.
Respect the equipment, stay within DIY boundaries, and your system will reward you with dependable cooling all season long.


