No matter how careful you are, not every PTAC startup is flawless.
Maybe the breaker trips. Maybe the unit powers on but doesn’t respond. Maybe it makes a noise that immediately tells you something isn’t right. When that happens, the most important thing isn’t fixing it fast — it’s shutting the system down safely and troubleshooting in the right order.
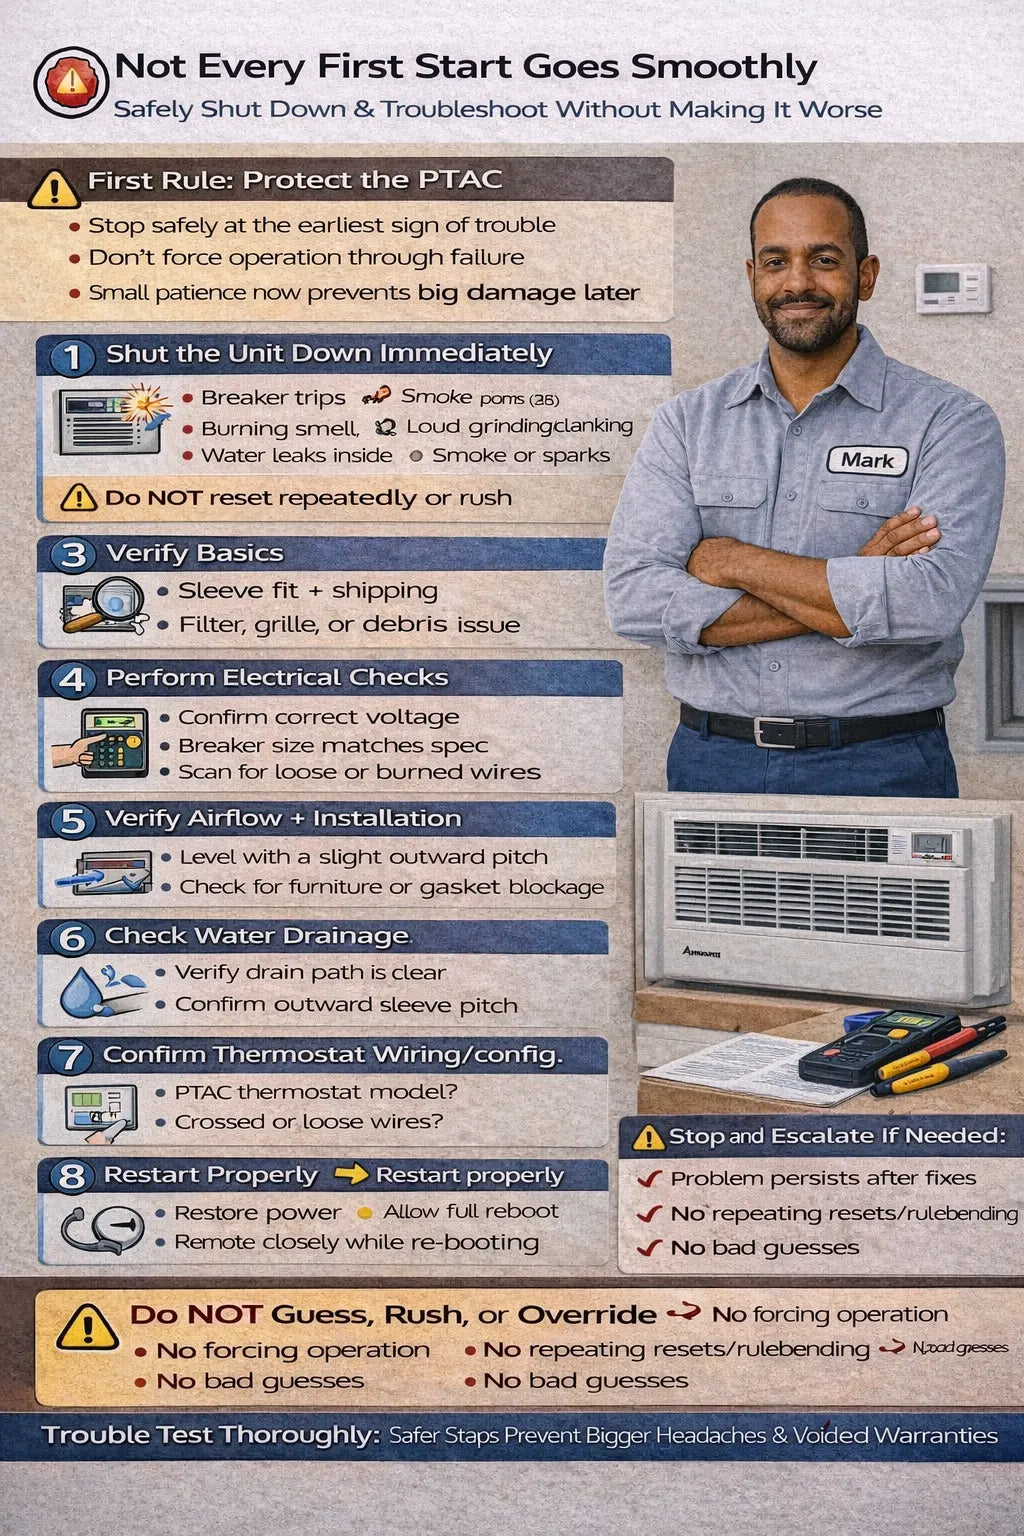
I’ve seen more damage caused by rushed reactions than by the original problem itself. This guide walks through how to shut down safely, what to check first, and how to troubleshoot startup issues without turning a small problem into an expensive one, using the Amana J-Series 15,000 BTU PTAC with 3.5 kW electric heat as our reference.
🧠 First Rule: Protect the Unit Before You Diagnose It
PTAC systems are designed with safeties, but those safeties can only do so much if the unit is repeatedly forced to run under bad conditions.
If something feels wrong during first startup:
-
Don’t “see if it clears”
-
Don’t keep resetting breakers
-
Don’t override controls
-
Don’t assume it will fix itself
Your first goal is a clean, controlled shutdown.
🔌 Step 1: When to Shut the Unit Down Immediately
Some signs mean you stop right away.
🚨 Immediate shutdown triggers
-
Breaker trips more than once
-
Burning smell that doesn’t fade quickly
-
Loud grinding, scraping, or clanking noises
-
Smoke or visible sparking
-
Water leaking indoors
-
Control panel flashing erratically
If you see or hear any of these, continuing operation risks electrical damage, water damage, or component failure.
🛑 Step 2: How to Shut Down Safely (The Right Way)
Shutting down a PTAC is more than hitting “off.”
✅ Safe shutdown procedure
-
Turn the unit off at the control panel or thermostat
-
Disconnect power at the breaker or unplug the unit
-
Leave power off for at least 3–5 minutes
-
Allow internal components to fully stop and discharge
This pause lets capacitors discharge and prevents control boards from locking into fault states.
⚠️ What NOT to Do During Shutdown
These reactions cause more harm than help.
❌ Avoid:
-
Rapid power cycling
-
Repeated breaker resets
-
Forcing mode changes mid-shutdown
-
Pulling the unit while energized
-
Ignoring smells or sounds
If you remember nothing else: slower is safer.
🔍 Step 3: Start Troubleshooting With the Basics (Not the Board)
Most startup problems aren’t electronic failures.
🔎 First things to verify
-
Unit fully seated in the wall sleeve
-
No shipping materials left inside
-
All filters installed correctly
-
No tools or debris inside the sleeve
-
Indoor and outdoor grilles unobstructed
You’d be surprised how many “mystery failures” end here.
⚡ Step 4: Electrical Checks — Without Guessing
Electrical issues are the most common startup failure cause.
⚙️ What to confirm
-
Correct voltage at the unit
-
Breaker size matches manufacturer specs
-
Dedicated circuit (no shared loads)
-
Secure wiring connections
-
No heat damage at outlets or terminals
Manufacturer reference:
Amana PTAC Technical & Electrical Resources
Never assume electrical is “close enough.” PTACs are sensitive to voltage mismatches.
🌬️ Step 5: Airflow & Installation Verification
Poor airflow causes shutdowns, errors, and short cycling.
🧱 Check:
-
Unit level side-to-side
-
Slight outward pitch for drainage
-
Foam gaskets intact
-
No gaps around the chassis
-
Furniture, curtains, or beds not blocking airflow
Airflow problems often masquerade as control or compressor issues.
💧 Step 6: Water & Drainage Checks
If water shows up during startup, stop.
🚿 Inspect:
-
Sleeve pitch (must drain outward)
-
Drain openings clear
-
No sealant blocking drain paths
-
No insulation stuffed into sleeve
Drainage problems almost never fix themselves — they worsen over time.
For moisture fundamentals, see:
Energy.gov – HVAC Moisture & Drainage Basics
🎛️ Step 7: Control & Thermostat Troubleshooting
Control problems are common during first start.
🧠 Verify:
-
Thermostat is PTAC-compatible
-
Wiring follows the diagram exactly
-
No crossed or loose wires
-
Thermostat configured for electric heat or heat pump correctly
If controls behave erratically, disconnect power and re-verify wiring before restarting.
🔁 Step 8: Performing a Clean Restart
Once checks are complete, restart properly.
🔄 Proper restart steps
-
Restore power
-
Allow full control board initialization
-
Do not demand heating or cooling immediately
-
Observe startup sequence closely
A clean restart tells you whether the correction worked.
🚨 Step 9: When to Stop Troubleshooting and Escalate
Some issues shouldn’t be pushed past a certain point.
🛑 Stop and escalate if:
-
Breaker continues to trip after corrections
-
Error codes persist across restarts
-
Electrical measurements are unstable
-
Mechanical noises continue
-
Water intrusion cannot be resolved
At this point, continuing risks warranty issues or permanent damage.
📋 Common Startup Problems & Safe Responses
❗ Breaker trips
→ Shut down, verify voltage & breaker size
❗ Fan runs but no heating/cooling
→ Wait for delay, check controls & airflow
❗ Loud vibration
→ Shut down, re-seat unit, check mounting
❗ Water leak
→ Shut down cooling, verify pitch & drains
❗ Control unresponsive
→ Power down, recheck wiring & compatibility
Every one of these has a safe stopping point.
🧠 Mark’s Rule for Troubleshooting
If you find yourself:
-
Guessing
-
Repeating the same reset
-
Hoping it “clears up”
-
Feeling rushed
Stop.
Good troubleshooting is methodical, not emotional.
🧠 Mark’s Final Take
A rough first start doesn’t mean you did something wrong — but how you respond to it matters.
If you shut the system down safely, work from the basics upward, and resist the urge to force operation, you protect:
-
The equipment
-
The installation
-
The warranty
-
Your time
PTACs are forgiving when treated carefully and unforgiving when rushed.
Slow down. Shut down safely. Fix the root cause.
That’s how first-start problems stay small.


