
Key Takeaways
-
Clean filters every 4–6 weeks – dirty screens raise energy use by 10%+.
-
Keep 2 ft clear around the outdoor unit – blockages reduce airflow and lifespan.
-
Do monthly checks – catch 80% of issues early.
-
Get yearly pro tune-ups – ensures peak heating/cooling performance.
-
Routine care cuts energy waste up to 30% – keeps the system running efficiently.
Why Caring for Your Mini-Split Matters

Beyond savings, good maintenance protects indoor air. A clean filter traps pollen and pet dander; a clear condensate drain stops moldy smells. For families with asthma, that matters as much as a lower power bill. Finally, manufacturers tie their 10- to 12-year parts warranties to proper care records, so skipping service can void the coverage just when you need it. In short, a few minutes each month keeps comfort high, costs low, and the warranty safe.
Want to cut your energy bill fast? See our top-rated mini-split systems.
Meet the Parts: A Quick Tour of Your Mini-Split
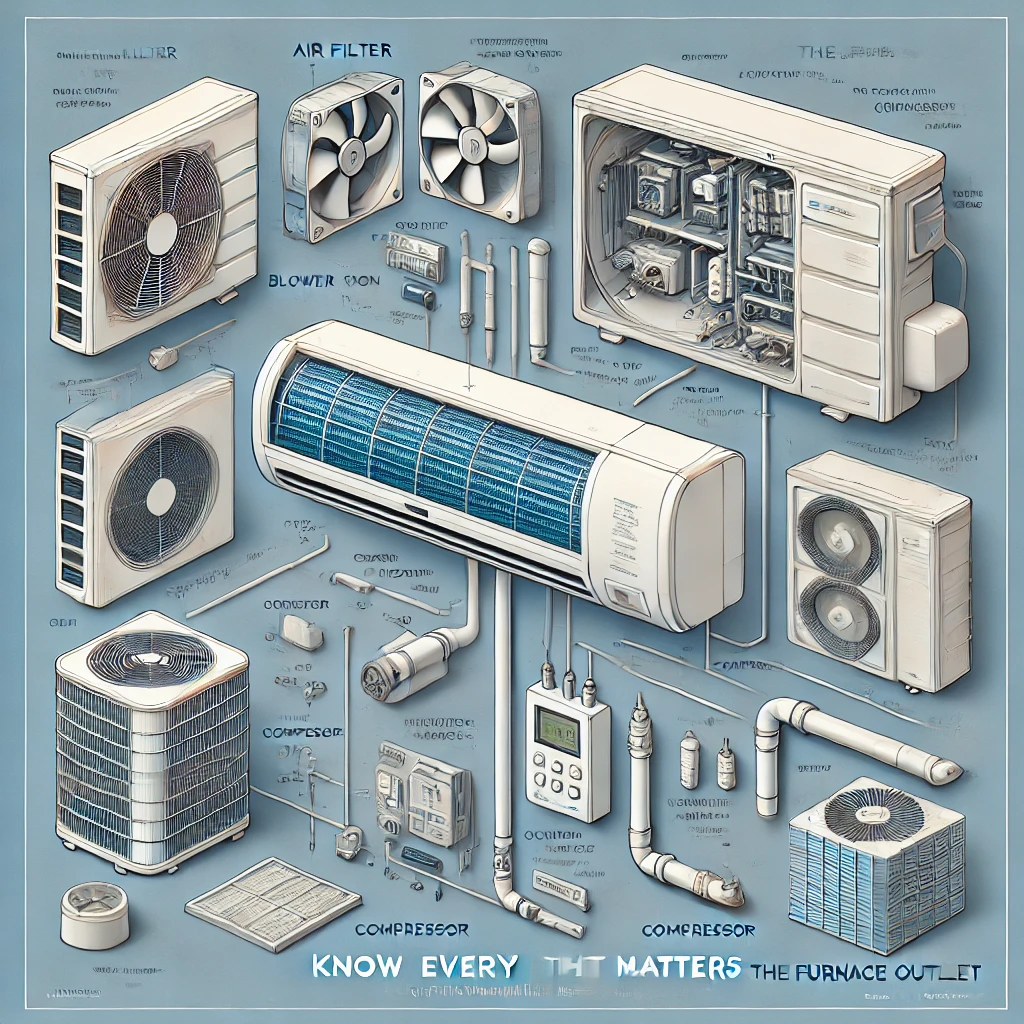
Key parts everyone should recognize:
-
Filter frame – slides out without tools for washing.
-
Evaporator fins – aluminum plates that must stay dust-free to move heat.
-
Blower wheel – hidden squirrel-cage fan that pushes air across the coil.
-
Compressor – the “heart” that pumps refrigerant; inverter models speed up or slow down rather than cycling on/off.
-
PCB (control board) – brains of the system, reading sensors and throttling the compressor.
Knowing these pieces helps you decide what you can clean (filters, fins, drain) and what a licensed HVAC tech should handle (refrigerant charge, electrical lugs).
Not sure which system you own? Use our visual guide.
Indoor Unit TLC: Filters, Coils, and Condensate Lines

Next, shine a flashlight at the evaporator fins. If they sparkle silver, you’re good. If they look gray, brush them gently with a soft coil brush. Never stab fins with a screwdriver; bent fins block air. Twice a year, spray a no-rinse coil cleaner to melt stubborn grime.
Finally, pour a cup of white vinegar into the condensate channel. Vinegar kills algae that can clog the drain line and cause indoor leaks. If water ever drips from the head, suspect a blocked line first—it’s usually an easy DIY fix.
Pro Tip: Always switch off the breaker and wait five minutes for capacitors to discharge before removing any panel.
See maintenance-friendly mini-splits built for easy care.
Outdoor Unit Defense: Stopping Dirt, Leaves, and Ice

In freezing states, brush snowdrifts off the top after every storm. Ice blocks airflow and can crack the fan shroud. If storms coat the coil with thick ice, switch the unit to “defrost” or call a pro; hacking ice off with a screwdriver often punctures the coil.
Loose electrical lugs inside the condenser cause many mysterious shutdowns. With power off, a technician can torque the screws to factory spec at the annual tune-up. That five-minute step saves expensive boards from voltage spikes.
Need a deeper dive on shielding the unit and yourself? Check out protect your mini-split for step-by-step photos.
Simple Checks for Strong Summer Cooling

-
Morning filter glance. If the mesh looks dusty, rinse it before the afternoon heat load hits.
-
Smoke-stick leak hunt. Hold an incense stick near window frames; sideways smoke shows air leaks that force longer run-times.
Before the first heatwave:
-
Rinse the outdoor coil.
-
Vacuum the condensate line with a wet/dry vac.
-
Test the remote’s batteries.
-
Set the thermostat 3 °F higher when no one is home, rather than turning the unit off.
A steady setpoint lets the inverter compressor “cruise” and avoids the energy spike of full-blast restarts. Field tests shared in The Furnace Outlet’s mini-split efficiency tips show this habit alone can shave 30 % off July power bills.
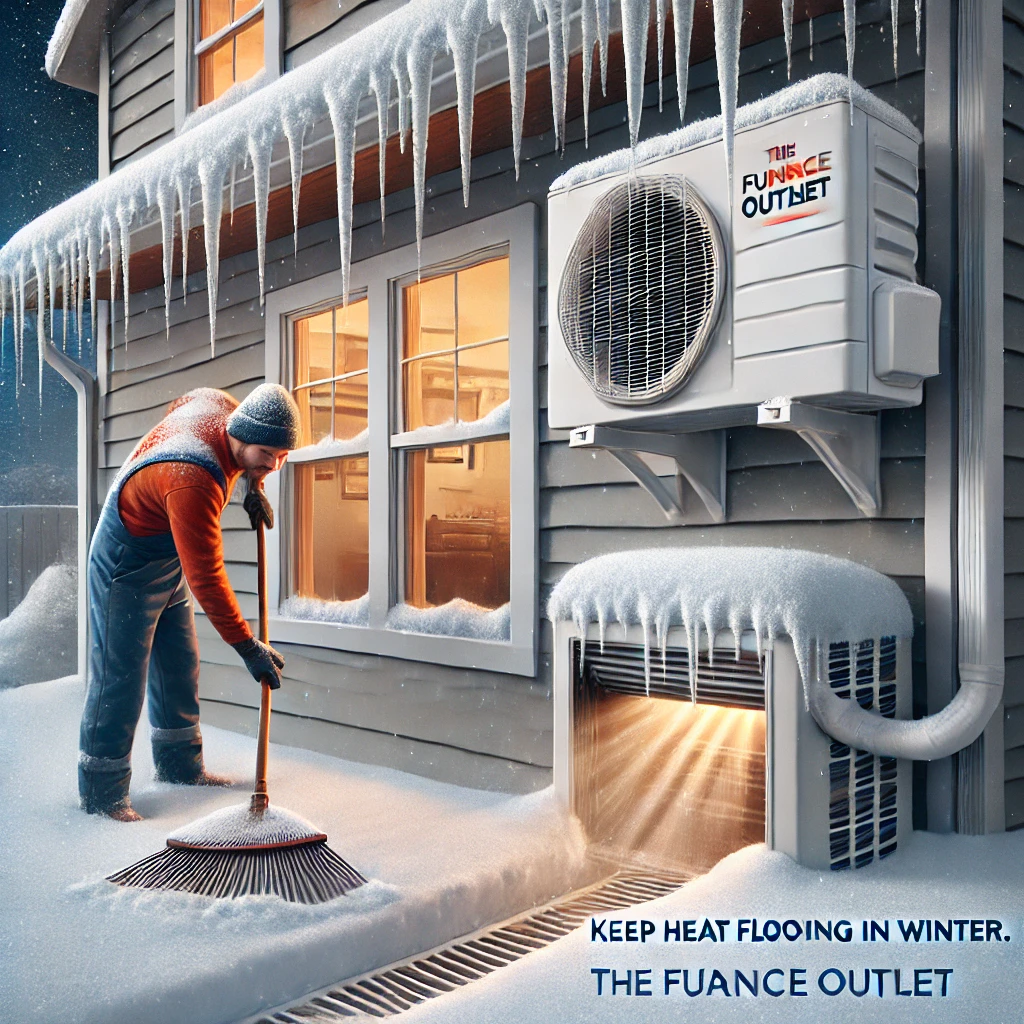
Cold-Weather Steps to Keep Heat Flowing
-
Clear snow every storm. Use a soft broom; never pour hot water—it may crack the coil.
-
Turn on “defrost” mode for ten minutes if ice cakes the fins.
-
Angle louvers downward so warm air circulates near the floor, then rises naturally.
-
Keep gutters above the unit unclogged; dripping icicles can spear the fan.
In bitter climates, some homeowners add a condenser roof or wind baffle. These shields work only if they allow full vertical airflow. Ask your tech before mounting anything.
Remember that refrigerant thickens in extreme cold. A yearly service visit includes checking charge and superheat values to ensure the compressor does not overwork.
Protect your system with cold-weather-rated units.
Fix-It Fast: Troubles You Can Solve at Home

Most everyday hiccups trace back to three culprits: filters, drains, and power supply.
|
Symptom |
Likely Cause |
Quick Fix |
|
Weak airflow |
Dirty filter |
Wash and dry filter |
|
Water drip |
Clogged drain |
Flush with vinegar or wet/dry vac |
|
No power |
Tripped breaker or dead batteries |
Reset breaker, replace remote batteries |
|
Musty smell |
Dirty coil/drain |
Clean coil; flush drain |
If cleaning and resets fail, stop and call a licensed tech—deep electrical or refrigerant work is not DIY-friendly. Touching copper lines can cause frostbite, and U.S. law requires EPA-certified handling of R-410A and R-32.
Need help diagnosing your issue? Contact our support team.
Know the Warning Signs: When a Pro Should Step In

-
Metal-on-metal grinding – often a failing fan motor bearing.
-
Repeated “E6” or “P4” error codes – signal sensor faults or compressor trips.
-
Ice forming on indoor fins – could be low refrigerant.
-
Outdoor unit cycles on/off every minute – called short-cycling; risks compressor failure.
If any of these appear, shut the system off and schedule service. A technician will:
-
Hook up gauges to read refrigerant pressure.
-
Test capacitor values and PCB voltage.
-
Measure superheat/subcool to check charge accuracy.
-
Inspect for oil stains that point to minute copper leaks.
Quick action protects the compressor, the costliest part of the system. For a homeowner’s checklist on spotting red flags, see mini-split buyer checks.
Build a Year-Round Mini-Split Care Plan

Use this simple schedule:
|
Month |
Task |
|
January |
Check for ice, sweep snow, test heat mode |
|
March |
Rinse indoor filter; inspect drain |
|
May |
Full spring cleaning: indoor coil brush, outdoor coil rinse |
|
July |
Mid-season filter wash; smoke-stick leak test |
|
September |
Pre-heating check: wash filter, flush drain, clear shrubs |
|
November |
Schedule professional tune-up; torque electrical lugs |
Print or save our simple year-round care calendar.
Frequently Asked Questions
Q: How often should I wash the filter if I have two dogs?
A: Check it every two weeks; most pet owners end up rinsing it monthly.
Q: Can I shut the outdoor unit off with a tarp in winter?
A: No. Airflow must stay open. Use a breathable condenser cover designed for heat pumps.
Q: Why does my remote keep losing its settings?
A: Many remotes store settings in small coin batteries. Replace them yearly.
Q: Is vinegar safe for the drain line?
A: Yes. White vinegar dissolves algae without harming PVC tubing.
Q: Do mini-splits need Freon “top-ups” every few years?
A: No. Refrigerant is sealed for life; needing a top-up means there’s a leak that must be repaired first.


