The Step-by-Step Guide Every Homeowner Can Follow to Keep Their Goodman System Running Like New
Hi folks — Tony here.
You’ve probably heard me say this before: a well-installed air conditioner is only as good as how it’s maintained.
And the truth is — most breakdowns I get called for could’ve been prevented with 10 to 15 minutes of seasonal maintenance. That’s it. No special tools. No refrigerant gauges. Just simple, consistent care.
Today, I’m going to walk you through the same seasonal checklist I use for my own Goodman 2-Ton 14.3 SEER2 AC condenser (Model GSXN402410) — the same one I’ve installed in hundreds of homes.
If you follow this guide, your system will cool stronger, run quieter, last longer, and cost less to operate — and you’ll avoid the surprise of your AC quitting in the middle of July.
💡 Why Maintenance Matters More Than You Think
Your GSXN402410 is a tough, factory-tested piece of equipment. Goodman designs these condensers for years of dependable performance in real-world conditions — high humidity, dust, and heavy daily use.
But even the best system can lose efficiency fast if you don’t maintain it.
Here’s what happens when you skip maintenance:
-
Dust and pollen clog the outdoor coil fins.
-
The compressor works harder, drawing more amps.
-
Cooling performance drops 10–20%.
-
Energy bills climb.
-
Eventually, electrical components overheat and fail.
“It’s like driving your truck with dirty oil and a clogged air filter — it’ll run, but not for long.”
📘 Reference: EnergyStar – Maintain Your Cooling System
🧭 Understanding the Basics: What Each Part Needs
Let’s take a minute to understand the three main parts that maintenance keeps in check:
-
The Condenser (Outdoor Unit): Releases heat from inside your home. Needs airflow and clean coils to do its job efficiently.
-
The Evaporator Coil (Indoor Coil): Absorbs heat and humidity. Needs a clean filter and drain to prevent icing and overflow.
-
The Air Handler or Furnace: Moves air through the system. Needs clear ducts and correct fan speeds to maintain balanced airflow.
If all three stay clean and connected, your GSXN402410 will run like it did the day it was installed.
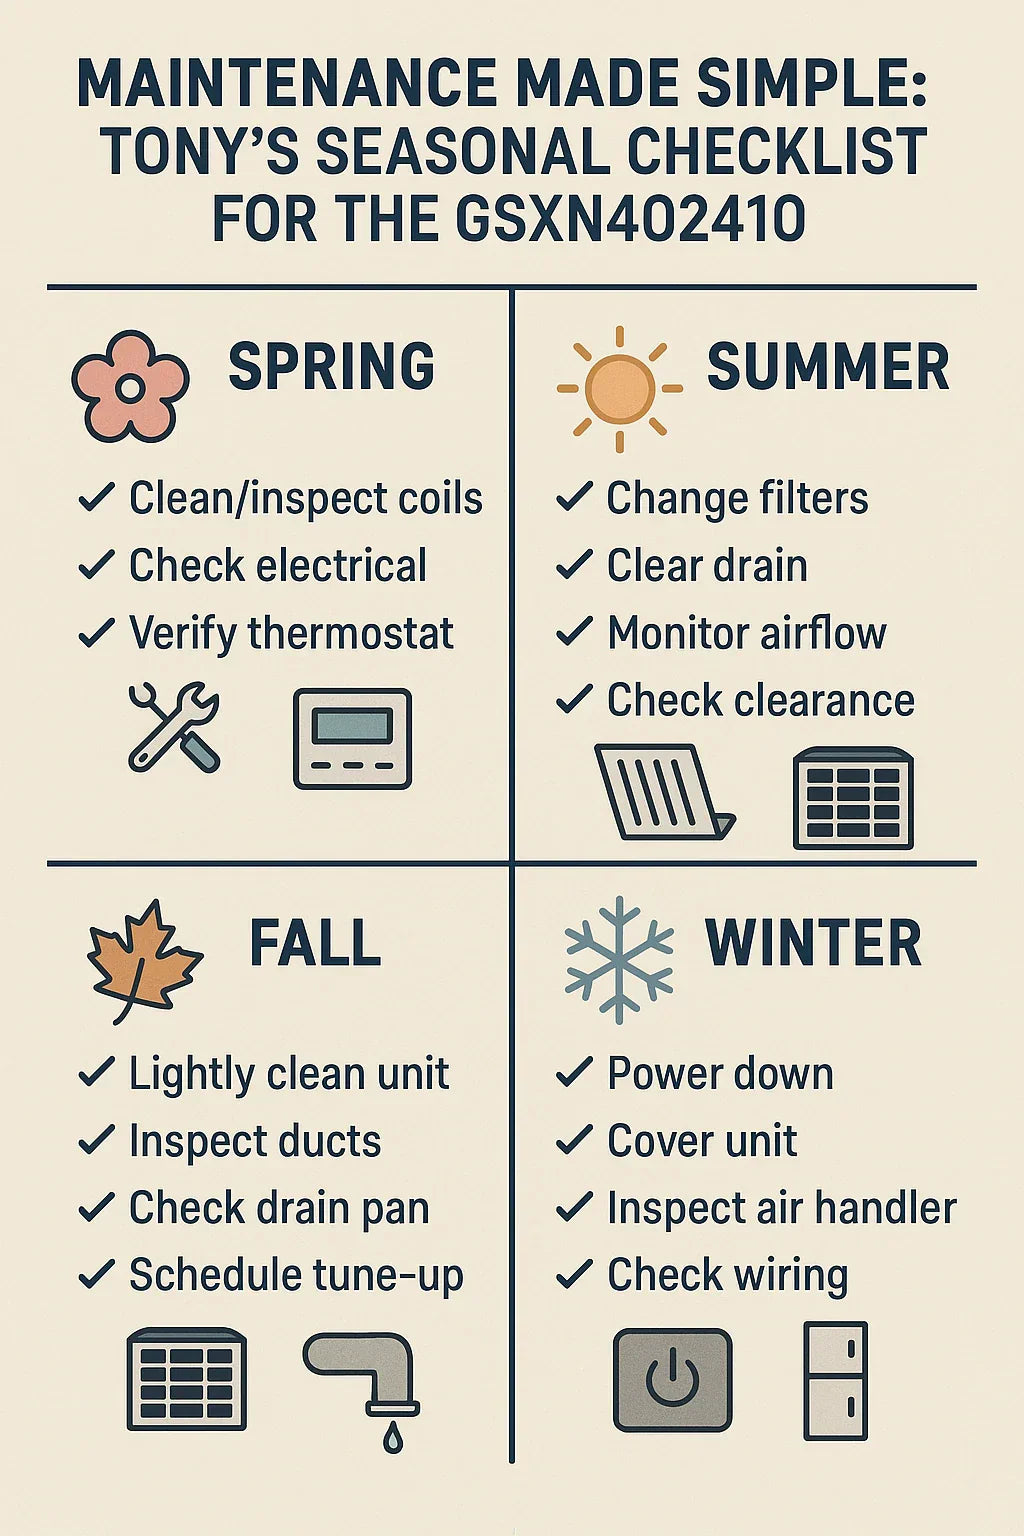
🌸 SPRING: Pre-Season Prep — Setting the Stage for Summer
Spring is when you wake your AC up from hibernation. Before those first hot days, here’s what Tony does every April:
✅ Step 1: Power Off and Inspect the Outdoor Unit
Turn off power at the disconnect switch or circuit breaker. Then:
-
Remove leaves, branches, and debris from around the unit.
-
Hose off the condenser coil from the inside out using gentle pressure.
-
Straighten bent fins using a fin comb (you can grab one for under $10).
-
Check fan blades for rust or cracks.
-
Make sure the concrete pad is level.
“A clean coil can drop your system pressure by 50 psi — that’s free efficiency.”
✅ Step 2: Inspect Electrical Components
Remove the access panel (with power OFF) and check:
-
Contactors for pitting or burn marks.
-
Wiring insulation for cracks or rodent damage.
-
Tightness of terminal screws (a common cause of failures).
If anything looks corroded or burnt, call a tech before startup.
📘 Reference: Goodman – GSXN4 Maintenance Guidelines
✅ Step 3: Check the Thermostat
-
Replace batteries (if applicable).
-
Set it to “Cool” and 70°F to test startup.
-
Listen for the click at the relay.
-
Make sure the fan starts smoothly.
✅ Step 4: Clean or Replace Filters
Replace with a MERV 8–11 pleated filter for best balance between airflow and filtration.
“Don’t go crazy with high MERV filters — too much restriction can choke airflow.”
✅ Step 5: Inspect the Drain Line
Locate the PVC condensate drain (usually near the indoor coil) and pour in:
-
1 cup of white vinegar OR
-
½ cup bleach + ½ cup water mix
This kills algae before it clogs the line.
📘 Reference: Energy.gov – Air Conditioner Maintenance Tips
☀️ SUMMER: Keeping the Cool Air Flowing
Once your AC is in daily use, your job is to keep it breathing and draining.
✅ Step 1: Change Filters Every 30–45 Days
This is the #1 thing homeowners neglect. Dirty filters = restricted airflow, frozen coils, and high bills.
Tony’s tip:
“Write your filter change date on the frame. No guessing — just check your calendar.”
✅ Step 2: Monitor Airflow & Temperatures
Every month, check:
-
Supply vent temperature (should be 18–22°F colder than return air).
-
Listen for rattling or hissing noises.
-
Make sure airflow is steady and quiet.
A smaller temperature difference means dirt or low refrigerant.
✅ Step 3: Keep the Condenser Clear
Cut grass and trim plants at least 24 inches around the condenser.
Don’t stack mulch or block the bottom air intake vents.
“I’ve seen systems die just because a flower bed got too close.”
✅ Step 4: Check the Condensate Drain Monthly
If you see water pooling or the line isn’t dripping outside, it’s clogged.
Use a wet/dry vacuum to pull out debris from the drain outlet.
📘 Reference: EnergyStar – HVAC Filter Replacement
✅ Step 5: Visual Check for Icing or Oil Stains
If you see ice on the copper lines or oil residue, shut off the unit and call a pro — it could mean low refrigerant or a leak.
“Never chip off coil ice — it’s not frozen water, it’s frozen refrigerant. Let it thaw naturally.”
🍁 FALL: The Cooling Season Wind-Down
As summer fades, your goal is to clean, protect, and prepare for winter storage.
✅ Step 1: Rinse and Cover the Condenser
Clean the coils one last time. Once dry:
-
Place a breathable mesh cover or top shield over the unit.
-
Never wrap the sides completely — it traps moisture and rusts the coils.
“You’re not tucking it in for bed, just keeping the snow off its face.”
✅ Step 2: Seal and Insulate Ducts
Inspect accessible ducts in your attic, crawlspace, or basement:
-
Use mastic sealant for leaks (not regular duct tape).
-
Add insulation where the ducts feel cold or sweaty.
📘 Reference: EnergyStar – Duct System Efficiency
✅ Step 3: Flush the Drain Pan and Line
Use vinegar or a safe coil cleaner to prevent mold or biofilm buildup.
Ensure the drain line slopes gently downward for gravity flow.
✅ Step 4: Schedule a Professional Tune-Up
Fall is the best time for a tech to:
-
Check refrigerant charge
-
Test capacitors
-
Measure voltage and amperage draw
-
Inspect blower motor bearings
-
Verify coil cleanliness
You’ll pay less in the off-season, and it’s one less thing to worry about next spring.
📘 Reference: ACCA – HVAC Quality Maintenance Standard
❄️ WINTER: Protect Your Investment
Even though your GSXN402410 will be idle, cold and moisture can still do damage if you’re not careful.
✅ Step 1: Power Off the Unit
Flip the outdoor disconnect to OFF to prevent accidental starts during cold weather.
✅ Step 2: Cover the Top Only
Use a vinyl or mesh top cover — never a full wrap.
A full cover traps condensation, leading to rust and corrosion.
“If you’re wrapping your AC like a Christmas present, you’re doing it wrong.”
✅ Step 3: Inspect Air Handler or Furnace Blower
Vacuum dust from the blower cabinet.
Check for any rust or water marks.
Run the fan for 10 minutes once a month to keep bearings lubricated.
✅ Step 4: Check Condenser Pad and Wiring
Make sure the pad hasn’t shifted due to frost heave.
Inspect low-voltage wires for chewing damage from rodents or pets.
📘 Reference: EPA – Section 608 Certification Guidelines
🔋 Tony’s 15-Minute Monthly Routine (All Year)
You don’t have to wait for seasons to pass — I spend just 15 minutes once a month giving my Goodman a quick once-over.
-
Peek at the filter.
-
Check the outdoor coil for dirt or leaves.
-
Pour vinegar into the drain line.
-
Make sure the fan runs smooth and quiet.
-
Verify that cold air still feels strong at the main vent.
“Maintenance is about rhythm, not reaction. When it becomes habit, your system never surprises you.”
🧰 Pro vs DIY: Know Your Limits
| Task | Safe for DIY? | Why |
|---|---|---|
| Filter replacement | ✅ | Simple, no tools required. |
| Cleaning outdoor coils | ✅ | Gentle rinse, no chemicals needed. |
| Checking thermostat | ✅ | Straightforward test. |
| Clearing drain line | ✅ | Easy vinegar treatment. |
| Tightening electrical lugs | ⚠️ | Turn off power, use caution. |
| Checking refrigerant charge | ❌ | Requires EPA-certified tools. |
| Replacing contactors/capacitors | ❌ | Electrical shock risk — pro job. |
“If it needs gauges, it needs a pro. Simple rule.”
🧾 Tools & Products Tony Trusts
| Purpose | Product | Why |
|---|---|---|
| Coil Cleaning | WEB Coil Cleaner | Non-corrosive and effective. |
| Fin Straightening | Supco Fin Comb | Restores airflow through bent fins. |
| Drain Line Cleaning | Pan-Treat Tablets | Prevents algae and odors. |
| Filter Replacement | Honeywell MERV 8 | Perfect airflow balance for Goodman systems. |
| Vacuuming Debris | Shop-Vac 4.5 HP | Ideal for outdoor cleanup. |
“Spend a few bucks on the right tools once — save hundreds every year.”
🧠 Tony’s Top 5 “Golden Rules” of AC Maintenance
-
Airflow is life. Never block vents, coils, or returns.
-
Cleanliness counts. Dirt kills efficiency faster than wear.
-
Drain lines never forgive. A clogged drain ruins ceilings.
-
Record readings. Track temperature splits and filter dates.
-
Stay consistent. Skipping one season cancels the previous one’s effort.
🏁 Tony’s Closing Thoughts
Goodman builds systems that last — but no system can take care of itself.
The GSXN402410 is a straightforward, single-stage powerhouse that rewards regular attention. Follow this checklist, and your system will cool better, run quieter, and save you real money every month.
“I’ve installed hundreds of ACs over the years, and the ones still running strong today all have one thing in common — their owners cared enough to keep them clean.”
In the next topic we will know more about: Troubleshooting Guide: Common 2-Ton AC Issues (and How Tony Fixed Them)


