🏠 Introduction: The Big Question for Homeowners Like Mark
You’ve picked the right unit — the Amana 9,200 BTU Through-the-Wall Air Conditioner with Heat Pump — and now comes the next decision:
Do you install it yourself, or bring in a pro?
For homeowners like Mark, who are hands-on but safety-conscious, this is a real fork in the road. Through-the-wall AC installation isn’t complicated—but it does require some serious tools, careful planning, and a basic understanding of framing, electricity, and moisture control.
This guide will help you:
-
Understand what’s involved in a DIY install
-
See where the risks are
-
Know when to hire a professional
-
Estimate real-world costs for both options
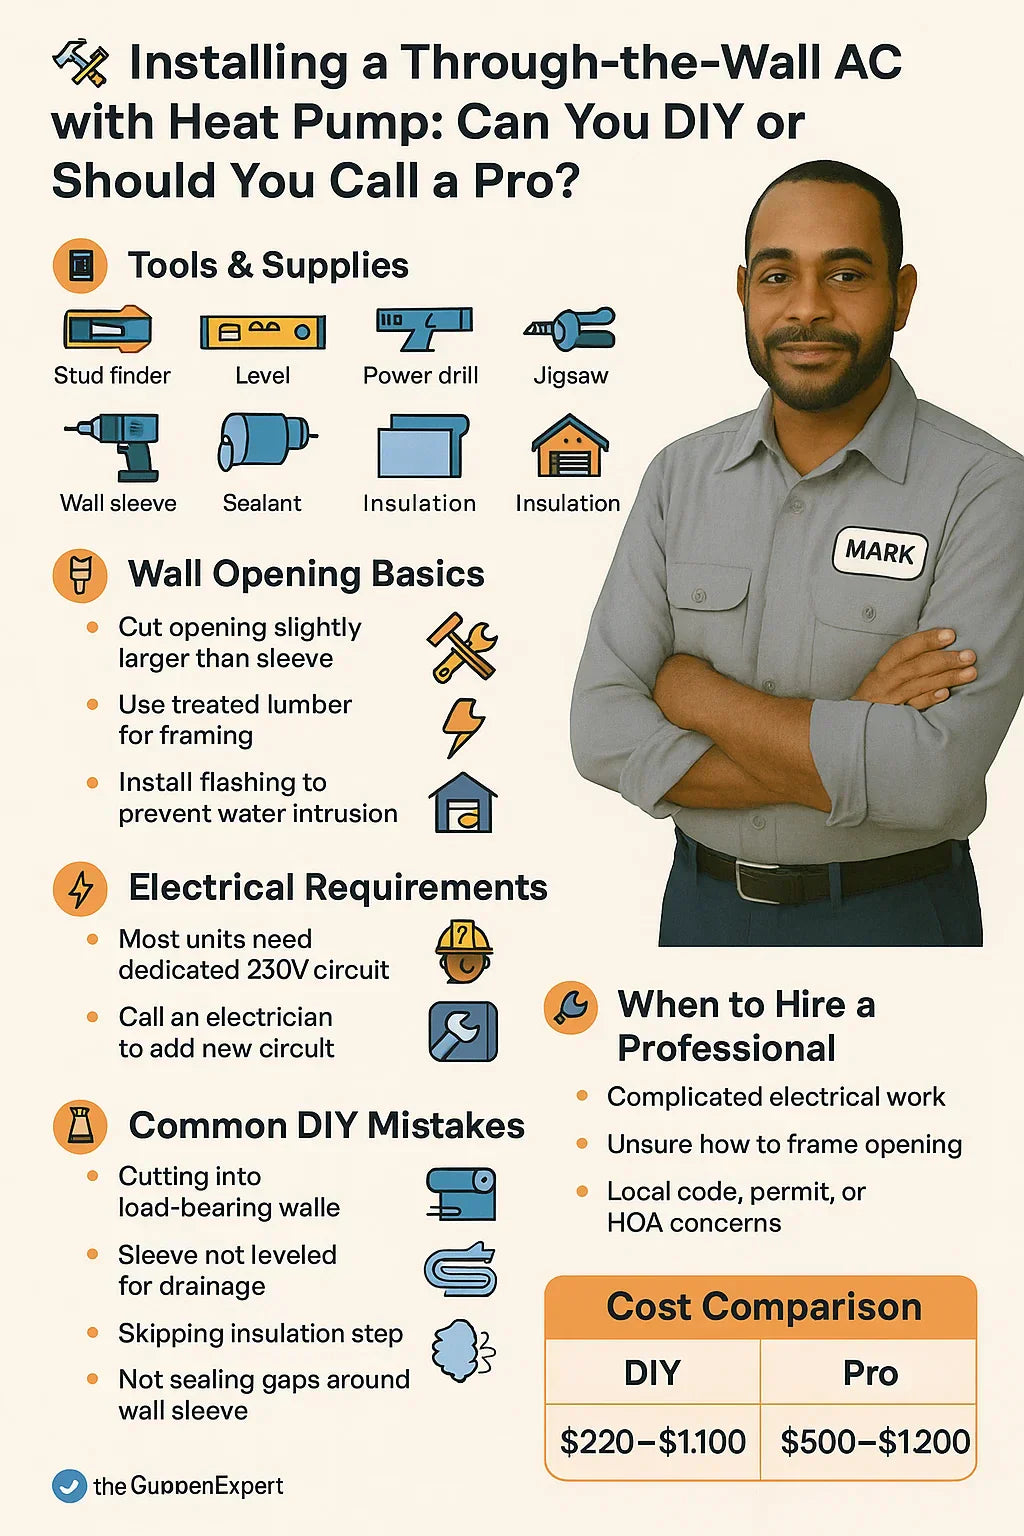
🧰 What You’ll Need for a DIY Through-the-Wall AC Installation
Installing the Amana 9,200 BTU unit requires more than just muscle — you’ll need tools, patience, and safety gear.
🧱 Tools & Supplies:
| Tool/Item | Purpose |
|---|---|
| Stud finder | Locate framing in the wall |
| Level | Ensure sleeve and unit are horizontal |
| Jigsaw or reciprocating saw | Cut through drywall and sheathing |
| Power drill | Fasten framing and sleeve |
| Caulk gun & waterproof sealant | Seal the sleeve |
| Measuring tape | Accurate cut-out and placement |
| Wall sleeve (required) | Holds the unit in place |
| Insulation foam/sealant | Prevents air leaks |
| 230V electrical outlet | Matches Amana’s power spec |
🔗 Amana Wall Sleeve Installation Guide (PDF)
🧱 Step-by-Step: Wall Prep & Sleeve Installation
🔎 Step 1: Choose the Right Spot
-
Exterior-facing wall
-
Clearance outside (at least 5 inches for airflow)
-
No structural obstructions (pipes, studs, or electrical)
⚠️ Avoid load-bearing walls unless you know how to frame a header safely.
🧰 Step 2: Cut the Opening
-
Mark out dimensions per sleeve template
-
Cut drywall, then exterior sheathing and siding
-
Use treated lumber to frame the opening
🧊 Step 3: Install the Wall Sleeve
-
Slide sleeve through the hole
-
Slight tilt downward (1/4") ensures proper drainage
-
Screw into framing
-
Seal edges with exterior-grade caulk
🔗 Energy Vanguard – Proper AC Sleeve Installation
⚡ Electrical Requirements: 230V or 115V?
The Amana 9,200 BTU model typically requires a 230V circuit.
⚠️ Check First:
-
Look for a dedicated 230V outlet near install site
-
If not present, you’ll need an electrician to:
-
Run new wiring
-
Install a 230V breaker
-
Add GFCI or AFCI protection as required by code
-
Never use an extension cord or adapter. It’s unsafe and voids your warranty.
🧪 Common DIY Mistakes to Avoid
-
Not checking for studs or wiring — could cut through something dangerous
-
Failing to level the sleeve — causes drainage problems and noisy operation
-
Skipping insulation — leads to air leaks, mold risk, and efficiency loss
-
Over-relying on caulk — gaps should be filled with foam sealant AND caulk
-
Improper electrical wiring — can lead to short circuits or even fire
🔗 Why DIY HVAC Installs Go Wrong
🔧 When to Call a Pro: Red Flags You Shouldn’t Ignore
While Mark may be confident with a drill, some scenarios call for expert help:
🚫 You should hire a pro if:
-
Your wall is load-bearing
-
You don’t have an existing 230V outlet
-
Your home is older with aluminum or knob-and-tube wiring
-
You’re unsure how to frame or insulate a wall opening
-
You live in a state or county requiring a permit for HVAC installations
📌 Tip: Many HVAC pros will do installation only (if you’ve bought the unit separately) for ~$300–$500.
📊 Cost Comparison: DIY vs. Professional Installation
| Category | DIY | Professional |
|---|---|---|
| Wall sleeve | $80–$120 | Included in quote |
| Tools (if needed) | $100–$300 | Not required |
| Sealants/mounting | $40–$75 | Included |
| Electrical (if needed) | $300–$700 (electrician) | Included or extra |
| Labor | $0 (your time) | $300–$700 |
| Total | $220–$1,100 | $500–$1,200 |
🧠 For many homeowners, it comes down to whether your home is already wired and ready. If it is, DIY is very doable. If not, call a pro.
🔗 Cost to Install Through-the-Wall AC
🧠 Mark’s Tip: Know Your Limits
“I tell homeowners all the time—if you’ve hung drywall or installed a window, you’ve probably got the skills to install a wall AC. But when electricity gets involved, I don’t take chances. A licensed electrician is worth every penny.”
📋 Local Code & Permit Considerations
Even though it’s a wall unit and not central HVAC, you may still need a permit if:
-
You modify the electrical system
-
You’re cutting a structural wall
-
Your HOA or municipality has zoning rules
📌 Always Check:
-
Local building department website
-
Your homeowner’s insurance (for DIY jobs)
🔗 International Code Council – Residential Code Reference
✅ Final Verdict: Should You DIY or Hire a Pro?
✅ Go DIY if:
-
You have a 230V outlet nearby
-
You’re comfortable with tools and framing
-
You want to save $300–$600
-
Your wall is non-load-bearing
✅ Hire a Pro if:
-
You’re adding new electrical circuits
-
Your wall needs reinforcement
-
You’re concerned about code compliance
-
You want peace of mind and a warranty-backed job
Either way, the Amana 9,200 BTU Through-the-Wall AC with Heat Pump offers a manageable install, high versatility, and reliable all-season performance — the key is to install it correctly from the start.
In the next topic we will know more about: Do Heat Pumps Work in Winter? What You Need to Know About Year-Round Comfort


