Ready to upgrade? The Goodman 3 Ton 13.4 SEER2 R-32 Air Conditioner Condenser (Model GLXS3B3610) is designed for the next generation of home cooling — combining modern refrigerant technology, real-world efficiency, and long-lasting reliability.
🧩 Understanding R-32 Installation Basics
If you’ve ever watched an HVAC crew set up an air conditioner, you know it’s not as simple as plugging in a new appliance. Installing a Goodman R-32 system is a precise, professional process — but knowing what to expect makes the experience smoother for you and your installer alike.
The biggest difference with Goodman’s R-32 units is the refrigerant itself. Unlike older R-410A, which is a blend of two gases, R-32 is a single-component refrigerant. It’s more efficient at heat transfer and requires 20–30% less volume to achieve the same cooling effect.
R-32 is also categorized as a “mildly flammable” A2L refrigerant, meaning it’s stable under normal use but must be handled carefully during charging and recovery. That’s why the EPA requires certified technicians for all R-32 installation work (EPA – Safe Handling of A2L Refrigerants).
Goodman systems make this easier by shipping factory pre-charged condensers. The installer doesn’t have to fill the entire system manually — they just connect, test, and balance the refrigerant charge according to line set length and system configuration.
Savvy’s note: “R-32 isn’t complicated; it’s just modern. Your technician will already be trained and equipped for it.”
⚙️ Pre-Installation Checklist for Homeowners
Before your installer even steps through the door, a little preparation goes a long way.
Here’s what you can do to make installation day fast and seamless:
-
Clear the area where your outdoor condenser will sit — ideally at least 24 inches of open space around all sides.
-
Ensure a level, stable base, like a concrete or composite pad. Uneven surfaces can stress the compressor.
-
Check your breaker panel. Your Goodman 3-ton R-32 system typically needs a 30–40 amp double-pole breaker and a dedicated circuit.
-
Provide easy access to the air handler or furnace if your system is split — this will save time during line and wiring setup.
-
Ask about permits if your municipality requires them.
The U.S. Department of Energy’s installation guide recommends placing the unit in a shaded, well-ventilated area away from exhaust vents and overhanging shrubs for best performance.
Savvy’s tip: “Prep your space like you’d prep for furniture delivery — clear, level, and accessible. The smoother it starts, the better your system performs.”
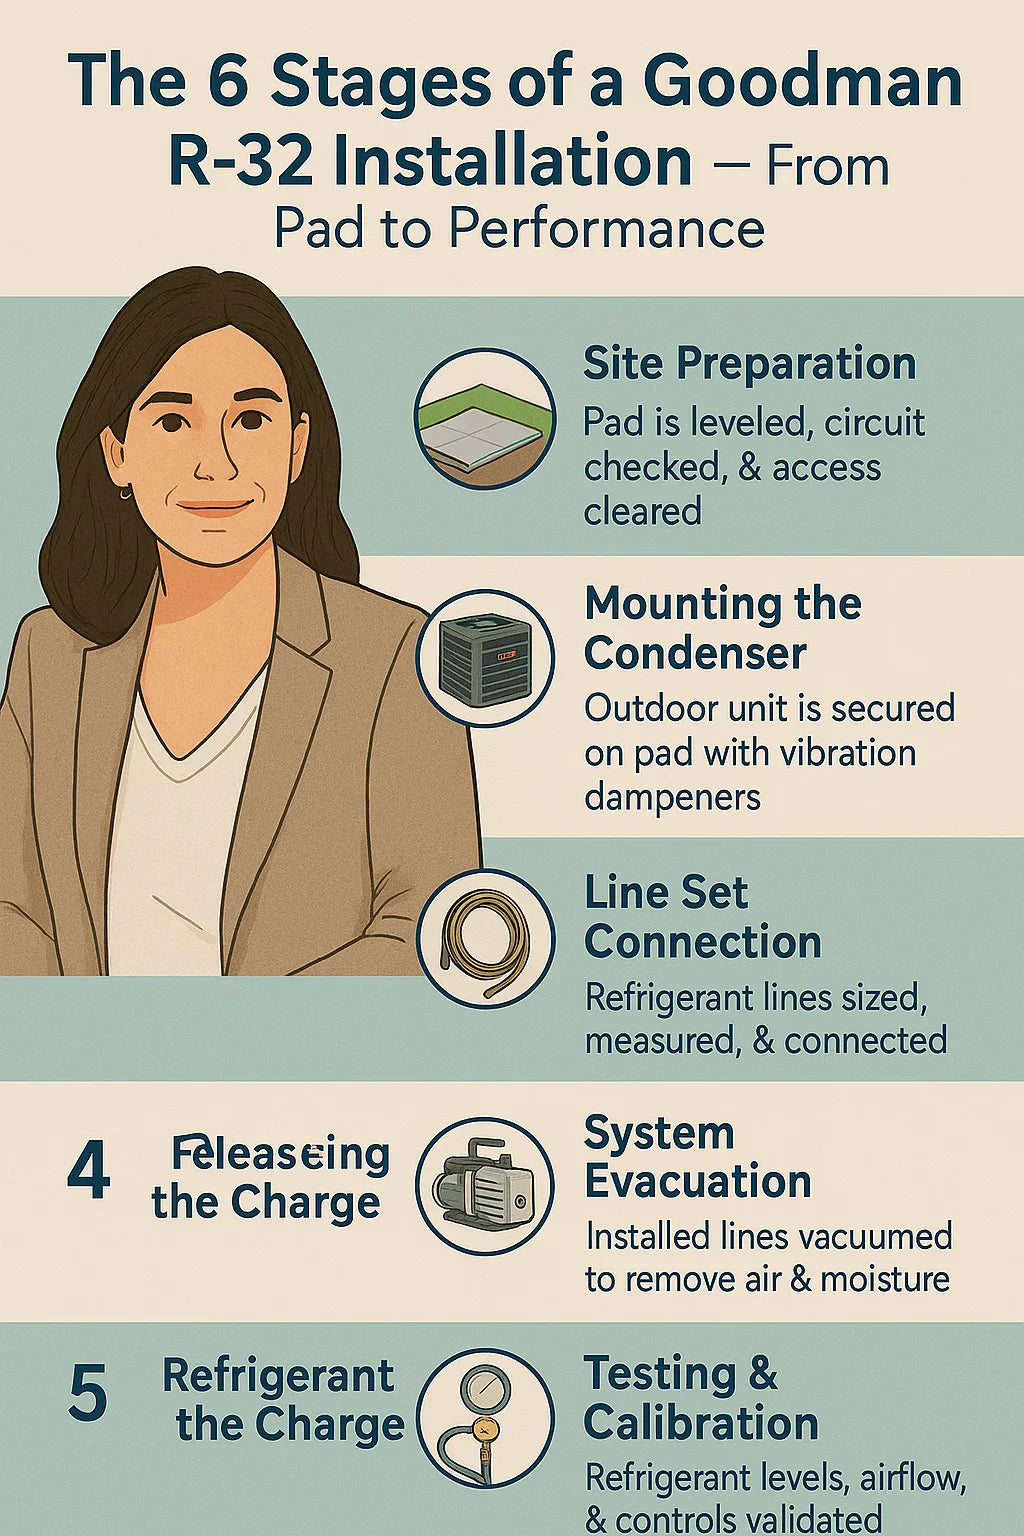
🧰 What Technicians Do on Installation Day
Now for the exciting part — watching your Goodman R-32 system come to life.
Here’s what your HVAC team will do step-by-step:
1. Mount the Outdoor Condenser
Your installer sets the R-32 condenser unit on a pre-leveled pad, using vibration-resistant mounts to prevent rattling. Goodman units are compact, so they often fit neatly where your old system sat.
2. Run the Line Set
Next, copper tubing connects the outdoor condenser to your indoor air handler. For R-32 systems, technicians ensure the correct line set diameter and length — typically 3/4" suction and 3/8" liquid lines for a 3-ton setup.
If reusing old lines, they must be flushed and pressure-tested first (HVAC School – Proper Line Set Installation).
3. Evacuate and Pressure Test
Before charging, the tech uses a vacuum pump and micron gauge to remove air and moisture from the system. Any trace of air can cause ice formation and compressor failure.
4. Release the R-32 Charge
Goodman pre-charges its condensers for a specific line length (usually 15 feet). The technician releases the R-32 refrigerant into the line set and measures superheat and subcooling to confirm optimal charge.
5. Electrical and Communication Wiring
Finally, they connect power lines, control wiring, and thermostat cables. Modern Goodman systems use low-voltage smart communication wiring compatible with ComfortBridge™ controls.
Savvy’s observation: “It’s part science, part art. Every gauge reading tells your installer something about how your home will feel when it’s all done.”
🌡️ R-32 vs. R-410A Installation Differences
While both refrigerants cool effectively, their setup procedures differ slightly. Here’s how:
| Step | R-410A | R-32 |
|---|---|---|
| Charge Volume | Higher | ~30% Lower |
| Pressure Level | Standard | Slightly Higher |
| Leak Sensitivity | Moderate | More Sensitive |
| Refrigerant Type | Blend (requires balance) | Pure (easier recovery) |
| Tools Needed | Standard | A2L-rated tools (leak detector, pump, recovery tank) |
The AHRI’s refrigerant transition guidelines confirm that R-32 simplifies recovery and recycling, since it doesn’t separate like blended refrigerants.
Why this matters: R-32 reduces long-term maintenance costs and makes servicing simpler — one of the biggest homeowner advantages of the Goodman R-32 series.
Savvy’s reflection: “It’s like going from an old flip phone to a smartphone — fewer moving parts, more reliability.”
⚡ Electrical and Safety Standards Homeowners Should Know
Every new HVAC installation must meet National Electrical Code (NEC) and NFPA safety standards. Your installer will:
-
Verify proper breaker and wire gauge sizing.
-
Install a disconnect box near the condenser for emergency shutoff.
-
Ensure grounding and surge protection to prevent damage during storms.
-
Label all connections per code.
The National Fire Protection Association (NFPA) emphasizes correct circuit sizing to avoid overheating wires or tripping breakers.
Goodman systems make this easier with factory-wired safety features, including:
-
Compressor overload protection
-
Service valves with Schrader cores for safe refrigerant access
-
Lockable electrical covers
Savvy’s reassurance: “Goodman builds safety right into the box — your electrician just connects the dots.”
🔋 Testing and Commissioning the System
After installation, your technician will test, fine-tune, and document everything. This step ensures your Goodman R-32 system performs exactly as designed.
Here’s what to expect:
-
Refrigerant pressure check to confirm balanced charge.
-
Airflow verification with anemometers or static pressure readings.
-
Electrical current test for the compressor and fan motor.
-
System startup test under both cooling and idle conditions.
Goodman’s ComfortBridge™ technology continuously monitors and adjusts performance to maintain efficiency. If your air handler is equipped, it automatically communicates with the condenser to optimize output.
Your installer will likely provide a short performance report before leaving — noting pressures, amperage, and thermostat readings.
Savvy’s advice: “Don’t rush this step — commissioning is where your installer proves your system’s worth.”
🧼 Clean-Up, Documentation, and Warranty Registration
Once testing is complete, it’s cleanup and paperwork time.
Your installation team will:
-
Remove packaging, excess wiring, and debris.
-
Inspect all joints for leaks.
-
Wipe down coils and confirm drain lines are clear.
-
Label the system with refrigerant type and safety info.
Now, for your part — register your Goodman unit. Doing this within 60 days activates the 10-year limited parts warranty (Goodman Registration Portal).
Registration checklist:
-
Model and serial number (found on the outdoor unit plate)
-
Installation date and contractor details
-
Your contact info
Savvy’s tip: “Take a quick photo of your unit label. You’ll thank yourself later if you ever need service or warranty support.”
🌿 Post-Installation Maintenance and Homeowner Orientation
Before your HVAC crew leaves, they should walk you through how to operate and maintain your new system.
Here’s what to ask:
-
Filter maintenance schedule: Replace or clean filters every 1–3 months.
-
Outdoor unit care: Keep at least 2 feet clear of plants or debris.
-
Smart thermostat pairing: Goodman systems integrate beautifully with Nest, ecobee, and Honeywell models.
-
Seasonal cleaning: Rinse condenser coils gently with a garden hose twice a year.
The ENERGY STAR maintenance checklist is a great resource for keeping performance high and costs low.
Savvy’s reminder: “Maintenance isn’t optional — it’s how you keep your efficiency real.”
🧠 Common Installation Day Questions, Answered
Q1: How long does R-32 installation take?
Typically 4–6 hours, depending on line set length, accessibility, and whether the old system needs removal.
Q2: Can I reuse my old line set?
Yes — but only if it’s been pressure-tested and cleaned. R-32 operates at slightly higher pressures, so the lines must meet updated standards.
Q3: Is R-32 safe for residential use?
Absolutely. It’s classified as A2L – low toxicity, mild flammability, and is widely used in Europe and Japan. All Goodman R-32 systems meet strict EPA refrigerant handling regulations.
Q4: Do I need special insurance or permits?
Usually no — local HVAC contractors handle any required permits.
Q5: What if there’s a refrigerant leak?
R-32 dissipates quickly and doesn’t linger in the atmosphere like older gases. Your tech can easily recover and recharge it with minimal cost.
Savvy’s reassurance: “Most of the ‘new refrigerant’ anxiety is outdated. Today’s HVAC pros are trained and equipped for R-32.”
🧭 A Look Behind the Scenes — Why Goodman R-32 Installs Are Faster
Goodman’s R-32 lineup is engineered to make the installer’s job simpler, which means less downtime and fewer callbacks for homeowners.
Key innovations include:
-
Factory pre-charging: Reduces the need for on-site refrigerant handling.
-
Optimized coil geometry: Improves airflow and reduces brazing time.
-
Quick-access panels: Make electrical connections straightforward.
-
Compact design: Easier transport and smaller footprint for tight spaces.
This efficiency not only cuts labor time but also lowers potential installation errors — a win-win for both homeowners and contractors.
Savvy’s observation: “Goodman thought about the installer experience too — because when their job’s easier, my comfort’s more reliable.”
🏁 Savvy’s Final Word — A Smart Setup for a Smarter System
“Watching my Goodman R-32 system come together was impressive — precise, efficient, and clearly designed for the real world. From vacuum testing to warranty activation, every step made me confident this investment will last.”
Here’s what you can expect when installation day wraps up:
✅ Quiet, efficient cooling from day one
✅ A smaller environmental footprint with R-32
✅ Long-term energy savings from SEER2-rated performance
✅ A decade of warranty-backed peace of mind
The Goodman 13.4 SEER2 R-32 condenser isn’t just the future of cooling — it’s proof that sustainability and simplicity can work hand in hand.
So, when your tech starts connecting gauges and wiring lines, remember: each careful step is building your home’s comfort for the next 10+ years.
Savvy’s closing line:
“Installation day isn’t just setup day — it’s the start of your home’s next comfort chapter.”
In the next topic we will know more about: Maintenance Made Easy — Seasonal Tips to Keep Your 3-Ton R-32 System Running Efficiently


