👋 Tony’s Take: “Installing It Myself Was the Best Education I Ever Got”
Hey folks — Tony here.
When my old gas furnace finally gave out, I decided to do something I’d been thinking about for years: switch to an electric furnace. No gas leaks, no pilot light, no exhaust pipe maintenance — just clean, quiet heat.
And since I’ve been in home repair most of my life, I figured, “How hard could it be?”
Spoiler alert: it wasn’t hard, but it was definitely an education.
In this guide, I’ll walk you through exactly what I learned setting up my own electric furnace — the good, the tricky, and the parts I recommend leaving to a licensed electrician.
If you’re planning to replace your own furnace (or just want to know what’s involved before hiring a pro), this is for you.
⚙️ Why I Chose an Electric Furnace
My gas system was 20 years old, rusting, and constantly giving me ignition issues. I wanted something:
-
Simpler (fewer moving parts)
-
Safer (no open flame or gas lines)
-
Cleaner (no exhaust or CO risk)
After a lot of research, I went with a 15 kW Goodman electric furnace — enough for my 1,800 sq. ft. home in Ohio.
Electric heat isn’t right for every region (I’ll touch on that later), but for moderate climates or all-electric homes, it’s a solid, low-maintenance choice.
“Electric furnaces aren’t complicated — but the wiring sure can be. That’s where you need patience, preparation, and respect for electricity.”
🧾 My Pre-Installation Checklist
Before I even picked up a screwdriver, I made sure my home could handle the new system.
Here’s what I checked first — and what you should too:
| Step | What to Check | Why It Matters |
|---|---|---|
| 1 | Panel Capacity | You’ll need 60–100 amps free in your electrical panel. |
| 2 | Breaker Size | Match the unit’s rating (typically 60A for 10 kW, 100A for 20 kW). |
| 3 | Wire Gauge | 8 AWG for 40–60 amps, 6 AWG for 80–100 amps. |
| 4 | Duct Size | Must match furnace CFM rating — otherwise you’ll choke airflow. |
| 5 | Return Air Location | Needs a clear, unobstructed path. |
| 6 | Mounting Clearance | Leave 2–3 ft for service access. |
| 7 | Thermostat Compatibility | Make sure it supports electric heat. |
Tony’s Tip:
“Always read your manufacturer’s electrical specs before buying wire or breakers. One wrong size can fry a $1,000 furnace.”
🧰 Tools & Materials I Used
Here’s everything that made the job easier (and safer):
Hand Tools:
-
Screwdrivers (flat and Phillips)
-
Nut driver set
-
Adjustable wrench
-
Sheet metal snips
-
Cordless drill
Electrical Tools:
-
Non-contact voltage tester
-
Multimeter
-
Wire stripper & crimper
-
Electrical tape
-
Cable clamps
Supplies:
-
8 AWG copper wire (for 15 kW furnace)
-
80-amp double-pole breaker
-
Flexible conduit
-
Foil duct tape
-
20x25x1 air filter
-
Mounting screws
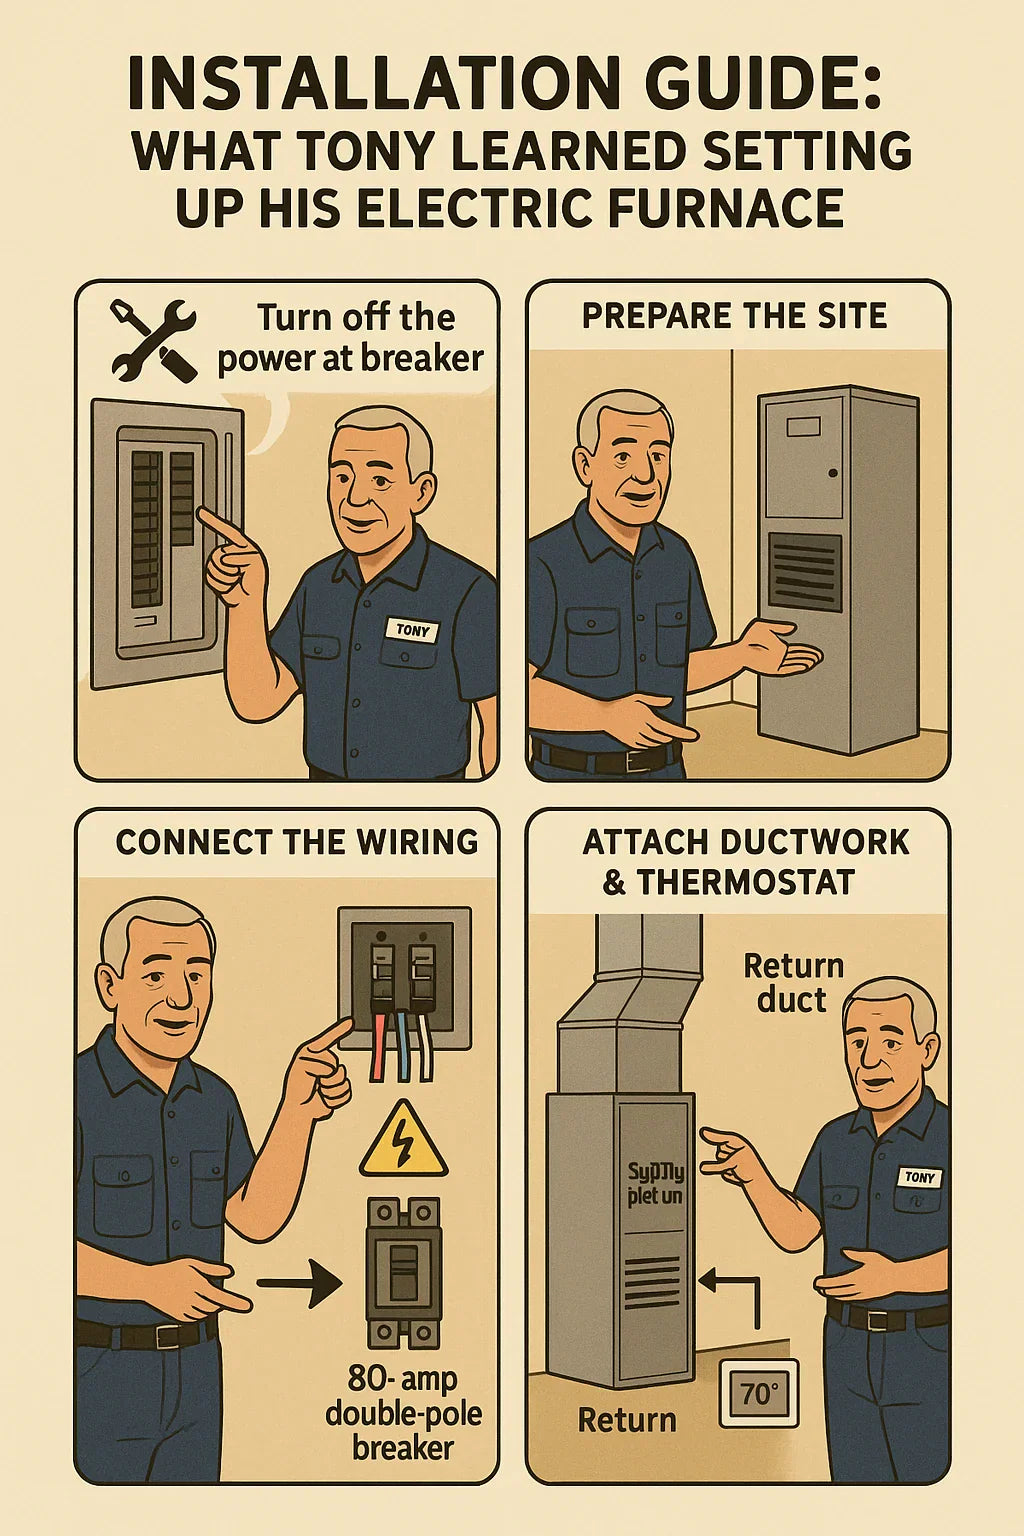
🔧 Step-by-Step: How I Installed My Electric Furnace
Let’s get into the meat of it — how I actually set it up.
Step 1: Disconnect the Old Furnace
Safety first. I shut off power to the old gas furnace at the breaker and gas valve. Then I disconnected:
-
The gas line (capped it properly)
-
The vent pipe
-
The low-voltage thermostat wires
-
The ductwork (supply and return)
After sliding the old unit out, I vacuumed and swept the base. You’d be amazed how much dust lives under a 20-year-old furnace.
Step 2: Prepare the Space
I set my new Goodman unit on a vibration pad for stability and to dampen blower noise.
Clearance check:
-
3 ft front
-
1 ft each side
-
6 inches rear (for wiring access)
I made sure the return plenum opening lined up with the furnace inlet — no awkward angles or forced fits.
Step 3: Install the New Furnace
-
Position the furnace in line with the existing ducts.
-
Secure it with sheet metal screws to the supply plenum.
-
Seal all joints with foil tape (never duct tape — it breaks down).
-
Connect the return air duct snugly and tape seams airtight.
“Good ductwork is half the battle. Leaky ducts = wasted heat and higher bills.”
Step 4: Wiring the Furnace
This was the most critical part — and the one where I triple-checked every move.
⚡ Main Power
-
Ran 8 AWG copper wire through flexible conduit to the furnace junction box.
-
Installed an 80-amp double-pole breaker in my service panel.
-
Connected the wires:
-
Black / Red = hot legs
-
White = neutral (if used)
-
Green = ground
-
⚠️ Grounding
Always connect the green wire to the furnace’s ground screw. Grounding prevents shock risk if a wire shorts inside the cabinet.
🔌 Thermostat Connection
-
Connected R, W, and G terminals for heat and fan control.
-
Mounted a new programmable thermostat rated for electric furnaces.
Tony’s Warning:
“If any part of wiring confuses you — stop. Electricity isn’t forgiving. I had a licensed electrician double-check my setup before energizing it.”
Step 5: Power-Up and Testing
Once everything was wired, I turned on the breaker and thermostat.
What I checked:
-
The blower started smoothly (no humming).
-
Heating elements glowed red after a short delay.
-
Airflow felt strong and even at each vent.
-
Measured voltage and amperage — both within spec.
Temperature rise was about 45°F, right where it should be for my model.
Then I labeled my breaker panel clearly:
“Electric Furnace – 80A Double Pole – 15 kW”
Step 6: Fine-Tuning
After running for 30 minutes, I noticed a light vibration sound. Turns out one duct seam was slightly loose — easy fix with extra foil tape.
I also calibrated my thermostat by checking room temp with a thermometer and adjusting the offset by 1°F.
⚡ Tony’s Lessons Learned
I’ve done a lot of home projects, but this one taught me more about planning and electrical respect than almost any other.
Here’s what I learned the hard way:
-
Measure everything — twice.
I misjudged my duct collar size at first. A $10 adapter fixed it, but measuring early would’ve saved an hour. -
Don’t cheap out on wire.
The wrong gauge can overheat and trip breakers constantly. -
Label every connection.
I used masking tape on each thermostat wire (R, W, G). That saved a headache later. -
Plan your conduit route.
Flexible conduit keeps wiring neat and safe from vibration. -
Test before you tape.
Run the system briefly before sealing everything up. If you need to rewire, you’ll thank yourself.
🧭 When to DIY vs When to Hire a Pro
Here’s the honest truth — if you’re comfortable with light electrical work and ducting, an electric furnace installation is doable. But if any of this sounds over your head, hire a pro for the wiring and breaker work.
DIY-friendly tasks:
-
Mounting and connecting ducts
-
Installing filters and insulation
-
Thermostat wiring (low-voltage)
Pro-only tasks:
-
Main power wiring
-
Breaker installation
-
Panel capacity verification
“I’m all for DIY — but not at the cost of safety. When it comes to high voltage, a second set of eyes is worth every penny.”
🧰 Common Installation Mistakes I See All the Time
| Mistake | Why It’s a Problem | Tony’s Fix |
|---|---|---|
| Using undersized wire | Overheats & trips breaker | Always match gauge to amperage |
| No ground wire | Shock risk | Bond furnace to ground |
| Leaky ducts | Wastes energy | Seal with foil tape or mastic |
| Blocking return vent | Poor airflow | Keep clear 18" around intake |
| Miswired thermostat | No fan or heat response | Double-check R, W, G connections |
| Skipping airflow test | Overheating risk | Verify strong air from all vents |
🧾 Post-Installation Maintenance
Once installed, keep it clean and efficient.
-
Change the filter every 1–2 months.
-
Inspect wiring annually.
-
Vacuum coils and blower housing each spring.
-
Schedule a professional check-up every other year.
These small habits protect your system — and your warranty.
🧮 Installation Costs (2025 Estimate)
| Item | DIY Cost | Pro Installed |
|---|---|---|
| 15 kW Electric Furnace | $1,000 – $1,300 | $1,000 – $1,300 |
| Electrical Supplies | $150 – $250 | $250 – $400 |
| Labor (if hired) | — | $800 – $1,200 |
| Duct Adjustments | $100 – $300 | $300 – $500 |
| Total | $1,300 – $1,700 | $2,300 – $3,400 |
💡 If you already have compatible ductwork and electrical service, you’ll save big going DIY — just be careful and follow the specs to the letter.
📋 Tony’s Pro Tips for a Smooth Install
✅ Plan wiring first, mount second.
It’s easier to work on wiring when the furnace is still movable.
✅ Use foil tape — not duct tape.
Foil withstands heat and keeps airflow airtight.
✅ Add a surge protector.
It’s cheap insurance against power surges that can fry your heating elements.
✅ Label everything.
Future you will thank you during maintenance or upgrades.
✅ Check the temperature rise.
If it’s above 70°F, airflow is restricted — usually a dirty filter or small duct.
🧾 My Final Inspection List
| Task | Verified | Notes |
|---|---|---|
| Breaker installed correctly | ☑ | 80A double pole |
| Wire gauge verified | ☑ | 8 AWG copper |
| Furnace grounded | ☑ | Green wire secured |
| Ducts sealed | ☑ | Foil tape, no leaks |
| Airflow tested | ☑ | Steady and strong |
| Thermostat calibrated | ☑ | 1°F offset corrected |
| Filter installed | ☑ | MERV 8 clean filter |
| System labeled | ☑ | Breaker, ducts, panel |
✅ Result: Smooth startup, no tripped breakers, even heating throughout the house.
🌡️ Is an Electric Furnace Installation Worth It?
For me — absolutely.
-
My system is whisper-quiet.
-
My winter electric bill averages around $150.
-
Maintenance takes maybe 15 minutes a month.
If you live in a region with moderate winters or cheap electricity (under $0.12/kWh), it’s one of the simplest and cleanest systems you can install.
Just plan carefully, stay safe, and test everything twice.
“It’s not about being an electrician — it’s about being a responsible homeowner.
Respect the system, and it’ll respect you.”
🔗 Verified References
🧭 Tony’s Final Word
Installing an electric furnace taught me that simplicity doesn’t mean easy. It’s simple once you understand how everything works together — power, airflow, safety, and comfort.
But here’s the thing: once you’ve installed it right, it’s one of the most reliable heating systems you can own.
No flame. No vent. No pilot. Just pure, clean, even heat.
“Do it once, do it right — and you’ll never dread winter again.”
In the next topic we will know more about: Troubleshooting Common Electric Furnace Issues (And When to Call a Pro)


