When you’re investing in a new HVAC system, one of the biggest choices isn’t just the tonnage or the brand—it’s how the air handler is installed. If you’ve chosen a multi-positional air handler, you’ve picked one of the most flexible, adaptable options available.
But what exactly does installation look like? And what should you expect, whether you’re a homeowner planning an upgrade or a small business owner preparing for light commercial installation?
In this guide, we’ll walk through every step of the process—from what “multi-positional” means to prep work, installation steps, challenges, and maintenance—so you can head into your project confident and informed.
🏠 What Is a Multi-Positional Air Handler (and Why Does It Matter)?
An air handler is the indoor component of your split HVAC system. It contains the blower fan, evaporator coil, and air filter, and it’s responsible for circulating cooled (or heated) air throughout your ductwork.
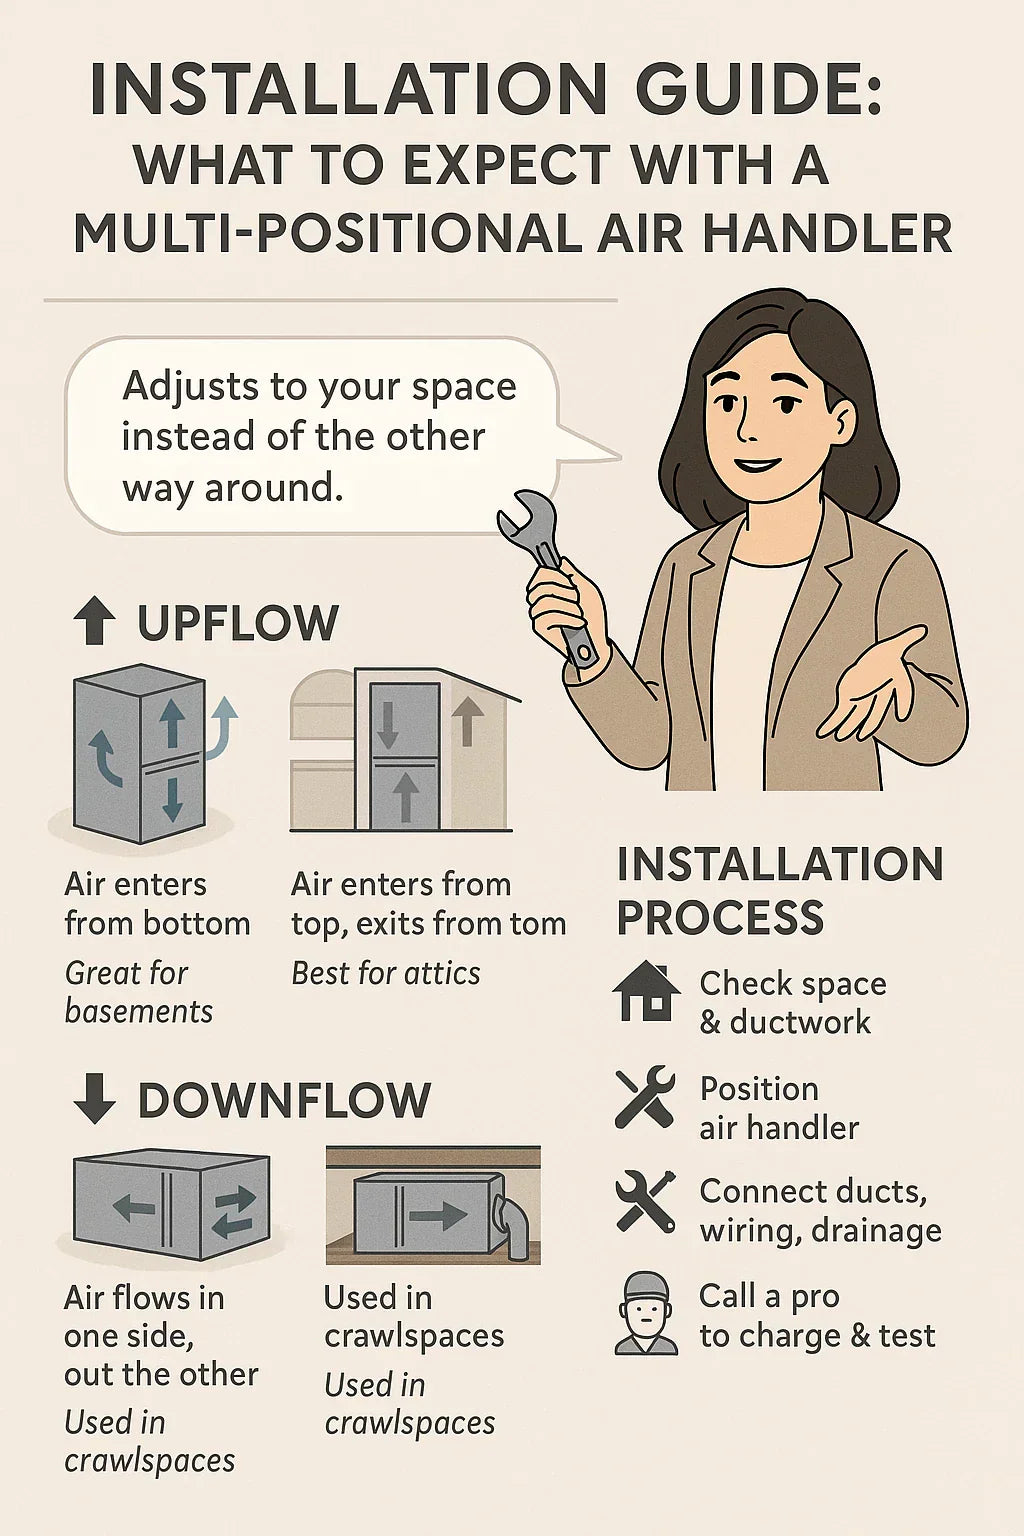
A multi-positional air handler is designed to be installed in multiple airflow orientations:
-
Upflow → air enters bottom, exits top (perfect for basements or closets).
-
Downflow → air enters top, exits bottom (used when the unit sits in an attic).
-
Horizontal left/right → air flows in one side and out the other (best for crawlspaces or tight mechanical rooms).
👉 Translation: Instead of being locked into one layout, a multi-positional air handler adapts to your building. That means fewer installation headaches, fewer costly duct modifications, and more flexibility for builders and renovators.
🔗 Energy.gov – Central Air Conditioning Basics
📏 Step 1: Choosing the Right Configuration
Before a technician even brings in tools, they’ll decide which orientation makes sense for your space.
🔼 Upflow (Bottom → Top)
-
Common in basements or closets.
-
Air is pulled in from the bottom, cooled, and pushed upward into ductwork above.
-
Works great in northern homes with basements.
🔽 Downflow (Top → Bottom)
-
Common in attics or locations where ductwork runs downward.
-
Air is pulled from the top, cooled, and pushed downward.
-
Best for southern climates where HVAC units are often in the attic.
↔️ Horizontal (Left or Right)
-
Ideal for crawlspaces, garages, or tight mechanical rooms.
-
Air enters one side and exits out the other.
-
Used when vertical space is limited.
📊 Savvy Tip: A multi-positional air handler is like a “Swiss Army knife” for installers. Instead of forcing your home to adapt to the unit, the unit adapts to your home.
📦 Step 2: Preparing for Installation
Good prep work makes installation smooth. Here’s what happens before the air handler is even unboxed:
-
Space Check: Verify the closet, attic, crawlspace, or utility room has enough clearance for airflow and maintenance access.
-
Ductwork Prep: Inspect existing ducts for leaks, sizing, and insulation. A new air handler won’t perform well with leaky or undersized ducts.
-
Electrical Requirements: Ensure a dedicated circuit is ready. Air handlers often run on 208/230V power.
-
Drainage Prep: Plan condensate drain line routing (and pump, if gravity drainage isn’t possible).
-
Refrigerant Line Set Location: Make sure the copper lines from the outdoor condenser can be connected without excessive bends or kinks.
-
Safety Equipment: Gloves, goggles, lift support (air handlers can weigh 120–150 lbs).
🔗 OSHA – Electrical Safety in HVAC
🏗️ Step 3: The Installation Process
Now to the fun part—the actual setup. While every install has unique quirks, here’s the step-by-step process most technicians follow:
1️⃣ Positioning the Air Handler
-
Set the air handler in the proper orientation (upflow, downflow, or horizontal).
-
Level the unit to ensure proper drainage.
-
Add vibration isolation pads to reduce noise.
2️⃣ Connecting Ductwork
-
Attach supply and return ducts to the air handler.
-
Seal joints with mastic or foil tape to prevent air leaks.
-
Verify proper airflow direction matches chosen configuration.
3️⃣ Electrical Connections
-
Connect the unit to the electrical panel with a dedicated breaker.
-
Wire in the thermostat for system control.
-
Confirm all safety switches are functional.
4️⃣ Drainage Setup
-
Install condensate drain line with proper slope.
-
Add a float switch to shut off the system if the drain clogs.
-
In attics or crawlspaces, install a secondary drain pan for protection.
5️⃣ Refrigerant Line Set Connections
-
Connect copper line set (suction + liquid lines) from outdoor condenser to the air handler’s coil.
-
Insulate suction line to prevent sweating.
6️⃣ Charging & Testing
-
Licensed technician charges system with refrigerant (R-32, R-410A, etc. depending on unit).
-
Test for leaks, measure superheat and subcooling, and ensure system operates at peak performance.
📊 Savvy Note: DIYers can prep space, ducts, and electrical conduit, but refrigerant handling is EPA-regulated. Always let a certified tech handle the charge.
🔗 EPA – Section 608 Refrigerant Rules
⚖️ Step 4: Common Installation Challenges
Even with flexible multi-positional units, challenges pop up. Here are the most common and how pros handle them:
-
Tight Spaces: Attics and crawlspaces can limit maneuverability. Solution: horizontal orientation.
-
Improper Drainage Slope: Without proper slope, condensate backs up. Solution: condensate pumps.
-
Noise/Vibration: Poor mounting leads to rattling. Solution: vibration pads + duct insulation.
-
Ductwork Leaks: Even the best unit underperforms if ducts leak. Solution: seal before install.
🛡️ Safety Considerations
Multi-positional air handler installs involve electricity, refrigerant, and heavy equipment. Safety is key:
-
Shut off power at the breaker before starting work.
-
Use proper lifting equipment—don’t try to muscle 150 lbs up an attic ladder.
-
Refrigerant requires EPA certification to handle legally.
-
Follow clearance codes to avoid fire hazards near electrical panels or gas furnaces.
🛠️ Maintenance After Installation
The installation isn’t the end of the story. Multi-positional air handlers need care to keep them efficient.
🔄 Homeowner Tasks
-
Replace or clean filters every 1–3 months.
-
Check drain line for clogs (flush with vinegar solution).
-
Listen for unusual noises from blower motor.
🧰 Technician Tasks (Annual)
-
Inspect evaporator coil for dirt buildup.
-
Test blower motor amps.
-
Verify refrigerant levels are steady.
-
Clean and test safety switches.
🔗 Energy Star – Seasonal HVAC Maintenance Tips
📊 Pros & Cons of Multi-Positional Air Handlers
✅ Pros
-
Flexible installation (upflow, downflow, horizontal).
-
Saves money by adapting to existing ductwork.
-
Reliable comfort distribution across layouts.
-
Great for both homes and light commercial spaces.
❌ Cons
-
Larger footprint than ductless mini-splits.
-
Requires professional refrigerant handling.
-
Installation cost slightly higher than single-position units.
🧰 Real-World Examples
Case 1: Basement Installation (Upflow)
-
2,200 sq. ft. home in Ohio with ductwork running overhead.
-
Upflow configuration fit basement utility closet perfectly.
Case 2: Attic Installation (Downflow)
-
2,000 sq. ft. home in Texas with ducts feeding downward.
-
Downflow orientation avoided costly duct rerouting.
Case 3: Retail Store (Horizontal)
-
2,400 sq. ft. retail space with limited utility room.
-
Horizontal setup allowed placement above storage room ceiling.
🏁 Final Takeaway: What to Expect
Installing a multi-positional air handler is about flexibility and future-proofing. Here’s what you can expect:
-
Installation takes half a day to a full day depending on ductwork.
-
Most of the process is prep work—aligning ductwork, drainage, and wiring.
-
Once installed, your air handler adapts to your space, delivering comfort without costly structural changes.
💬 Savvy’s closing note:
“A multi-positional air handler is like a puzzle piece that fits wherever you need it. If you want an HVAC upgrade that adapts to your space, not the other way around, this setup is worth every penny.”
In the next topic we will Know more about: How Much Does a 4-Ton Daikin Split System Cost in 2025? Equipment, Labor & ROI


