When I first decided to add extra cooling to my home, I knew I wanted something efficient, quiet, and budget-friendly. After weeks of research, I landed on the MRCOOL Advantage Series 12,000 BTU 230V Mini Split Heat Pump. It promised reliable performance, but here’s the thing: unlike MRCOOL’s “DIY Series,” the Advantage requires a more traditional installation.
That didn’t scare me off—I’ve tackled my fair share of home projects. What I did learn, though, is that installing a mini split isn’t like hanging a picture frame. It involves drilling through walls, handling refrigerant lines, wiring 230 volts, and making sure you don’t create leaks or shorts.
This guide is everything I wish I’d had before I started. Whether you’re a confident DIYer or just curious about what goes into a professional install, let me walk you through how I set up my MRCOOL Advantage from start to finish.
📦 Step 1: What’s in the Box?
When my MRCOOL Advantage system arrived, here’s what I found inside:
-
Indoor air handler (12k BTU)
-
Outdoor condenser
-
Mounting plate (for the indoor unit)
-
Remote control & batteries
-
User & installation manual
-
Pre-flared refrigerant line connections (but not a pre-charged line set like the DIY model)
What’s not included (and you’ll need):
-
Wall sleeve (for protecting the hole through your wall)
-
Condensate drain hose (longer than the starter one provided)
-
Electrical whip (for outdoor connections)
-
Dedicated 230V breaker & disconnect box
-
Vacuum pump & manifold gauges (to evacuate air from refrigerant lines)
👉 Mark’s Tip: Before you even start, make a checklist. I didn’t, and I ended up making a frantic hardware store run halfway through the project.
MRCOOL Official Product Manuals
🛠️ Step 2: Tools & Safety Gear
Here’s what I used:
-
Power drill + hole saw (3–3.5 inches)
-
Stud finder & level
-
Torque wrench with flare nut sizes
-
Screwdrivers & pliers
-
Wire stripper/cutter
-
Vacuum pump & manifold gauge set
-
Voltage tester
-
PVC tape, foam insulation, zip ties
Safety gear:
-
Work gloves
-
Safety goggles
-
Ear protection (when drilling)
⚠️ Important: If you’re not comfortable with 230V electrical work, hire a licensed electrician. I’m pretty handy, but I brought in a pro just to handle the breaker connection. Electricity isn’t something to gamble with.
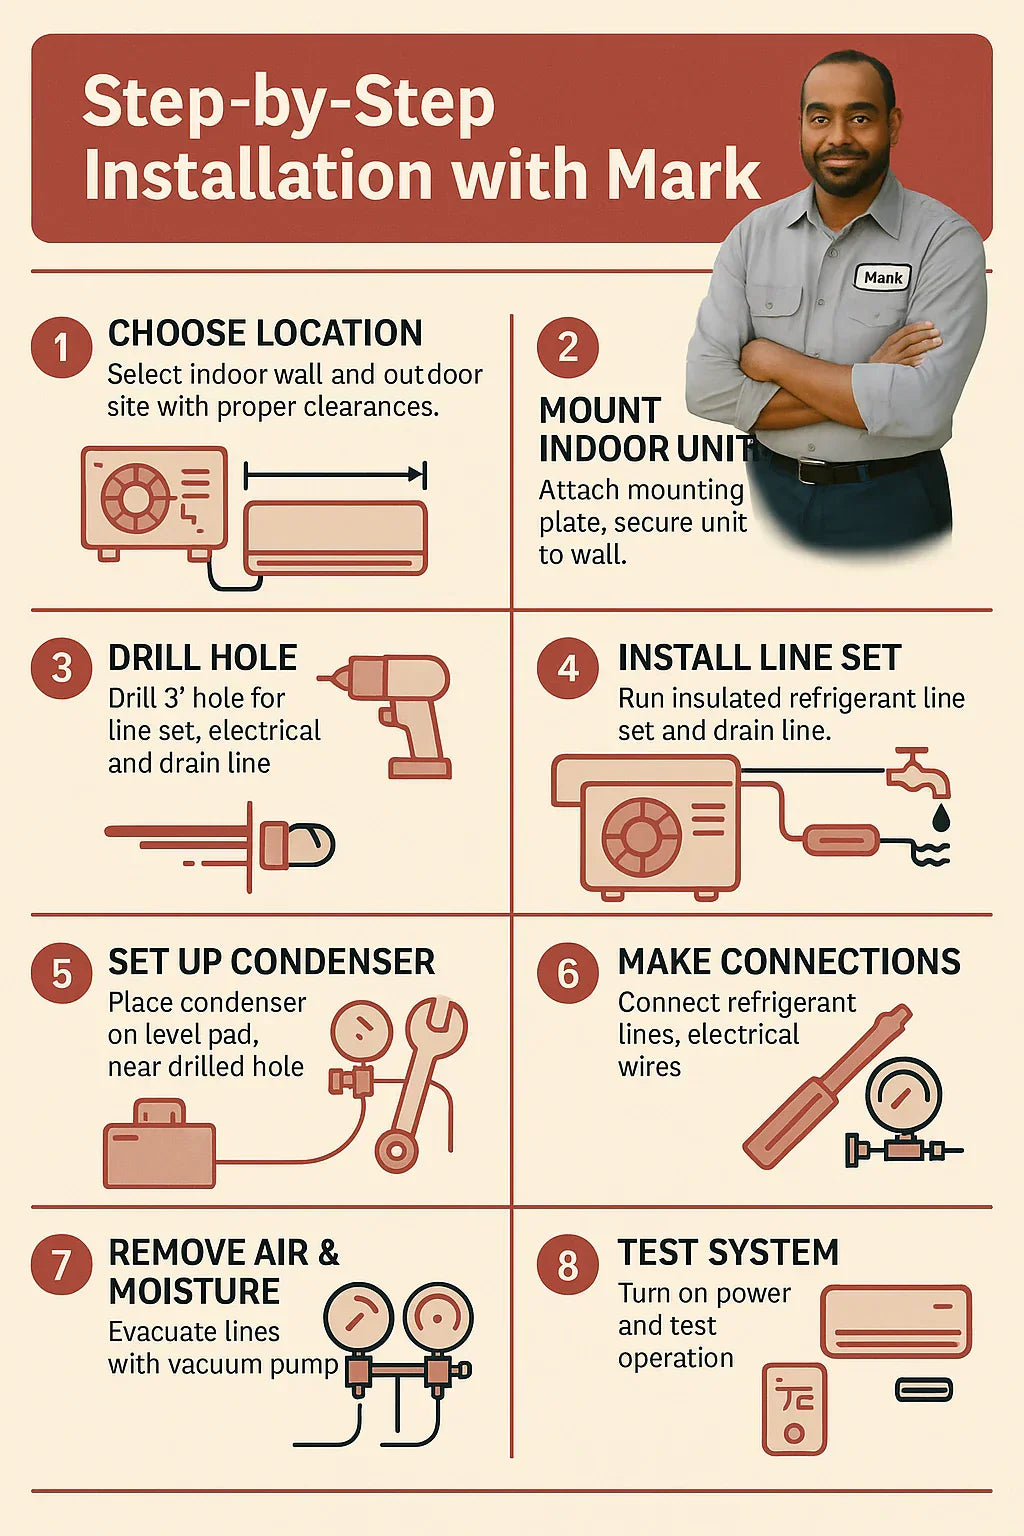
📍 Step 3: Choosing the Right Location
Indoor Unit
The air handler needed to go on an interior wall that:
-
Wasn’t blocked by furniture
-
Had space for 12 inches clearance above, 6 inches on sides, and 7 feet from the floor
-
Allowed me to run the line set directly outside without hitting studs or plumbing
I almost mounted it above my couch, but then realized the air stream would blow right onto guests. I shifted it to the opposite wall, and the airflow feels natural now.
Outdoor Unit
The condenser needed:
-
A level pad (I used a precast one)
-
12–24 inches clearance around sides
-
At least 5 feet clearance above for airflow
-
Distance from bedrooms (it’s quiet, but not silent outdoors)
👉 Mark’s Tip: Don’t forget drainage. The outdoor unit drips condensation in summer. Place it where water won’t pool or freeze in winter.
Energy.gov – Mini Split Placement
📏 Step 4: Mounting the Indoor Unit
-
I used a stud finder to locate secure spots.
-
Screwed in the mounting plate, making sure it was perfectly level.
-
Hung the indoor unit temporarily to check alignment.
At this point, I felt pretty good. The air handler is light enough that one person can lift it, but I still asked my wife to help hold it while I lined it up.
🧰 Step 5: Drilling the Wall Hole & Running the Line Set
This was the part that made me sweat. Cutting a 3.5-inch hole through my wall felt like a no-turning-back moment.
Key things:
-
Drill slightly downward toward the outside (about ¼ inch slope) so condensate drains out naturally.
-
Insert a wall sleeve to protect insulation and wires.
-
Run refrigerant lines, drain hose, and electrical cables through the hole, bundled neatly.
👉 Mark’s Tip: Tape the drain line to the bottom of the bundle. Gravity is your friend here—you don’t want water backing up indoors.
🌬️ Step 6: Setting the Outdoor Condenser
I placed the condenser on a plastic pad, checking level with shims. Anchored it down to prevent vibration.
Clearances checked ✅
Line set aligned ✅
Drainage slope confirmed ✅
At this point, the install started to look real—I could see the indoor and outdoor units “connected.”
⚡ Step 7: Electrical Setup (230V)
The MRCOOL Advantage 12k requires a 230V dedicated circuit. That meant:
-
Installing a 15-20 amp breaker in my panel
-
Running 12/2 wire to a disconnect box outdoors
-
Using an electrical whip to connect the disconnect to the condenser
Then, I wired the indoor and outdoor units together with communication cables.
⚠️ Mark’s Warning: This was the one part I didn’t DIY. I had an electrician friend handle the breaker hookup. Messing with a live panel is not worth the risk.
Energy Star – Mini Split Electrical Requirements
🌀 Step 8: Refrigerant Lines & Vacuuming
Unlike the MRCOOL DIY series, the Advantage doesn’t come with pre-charged quick-connect lines. That means you need to:
-
Connect the pre-flared copper refrigerant lines.
-
Use a torque wrench to avoid overtightening (which causes leaks).
-
Hook up a vacuum pump + manifold gauges.
-
Pull a vacuum to remove all air and moisture.
-
Check that the system holds vacuum for 15+ minutes.
This step was the most technical. I borrowed a vacuum pump from a buddy in HVAC and followed MRCOOL’s instructions carefully.
👉 Mark’s Tip: If you skip this, your system won’t run efficiently—and could fail early. Don’t cut corners here.
HVAC School – Proper Evacuation of Lines
▶️ Step 9: Startup & Testing
With everything connected, it was time for the big moment.
-
Turned on the breaker
-
Powered on the unit with the remote
-
Set it to cooling mode at 70°F
Within 2 minutes, cool air was flowing. I checked with a thermometer: air coming out was 20°F cooler than intake. That’s exactly what you want.
Switched to heating mode, and warm air flowed within 5 minutes.
No leaks, no error codes, no strange noises. Success.
🧹 Step 10: Final Touches
-
Sealed wall penetration with foam + silicone.
-
Secured drain hose to the exterior wall.
-
Mounted the remote holder on the wall.
-
Cleaned up insulation debris.
Then, I grabbed a cold drink and sat under my newly cooled living room.
❌ Common Mistakes to Avoid
I got lucky, but here are the biggest pitfalls I read about:
-
Flat drain line: causes indoor leaks. Always slope down.
-
Skipping the vacuum step: leads to poor efficiency.
-
Undersized wiring: trips breakers.
-
Bad placement: blocks airflow or causes noisy operation.
Consumer Reports – AC Buying & Installation Guide
✅ Mark’s Final Takeaways
-
Time: Took me ~6 hours total (with breaks).
-
Cost: Saved about $1,000 vs. pro install.
-
Difficulty: 7/10 for DIYers with tools. 10/10 if you hate wiring.
-
Comfort: Night and day difference in my living room.
Would I do it again? Absolutely. But I’d recommend:
-
Hiring an electrician for the breaker.
-
Borrowing or renting HVAC tools if you don’t have them.
👉 The MRCOOL Advantage isn’t as plug-and-play as their DIY series, but if you’re willing to put in the effort, it’s a rock-solid system.
In the next topic we will know more about: How Efficient Is the Advantage Series? SEER2, EER & Real-World Savings


