Hey — Jake here. If you're shopping for a through-the-wall air conditioner (TTW AC), one of the biggest decisions you’ll make is getting the right size. Too small, and the unit will struggle; too large, and it’ll waste energy, short cycle, and cost more in the long run. This article will walk you step by step through how to size a TTW AC properly — from BTU math to efficiency ratings — so you get comfort and savings.
1. Why Sizing Matters ⚖️
Before we dive into formulas, here’s the reality: sizing is just as important as brand or features. An oversized AC will cool the space quickly, but it won’t run long enough to dehumidify. That leaves you feeling clammy and uneasy, and it causes frequent on/off cycles (short cycling), which wear down the compressor faster. Conversely, an undersized unit will run continuously, still fail to reach your target temperature, and draw excessive power.
A study by NREL warns that oversized equipment can lead to efficiency loss, increased energy usage, and compromised humidity control. NREL Docs
The Department of Energy also emphasizes that proper sizing helps match cooling capacity to room load. The Department of Energy's Energy.gov
In short: size matters. Let’s get it right.
2. Understanding BTUs — The Basic Cooling Unit
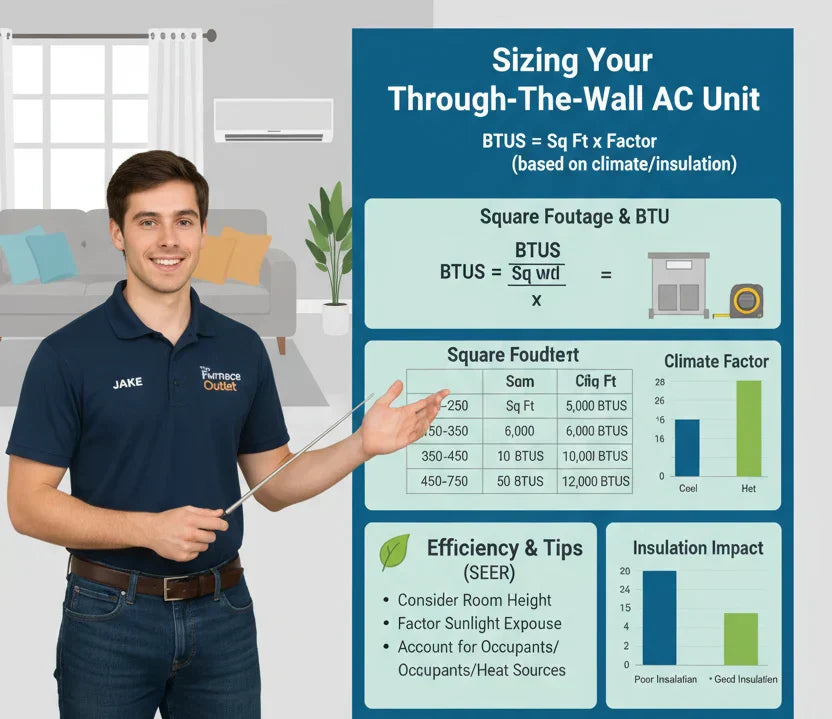
BTU = British Thermal Unit. In HVAC terms, it’s an estimate of how much heat an AC can remove from a room in one hour.
-
1 BTU is the amount of heat required to raise (or lower) the temperature of one pound of water by 1°F.
-
In air conditioning, BTU/h (per hour) is the cooling rate.
So when you hear “10,000 BTU AC,” that means it’s capable of removing 10,000 BTUs of heat per hour under specific test conditions.
But not all BTU ratings are equal — they’re influenced by external temperature, humidity, insulation, etc. The DOE now uses more stringent test methods (EER2 etc.) for newer models. The Department of Energy's Energy.gov
When sizing, assume that you need approximately 20 BTU per square foot of well-insulated living space — then adjust for real-world conditions. The Department of Energy's Energy.gov
3. Room Size → BTU Table (Baseline)
Here’s a baseline chart to give you a starting point. (These figures assume standard 8 ft ceilings, average insulation, moderate sun exposure.)
| Room Area (sq ft) | Typical BTU Range | Example Use |
|---|---|---|
| 150 – 250 | 5,000 – 6,500 | Small bedroom, study |
| 250 – 350 | 7,500 – 9,000 | Medium bedroom, small living room |
| 350 – 450 | 9,500 – 11,500 | Larger bedroom, family room |
| 450 – 550 | 12,000 – 13,500 | Master bedroom, open plan room |
| 550 – 700 | 14,000 – 16,000 | Large living space, combined rooms |
These ranges align with general sizing charts used in HVAC guides. aircondlounge
After that, you add or subtract based on real-world adjustments. Let’s go through those.
4. Factors That Adjust Your BTU Needs
That baseline is only a starting point. Here are real-life factors you need to adjust for:
4.1 Ceiling Height
If your ceiling is taller than 8 feet (say 9 or 10 ft), you have more air volume. You might add 10–20% to your BTU estimate.
4.2 Insulation Quality & Wall Construction
Poor insulation or older walls (thin walls, single-pane windows, no cavity insulation) increase heat gain. You may need to add another 10–25%.
4.3 Sun Exposure / Orientation
Rooms that face west or south (in the Northern Hemisphere) get more direct sunlight. Add 10–15% to your cooling requirement. Conversely, shaded rooms might allow you to subtract 10%.
4.4 Occupants & Activities
Each extra person generates heat (~600 BTU each beyond two). Add that. Also account for heat from computers, TVs, lighting, or kitchen appliances if in the same zone.
4.5 Windows & Doors
Large windows, especially single-pane, or frequent door openings add to heat load. Consider adding 5–10% for this.
4.6 External Climate
If you live in a very hot, humid area, bump up your BTU estimate. If you’re in a mild climate, you can be more conservative.
So your “adjusted BTU” = baseline BTU × (1 + sum of adjustment percentages).
5. Efficiency Metrics: EER, CEER & SEER2
Size is just one dimension. Efficiency determines how much electricity you pay to cool.
5.1 EER (Energy Efficiency Ratio)
EER = BTU of cooling ÷ power input in watts.
It’s a measure of efficiency under a given set of test conditions (usually 95°F outside). Higher is better.
5.2 CEER (Combined EER)
CEER includes both active cooling consumption and standby/off-mode power draw. It gives you a more realistic daily efficiency.
When comparing room or wall ACs, you’ll often see CEER on their EnergyGuide label.
5.3 SEER2 (Seasonal Efficiency)
For ducted systems, SEER (Seasonal Energy Efficiency Ratio) is the performance averaged over a season. With new standards (2023+), SEER2 (and EER2) are becoming more common in regulatory specs.
For through-the-wall / room ACs, CEER and EER are more relevant than SEER2. However, being aware of the newer metrics helps as manufacturers evolve.
6. Combining Sizing & Efficiency: What Does It Mean?
Let’s put it all together.
Imagine you determine you need 12,000 BTU after adjustments. Now look at efficiency:
-
If Unit A is 12,000 BTU and has EER = 10, it draws 1,200 W to cool.
-
If Unit B is 12,000 BTU and has CEER = 12, it’s more efficient in real operation, consuming less standby energy too.
Higher efficiency means lower electricity bills per unit of cooling. Over years, that saves you more than the extra purchase cost. Many top wall/window ACs now advertise EER ≥ 12 or CEER ≥ 10 as desirable benchmarks.
In fact, The Furnace Outlet’s efficiency guide notes that for through-the-wall and window ACs, “look for EER ≥ 12, CEER ≥ 10.”
7. Real-World Sizing Examples
Let me walk you through a couple of real-world scenarios so you can see the math in action.
Example 1: Small Bedroom
-
Room: 12 ft × 15 ft = 180 sq ft
-
Baseline (20 BTU/ft²): 180 × 20 = 3,600 BTU → round to 5,000 BTU minimum
-
Ceiling height: 8 ft standard → no change
-
Insulation: good
-
Shaded: slight subtraction
-
Occupants: 2
-
Appliances: minimal
Final estimate: ~5,000 to 6,000 BTU unit is fine.
Example 2: Sunlit Living Room
-
Room: 20 ft × 25 ft = 500 sq ft
-
Baseline: 500 × 20 = 10,000 BTU
-
Ceiling: 9 ft → +10% → 11,000
-
Sun exposure: West-facing → +12% → ~12,320
-
Appliances & electronics: +3%
-
Final adjusted: ~12,700 BTU → choose a 13,000–14,000 BTU model
If you pick a 14,000 BTU model, the slight oversizing is okay if it’s well-designed (has variable speed or inverter features) so it doesn’t short-cycle.
8. Sizing Mistakes You Must Avoid
Here are pitfalls I often see:
-
“Bigger is better” mentality — leads to wasted energy and poor dehumidification
-
Ignoring wall insulation, sunlight, or room orientation
-
Not factoring in voltage or electrical constraints
-
Forgetting extra load from electronics, cooking, or occupancy
-
Assuming all units of same BTU are equal — efficiency and part quality matter
-
Overlooking wall sleeve compatibility; you don’t want mismatched unit/sleeve sizes
Link this to your installation guide so readers know structural restrictions: “Before you cut, measure your sleeve and structural clearances.”
9. How to Pick the Best Match
When you shop, filter models by:
-
Cooling capacity (BTU) close to your adjusted estimate.
-
Efficiency — higher EER/CEER is better.
-
Voltage / power requirements — your home wiring must support it.
-
Noise level (dB) — quieter units are better for bedrooms and living rooms.
-
Features such as variable speed compressors, timers, or WiFi control.
-
Sleeve compatibility — ensure the unit fits the sleeve dimensions (or plan a proper sleeve).
Also, when in doubt, pick the slightly lower BTU if the efficiency is high — it’s better to run a little longer than to overshoot.
10. Efficiency & Cost Estimation
To estimate operating cost, use this formula:
Annual Cost = (BTU ÷ CEER) × (hours used per year) × (cost per kWh)
Say you have a 12,000 BTU unit with CEER = 12, running 1,000 hours/year at $0.15/kWh:
-
BTU ÷ CEER = 1,000 watts usage (approx)
-
Usage = 1,000 W × 1,000 h = 1,000,000 Wh = 1,000 kWh
-
Cost = 1,000 × $0.15 = $150/year
That’s a rough estimate. More efficient models with higher CEER reduce that cost. Real world efficiency and standby loads vary.
11. Practical Steps for Jake (You) to Size Your Space
Follow these action steps:
-
Measure your room’s length × width → get square footage.
-
Pick baseline BTU = area × ~20 BTU/ft².
-
Apply adjustments for insulation, ceiling height, sun exposure, occupancy.
-
Choose a model that matches adjusted BTU and offers strong CEER/EER.
-
Check electrical compatibility — see breaker, wiring, voltage.
-
Confirm sleeve dimensions or plan sleeve installation.
-
Run the cost estimate and see if it fits your budget.
In the next topic we will know more about: What’s the Difference Between Through-the-Wall and Window Air Conditioners?


