Choose the spot like a pro: wind, snow, and traffic
Start by mapping wind and snow patterns on your property. If the north wind drives snow into a corner of the yard, don’t put the unit there. Keep it out from under roof edges where snow or ice can slide off. Avoid walkways and patios where meltwater can refreeze and cause slips. Give service access techs need space to work and a safe path in winter. For small lots, a side yard that’s not the main snow-dump zone is usually best. When you’re weighing models for tight spaces, browse compact options in our ductless mini-splits and air handlers.
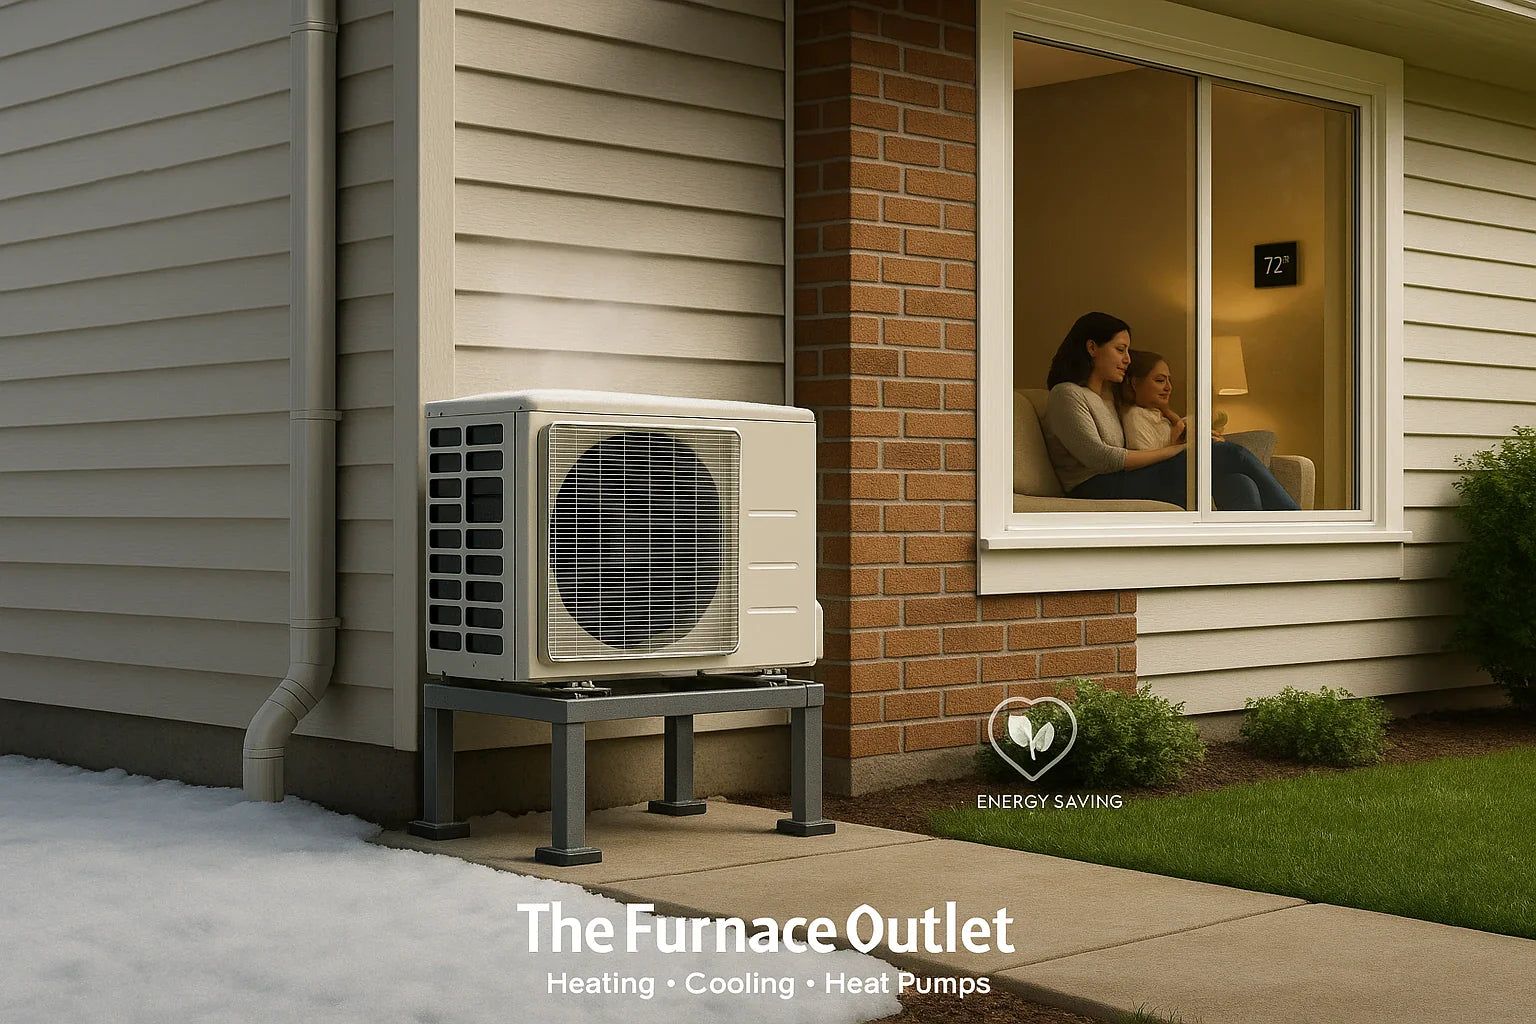
Elevation & mounting height: stay above the snow
In cold regions, the rule is simple: elevate the unit at least 12 inches above the highest expected snow level. That might mean a pre-engineered stand, wall brackets, or a concrete pad with risers. An open-bottom stand lets wind blow under the base so snow doesn’t pack in. Fasten stands to frost-proof footings to avoid heave and tilt. On wall mounts, hit structure—not just siding—and use anti-vibration pads. If you’re exploring equipment that pairs well with elevated installs, see our R-32 heat pump systems and compatible accessories.
Keep it level so defrost works right
Heat pumps shed frost by reversing flow and draining meltwater. If the unit isn’t level (side-to-side and front-to-back), water pools, refreezes, and you get an ice sculpture instead of heat. Use a solid pad or stand, shim as needed, and verify with a 9–12″ level on the top rail. Re-check level after the first deep freeze; minor settling is common. If you’re re-using an old pad, grind high spots or switch to a new pad with bolted risers.
Add a slight (⅛″) pitch away from the house on pads near siding to keep meltwater off the wall—just keep the unit itself square and level on its risers.
Wind baffles & barriers: when and how to use them
Cold wind strips heat from the outdoor coil and can even spin the fan backward on start-up. If you can’t cite the unit in a naturally protected spot, install a wind baffle. Place the baffle to block prevailing winds without choking intake or discharge. Leave the manufacturer-required clearances on all sides and above. Simple materials—galvanized panels or composite sheets—work fine if they’re anchored and don’t recirculate exhaust air. In icy regions, baffles also help shield the fan hub from freezing rain.
Think “wind shadow,” not “box.” A three-sided box traps air; a one- or two-panel baffle, set several inches off the unit, usually does the trick.
Control snow drifts before they bury the coil
Snow doesn’t just fall—it moves. Keep the unit away from fence corners, driveway snow dump zones, and roof slide paths. Use open-bottom stands so wind scours under the base. Maintain 24 inches of clearance around the cabinet so you can shovel quickly after storms. If you must be near a drift line, a short snow fence or shrub row (with space for airflow) can redirect accumulation. Never aim a snowblower at the unit; the packed snow turns to solid ice on the coil.
Install a small drip cap or diverter if minor roof runoff is unavoidable. It’s cheap insurance against ice sheets forming in the grille.
Airflow & service clearances that actually work
Most manufacturers call for at least 24 inches on sides and more above the fan for discharge. More is better, especially in snow country where shoveling shrinks clearances. Keep the back of the unit off the wall per the spec—tight backs starve the coil. Avoid facing two units directly at each other unless the manual says it’s okay. Stacking units vertically outdoors is usually a no in cold climates due to recirculation and snow load.
Plan a service zone: 36 inches on one “working” side with clear footing. Your future self (or tech) will thank you during a February call.
Protect against water, ice, and roof runoff
Water is the enemy when temps bounce above and below freezing. Don’t mount under un-guttered eaves. If you must be near a dripline, add a drip edge or shield that extends past the cabinet footprint so water doesn’t sheet onto the coil. Keep units off walkways to avoid refreeze hazards. If you’re selecting packaged gear for rooftops or pads with built-in drainage solutions, compare options in our residential packaged units and package units.
After a thaw, brush slush from the base before the overnight freeze. Removing two minutes of slush saves you an hour of chipping ice tomorrow.
Line sets & wall penetrations: seal, insulate, protect
Run the shortest practical line set with gentle bends. Insulate and UV-protect the suction line; in severe cold, exposed foam gets brittle—use a UV-rated jacket or line-hide channel. Air-seal wall penetrations with exterior-grade sealant and a sleeve so warm indoor air doesn’t leak out and frost the siding. Slope conduits and condensate pathways outward so water can’t backflow and freeze. Ready to source materials? Check our line sets and install accessories.
Label the lines and leave a simple diagram near the disconnect. Future service in a snowstorm is faster (and cheaper) when everything’s obvious.
Vibration, noise, and neighbor-friendly placement
Cold makes plastics and metals stiffer, which can amplify vibration. Use anti-vibration pads on stands and avoid mounting to flimsy decks or thin wall sheathing. Keep the fan discharge pointing away from bedrooms and quiet patios. Check local setback rules if you’re near a property line. On wall brackets, add rubber isolators and confirm lag bolts are into structural framing, not just the sheathing.
If a hum shows up only when it’s below 15°F, it’s often a resonance in the stand. A cross-brace or different pad durometer usually fixes it.
Winter maintenance that keeps efficiency up
After each storm, brush snow off the top grille, coil faces, and base. Keep the 24-inch perimeter open for airflow. Never chip ice with a screwdriver—you’ll puncture the coil. If ice builds, shut the system off, let it melt naturally, clear obstructions, then restart. Learn your unit’s defrost behavior (steam clouds are normal). If frost returns quickly, check level, wind exposure, and clearances first. For sizing, accessories, and DIY-friendly options, see our ductless mini-split systems and the Sizing Guide.
Common placement mistakes to avoid
-
Too low to the ground: snow packs into the base—raise it.
-
Under roof edges: ice sheets crush fan guards—move or add a diverter.
-
Aimed into wind tunnels: baffle or relocate.
-
Tight to walls/fences: starved airflow—open it up.
-
Facing another unit: recirculates cold discharge air—re-orient.
-
On busy paths: melt-refreeze hazards—shift location.
-
Unsealed penetrations: heat loss and frost—seal and insulate.
Need help planning the layout? Our Design Center and quick Quote by Photo tools make it easy, and our Help Center is always open.
FAQ
How high should I mount a heat pump in snowy climates?
At least 12 inches above the highest expected snow depth. In heavy-drift areas, go 18–24 inches and use an open-bottom stand.
Do I need a wind baffle?
If the site is exposed to strong prevailing winds, yes. Baffles cut wind chill on the coil and prevent reverse fan spin. Leave manufacturer clearances.
How much space around the unit is enough?
Plan for 24 inches minimum on all sides and extra above the fan. Reserve 36 inches on one side for service.
Can I put the unit under an overhang?
Only if you maintain clearances and there’s no roof runoff. Add gutters or a drip cap so water doesn’t freeze on the coil.
What’s the biggest cause of winter freeze-ups?
Units installed too low or not level. That traps snow and stops proper drainage during defrost.
Is it okay to blow snow away from the unit?
Use a shovel or broom near the cabinet. Don’t aim a snowblower at it—packed snow becomes solid ice on the coil.
Should I cover the outdoor unit in winter?
No. Covers block airflow and trap moisture. Keep it clear instead.
How often should I clear snow and ice?
After every storm. A two-minute brush-off prevents hours of defrost issues later.
Can two outdoor units face each other?
Avoid it unless the manufacturer allows it. Facing units can recirculate cold discharge air and reduce capacity.
What about line sets in extreme cold?
Insulate, UV-protect, and air-seal all penetrations. See our line sets for properly sized runs and fittings.


