When Mark purchased his GE 14,000 BTU 208/230 Volt Through-the-Wall Air Conditioner with Electric Heat (AKEQ14DCJ), he thought the hardest part was choosing the model. But once it arrived, another question popped up:
👉 “Do I install this myself, or hire a professional—and what’s the real cost difference?”
This guide takes a deep dive into DIY vs. professional installation costs for the GE 14,000 BTU through-the-wall AC, exploring:
-
Tools, materials, and hidden expenses for DIY
-
Professional quotes and what’s included
-
Risks, warranties, and safety considerations
-
Mark’s real-world hybrid solution (DIY + electrician)
-
How to decide which option makes sense for your budget and skill level
📏 Why Installation Costs Vary So Much
Unlike a portable or window AC, a through-the-wall unit is a permanent installation. That means:
-
Cutting into your wall (or reusing an old sleeve)
-
Framing the opening to support 100+ lbs of weight
-
Sealing the gaps to prevent air and water leaks
-
Wiring a dedicated 208/230V outlet (not a standard household plug)
👉 This complexity is why professional installation quotes can be anywhere from $1,500 to $2,100, while DIYers like Mark spend under $1,200.
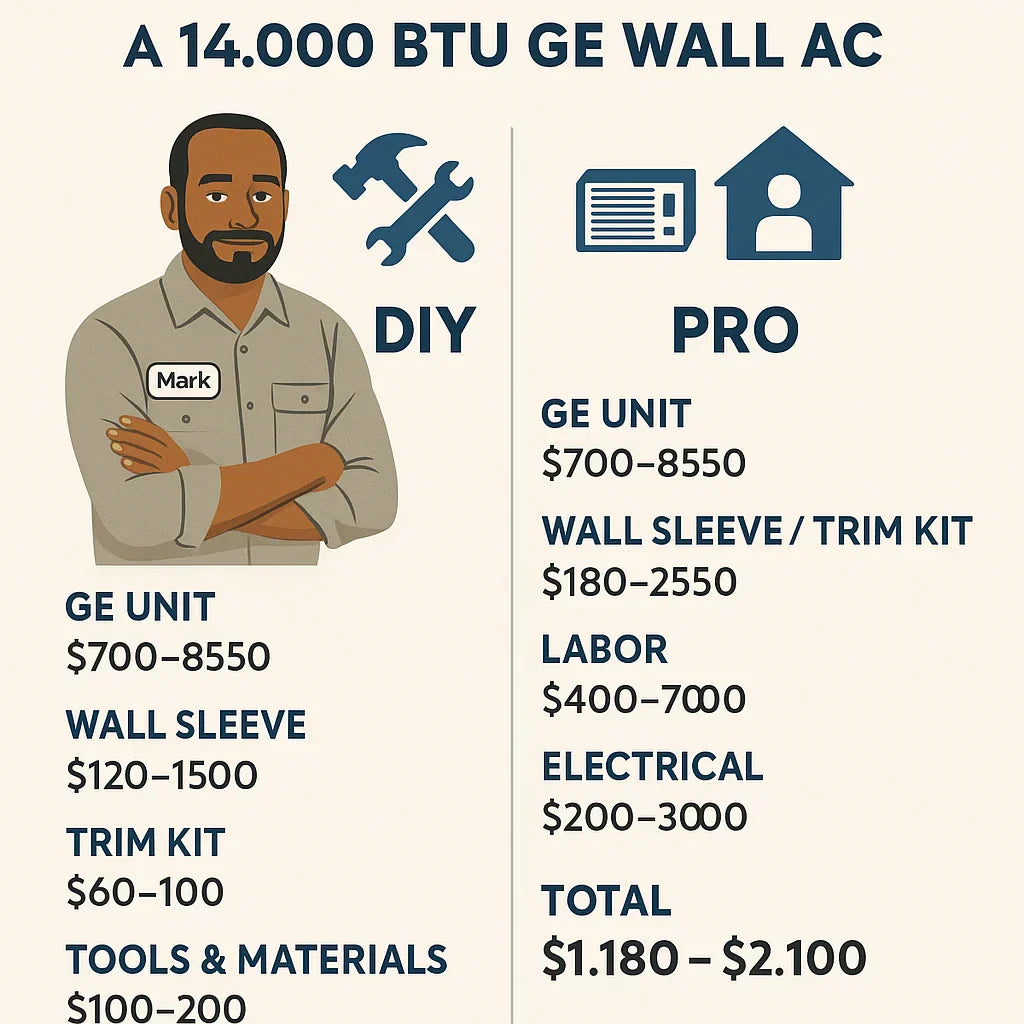
🛠️ DIY Installation Costs
Mark decided to handle most of the install himself. He had moderate carpentry skills and owned some tools, but still had to budget for materials.
🔹 Materials & Tools Needed
| Item | Estimated Cost | Notes |
|---|---|---|
| GE AKEQ14DCJ Unit | $700–$850 | Base equipment cost |
| GE Wall Sleeve | $120–$150 | Required for stability & drainage |
| GE Trim Kit (RAK204D) | $60–$100 | For sealing & professional finish |
| Reciprocating Saw | $80–$120 | Needed if cutting a new opening |
| Drill + Bits | $50–$100 | For screws and anchoring |
| Level & Tape Measure | $20–$40 | Precision tools for straight cuts |
| Spray Foam + Exterior Caulk | $20–$40 | To seal gaps |
| Safety Gear (gloves, goggles, mask) | $25–$50 | Essential for safe cutting |
| Subtotal (materials/tools) | $1,075–$1,450 | Includes AC, sleeve, tools, and sealing supplies |
🔹 Electrical Costs (Even for DIYers)
Because the GE AKEQ14DCJ requires 208/230V power, Mark couldn’t do it all himself. He needed a licensed electrician to:
-
Install a dedicated breaker in the panel
-
Run a 208/230V line to the wall opening
-
Add a proper outlet
Electrician cost: $200–$300
👉 DIY Total: $1,180–$1,600 (depending on tools you already own)
👷 Professional Installation Costs
If you’d rather let the pros handle everything, expect a higher bill—but less hassle.
🔹 Breakdown of Professional Costs
| Item | Estimated Cost | Notes |
|---|---|---|
| GE AKEQ14DCJ Unit | $700–$850 | Same equipment cost |
| Wall Sleeve & Trim Kit | $180–$250 | Often bundled by installer |
| Labor (framing, cutting, sealing) | $400–$700 | Based on hourly rates & difficulty |
| Electrical hookup (208/230V) | $200–$300 | Licensed electrician included |
| Total Professional Cost | $1,500–$2,100 | All-inclusive |
🔹 What You’re Paying For
-
Contractor labor & expertise
-
Tools & equipment you don’t own
-
Cleanup & disposal of wall debris
-
A workmanship warranty in some cases
👉 Mark got one professional quote for $1,850 all-in, which he compared to his $1,050 hybrid install.
⚖️ Pros & Cons of DIY vs. Pro
✅ DIY Pros
-
Save $500–$700 in labor costs
-
Learn valuable home improvement skills
-
Full control over schedule & materials
⚠️ DIY Cons
-
Mistakes can cause water leaks, drafts, or costly repairs
-
Requires physical labor & carpentry skills
-
Still must hire an electrician for safety
👷 Pro Pros
-
Fast and efficient (often done in 1 day)
-
Less stress and physical effort
-
May come with labor warranty
👷 Pro Cons
-
40–60% higher total cost
-
Less flexibility (must schedule appointments)
-
Some contractors may upsell extras
🧰 Mark’s Hybrid Approach
Mark took a middle-ground path:
-
He did the framing, cutting, and sealing himself over a weekend.
-
He hired an electrician for the 230V line and outlet.
His Total: ~$1,050
Pro Quote He Avoided: $1,850
👉 “Doing the grunt work myself saved me almost $800. The electrician was the only step I wasn’t comfortable tackling—and it was worth every penny for safety.”
📌 Safety Considerations
Mark emphasizes one point for DIYers: don’t mess with electricity unless you’re licensed.
-
230V shocks are dangerous, not DIY-friendly.
-
Incorrect wiring can damage the AC or cause fire hazards.
-
Some municipalities require permits for this type of installation.
👉 Always budget for a professional electrician, even if you DIY everything else.
💡 Cost-Saving Tips
-
Reuse an existing wall sleeve if you’re replacing an older unit and the sleeve is in good condition.
-
Borrow or rent tools from a hardware store instead of buying new.
-
Shop seasonal sales for sleeves, trim kits, and sealing supplies.
-
Bundle electrical work if you’re already hiring an electrician for other projects.
🏠 When to Choose DIY vs. Pro
-
Choose DIY if…
-
You’re handy with tools and comfortable cutting drywall/siding.
-
You want to save money and don’t mind a weekend project.
-
You’re willing to hire an electrician for the final hookup.
-
-
Choose Pro if…
-
You want a fast, guaranteed install with no learning curve.
-
You live in a multi-unit building where rules require licensed contractors.
-
You don’t have the tools or time to tackle the project.
-
🔗 Verified References
✅ Final Thoughts
So, how much does it cost to install a GE 14,000 BTU through-the-wall AC?
-
DIY: $1,180–$1,600 (Mark did it for ~$1,050 by reusing tools and only hiring an electrician).
-
Pro: $1,500–$2,100, depending on your location and labor rates.
👉 Mark’s advice: “If you’ve got the tools and the patience, DIY can save you hundreds. But never cut corners on electrical. That’s the one step that always belongs to the pros.”
In the next topic we will know more about: Can a GE Wall Unit Heat in Winter? What Mark Learned About Electric Heat


