🏠 Introduction: Should You DIY or Call a Pro?
When I began looking into a 2‑ton R‑32 air conditioner for my home in 2025, I thought: Could I save thousands by installing it myself? After all, with online tutorials and DIY forums, it’s tempting. But I quickly realized installing an R‑32 system is nothing like swapping out a window AC.
Between new refrigerant safety standards, electrical requirements, and warranty concerns, the decision boiled down to two paths:
-
DIY: Cheaper upfront, but risky and often non‑compliant.
-
Pro Installation: More expensive, but safer, legal, and longer‑lasting.
This guide breaks down the step‑by‑step installation process, the pros and cons of DIY vs. hiring a pro, and what I ultimately learned.
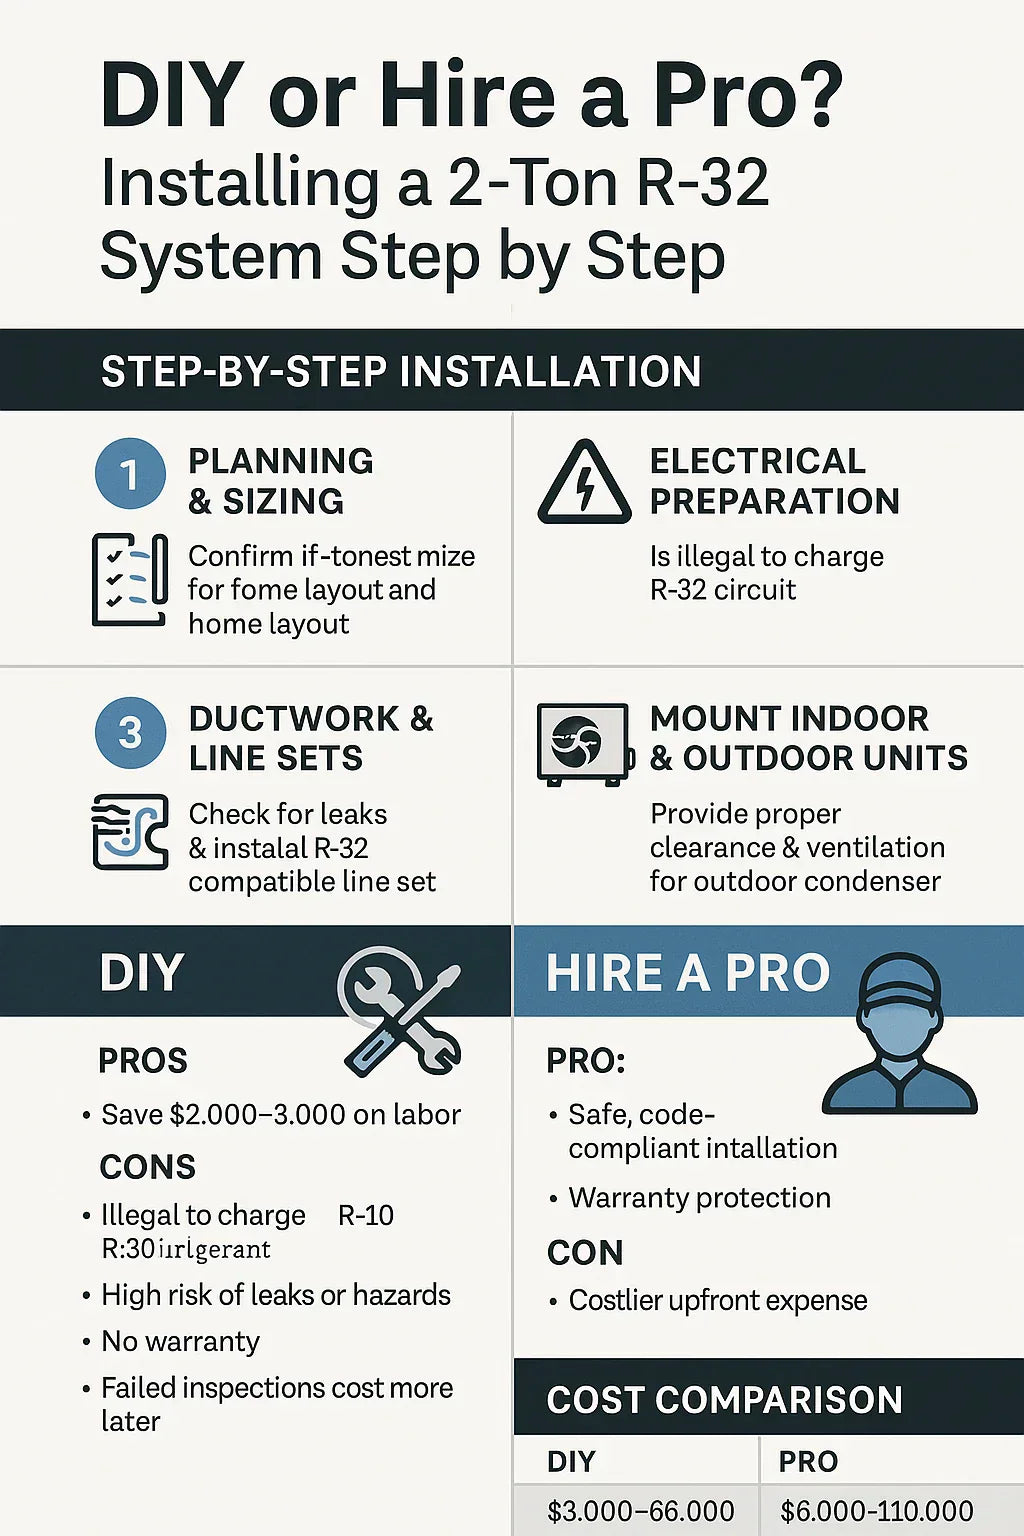
📋 Step‑by‑Step Overview of a 2‑Ton R‑32 Installation
Here’s what goes into setting up a 2‑ton R‑32 system—and why most of these steps are better left to a licensed HVAC pro.
🔧 Step 1: Planning & Sizing
-
Confirm tonnage: A 2‑ton AC is generally suited for homes around 1,000–1,400 sq. ft., but factors like climate and insulation matter
-
Use BTU calculators: Online tools can give you a ballpark estimate.
-
Samantha’s Tip: I used The Furnace Outlet’s Sizing Guide to double‑check my home’s needs.
Mistake to Avoid: Oversizing your system leads to short cycling and humidity issues.
⚡ Step 2: Electrical Preparation
-
A dedicated 220V circuit is usually required.
-
May need breaker upgrades and thicker wiring.
-
Electrical work without a permit is illegal in many states
DIY Risk: Handling live electrical wiring can cause shocks, fires, or failed inspections.
🌀 Step 3: Ductwork & Line Sets
-
Inspect existing ducts: Leaks can waste up to 30% of conditioned air
-
Upgrade or replace line sets: Not all older sets are R‑32 compatible.
-
Seal with mastic to prevent airflow loss.
My Experience: I needed a new line set because my old one wasn’t rated for R‑32 pressures. That added $600 to the project.
🛠️ Step 4: Mounting the Indoor & Outdoor Units
-
Outdoor condenser: Requires clearance on all sides for airflow
-
Indoor air handler: Must be properly leveled to prevent condensate leaks.
-
Support pads: Help reduce vibration and noise.
DIY Risk: Improper mounting = noisy operation, poor efficiency, or water damage.
❄️ Step 5: Charging the System with R‑32
This is where DIY hits a wall.
-
R‑32 refrigerant is classified as A2L (mildly flammable)
-
Requires EPA 608 certification to handle legally
-
Charging involves vacuuming the line set, leak testing, and filling to precise specifications.
DIY Risk: Incorrect charging can damage the compressor, void warranties, or create safety hazards.
🧾 Step 6: Permits, Codes & Final Inspection
-
Local permits: Typically $150–$500.
-
2025 building codes require compliance with A2L refrigerant safety standards
-
A licensed inspector must approve the system before final use.
Samantha’s Lesson: Without a permit, your warranty may be void and home insurance claims denied if issues arise.
⚖️ DIY vs. Hiring a Pro: The Breakdown
🛑 DIY Approach
Pros
-
Save $2,000–$3,000 in labor costs
-
Learn new skills and understand your system better
Cons
-
Illegal to handle refrigerant without certification
-
High risk of leaks, fire hazards, or injury
-
Warranties usually voided
-
Failed inspections can cost more later
✅ Hiring a Pro
Pros
-
Code‑compliant installation
-
Warranty stays valid
-
Safer handling of R‑32
-
Professional duct sealing and electrical upgrades
Cons
-
Labor adds $2,000–$3,500 to the bill
-
Scheduling availability can delay installation
💵 Cost Comparison
| Option | Estimated Cost Range | Risks |
|---|---|---|
| DIY (Partial) | $3,000–$6,000 | Code violations, leaks |
| Pro Installation | $6,000–$10,000 | Higher labor expense |
My Experience: I initially considered DIY but quickly realized the risk wasn’t worth it. The peace of mind from hiring a pro was priceless.
🛡️ Safety & Legal Considerations in 2025
🔥 Flammability Risks
R‑32’s A2L rating means it’s mildly flammable, but safe when installed correctly.
📜 Legal Requirements
-
EPA Section 608 certification required to handle refrigerants
-
Most states require permits and inspections for AC installs
🏡 Home Insurance Factor
If you install DIY and something goes wrong, insurance may not cover damages.
🎁 Rebates & Warranty Protection
-
Federal Tax Credits: Up to $2,000 for qualifying systems under the Inflation Reduction Act
-
Utility Rebates: $200–$1,000 in many areas
-
Warranty Validity: Most manufacturers require pro installation to honor 10‑year parts warranties
✅ Samantha’s Takeaway: My Choice in 2025
After weighing the risks and rewards, I chose to hire a certified A2L installer. Yes, it cost more, but it ensured:
-
My system was safe and code‑compliant
-
I kept my manufacturer warranty intact
-
I qualified for rebates and tax credits
If you’re considering a DIY installation, my advice is simple: don’t risk it. The money you save upfront could cost you far more in repairs, safety hazards, or lost rebates down the line.
🔗 Helpful External Resources
In the next topic we will know more about: Maintenance Guide for Your 2-Ton R-32 AC: Seasonal Tips for Peak Performance


