🏡 1. Jake’s Story: The Weekend He Almost Installed His Own Heat Pump
When Jake Lawson, a Michigan homeowner and weekend DIY enthusiast, bought his new Goodman 3 Ton 15.2 SEER2 Heat Pump System, he had a goal: save money by installing it himself.
After all, Jake had installed everything from ceiling fans to garbage disposals. How hard could a heat pump be?
“I figured I’d clear the space, hook up the lines, and have heat by Sunday,” Jake recalls.
“Then I learned about EPA licenses, refrigerant laws, and how one mistake could void a $10,000 system.”
Jake’s experience isn’t unique. Many homeowners wonder if installing their own heat pump is worth the risk. The short answer? You can do a lot — but not everything.
This guide walks through what you can safely handle as a homeowner, what requires a licensed HVAC pro, and how Jake saved money and kept his Goodman warranty intact.
⚙️ 2. Why Heat Pump Installation Isn’t Like Other DIY Projects
Installing a heat pump isn’t like swapping out a water heater or laying new flooring. It involves three disciplines at once — electrical, refrigerant, and airflow engineering.
A single mistake (like overcharging refrigerant or wiring polarity incorrectly) can lead to:
-
Compressor failure
-
Refrigerant leaks
-
Tripped breakers
-
Even home insurance issues
Jake says:
“I realized this wasn’t a simple ‘plug it in and go’ project. There are parts you can prepare — and parts only a pro should touch.”
📘 Reference: Energy.gov – Heat Pump Installation Guidance
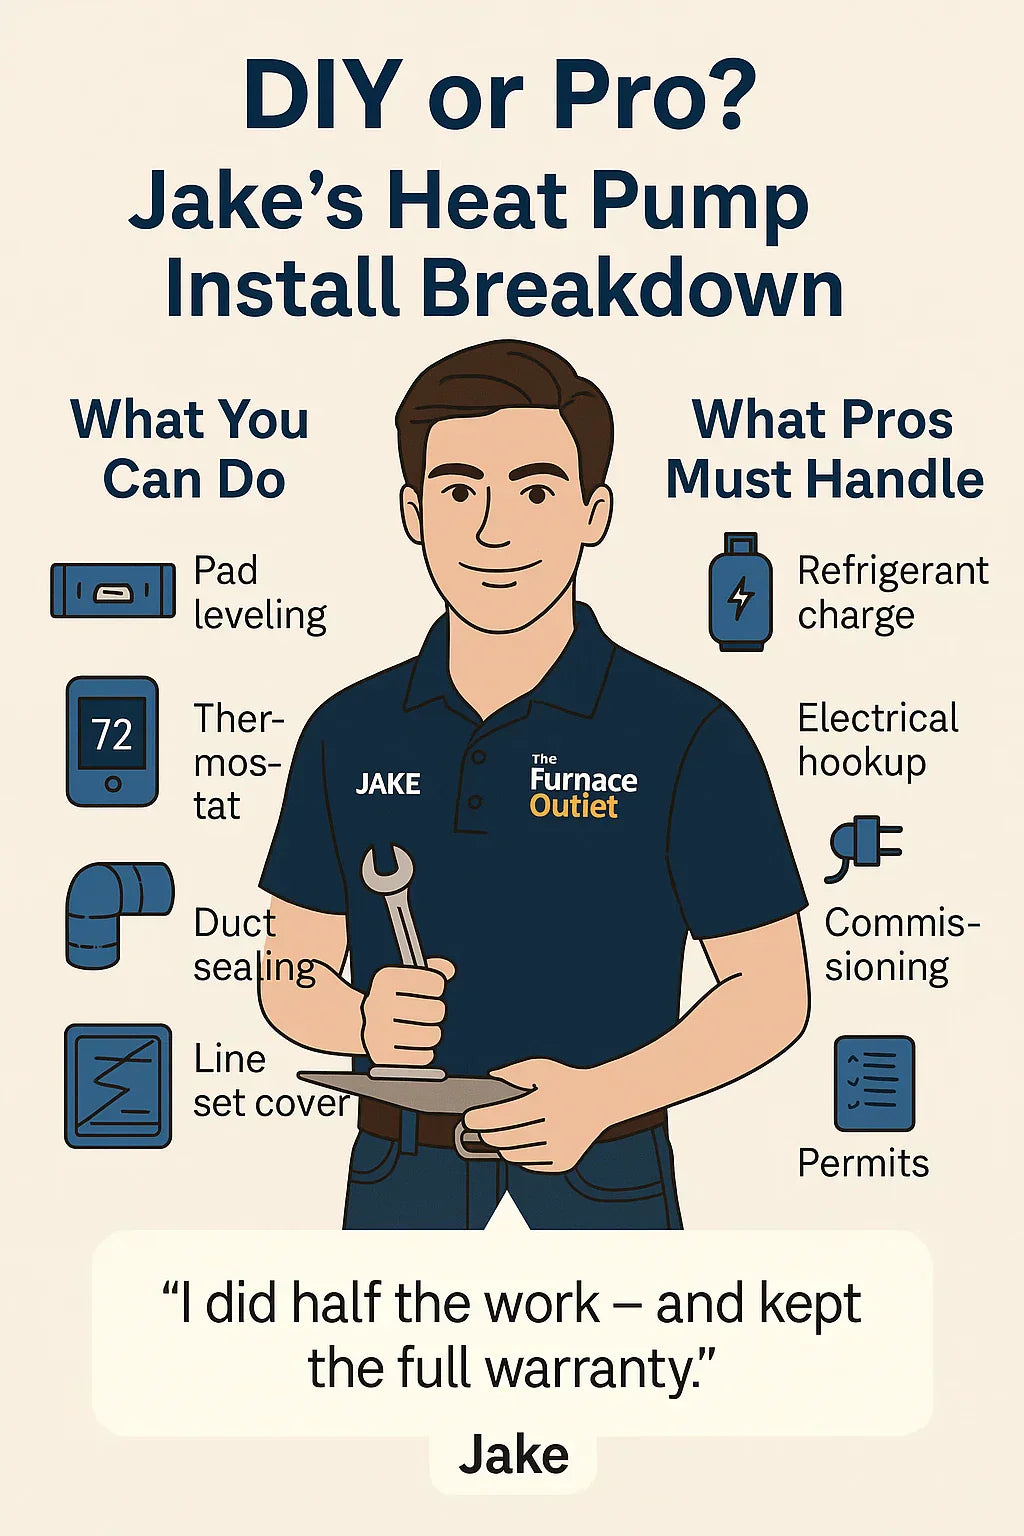
🧩 3. What Homeowners Can Do Themselves
Jake still rolled up his sleeves. There are several key prep tasks homeowners can safely and legally perform before the technician arrives.
✅ 3.1. Site Preparation
-
Choose a level, shaded spot for the condenser (outdoor unit).
-
Maintain at least 12–18 inches of clearance on all sides.
-
Avoid roof runoff and snow buildup zones.
Jake used a pre-fab concrete pad, leveled it with gravel, and installed vibration pads.
✅ 3.2. Mounting a Wall Bracket or Base Stand
If your system sits above snow line or on uneven terrain, you can install a condenser stand or wall bracket using manufacturer specs.
“I measured twice, drilled once — and had the outdoor stand up in an hour,” Jake says.
✅ 3.3. Thermostat Wiring and Mounting
You can install a smart thermostat compatible with your Goodman system before the pro arrives. Jake used a Wi-Fi model with heat pump settings.
📗 Tip: Label your thermostat wires before disconnecting the old unit.
✅ 3.4. Ductwork Preparation
DIY duct tasks include:
-
Sealing gaps with mastic or foil tape (never cloth tape).
-
Adding insulation to accessible ducts.
-
Replacing dirty or undersized return filters.
✅ 3.5. Line Set Path Preparation
Drilling and running line set covers (the insulated refrigerant lines between indoor and outdoor units) can be done with care.
Jake pre-installed his covers, saving the installer almost an hour.
“I did the grunt work. The pro did the science.”
These simple tasks saved him about $500–$700 in labor.
🧰 4. What You Should Leave to the Professionals
Some installation steps are not DIY-eligible due to safety, warranty, and legal restrictions.
| Task | Requires License | Why It’s Not DIY |
|---|---|---|
| Refrigerant handling | ✅ EPA Section 608 | Legal restriction; high pressure + environmental risk |
| Electrical connection | ✅ Local permit | Must meet NEC and local code |
| Line set connection | ✅ | Requires torque accuracy and nitrogen pressure test |
| Vacuum pulling & leak testing | ✅ | Specialized tools; must reach <500 microns |
| Refrigerant charging | ✅ | Precision pressure & temperature control |
| System commissioning | ✅ | Calibration + airflow balance required |
Jake’s key takeaway:
“I stopped where the refrigerant started — and that decision probably saved my warranty.”
📘 Reference: EPA Section 608 Certification Overview
⚠️ 5. The Legal and Safety Side of HVAC Installation
Installing a heat pump involves compliance with federal and state laws, building codes, and manufacturer warranties.
-
EPA Section 608 Certification is required to handle or purchase refrigerants like R-32.
-
Local permits are mandatory for electrical hookups in most states.
-
Manufacturer warranties (like Goodman’s 10-year parts warranty) often become void if not professionally installed.
-
Incorrect installations can lead to home insurance claim denials in case of electrical or refrigerant damage.
📗 Reference: Goodman – Warranty Information
🧱 6. Jake’s Step-by-Step Prep Checklist
| Step | Skill Level | Jake’s Notes |
|---|---|---|
| Clear and level area for pad | Easy | “Use a level and crushed gravel for drainage.” |
| Mount stand or bracket | Moderate | “Follow weight and wind rating specs.” |
| Run line set covers | Moderate | “Plan your bends — refrigerant lines aren’t flexible.” |
| Install thermostat | Easy | “Turn off breaker first!” |
| Seal ducts | Moderate | “Mastic is messy but worth it.” |
| Add insulation | Easy | “Focus on the suction line hole.” |
Jake spent two weekends prepping everything. When the HVAC tech arrived, installation time dropped from two days to one.
🔧 7. R-32 Refrigerant: Efficient but Not for DIYers
Goodman’s new-generation systems use R-32 refrigerant — known for better performance and lower global warming potential (GWP 675 vs. 2,088 for R-410A).
However, R-32 operates at higher pressures and is mildly flammable (classified A2L).
Handling it requires certified tools and EPA-authorized recovery systems.
DIY mishandling can cause:
-
Overpressure damage
-
Flammable leaks
-
Compressor burnout
📙 Reference: Daikin – R-32 Safety & Handling Guide
“Once I read about R-32 pressure ratings, I was glad to let the pro handle that part.”
💸 8. Jake’s Cost Comparison: DIY vs. Pro Install
| Type | Typical Cost | Warranty | Risk Level |
|---|---|---|---|
| Full Professional Install | $4,500–$7,000 | Full (10-Year) | ✅ Lowest |
| Partial DIY (Jake’s Route) | $3,000–$5,000 | Full (with pro sign-off) | ⚠️ Moderate |
| Full DIY (Not Recommended) | $2,000–$3,500 | ❌ None | ❌ High |
Jake saved roughly $1,800 total doing all prep work himself while maintaining full warranty coverage.
“I didn’t touch the refrigerant lines, and Goodman still honored the full warranty — that was my peace of mind.”
🧠 9. How Goodman Systems Help DIYers
Goodman systems are designed with accessibility and serviceability in mind — even for homeowners who enjoy being hands-on.
-
Tool-free access panels for faster maintenance.
-
Clearly labeled wiring and color-coded terminals.
-
R-32 charge ports with pressure markings.
-
Vertical air handler (model AMST36BU1400) includes easy filter access and drain pan service.
“Everything was logically laid out. Even a DIYer could follow along safely with the prep.”
⚡ 10. Tools Jake Used
| Tool | Purpose |
|---|---|
| Level | Ensure condenser pad stability |
| Torque wrench | Mounting bracket tension |
| Cordless drill | Anchoring base stand |
| Hole saw | Routing line set through siding |
| Foil tape | Duct sealing |
| Digital thermostat | Programming and energy savings |
Jake purchased everything at his local hardware store for under $250.
🧰 11. Permits and Code Requirements
Before touching anything electrical or structural, Jake checked with his local building department.
Most municipalities require:
-
Electrical permit for 240V connection.
-
Mechanical permit for HVAC replacement.
-
Inspection before system activation.
Failing to pull permits can lead to fines or denied resale inspections.
📗 Reference: ICC – Residential HVAC Code Overview
“My inspector said half the DIY installs he fails are because the homeowner didn’t call before wiring.”
🧭 12. DIY Tasks After Installation
After the professional completed the refrigerant and electrical work, Jake handled the finishing touches:
-
Mounted line set covers neatly along the siding.
-
Installed weatherproof insulation around wall penetrations.
-
Programmed the thermostat’s heating/cooling schedules.
-
Cleaned up debris and verified condenser airflow clearance.
“I still got that satisfaction of finishing the job — just without the stress.”
🧪 13. Why Commissioning Matters
Commissioning is the process of testing and optimizing your system after install.
It ensures your Goodman heat pump operates at peak SEER2 efficiency.
Professionals perform:
-
Vacuum pressure check (<500 microns)
-
Refrigerant subcooling test
-
Airflow measurement (CFM)
-
Temperature differential check (ΔT)
-
Thermostat calibration
Without commissioning, efficiency can drop 20–30% — meaning higher bills and shorter system life.
📘 Reference: EnergyStar – Proper HVAC Installation
⚠️ 14. Common DIY Mistakes (and How Jake Avoided Them)
| Mistake | Consequence | Jake’s Prevention |
|---|---|---|
| Bending refrigerant line too tightly | Kinked line, refrigerant restriction | Left to pro |
| Skipping vacuum pull | Moisture in system, compressor damage | Pro handled |
| Cross-wiring thermostat | System short | Took photos first |
| Ignoring airflow clearance | Overheating | Maintained 18-inch gap |
| Failing to insulate suction line | Condensation leaks | Used Armaflex wrap |
“Knowing what not to do saved me more money than trying to do everything.”
💡 15. The Warranty Question: What Goodman Requires
Goodman warranties are generous — 10 years parts and compressor — but require proof of licensed installation.
DIY-only installs risk:
-
Denied claims on compressor or control board.
-
Voided labor coverage.
-
Loss of technical support.
Jake submitted his contractor’s invoice along with product registration, keeping his full warranty intact.
📗 Reference: Goodman – Warranty Registration
🔋 16. Jake’s Final System Setup
Jake’s home: 2,000 sq ft, Midwest climate.
System: Goodman GSZB403610 (15.2 SEER2, 8.1 HSPF2) with vertical air handler and dual-fuel furnace backup.
Results after first year:
-
Energy bills down 25%.
-
System runs quieter than his old unit.
-
Consistent comfort across all rooms.
🧠 17. For the Ambitious DIYer: What’s Safe to Practice
If you want hands-on experience without voiding warranties, start here:
-
Watch Goodman’s official installation tutorials.
-
Learn how thermostats communicate with heat pumps (O/B, Y, C wiring).
-
Replace filters quarterly and clean coils annually.
-
Understand defrost cycles and fan modes.
This knowledge helps homeowners communicate better with technicians and spot small issues before they grow.
🧾 18. Jake’s Full Cost & ROI Breakdown
| Item | Cost | Savings | Payback |
|---|---|---|---|
| Goodman 3 Ton System | $8,800 | — | — |
| Contractor Labor (partial) | $2,200 | — | — |
| Jake’s DIY Prep Savings | -$1,800 | — | — |
| Federal Tax Credit (25C) | -$2,000 | — | — |
| Energy Savings | — | $400/year | 4.5 years |
Jake’s total effective install cost: ~$7,200 after incentives, with full warranty and professional commissioning.
🌍 19. Environmental Bonus
Jake’s new R-32-based heat pump reduced his home’s CO₂ emissions by 30%, compared to his previous R-410A system.
That’s equivalent to planting 25 trees each year.
📘 Reference: Daikin – R-32 Environmental Impact
“It’s good knowing I’m helping the planet — and my wallet — at the same time.”
🧩 20. Jake’s Advice for Other Homeowners
“You don’t need to be a pro to be part of your HVAC project. You just need to know where your part ends.”
Jake’s approach — DIY prep, pro installation — strikes the perfect balance between cost, safety, and warranty protection.
He summarizes it in three steps:
-
Prep the site and wiring.
-
Hire a certified pro for refrigerant and electrical tie-ins.
-
Enjoy full efficiency, full warranty, and full satisfaction.
🏁 21. Final Takeaway
If you’re planning a new heat pump installation:
-
Be proactive.
-
Do the easy prep yourself.
-
Let licensed pros handle the rest.
You’ll save money, avoid risk, and keep your Goodman system running efficiently for decades.
In the next topic we will know more about: What Size Heat Pump Do I Need? How to Match Tonnage to Home Size


