
|
Key Takeaway |
-
Start with Manual J load calculations to avoid oversizing and control humidity.
-
Match 1.5–5 ton units to 650–3,000 sq ft for sizing accuracy.
-
Maintain 2 ft clearance around condenser for compressor longevity.
-
Use correct copper line sizes to ensure performance and oil return.
-
Install a 240V dedicated circuit with the correct breaker for safety.
Why Proper AC Installation Matters

Picture this: you save all summer for a shiny new 3-ton central air system, but two weeks after the install the house is still sticky and the power bill looks like a phone number. That headache almost always traces back to shortcuts taken during installation. A central air conditioner is more than a big metal box; it is a matched set of coils, lines, ducts, and controls that must fit your house the way a tailor fits a suit. The U.S. Department of Energy estimates that half of new units are either too big or too small, causing short cycling, frozen coils, and early compressor failure. The good news is that every one of those problems is preventable with careful planning and a checklist-driven process. In this guide you will learn, in plain language, the twelve steps professionals use to make sure a 1.5- to 5-ton system delivers cool, dry air for fifteen years or more. We will break down load math, duct design, wiring, refrigerant safety, and ongoing maintenance—no fluff, no buzzwords, only the practical methods that work in real houses today.
Upgrade smart—choose high-efficiency R-32 AC condensers to cut energy bills and avoid oversizing from day one.
Understanding AC Tonnage and Home Cooling Needs
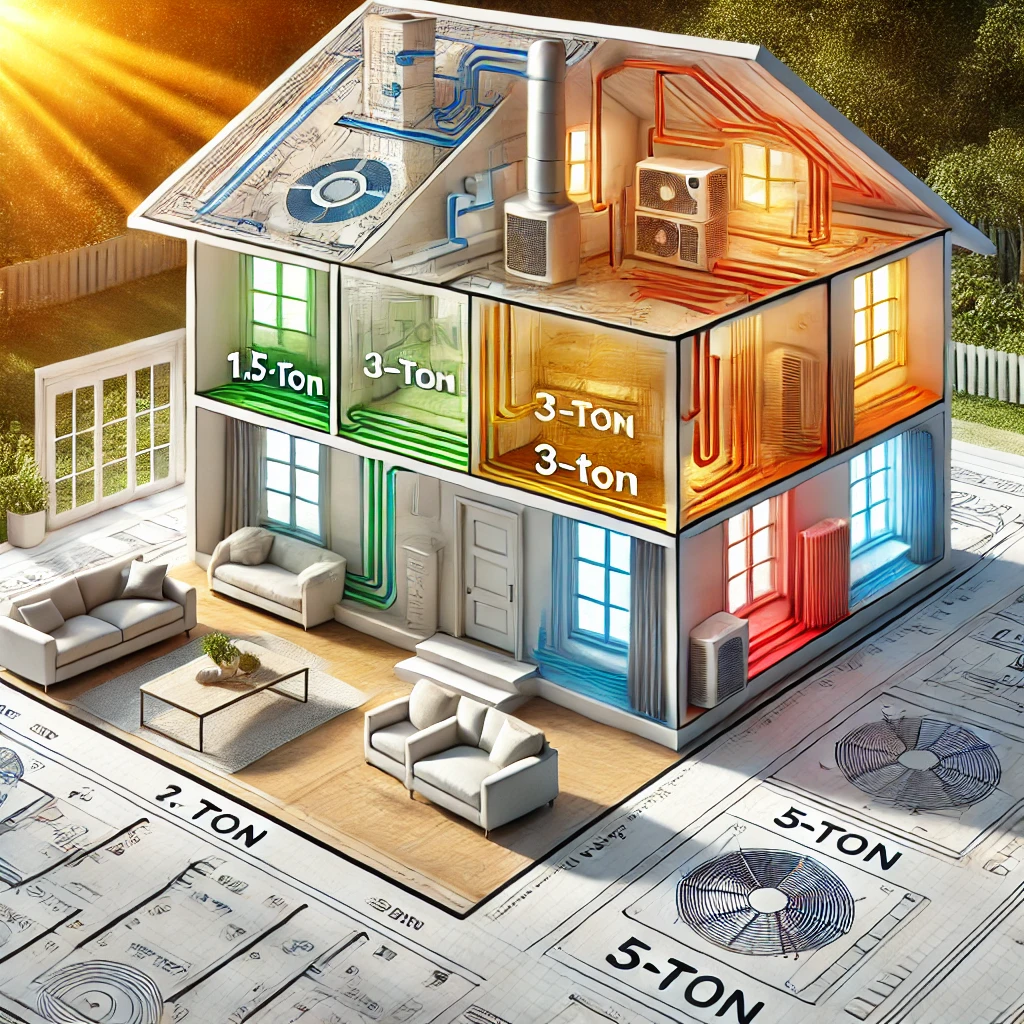
“Tonnage” sounds like weight, but in HVAC it means cooling power. One ton equals 12 000 BTU of heat removed each hour. A 1.5-ton unit pulls 18 000 BTU/h, while a 5-ton giant removes 60 000 BTU/h. The size of your living space is only the starting point. Insulation levels, window orientation, roof color, and even how many people cook dinner at once all feed into the final number. Still, the square-foot rules of thumb below help you spot obvious mismatches:
-
1.5 tons: 650 – 825 sq ft
-
3 tons: 1 400 – 1 600 sq ft
-
5 tons: 2 400 – 3 000 sq ft
If you live in a hot, humid climate like Houston, nudge the tonnage down rather than up; longer run times squeeze out extra moisture. In arid Phoenix you can sit a bit higher because humidity control is easier. Oversizing feels safe, yet it steals comfort by short-cycling—the compressor shuts off before indoor coils wring out water, leaving clammy air. Undersizing works the compressor too hard and raises indoor temperature on triple-digit days. The sweet spot is found by pairing room-by-room heat gains against realistic thermostat settings, then rounding to the next available size on the equipment chart.
Manual J Load Calculations Explained

Manual J is the industry gold standard for residential load work. Think of it as a recipe: feed in insulation R-values, window U-factors, roof pitch, local weather data, and internal gains from appliances. The software spits out both sensible (temperature) and latent (moisture) loads for every room. Why not just divide square feet by 500 and call it a day? Because that shortcut ignores variables that can double or halve the load. A west-facing room with a big picture window bakes at sunset even if the total house square footage looks small. Manual J also flags where duct supply runs should increase or decrease to keep each room within ±2 °F of setpoint. The total tonnage is the sum of the room loads, factored up about 10 % for miscellaneous leakage and safety margin. For most homes the final number lands neatly on standard sizes: 1.5, 2, 2.5, 3, 4, or 5 tons. Skipping Manual J is the single biggest reason central AC systems feel “weak” or “muggy” even when brand new. Many utilities and code offices now require a signed Manual J report before granting permits, making it both smart and mandatory.
Accurate AC sizing starts with a Manual J Load Calculation—discover why in our detailed 3-ton system sizing guide.
Site Preparation: Creating a Safe Foundation
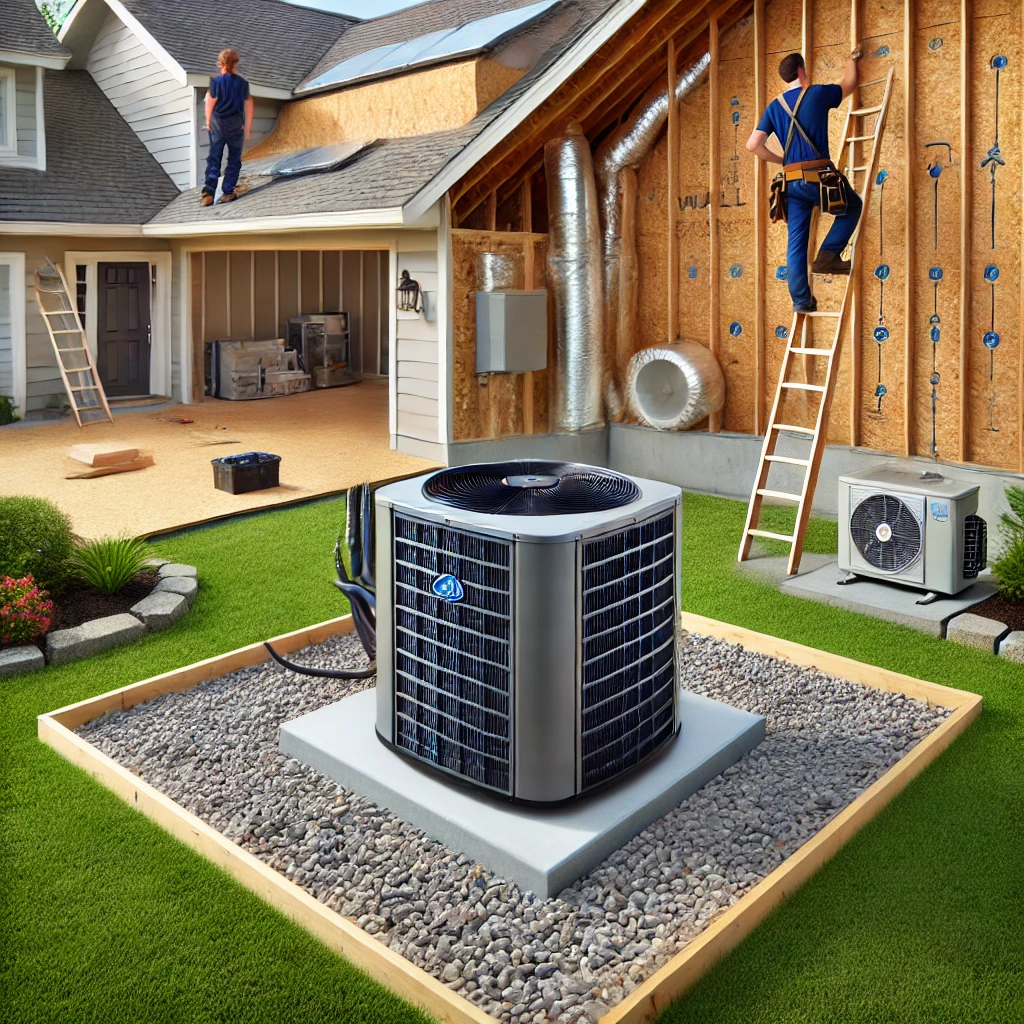
Before a wrench touches copper, prepare the ground—literally. The outdoor condenser must sit level on a pad or elevated brackets. Two inches of slope is enough to tilt the compressor oil and wreck bearings, so use a bubble level on all four sides. Leave at least 24 inches of clear space around the coil fence for hot-air discharge. Above, keep gutters and eaves two feet back to avoid icicle damage in winter. Indoors, verify access to the attic or crawlspace for duct routing; a tight hatch can turn a two-hour job into a back-breaking marathon. Protect attic insulation with plywood walk boards so technicians do not compress the R-value out of batts. Mark stud bays for thermostat wire and drill pilot holes instead of pounding nails through drywall, which can snag hidden electrical runs. Good site prep prevents tripped breakers, refrigerant leaks, and mangled sheet metal—failures that never show up on glossy brochures but haunt homeowners for years. Spend an afternoon measuring and clearing before delivery day, and the actual installation flows smoothly.
Designing and Sealing Ductwork for Peak Airflow
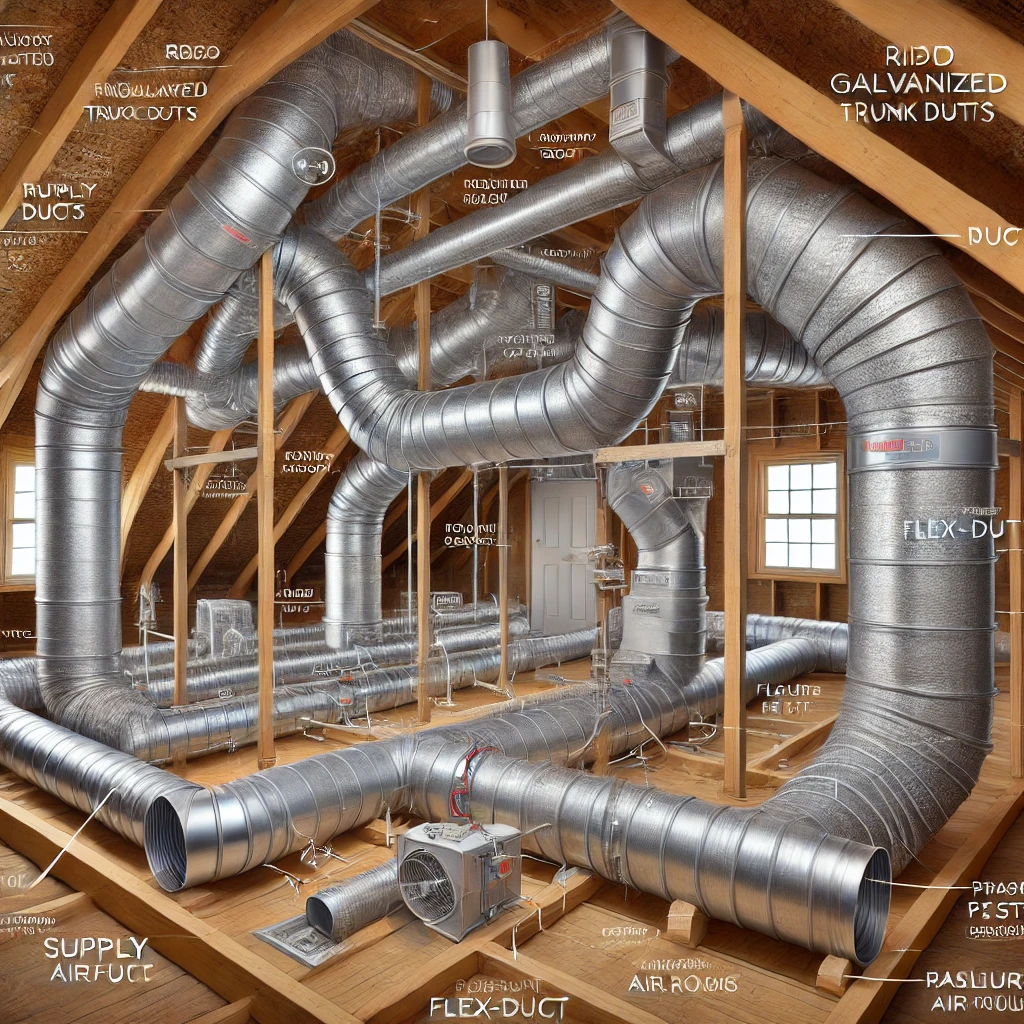
Ducts are the lungs of your air conditioner. Aim for 350 – 400 CFM (cubic feet per minute) of airflow per ton of capacity. That means a 3-ton unit needs about 1 100 CFM total supply. Undersized trunks choke airflow; oversized runs waste sheet metal and slow air so much that rooms feel stuffy. Use the equal-friction method or a ductulator chart to pick diameters that hold static pressure below 0.5 in. w.c. (inches of water column), the limit most ECM blowers like. Flex-duct is fine for short branches, but the main trunk should be rigid galvanized or mastic-sealed fiberboard to resist kinks. After install, a pressure test with a blower door or duct blaster—any leak larger than 6 % of total flow must be sealed with mastic or foil tape (never cloth d-tape, which dries out). Insulate ducts in attics to R-8 minimum; every uninsulated foot can lose around 2 °F, so a 50-foot run could drop delivered air by 100 °F-×-2 % = 2 °F—enough to notice. Balanced supply and return paths prevent doors from slamming shut and help the thermostat read true average house temperature.
Airflow and ductwork can make or break your system’s efficiency. Are SEER2 Ratings Enough? reveals the hidden truth.
Refrigerant Lines: Sizing, Routing, and Safety

Copper lines are the arteries moving refrigerant between indoor coil and outdoor condenser. A 5-ton system typically uses 3 ⁄8″ liquid and 3 ⁄4″ suction lines up to about 50 ft equivalent length. Go larger on very long runs to keep pressure drop below manufacturer limits. Never soft-solder (plumbing solder); always braze with 15 % silver rod to withstand the 400 psi pressures of modern R-410A. Purge nitrogen during brazing so scale does not flake into the compressor later. Support lines every 6 ft with hangers to stop vibration hum. Create a drip loop where the suction line enters the air handler to catch oil and prevent it flooding back when the compressor shuts off. After pulling an evacuation to <500 microns, weigh in the factory-specified charge to the nearest half-ounce. Topping off by feel is illegal and dangerous; too much refrigerant spikes head pressure and detonates valves, while too little causes the coil to ice like a freezer. Wear gloves and goggles; liquid R-410A hitting skin boils at –55 °C, causing instant frostbite.
Electrical Requirements and Circuit Protection

Central air conditioners live on dedicated circuits. Units 3 tons and up usually demand 240 V, 30-40 A breakers. Check the nameplate for Minimum Circuit Ampacity (MCA) and Maximum Fuse Size. Use copper conductors sized per NEC Table 310—#10 AWG for 30 A, #8 AWG for 40 A in lengths under 70 ft. Install a fusible disconnect within sight of the condenser so technicians can kill power while servicing. Inside, land thermostat wires on a low-voltage board fused at 3 A; this tiny fuse saves control boards from shorts caused by a squeezed wire staple. Ground both indoor and outdoor cabinets to the service ground rod; stray voltage can pit aluminum fins in months. Do not backfeed off a clothes-dryer circuit or share neutrals with lighting—common DIY shortcuts that trigger nuisance trips every storm. Finally, label the breaker “AC CONDENSER” in plain print; future electricians, and your own tired self at midnight, will thank you.
Need a complete system? Discover R-32 AC and air handler packages for efficient airflow and easy installation.
Testing, Calibration, and First-Run Checklist
With ducts sealed, lines evacuated, and power on, it is time for the moment of truth. Follow this ordered checklist:
-
Static pressure test: <0.5 in. w.c. across the coil.
-
Supply temperature split: 16 – 22 °F between return and closest supply register after 15 min run.
-
Superheat/subcooling: Match manufacturer chart for current outdoor temperature.
-
Airflow measurement: 350 – 400 CFM per ton using a flow hood or pitot traverse.
-
Thermostat calibration: Verify displayed room temp with a calibrated digital thermometer; adjust up to 2 °F if needed.
-
Condensate drain check: Pour a cup of water into the pan; it should empty within 60 seconds.
-
Lock-out refrigerant caps: Hand-tight plus a quarter-turn with a torque wrench to keep kids (and curious adults) out.
Document every reading on a startup sheet and tape a copy to the air handler door. Those numbers act like a “health record,” letting future techs spot drift before failure. Skipping this step can hide a slow leak or a mis-wired blower motor for years—until the first 100 °F day crashes the unit.
Energy Efficiency Upgrades that Pay Off

Energy bills never lie, and they punish sloppy installs. A SEER 16 unit can cut cooling costs by 20 % compared with an older SEER 13 system. Pair it with a smart thermostat that learns occupancy patterns, and you might pocket another 10 %. But hardware is only half the story. Insulate attic ducts to R-8, caulk top plates, and add attic blown-in cellulose to R-38; each task often pays back in two summers. Program the thermostat for 78 °F days, 82 °F away, and 75 °F nights—numbers that balance comfort and compressor runtime. Install a two-stage or variable-speed air handler: low speed handles mild spring evenings with whisper-quiet airflow, then ramps up when July scorches. Low-E window film blocks infrared heat while still letting daylight in, lowering west-facing room loads by up to 20 %. These upgrades are simple enough for most handy homeowners yet form the backbone of professional “whole-house performance” plans that utilities credit with double-digit energy savings.
Common Mistakes and How to Avoid Them
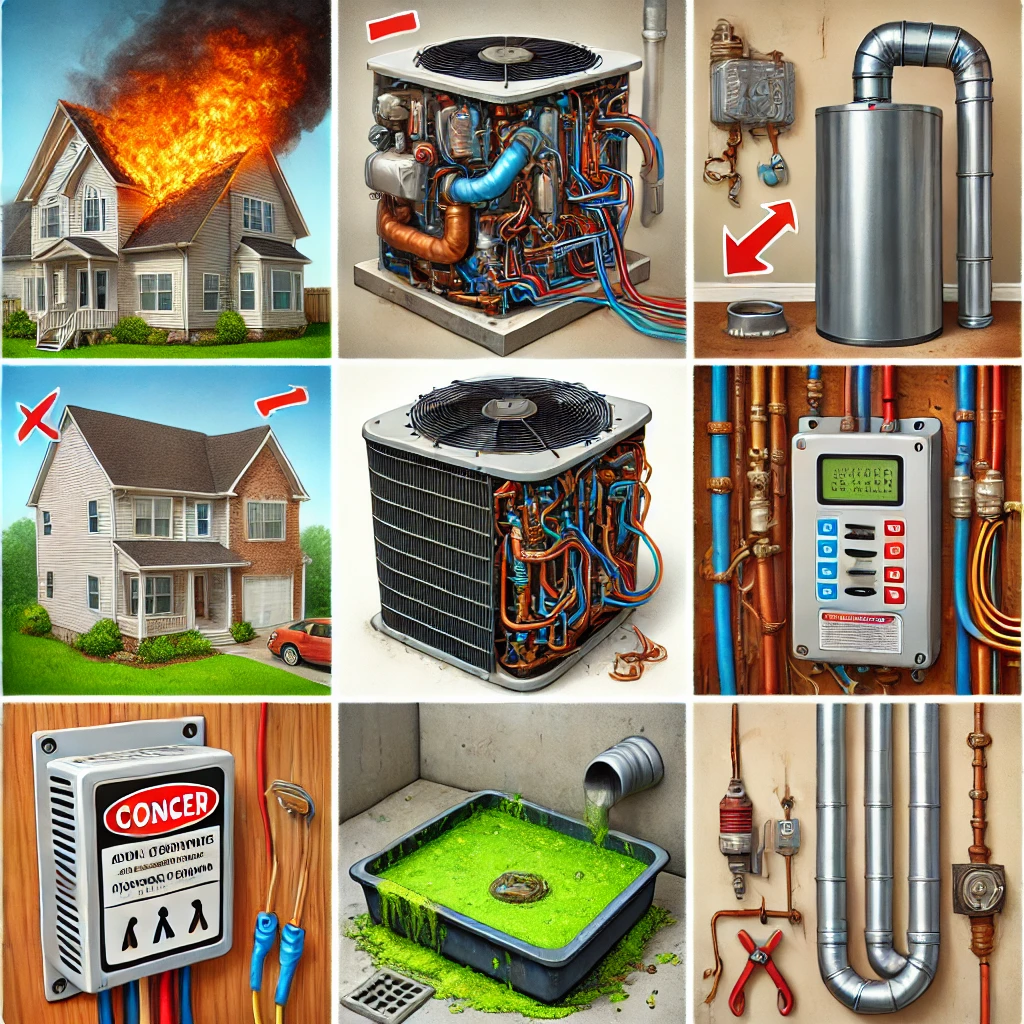
Even pros slip. The three repeat offenders:
-
Guessing tonnage from square feet alone: Leads to short cycling or endless runtime.
-
Ignoring duct leaks: Every one-inch gap at 0.5 in. w.c. leaks about 50 CFM—like leaving a small window open.
-
DIY wiring: A mis-sized breaker might not trip soon enough, letting a loose lug arc and torch the panel.
Other traps include skipping nitrogen while brazing (carbon snakes block TXVs), failing to slope condensate lines (algae clogs overflow pans), and leaving refrigerant caps finger-tight (invites theft or toddler tampering). Awareness is half the cure; a written checklist is the other half. Print the list, sign each box, and file it with the home-owner’s manual.
When to Call a Certified HVAC Technician

Some tasks look easy on YouTube but hide strict laws and serious risks. Handling refrigerant without an EPA 608 license carries federal fines. Opening the sealed electrical compartment voids most warranties unless work is logged by a licensed electrician. Load calculations require access to weather data and ACCA software. Even if you own the tools, having a tech perform final evacuation and charge saves money in the long run, because warranty claims sail through when install sheets show professional signatures. A good rule: If a mistake can start a fire, release refrigerant, or cost more than a month’s mortgage to fix, hire a pro. Homeowners can still save labor by clearing shrubs, pulling permit paperwork, and sealing obvious duct joints with mastic—the parts that do not require a license but still boost performance.
Long-Term Maintenance for 1.5–5 Ton Systems
A central AC is not “set it and forget it.” Every season do this simple loop:
-
Monthly: Replace or wash filters.
-
Spring: Hose off condenser fins from inside out; straighten bent fins with a comb.
-
Summer: Check refrigerant sight-glass or pressures; call a tech if bubbles persist.
-
Fall: Vacuum blower wheel blades; dust reduces CFM and strains the motor.
-
Winter: Cover the condenser top (not sides) to keep leaves out, but leave space for moisture to escape.
Stay cool year-round—discover essential maintenance tips in Air Conditioner Installation & Maintenance.
Every two years a pro pulls an official performance tune-up—analogous to a dental cleaning for compressors. Coil cleaning, contactor inspection, and capacitance tests catch 90 % of possible breakdowns. Treat maintenance like oil changes: cheap insurance for a machine that can cost five figures to replace.
Doing a tune-up or DIY install? Explore compact room ACs and R-32 systems built for new efficiency standards.
Frequently Asked Questions
Q1. How do I know if my current ducts can handle a bigger system?
Measure static pressure with a manometer. If adding airflow would push pressure over 0.5 in. w.c., ducts need enlargement or an extra return.
Q2. Is R-410A being phased out soon?
Newer A2L refrigerants like R-32 are gaining ground, but R-410A parts and service will remain available for many years. No need to rush a replacement.
Q3. Can I install a 5-ton unit on a single-story 2 000 sq ft house?
Probably not; Manual J usually shows 3–4 tons unless insulation is very poor. Oversizing leads to clammy air.
Q4. Does a smart thermostat void warranty if installed later?
No, as long as wiring meets voltage specs and you do not bypass safety switches.
Q5. Why does my new system short-cycle on mild days?
It may be oversized, or the thermostat may be in a draft path. Check both before calling for service.


