Newsletter Subscribe
Enter your email address below and subscribe to our newsletter

HVAC made simple

By Jake Lawson — the HVAC Specialist
One of the biggest misconceptions I see around DIY mini splits is that a system marketed for homeowner installation must also be a simple electrical project. That is not necessarily true. A purpose-built DIY mini split may simplify the refrigerant connection, especially when it uses an approved factory-prepared quick-connect line set, but the electrical side of the installation remains a completely separate consideration.
Depending on the exact mini split, you may need a dedicated branch circuit, correctly sized breaker or fuse, properly sized conductors, an outdoor disconnect, grounding, suitable conduit or cable, communication wiring between the indoor and outdoor units, surge protection, and compliance with applicable electrical and building codes. Some of that work can involve opening the home’s electrical panel and installing a new circuit, which is a very different level of risk from mounting an indoor air handler or routing a condensate drain.
That’s why I tell homeowners to divide a DIY mini-split installation into separate jobs rather than treating the entire project as one package. You might be completely comfortable mounting the equipment and routing a factory-prepared line set while still making the sensible decision to have a licensed electrician supply and connect the electrical circuit.
The most important rule is simple: never select your breaker, wiring or disconnect based solely on the mini split’s advertised BTU capacity. Read the nameplate and the electrical requirements in the installation manual for the exact model you are installing.
Search online for “what breaker does a mini split need?” and you’ll see plenty of simple answers. Unfortunately, mini splits don’t all have the same electrical requirements. Two systems with apparently similar cooling capacities can have different voltage requirements, minimum circuit ampacities and maximum permitted overcurrent protection.
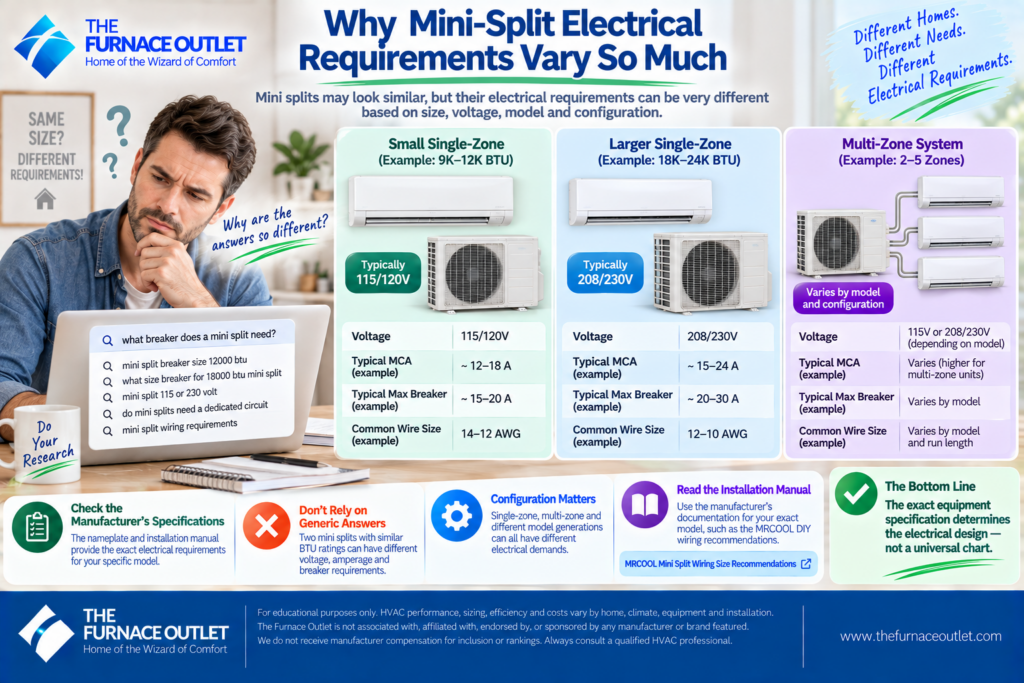
Some smaller residential systems operate at approximately 115/120 volts, while many larger mini splits use approximately 208/230 volts. Multi-zone equipment can have still different electrical demands. The outdoor condenser is commonly the primary power connection on ductless systems, with the indoor unit receiving power and/or communication through wiring connected to the outdoor equipment, but the exact architecture varies by manufacturer and model.
Current MRCOOL DIY documentation demonstrates why homeowners should avoid guessing. Its published wiring recommendations show different DIY models with different voltages, Minimum Circuit Ampacity values, maximum breaker sizes and recommended wire sizes. Even within one manufacturer’s DIY product family, those specifications change by model and generation.
MRCOOL Mini Split Wiring Size Recommendations
The takeaway isn’t that you should memorize a table of breaker sizes. It’s that the exact equipment specification determines the electrical design.
Before buying electrical components, I would locate the electrical data in two places: the outdoor unit’s rating/nameplate and the installation documentation for the exact model. Those sources may list voltage, frequency, phase, Minimum Circuit Ampacity (MCA) and Maximum Overcurrent Protection (MOCP or MOP), along with manufacturer-specific conductor and wiring requirements.
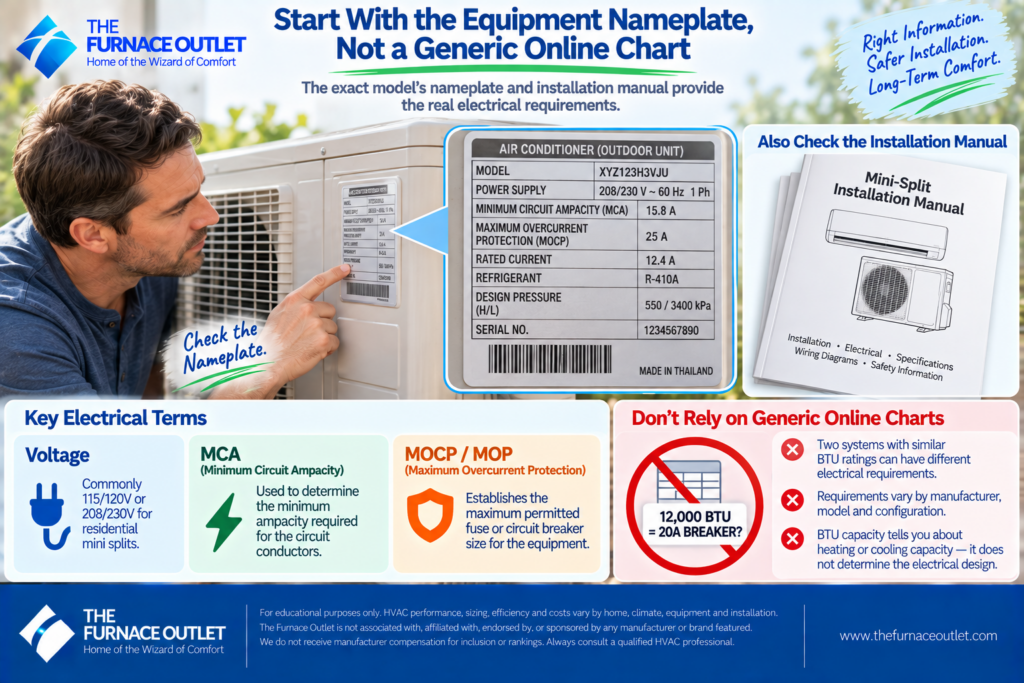
These terms can look unnecessarily technical at first, but they serve different purposes. MCA is used when determining the minimum ampacity required for the circuit conductors. MOCP/MOP establishes the maximum permitted overcurrent protective device for the equipment. Those numbers should not simply be treated as interchangeable values.
Daikin documentation, for example, instructs installers to size wiring to carry the MCA shown on the equipment rating plate and states that the fuse or circuit breaker should not exceed the equipment’s maximum overcurrent protection value. It also directs installers to follow the applicable electrical code and local requirements.
Daikin electrical and control wiring guidance
This is one reason a rule such as “a 12,000-BTU mini split uses this breaker” isn’t reliable enough for an actual installation. BTU capacity tells you about heating or cooling capacity. It does not, by itself, tell you everything required to design the branch circuit.
The circuit breaker protects the electrical circuit against overcurrent conditions. For a mini split, however, selecting that breaker isn’t simply a matter of looking at the appliance’s normal running amperage and choosing the next common breaker size. Air-conditioning and heat-pump equipment includes compressors and motors with electrical characteristics accounted for in equipment ratings and electrical-code requirements. This is why manufacturers provide MCA and maximum overcurrent protection information.
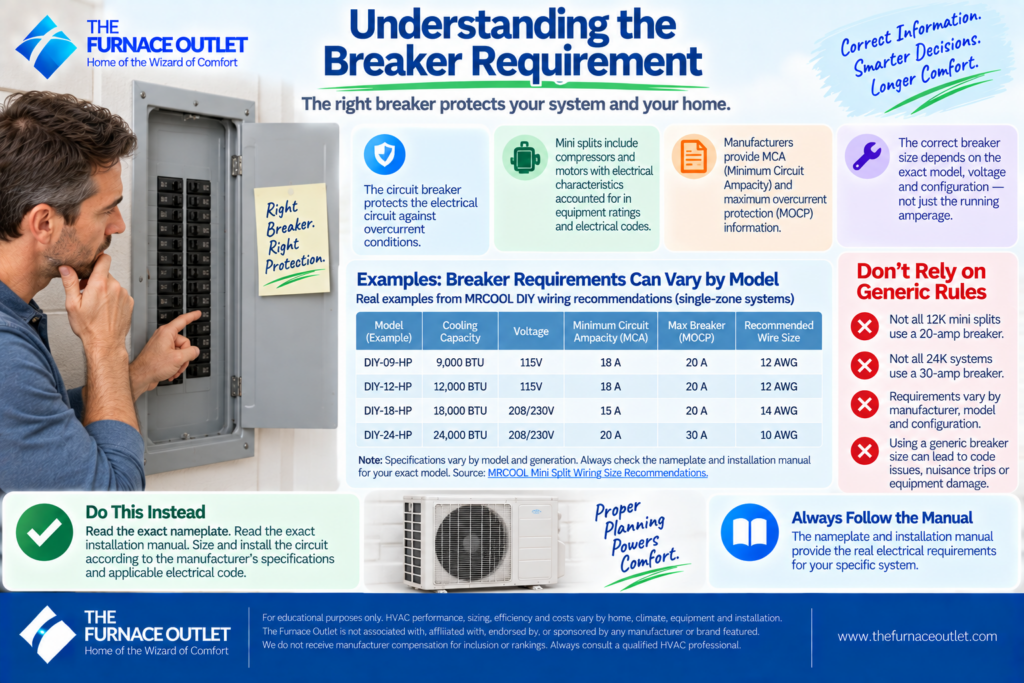
For example, MRCOOL’s current wiring recommendations illustrate just how much model-specific variation exists. Certain listed 115-volt DIY models have an MCA of 18 amps and a maximum 20-amp breaker, while other models in its published table have different MCA and maximum-breaker values. Larger and multi-zone systems can require considerably larger circuits.
I would therefore avoid publishing or relying on a blanket statement such as “all 12K mini splits need a 20-amp breaker” or “all 24K systems need a 30-amp breaker.” Those shortcuts can become outdated or simply be wrong for the equipment sitting in front of you. Read the exact nameplate. Read the exact manual. Then size and install the circuit according to those specifications and applicable code.
For typical permanently installed mini-split equipment, you should expect the electrical installation to involve a dedicated branch circuit sized for the equipment, subject to the manufacturer’s requirements and the electrical code applicable where the system is installed.
A dedicated circuit means the mini split isn’t simply sharing an ordinary household circuit with lights, receptacles or unrelated appliances. That matters because HVAC equipment can represent a significant electrical load and has specific overcurrent-protection requirements.
The circuit generally originates at the home’s electrical service or distribution panel, passes through the appropriate breaker, continues toward the outdoor equipment and incorporates the required disconnecting means. The exact arrangement depends on the system and jurisdiction.
This is also where I start asking homeowners whether DIY electrical work is really worth pursuing. Installing a mounting bracket is one thing. Working inside an energized service panel presents potentially lethal electrical hazards. If you’re not trained and legally permitted to perform that work, this is where the electrician should take over.
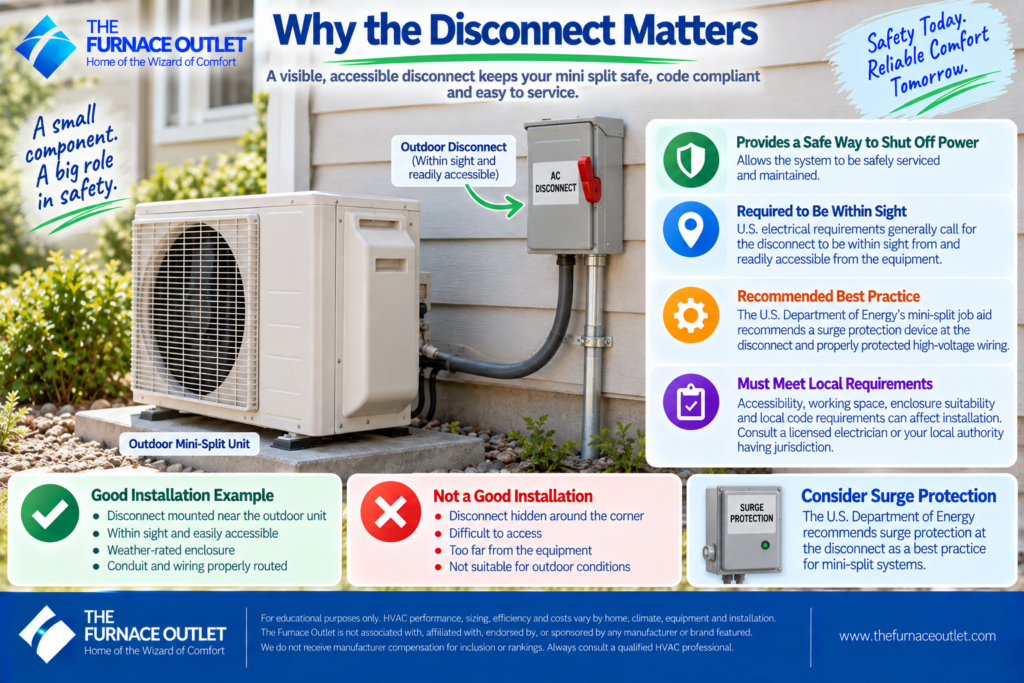
The outdoor disconnect is one of the most visible pieces of a typical mini-split electrical installation. You’ll often see a small weather-resistant enclosure mounted near the outdoor condenser. Its purpose is important: it provides a means of disconnecting power so equipment can be serviced safely. The applicable U.S. electrical requirements generally call for the disconnecting means for air-conditioning and refrigerating equipment to be within sight from and readily accessible from the equipment, subject to the code’s provisions and exceptions.
The U.S. Department of Energy’s mini-split installation job aid similarly shows system wiring running to an electrical disconnect within sight of the outdoor unit. It also recommends surge protection at the disconnect as a best practice and calls for high-voltage wiring to be protected appropriately.
U.S. Department of Energy Mini-Split Installation Job Aid
Don’t interpret “within sight” as permission to mount the disconnect anywhere that happens to be nearby. Accessibility, working space, enclosure suitability and local requirements can all affect the installation. Your electrician or local authority having jurisdiction can determine what is required at your property.
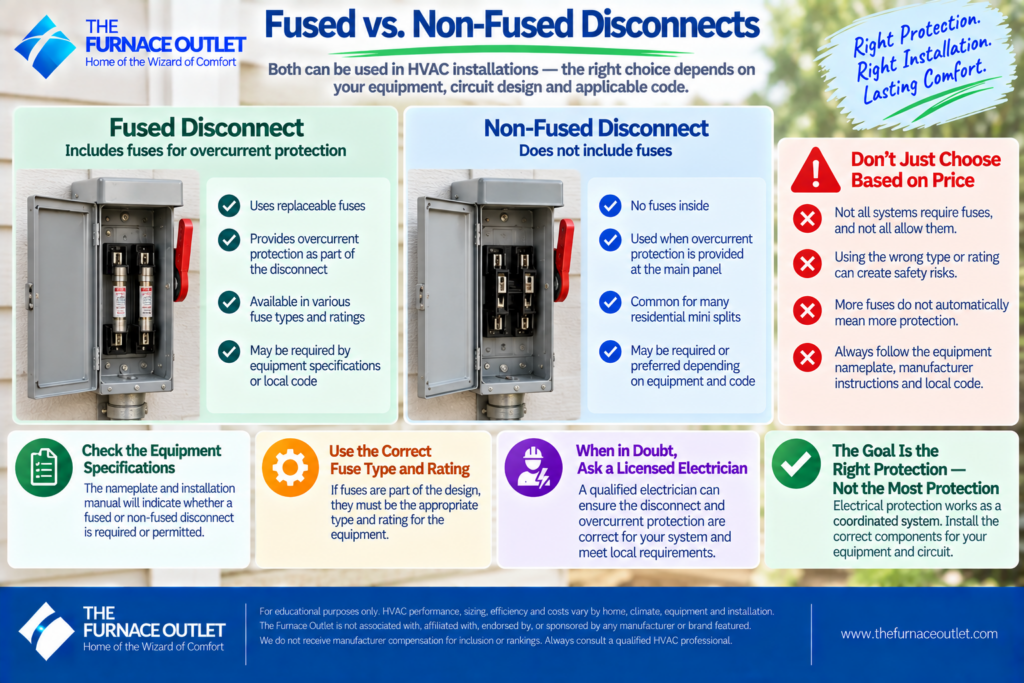
Homeowners shopping for components quickly discover that HVAC disconnects are available in fused and non-fused versions. That can create another temptation to choose based on price or whatever happens to be available at the hardware store. Don’t. Whether the installation requires or permits a fused or non-fused disconnect depends on the equipment specifications, circuit design and applicable code. The equipment nameplate may specify maximum fuse or circuit-breaker protection, and the manufacturer may provide additional instructions about the disconnecting means.
If fuses are part of the design, they also need the appropriate type and rating. You shouldn’t assume that installing additional fuses automatically makes the system safer. Electrical protection works as a coordinated system, and changing one part without understanding the entire circuit can create problems rather than solve them.
This is another area where a licensed electrician earns their fee. The objective isn’t to install the greatest possible number of protective devices; it is to install the correct protection for the equipment and circuit.
This may be the most common electrical question surrounding DIY mini splits, and it is another one where I don’t recommend starting with a universal answer. Wire size depends on the equipment’s required circuit ampacity, conductor material and insulation rating, installation method, applicable electrical code, terminal requirements, circuit length and other conditions that may require adjustment. The equipment’s MCA is an important starting point, but it isn’t the only consideration involved in a compliant branch-circuit installation.
Daikin’s electrical guidance specifically instructs installers to size wiring to carry the MCA on the rating plate and also notes considerations including conductor temperature rating and voltage drop. MRCOOL likewise publishes model-specific minimum and preferred wire sizes for its current DIY equipment rather than one universal wire recommendation for every mini split. So if someone tells you, “Just buy 12-gauge wire because that’s what mini splits use,” my next question would be: Which mini split?
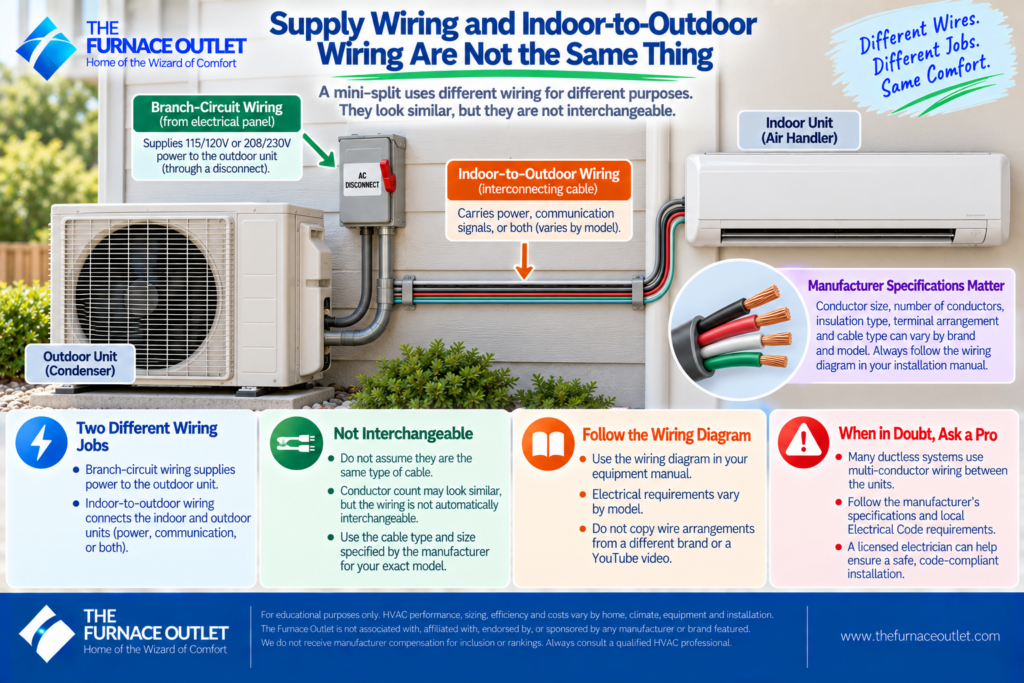
Another source of confusion is that a mini-split installation can contain different types of electrical wiring serving different purposes. The branch-circuit wiring supplies power from the electrical system to the HVAC equipment. Separate wiring may then connect the outdoor condenser to the indoor air handler. Depending on the system, that interconnecting cable can carry power, communication signals or both.
Those conductors are not automatically interchangeable with ordinary residential cable simply because the conductor count looks similar. Manufacturers can specify conductor size, number of conductors, insulation type, terminal arrangement, cable type and installation method. Carrier notes that many ductless systems use multi-conductor wiring between the units and emphasizes that exact electrical specifications vary by model. Carrier’s installation guidance also states that electrical connections should follow the model specifications and local electrical requirements.
Carrier Ductless Mini-Split Installation Guide
Follow the wiring diagram supplied with your equipment rather than copying the wire arrangement from a YouTube installation of a different mini split.
Wire color can help identify conductors, but it should never replace the equipment wiring diagram and terminal labels. This is particularly important with indoor-to-outdoor mini-split connections. A cable may have conductors in familiar colors, yet the manufacturer may assign those conductors to terminals differently from another model or generation.
MRCOOL’s installation documentation explicitly warns that wire colors for a particular series or model may differ from previous models, other series and general conventions. It instructs installers to follow the provided wiring diagrams and applicable regulations. That warning is worth remembering because a mini split can contain sensitive electronic controls and communication circuits. Incorrect connections aren’t just a matter of the unit refusing to start; miswiring can potentially damage components or create a safety hazard.
Match terminal to terminal according to the exact wiring diagram. Don’t rely on memory, another manufacturer’s diagram or a video’s color sequence.
Proper equipment grounding is an essential part of the installation. If an electrical fault energizes metal components, the grounding path is part of the protection system intended to help overcurrent devices operate as designed and reduce shock risk. The grounding conductor must therefore be installed and connected according to the equipment instructions and applicable electrical requirements. A mini split being marketed as “DIY” doesn’t change that obligation.
I would be especially cautious if an installation video treats grounding as an afterthought or suggests modifying a cord, eliminating a conductor or improvising a grounding connection. Electrical safety features are not optional accessories. The same principle applies to outdoor-rated enclosures, fittings and wiring methods. Components exposed to weather need to be suitable for that environment and installed accordingly.
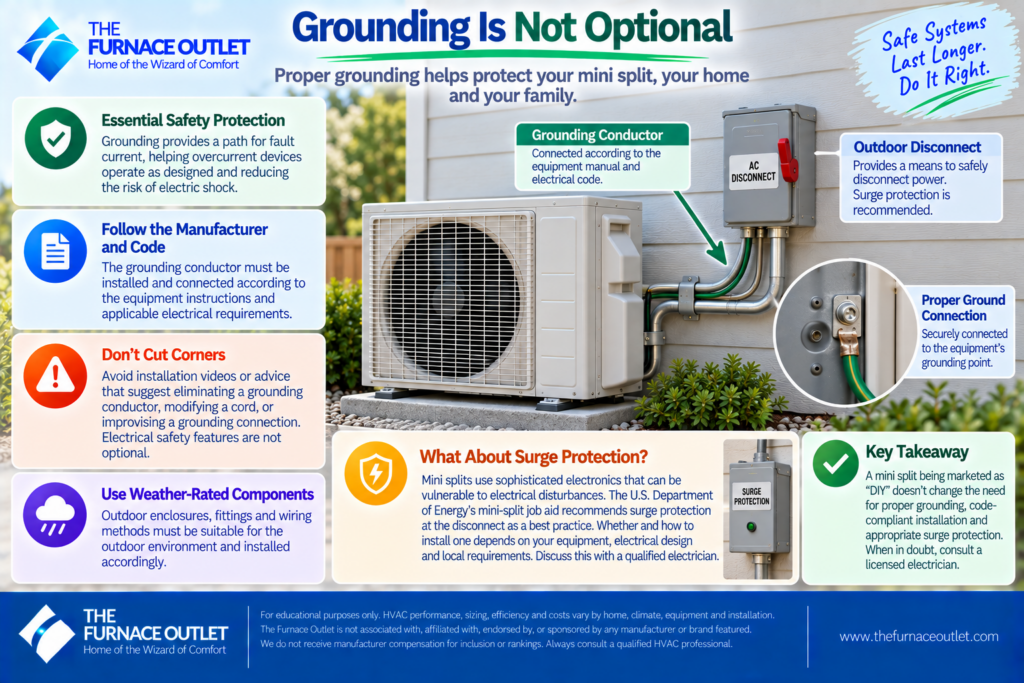
Modern mini splits are electronically sophisticated appliances. Inverter-driven compressors, control boards, sensors and communication electronics can all be vulnerable to electrical disturbances. The Department of Energy’s mini-split job aid identifies a surge-protection device at the disconnect as a best practice. Whether and how one should be installed on your particular system depends on the equipment, surge-protection device, electrical design and local requirements.
I consider surge protection worth discussing with the electrician, particularly where the electrical supply is prone to disturbances, but I wouldn’t install a random device simply because its packaging says “HVAC surge protector.” Compatibility, voltage configuration, connection method and installation location matter. Protection is useful only when it is correctly selected and installed.
Before purchasing a mini split, check whether your electrical panel can actually accommodate the required circuit. Having one empty breaker space doesn’t automatically answer that question. An electrician may need to evaluate available panel capacity, service capacity, existing loads, breaker compatibility and the condition of the electrical system.
Older homes can complicate matters. You might discover an outdated panel, limited service capacity, previous modifications or a lack of suitable spaces. In some installations, adding the HVAC equipment may be straightforward. In others, electrical upgrades can become a meaningful part of the project’s total cost. That’s why I recommend considering the electrical side before ordering the mini split, particularly with larger or multi-zone equipment.
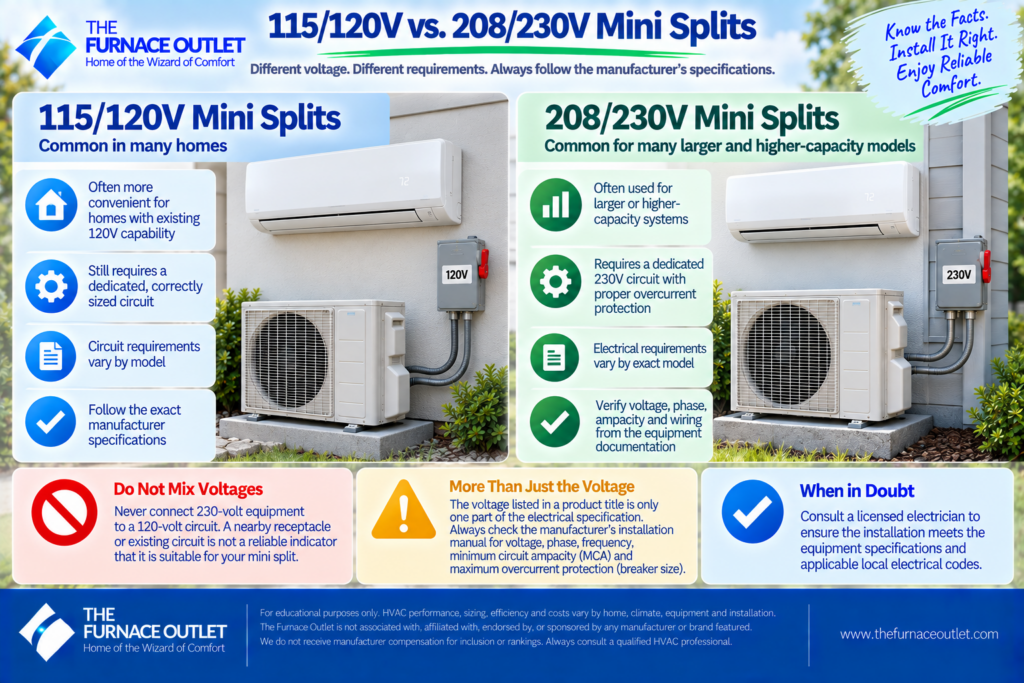
Homeowners sometimes assume that a 115-volt system is inherently easier to install than a 230-volt system. From an equipment-purchasing perspective, a lower-voltage model may fit certain homes more conveniently, but it doesn’t eliminate the need for a correctly designed circuit. MRCOOL’s current DIY specifications include both 115V and 230V equipment, with circuit requirements varying by exact model. The voltage printed in a product title should therefore be treated as one piece of the electrical specification, not as the complete installation plan.
Never attempt to connect 230-volt equipment to a 120-volt circuit or assume a receptacle or existing circuit is suitable because it happens to be nearby. Verify voltage, phase, frequency, ampacity, overcurrent protection and wiring requirements from the equipment documentation.
Multi-zone mini splits can significantly increase the importance of electrical planning because larger outdoor condensers may have greater electrical requirements than small single-zone equipment. Again, don’t estimate those requirements by adding the BTU ratings of the indoor heads. The outdoor equipment’s electrical data controls the supply requirements.
MRCOOL’s published DIY wiring table demonstrates the variation clearly: its listed multi-zone models span multiple MCA values and maximum breaker ratings depending on equipment size and generation. If you’re considering a multi-zone system, I would have the electrical requirements reviewed before ordering equipment. That gives you an opportunity to identify panel limitations or additional electrical work before several boxes of HVAC equipment arrive in the driveway.
One of the problems with internet DIY advice is that electrical requirements are often discussed as though they are identical everywhere. They aren’t. The National Electrical Code provides an important framework in the United States, but state and local jurisdictions adopt and enforce electrical codes, sometimes with amendments and different permitting or licensing requirements. Your authority having jurisdiction ultimately determines what is required where the equipment is being installed.
A manufacturer describing its mini split as DIY-friendly doesn’t override those requirements. The product may be designed so homeowners can complete certain mechanical or refrigerant-connection steps, while local rules may still require licensed electrical work or an electrical permit and inspection. Before beginning the project, check with the local building or electrical authority rather than assuming that an online installation video represents what is permitted in your location.
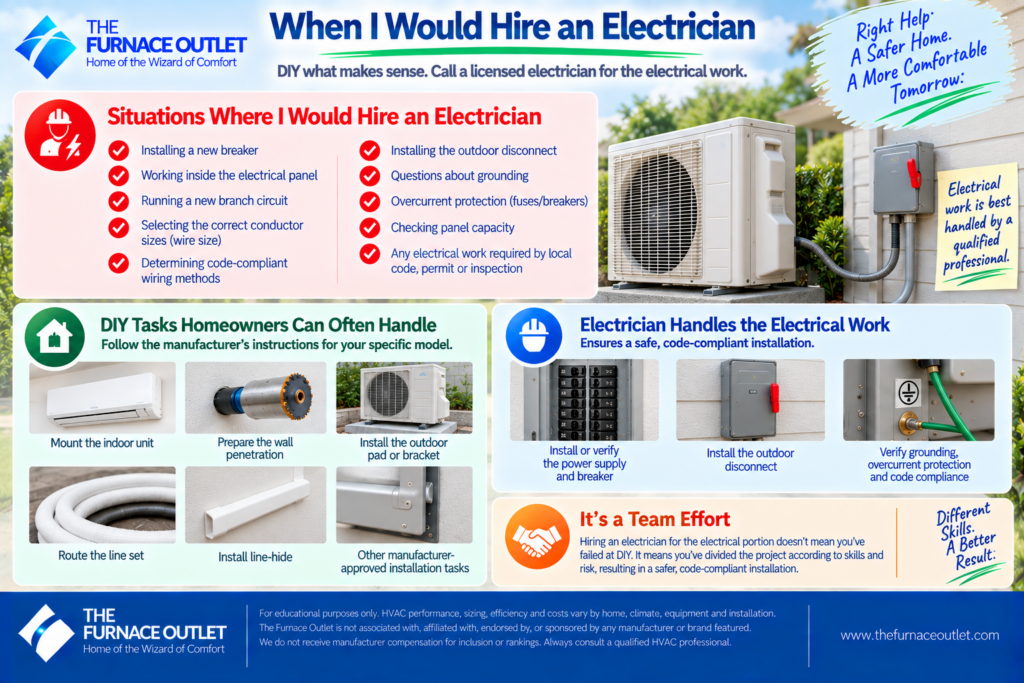
For many homeowners installing a DIY mini split, this is where I would draw a sensible boundary. If the project requires installing a new breaker, working inside the service panel, running a new branch circuit, selecting conductor sizes, determining code-compliant wiring methods, installing the outdoor disconnect or resolving questions about grounding, overcurrent protection or panel capacity, hiring a licensed electrician is a very reasonable decision.
That doesn’t mean you’ve failed at DIY. It means you’ve divided the project according to skills and risk. You can potentially mount the indoor unit, prepare the wall penetration, install the outdoor pad or bracket, position the condenser, route the line set, install line-hide and perform other manufacturer-approved homeowner tasks. The electrician can then install or verify the power supply and disconnect.
MRCOOL’s own multi-zone DIY documentation provides a useful example of that distinction: it says a certified electrician is required to supply power from a disconnect of the appropriate rating for the equipment covered by that manual. A product can therefore legitimately be DIY-oriented while still requiring professional electrical involvement.
Before equipment arrives, I would confirm the exact model number and read its installation manual from beginning to end, then locate the nameplate electrical specifications and identify the required voltage, phase, MCA and maximum overcurrent protection. I would determine whether a dedicated circuit is required, verify the appropriate conductor and wiring method, identify the specified disconnect arrangement, review grounding requirements and understand how the indoor and outdoor units are electrically interconnected.
I would also check whether the existing service panel has suitable capacity and compatible breaker space, whether outdoor wiring and enclosures need particular environmental ratings, whether surge protection is recommended, and whether permits or inspections are required. Finally, I would decide in advance which parts of the project I can legally and competently perform and which parts belong with a licensed electrician.
Doing that homework before purchasing the equipment is far easier than discovering halfway through installation that the circuit, panel or disconnect isn’t suitable.
Quick-connect technology has made certain mini-split installations far more approachable for homeowners. On qualifying systems, it can eliminate conventional field flaring and evacuation and reduce the specialized refrigerant work involved in installation. But electricity hasn’t somehow become DIY simply because the refrigerant connection has.
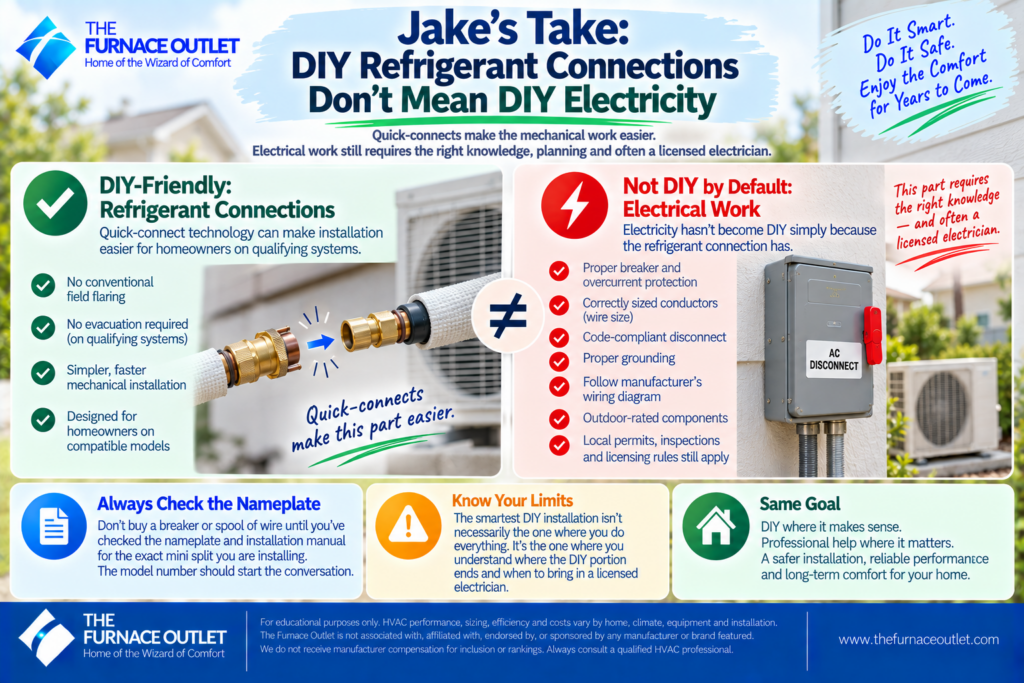
A mini split remains permanently installed HVAC equipment with meaningful electrical requirements. The breaker must be appropriate. Conductors must be correctly selected. The disconnect must meet the applicable requirements. Grounding matters. Wiring between indoor and outdoor equipment must follow the manufacturer’s diagram. Outdoor components must be suitable for their environment, and local permits, inspections and licensing rules still apply.
The smartest DIY installation isn’t necessarily the one where the homeowner performs every single task. It’s the one where the homeowner understands where the DIY portion ends. If you’re comfortable with the mechanical work but aren’t trained to install a new HVAC circuit, let an electrician handle the electrical portion. You can still save labor and participate substantially in the project without taking unnecessary risks around energized equipment.
Most importantly, don’t buy a breaker or spool of wire until you’ve checked the nameplate and installation manual for the exact mini split you are installing. The model number—not a generic BTU chart, forum post or installation video—should start the conversation.
What size breaker does a mini split need?
There is no universal mini-split breaker size. Requirements vary by exact model, voltage and electrical characteristics. Check the equipment’s nameplate and installation manual for its MCA and maximum overcurrent protection, then follow applicable electrical-code requirements.
Does a mini split need its own dedicated circuit?
Permanently installed mini-split equipment commonly uses a dedicated branch circuit designed for the equipment’s electrical requirements. The exact circuit arrangement should follow the manufacturer documentation and applicable local electrical code.
Do all mini splits use 230 volts?
No. Residential mini splits are available with different voltage requirements. Some smaller systems are designed for approximately 115/120V service, while many others use approximately 208/230V. Verify the exact model rather than assuming voltage from capacity alone.
Can I use a bigger breaker so it doesn’t trip?
You should never increase breaker or fuse size beyond what the equipment and applicable electrical requirements permit simply to prevent nuisance tripping. Repeated trips can indicate an electrical or equipment problem that needs diagnosis.
What does MCA mean on a mini split?
MCA means Minimum Circuit Ampacity. It is an important value used in determining the required conductor ampacity for the equipment. It should not be confused with the maximum permitted breaker or fuse rating.
What does MOCP or MOP mean?
Maximum Overcurrent Protection, sometimes shown as MOCP or MOP, identifies the maximum overcurrent protective-device rating permitted for the equipment. The manufacturer’s rating information and applicable electrical code should guide the final installation.
Does a mini split need an outdoor disconnect?
U.S. electrical requirements generally require a disconnecting means for air-conditioning and refrigerating equipment, with requirements governing its location and accessibility. NFPA’s NEC material describes the disconnect as being within sight from and readily accessible from the equipment, subject to specified provisions and exceptions.
Should I install surge protection for my mini split?
It can be worth considering because modern inverter mini splits contain sensitive electronics. The U.S. Department of Energy’s mini-split installation job aid describes surge protection at the disconnect as a best practice. Selection and installation should be appropriate for the particular electrical system and equipment.
Can I install the mini split myself and hire an electrician only for the wiring?
For a system designed for homeowner installation, that can be a practical approach where permitted. You may be able to complete manufacturer-approved mechanical installation tasks while a qualified electrician installs the circuit, breaker, disconnect and other electrical components. Always verify the equipment instructions and local requirements.
When should I definitely call an electrician?
If you are uncertain about panel capacity, breaker selection, conductor sizing, grounding, disconnect requirements, wiring methods or electrical codes—or if the work requires opening or modifying the service panel—professional electrical help is the safer route. Carrier likewise identifies electrical connections as a significant safety consideration in mini-split installation and recommends professional installation.
Editorial Disclosure: The Furnace Outlet is not associated with, affiliated with, endorsed by, or sponsored by any manufacturer or brand mentioned in this article. We do not receive manufacturer compensation for inclusion or rankings. Electrical specifications and installation requirements vary by model and jurisdiction. Always follow the current manufacturer’s documentation for your exact equipment and applicable electrical codes, permits and inspection requirements