Newsletter Subscribe
Enter your email address below and subscribe to our newsletter

HVAC made simple

By Jake Lawson — the HVAC Specialist
When homeowners hear the words DIY mini split, the first financial advantage that usually comes to mind is eliminating the HVAC contractor’s installation bill. That can certainly be an important source of savings, but it doesn’t mean the price printed on the mini-split box represents the total cost of the project. A complete installation can include the equipment itself, installation tools, mounting materials, electrical work, line-set accessories, condensate materials, permits and, in some situations, professional assistance.
The other complication is that two homes installing the same mini split can end up with very different project costs. One homeowner may already have a suitable electrical circuit, own the necessary tools and have a straightforward installation through an exterior wood-framed wall. Another may need a new 230-volt circuit, a longer line-set configuration, masonry drilling, an outdoor mounting bracket and professional electrical work. Comparing only the equipment prices would make those two projects look identical when they clearly aren’t.
For that reason, I prefer to think about mini-split installation cost in four separate buckets: equipment, mechanical installation materials and tools, electrical work, and professional labor. Once you understand those categories, it becomes much easier to compare a genuine DIY project with a conventional professionally installed system without relying on a misleading one-number estimate.
The mini split itself is usually the largest individual purchase in a DIY project, but equipment prices vary enormously. Capacity, efficiency, heating capability, compressor technology, number of indoor zones, controls, warranty terms and product family can all influence what you pay.
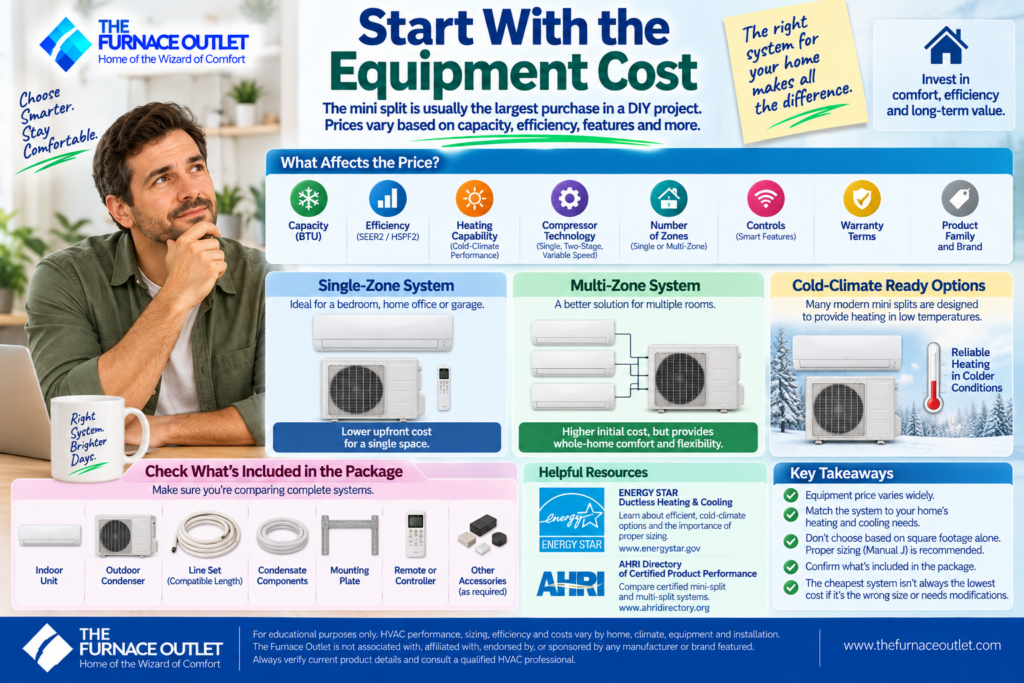
A small single-zone unit intended for a bedroom, home office or garage represents a very different project from a multi-zone heat-pump system serving several major rooms. Cold-climate performance can also matter. ENERGY STAR notes that many modern certified mini splits are designed to provide heating in cold conditions, while proper sizing remains essential to achieving the expected comfort and performance.
ENERGY STAR — Ductless Heating & Cooling
This is why I wouldn’t select equipment simply by finding the least expensive DIY mini split in the capacity range that appears appropriate. First determine the heating and cooling requirement, climate demands and number of zones. ENERGY STAR recommends proper HVAC sizing and points homeowners toward Manual J load calculations rather than selecting equipment solely from square footage.
You should also confirm that you’re comparing complete systems. A low advertised price may not necessarily represent every component needed for your particular installation. Determine whether the package includes the indoor unit, outdoor condenser, compatible line set, condensate components, mounting plate, remote or controller and other required accessories.
For performance comparisons, the AHRI Directory can also be useful because its certification programs include variable-speed mini-split and multi-split air conditioners and heat pumps.
AHRI Directory of Certified Product Performance — User Guide
The cheapest equipment purchase isn’t necessarily the lowest-cost project if the system is incorrectly sized or requires expensive modifications to make it suitable for the home.
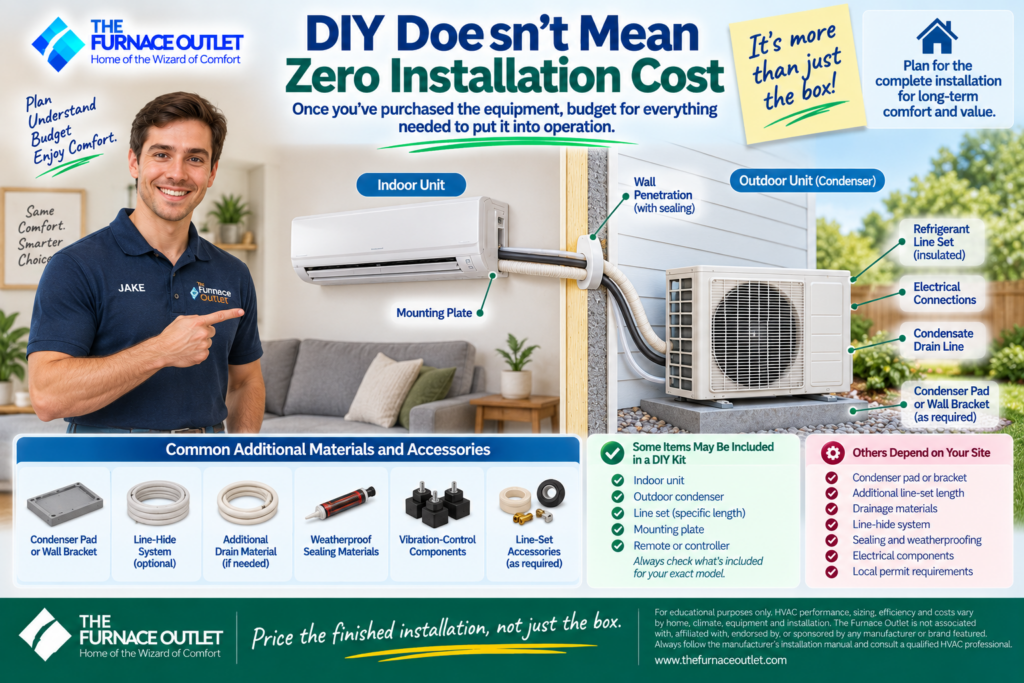
Once you’ve purchased the equipment, start building a second budget for everything needed to put it into operation. A typical wall-mounted installation can involve an indoor mounting plate, wall penetration, refrigerant line set, condensate drain, interconnecting wiring and an outdoor condenser mounted on a suitable base or bracket. A U.S. Department of Energy project description of a ductless installation similarly identifies the outdoor unit, indoor fan coil, refrigerant lines, electrical connections and condensate drainage as basic elements of a mini-split installation.
Some of these components may already be supplied with a purpose-built DIY kit, while others depend entirely on your installation site. You might need a condenser pad, wall bracket, line-hide system, additional drain material, weatherproof sealing materials, vibration-control components or manufacturer-approved line-set accessories. Those smaller purchases can accumulate quickly. Instead of treating them as unexpected expenses, inspect the installation site and inventory the equipment package before starting.
My rule is simple: price the finished installation, not just the box.
Tools are one of the most misunderstood parts of DIY mini-split economics because the answer depends heavily on what you already own. A homeowner with a well-equipped workshop may already have a drill/driver, level, tape measure, screwdrivers, ladder, stud finder, safety glasses and adjustable wrenches. In that case, the incremental tool expense could be relatively modest.
Someone starting with almost nothing may need to purchase or borrow considerably more. A properly sized hole saw and arbor may be needed for the wall penetration, while masonry construction can require completely different drilling equipment. Installation may also require model-specific tools identified by the manufacturer.
Before buying anything, read the exact installation manual from beginning to end and make a tool list from the actual procedure. MRCOOL’s current DIY guidance, for example, walks homeowners through preparation, mounting, condenser placement, line connections and system testing, while also emphasizing that electrical work should be performed by a licensed electrician.
MRCOOL — DIY Installation Guidance
Don’t automatically add professional refrigeration equipment to your shopping cart simply because you saw it in a conventional mini-split installation video. A purpose-built DIY system may be engineered around a very different connection procedure.

This distinction matters because conventional mini-split installations can involve specialized refrigeration equipment and procedures that a purpose-built DIY system may be designed to avoid. Depending on the system and installation method, professional work can involve evacuation equipment, gauges, refrigerant-handling equipment, tubing preparation tools, leak-testing equipment and other specialized instruments. Buying professional equipment for a single installation can quickly undermine the financial logic of choosing DIY equipment in the first place.
More importantly, owning the tools doesn’t automatically make every refrigeration procedure appropriate for homeowner work. EPA states that Section 608 technician certification applies to activities that could reasonably be expected to violate the integrity of a stationary appliance’s refrigerant circuit. Its guidance specifically identifies activities such as attaching or detaching hoses and gauges, adding or removing refrigerant, adding or removing components, and cutting refrigerant lines.
U.S. EPA — Homeowners and Refrigerant FAQs
So don’t compare DIY and professional installation solely by calculating whether you could buy a vacuum pump and gauges for less than a contractor’s labor charge. The more important question is whether your exact equipment is specifically designed and documented for the homeowner installation method you’re planning to use.
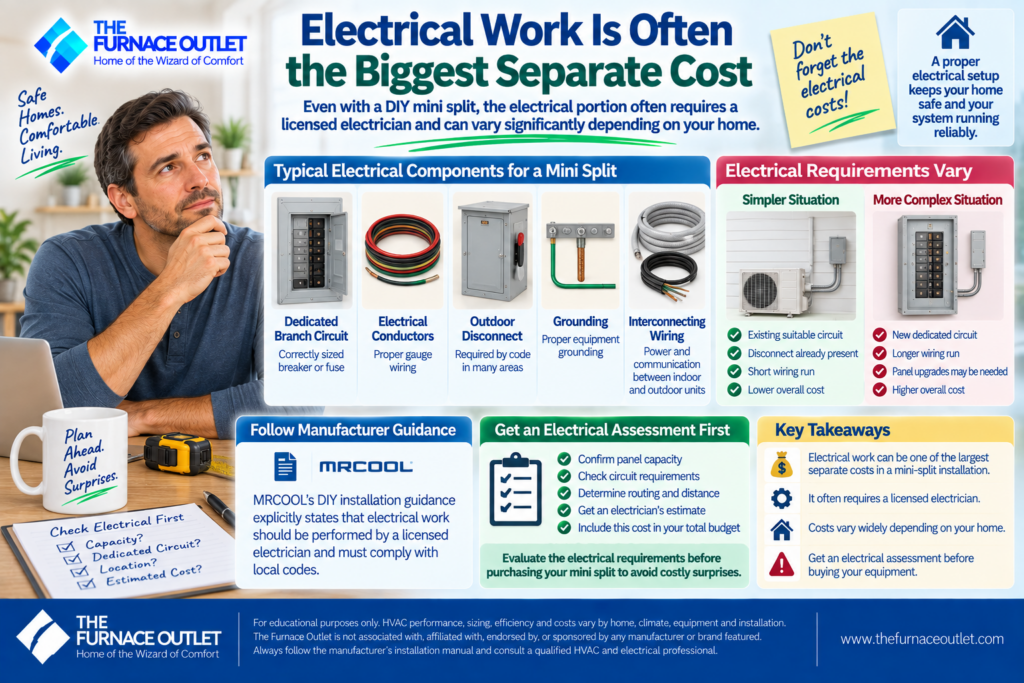
Electrical work deserves its own budget because even a genuine DIY mini split doesn’t automatically make the electrical portion a homeowner project. Depending on the equipment, installation can require a dedicated branch circuit, correctly sized breaker or fuse, conductors, grounding, outdoor disconnect and interconnecting wiring. The existing electrical panel also needs sufficient capacity and a suitable installation path. MRCOOL’s current DIY installation guidance explicitly says that electrical work should be performed by a licensed electrician and that electrical connections should comply with local codes.
The cost can therefore vary dramatically from one house to another. If an appropriate circuit and disconnect are already present near the outdoor-unit location and can legitimately be reused for the new equipment, the electrical portion may be relatively straightforward. If an electrician needs to run a new circuit a considerable distance from the panel, route cable through difficult construction or perform panel-related work, the cost can be substantially higher.
That is why I recommend obtaining an electrical assessment before purchasing the mini split whenever significant electrical work appears likely. You don’t want to select equipment based on its purchase price and discover afterward that the electrical infrastructure creates one of the largest expenses in the project.
The condenser needs a stable installation location with appropriate airflow and service access. Depending on the site, that might mean a ground-level equipment pad or an approved wall-mounting arrangement. A simple ground installation may require only an appropriate base and modest preparation. A wall-mounted condenser can involve brackets, appropriate structural fasteners and more installation labor. Snow-prone areas can introduce additional placement considerations, while roof runoff, vegetation and other obstacles may influence where the equipment can reasonably be located.
The Department of Energy’s ductless installation checklist calls for outdoor units to be accessible for service, free of airflow obstruction and mounted level on an appropriate support such as a bracket or pad. Don’t choose the cheapest condenser location merely because it requires the shortest line-set route. A good installation balances installation cost with airflow, drainage, serviceability and long-term protection of the equipment.
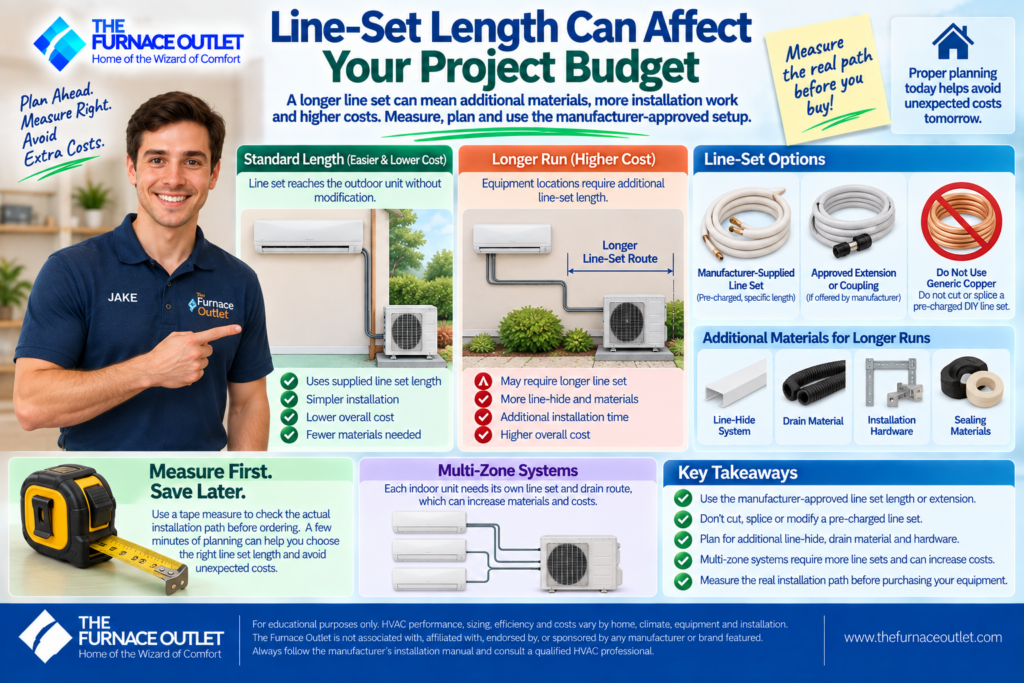
Line-set planning is another area where a seemingly inexpensive installation can become more complicated. Purpose-built DIY systems may use factory-prepared line sets in particular lengths. If the supplied or selected line set reaches the outdoor condenser without modification, installation can remain relatively simple. If your desired equipment locations require additional length, you need to determine whether the manufacturer offers an approved extension or coupling arrangement for your exact equipment.
Don’t assume you can simply buy generic copper, cut a pre-charged DIY line set or splice components together to reduce cost. The manufacturer-approved configuration controls. Longer routing can also increase the amount of line-hide, drain material and installation hardware needed. In multi-zone systems, these costs can multiply because several indoor units may need separate piping and drainage routes.
Measure the real installation path before ordering the equipment. A tape measure used during planning can save considerably more money than it costs.
A straightforward wall-mounted indoor unit on an exterior wall can often use a relatively simple gravity condensate route when the manufacturer’s design permits it. That keeps material and installation complexity relatively low.
Move the indoor unit farther inside the house, however, and condensate management may become more complicated. Longer drainage routes, difficult wall construction or locations where gravity drainage cannot be achieved can require additional planning and potentially additional equipment.
Don’t let a preferred indoor-unit location create an unnecessarily complicated drainage project without considering alternatives. Water produced during cooling needs a reliable path away from the indoor unit, and correcting a poorly planned drain after walls and trim are finished can be far more expensive than designing it properly before installation. This is another reason the lowest initial installation price isn’t necessarily the best installation.
Permit and inspection requirements vary by jurisdiction, project scope and the work being performed. Electrical work in particular can trigger local permit or inspection requirements. Don’t assume that calling a system “DIY” exempts it from local rules. DIY describes who performs certain installation tasks; it doesn’t override electrical codes, building requirements or refrigerant regulations.
Before ordering equipment, check with the authority having jurisdiction for your property. Ask what permits apply to the mechanical and electrical portions of the installation and whether particular work must be completed by licensed professionals. Permit costs may be relatively small compared with the overall project, but discovering the requirement after the installation is finished can create unnecessary expense and inconvenience.

When comparing DIY with professional installation, it is tempting to look at the contractor’s proposal, subtract the retail equipment price and label everything left over “labor.” That isn’t necessarily an accurate comparison. A professional installation price can incorporate system selection, site assessment, equipment procurement, transportation, specialized tools, mounting materials, refrigerant piping, electrical coordination, drainage work, commissioning, labor, insurance, overhead, permitting support and warranty-related responsibilities. Exactly what is included varies by contractor, which is why proposals need to be compared carefully.
Professional installation also becomes more valuable as project complexity increases. Multi-zone systems, long refrigerant runs, difficult electrical work, challenging condensate routing, unusual wall construction and projects requiring conventional refrigerant commissioning can all move the installation farther away from the simple homeowner-friendly scenario.
When obtaining contractor estimates, ask for a clearly defined scope rather than only a total price. Find out whether electrical work is included, who handles permits, what mounting materials are supplied, how condensate will be managed, whether line-hide is included, what commissioning is performed and what labor warranty applies.
DIY versus professional doesn’t have to be an all-or-nothing decision. A homeowner may be able to perform manufacturer-approved mechanical preparation while hiring an electrician for the branch circuit and electrical connection. Depending on the equipment and manufacturer’s instructions, the homeowner might handle planning, indoor mounting, wall penetration, condenser-pad preparation and other permitted DIY tasks while qualified professionals handle work outside that scope.
This approach can preserve part of the labor savings without requiring the homeowner to take responsibility for every trade involved. The important part is defining those responsibilities before the project begins. If an electrician or HVAC contractor will be involved, discuss the planned division of work beforehand rather than assuming a professional will automatically complete or approve work someone else has already performed.
A fair comparison should start with the same comfort objective and properly matched equipment, not simply two unrelated systems at different prices. ENERGY STAR emphasizes proper sizing because equipment that is too large or too small can struggle to provide the intended comfort and performance. For the DIY option, total the equipment, shipping if applicable, tools you genuinely need to acquire, mounting materials, line-set accessories, drainage materials, line-hide, electrical contractor work, permits and any professional assistance. I would also include a contingency for site-specific items discovered during installation.
For the professional option, obtain a written proposal that identifies the equipment, labor, electrical scope, materials, permits, commissioning and warranty responsibilities. Only then are you comparing two completed installations rather than comparing a DIY equipment box with a professionally delivered project.
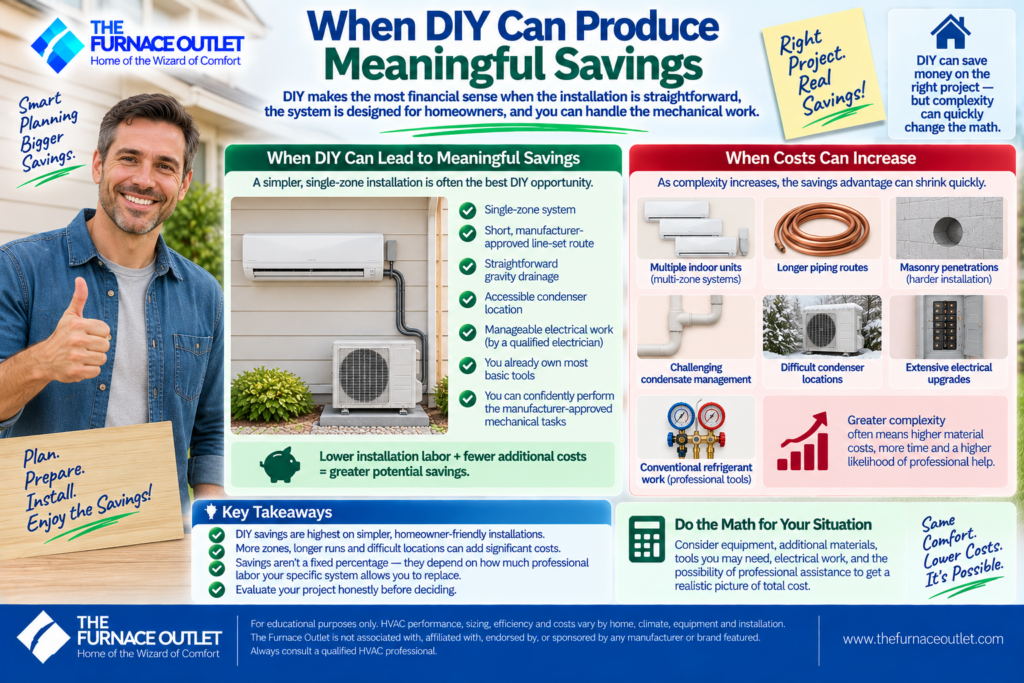
DIY economics are generally most attractive when the installation is mechanically straightforward and the equipment is specifically engineered for homeowner installation. Imagine a single-zone system installed on an exterior wall with a short, manufacturer-approved line-set route, straightforward gravity drainage, an accessible condenser location and manageable electrical work performed by a qualified electrician where appropriate. If the homeowner already owns most basic tools and can confidently perform the manufacturer-approved mechanical tasks, there may be substantial opportunity to reduce installation labor.
The equation changes as complexity increases. Multiple indoor units, long piping routes, difficult condensate management, masonry penetrations, challenging condenser locations, extensive electrical upgrades and conventional refrigerant work all reduce the simplicity advantage. DIY savings therefore aren’t a fixed percentage. They depend on how much professional labor the specific system legitimately allows the homeowner to replace.
There are also situations where paying more upfront for professional installation can be economically rational. If you would need to buy numerous specialized tools, hire professionals for several separate parts of the job and spend substantial time solving a complicated installation, the apparent DIY savings can shrink considerably. The same is true if an installation error could require expensive corrective work.
Professional involvement also becomes important when refrigerant work crosses regulatory boundaries. EPA says Section 608 certification is required for activities reasonably expected to violate the integrity of the refrigeration circuit and restricts the purchase of stationary-equipment refrigerants to appropriately certified technicians or qualifying employers.
U.S. EPA — Refrigerant Sales Restriction
The right financial comparison therefore includes risk and project complexity, not simply hourly labor rates.
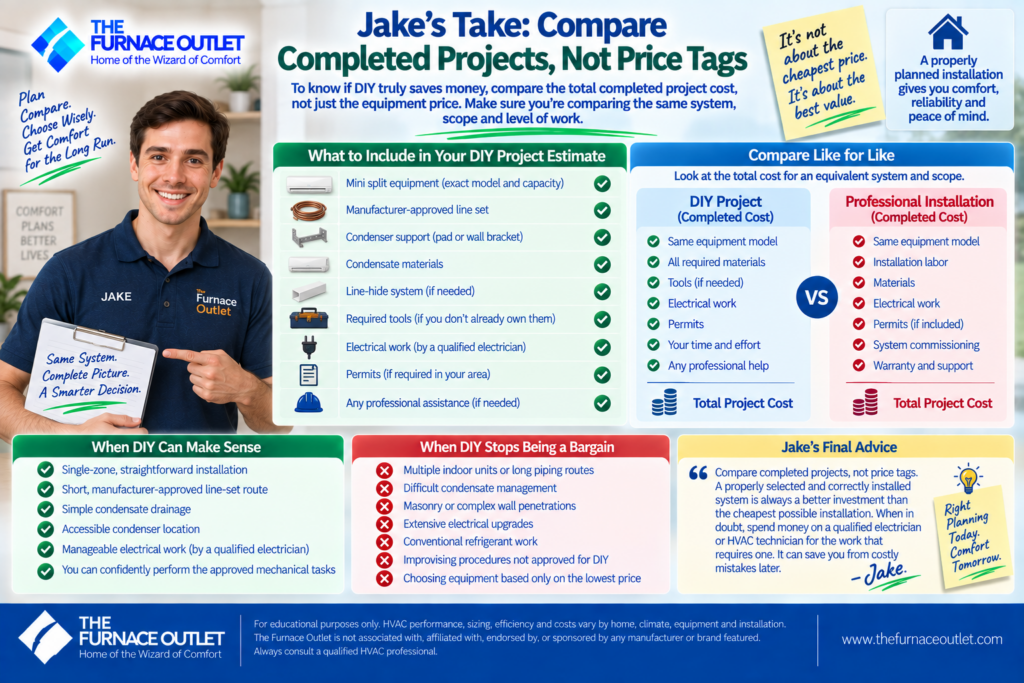
If you’re trying to decide whether DIY installation saves enough money to be worthwhile, don’t compare a $X equipment listing with a $Y contractor quote and assume the difference represents pure savings. Those numbers may describe completely different scopes of work. Build the DIY project on paper first. Include the exact equipment, approved line set, condenser support, condensate materials, line-hide, required tools, electrical work, permits and any professional assistance. Then compare that completed-project estimate with professional proposals covering equivalent equipment and scope.
For a well-planned, purpose-built single-zone DIY installation, doing the manufacturer-approved mechanical work yourself can eliminate a meaningful portion of installation labor. But DIY stops being a bargain when saving money becomes the reason for improvising refrigerant work, electrical work or installation procedures that the equipment wasn’t designed for homeowners to perform.
I would rather see a homeowner spend money on a qualified electrician or HVAC technician for the portion that genuinely requires one than spend that same money later correcting an avoidable mistake. The objective isn’t the cheapest possible installation. It’s a properly selected, correctly installed system at a project cost that makes sense.
Is installing a DIY mini split always cheaper than professional installation?
Not necessarily. A straightforward purpose-built DIY system can reduce mechanical installation labor, especially when the homeowner already owns basic tools. Electrical upgrades, difficult routing, permits, special mounting requirements and professional assistance can reduce that advantage considerably, so compare complete project costs rather than equipment prices alone.
What costs should I include in a DIY mini-split budget?
Include equipment, approved line-set components, mounting materials, condenser support, condensate materials, line-hide or protective coverings, required tools, electrical work, permits and any professional assistance. Shipping and site-specific construction work should also be included when applicable.
Do I need to buy a vacuum pump for a DIY mini split?
That depends entirely on the equipment and manufacturer’s installation procedure. A purpose-built homeowner system may use a manufacturer-engineered connection method that avoids conventional field evacuation, while a conventional mini-split can require professional refrigeration procedures. Never assume “factory charged” automatically means “no vacuum.”
Should electrical work be included when comparing DIY and professional prices?
Yes. Electrical work can represent an important portion of the finished project and should be included on both sides of the comparison. MRCOOL’s current DIY installation guidance, for example, says electrical work should be performed by a licensed electrician and follow applicable local codes.
Can I save money by purchasing refrigerant tools and doing conventional HVAC work myself?
Buying equipment doesn’t remove regulatory or technical requirements. EPA states that Section 608 certification applies to activities reasonably expected to violate the integrity of the refrigeration circuit, including several refrigerant-related installation and service activities.
Is a multi-zone DIY mini-split more expensive to install than a single-zone system?
It generally involves more components and installation work because multiple indoor units can require separate mounting locations, piping routes, condensate arrangements and interconnections. The exact cost difference depends on the system and building layout rather than simply the number of indoor heads.
What’s the best way to compare contractor quotes with DIY?
Compare equivalent finished projects. Confirm equipment model and capacity, electrical scope, line-set work, mounting, drainage, permits, commissioning, included materials and warranty responsibilities. That gives you a much more meaningful comparison than subtracting an online equipment price from a contractor’s total proposal.
Editorial Disclosure: The Furnace Outlet is not associated with, affiliated with, endorsed by, or sponsored by any manufacturer or company featured. We do not receive manufacturer compensation for inclusion or rankings. Equipment prices, labor rates, permit requirements, incentives and installation costs vary substantially by location, home, equipment and project complexity. Verify current equipment specifications and pricing, follow the exact manufacturer’s installation instructions, and consult qualified HVAC and electrical professionals where appropriate.