Newsletter Subscribe
Enter your email address below and subscribe to our newsletter

HVAC made simple

By Jake Lawson — the HVAC Specialist
A purpose-built DIY mini split can make parts of ductless installation much more approachable for a homeowner, but “DIY-friendly” should never be confused with “mistake-proof.” The equipment still has to be sized correctly, mounted securely, connected according to the manufacturer’s procedure, drained properly and supplied with the correct electrical service. A small error during installation can show up later as poor comfort, water around the indoor unit, excessive noise, reduced efficiency or a refrigerant problem.
The important distinction is that not every mini split is designed for the same installation process. A conventional system may require field-prepared refrigerant connections, evacuation and professional commissioning, while certain purpose-built DIY systems use factory-prepared pre-charged line sets and proprietary connection methods. The exact installation manual for your model and generation should therefore be the primary authority throughout the project. The following 12 mistakes are the ones I would pay particular attention to before, during and immediately after a homeowner-installable mini-split project.

One of the first installation mistakes can happen before you even open the box. Homeowners frequently see a capacity recommendation based on room square footage and treat it as a complete sizing calculation. Square footage is useful for preliminary planning, but it cannot capture everything that determines the actual heating and cooling load of a room or home.
Insulation, window area, air leakage, ceiling height, orientation, occupancy, local summer conditions and winter design temperatures can all change the load. ENERGY STAR specifically emphasizes proper sizing and points homeowners toward Manual J load calculations for determining heating and cooling requirements. A system that is too small can struggle during demanding weather, while an oversized system can also create comfort and operating problems.
ENERGY STAR — Ductless Heating & Cooling
This becomes especially important when the mini split will provide significant winter heating. A model’s nominal BTU rating does not by itself tell you how much heating capacity it can deliver as outdoor temperature falls. Climate-specific performance and the exact equipment combination matter, so sizing should come before bargain hunting.

DIY mini splits can look deceptively interchangeable. Two indoor units may have similar capacities, and two line sets may appear to have identical fittings, but that doesn’t mean they belong together. Equipment generation, refrigerant, tubing dimensions, connection design, indoor-unit capacity and outdoor-unit compatibility can all matter.
Current manufacturer documentation illustrates why this deserves attention. MRCOOL, for example, publishes specific compatibility information for its current R-454B DIY line sets and advises keeping fittings clean, avoiding line-set kinks and performing the required leak test before opening the valves. Its documentation also identifies particular line sizes and equipment combinations rather than presenting every DIY line set as universally interchangeable.
MRCOOL — DIY Pre-Charged Line-Set Guidance
Before installation, verify the indoor unit, condenser, line set, accessories and any extension or coupling against the documentation for the exact system. This is particularly important when buying equipment from multiple sellers or combining components purchased at different times.

A mini split can be installed perfectly and still perform poorly if the indoor unit is in the wrong location. The air handler needs to distribute conditioned air into the occupied space without having its intake or discharge obstructed by furniture, cabinetry, curtains or architectural features.
The mounting surface also matters. The unit needs appropriate structural support and manufacturer-required clearances, and the location must work with the refrigerant-line, wiring and condensate routes. Choosing the wall simply because it looks convenient from inside the room can create an awkward installation outside.
Before drilling, I would plan the indoor unit, wall penetration, condensate route, line-set path and outdoor condenser as one continuous installation. A good indoor location is one that works for both airflow and the mechanical connections behind it.

The indoor mounting plate may look like one of the simplest parts of the job, which is precisely why it can be rushed. A plate that isn’t installed according to the manufacturer’s instructions can make it harder to seat the air handler correctly and can contribute to alignment or drainage problems.
Use the supplied template where applicable, identify suitable mounting points and check the plate with an actual level rather than assuming nearby trim, a ceiling or a window is level. Current MRCOOL fifth-generation instructions, for example, direct installers to use the template to mark mounting locations, level the plate and secure it to the wall.
MRCOOL — 5th Gen DIY Quick Start Guide
The wall itself also deserves attention. Drywall, masonry and other construction types can require different fastening methods. If you are uncertain about structural support or what is hidden inside the wall, solve that question before hanging the equipment.
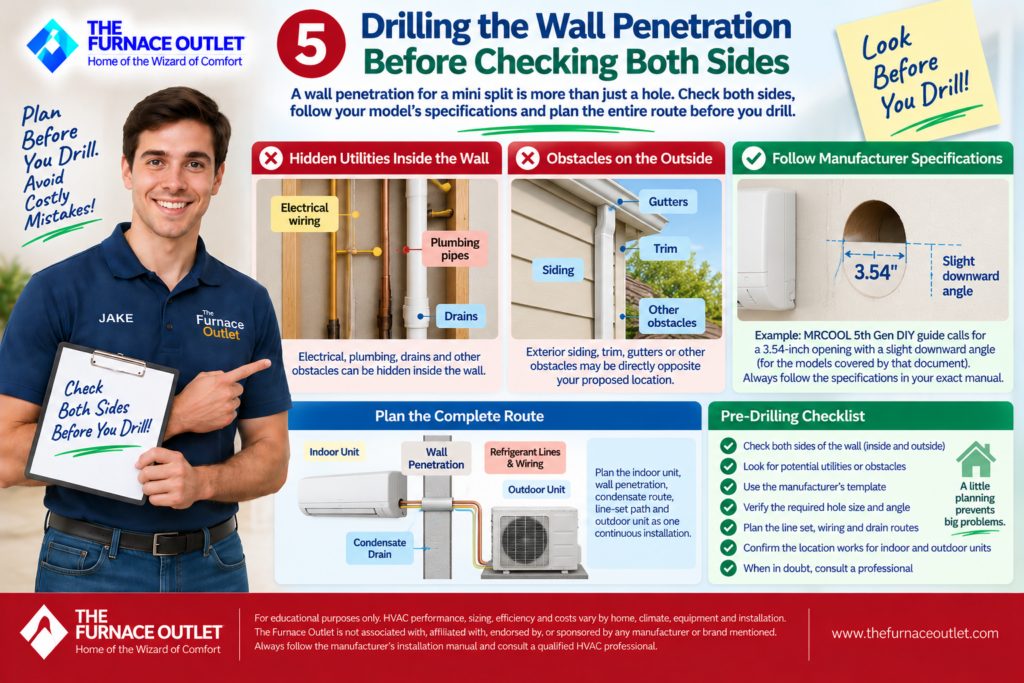
The large wall opening required by many wall-mounted mini splits deserves more planning than an ordinary screw or pilot hole. Electrical wiring, plumbing, drains and structural elements can be hidden inside the wall, while exterior siding, masonry, trim, gutters or other obstacles may be directly opposite the proposed indoor location.
The diameter and position of the penetration are also model-specific. As one current example, MRCOOL’s fifth-generation DIY quick-start guide calls for a 3.54-inch opening for the equipment covered by that document and specifies a slight downward angle. That number should not be generalized to other mini splits; the point is to follow the dimensions in your exact manual rather than copying an installation video for another model.
Check both sides of the wall, inspect for clues to hidden utilities, use the manufacturer’s template and verify the required penetration before the hole saw touches the wall. A few minutes spent planning here can prevent one of the most expensive DIY mistakes in the project.
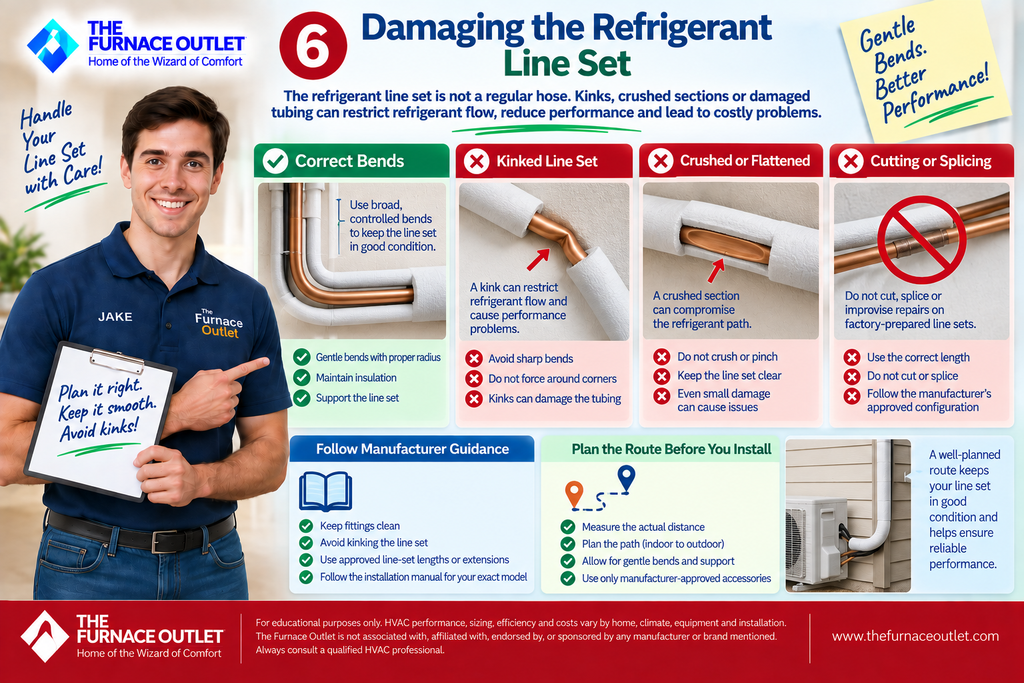
The refrigerant piping has to travel from the indoor unit to the outdoor condenser, and that route often requires bends. The mistake is treating the line set like ordinary flexible hose and forcing it around a corner that is too tight.
A kink, flattened section or damaged tube can compromise the refrigerant path and potentially turn a straightforward DIY installation into a service problem. Factory-prepared DIY line sets deserve particular care because cutting out a damaged section or improvising a repair may not be part of the approved homeowner procedure.
Plan broad, controlled bends and support the tubing as you move it. Current MRCOOL guidance specifically tells installers to keep fittings clean and avoid kinking the line set. It also provides manufacturer-specific instructions for managing extra length and approved extensions.
Don’t try to make an incorrect line-set length fit by aggressively bending, crushing, cutting or splicing it. Determine the actual route before ordering and use only the configuration approved for the exact system.
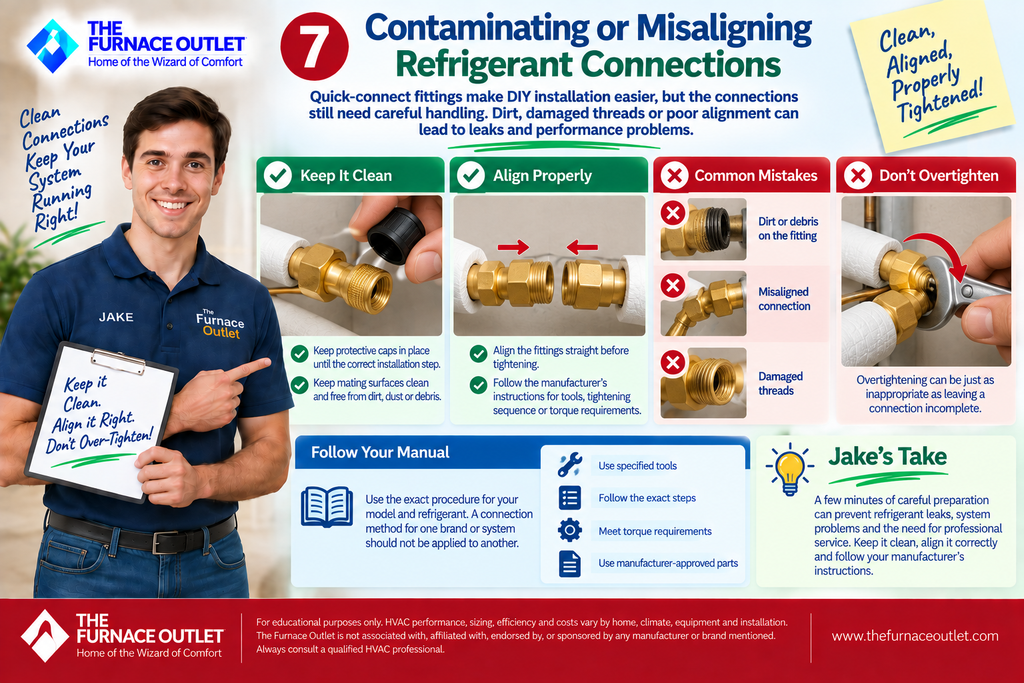
A factory-prepared quick-connect system removes some of the operations associated with conventional field-installed refrigerant piping, but the connections still deserve careful handling. Dirt, damaged threads, poor alignment or forcing a fitting together incorrectly can undermine the connection you are relying on to contain refrigerant.
Keep protective caps in place until the appropriate installation step, keep mating surfaces clean and align the fittings before tightening them. If the manual specifies particular tools, tightening sequences or torque requirements, follow those instructions rather than tightening by feel.
Don’t assume that “tighter” always means “safer.” Overtightening can be just as inappropriate as leaving a connection incomplete when the manufacturer specifies a particular procedure.
Most importantly, don’t substitute generic advice for the manual. A connection procedure designed for one manufacturer’s pre-charged system should not automatically be applied to another brand, refrigerant or equipment generation.
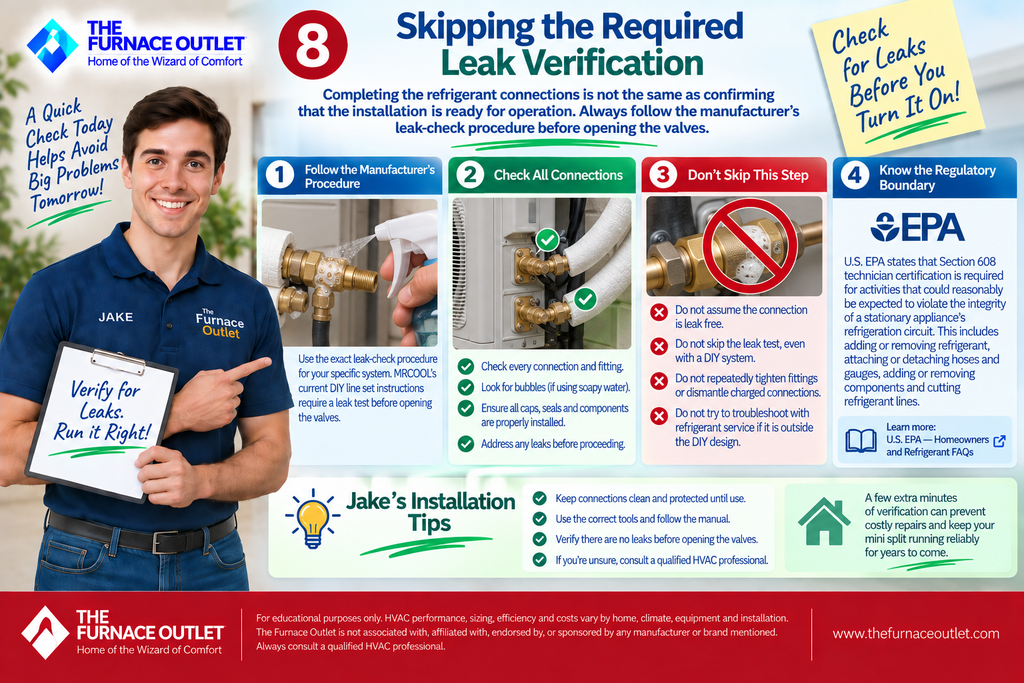
Completing the refrigerant connections is not the same thing as confirming that the installation is ready for operation. Purpose-built DIY systems can simplify refrigerant-side work, but that does not make verification optional.
Follow the exact leak-check procedure specified by the manufacturer for the equipment you purchased. MRCOOL’s current documentation for its pre-charged DIY line sets explicitly instructs installers to perform a leak test before opening the valves.
If a connection fails the manufacturer’s verification procedure, stop and determine the appropriate corrective action. Repeatedly tightening fittings, dismantling charged connections or experimenting with refrigerant should not become an improvised troubleshooting method.
There is also a regulatory boundary here. EPA states that Section 608 technician certification is required for activities that could reasonably be expected to violate the integrity of a stationary appliance’s refrigeration circuit. EPA specifically discusses adding or removing refrigerant, attaching or detaching hoses and gauges, adding or removing components and cutting refrigerant lines.
U.S. EPA — Homeowners and Refrigerant FAQs
If troubleshooting has moved from checking a manufacturer-designed DIY connection to opening or servicing the refrigeration circuit, it is time to understand those requirements and bring in appropriately qualified help.
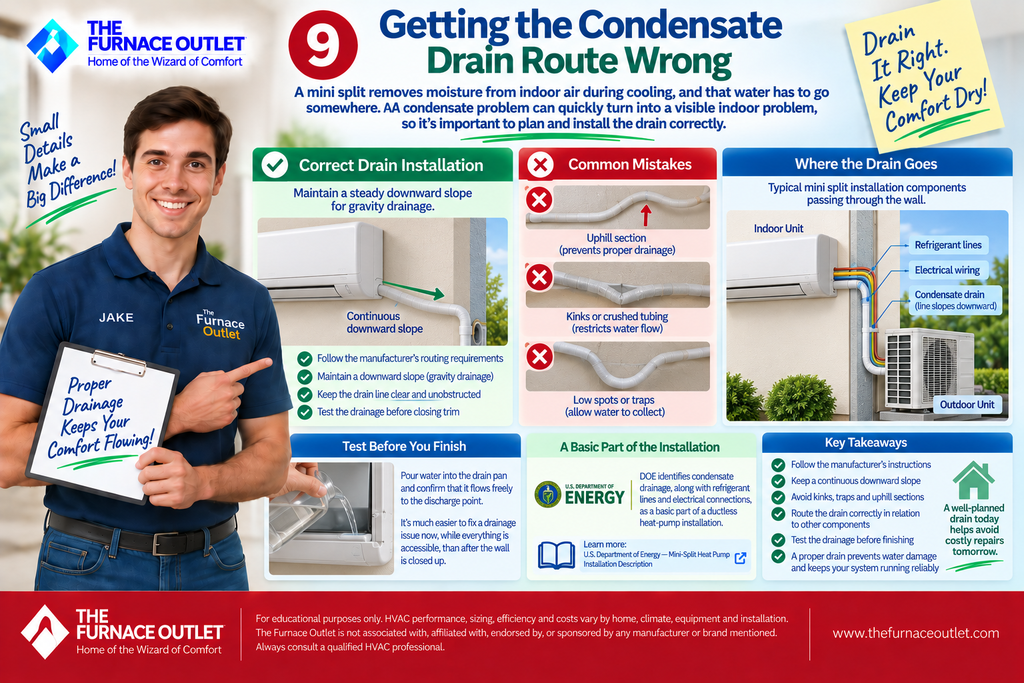
A mini split removes moisture from indoor air during cooling, and that water has to go somewhere. A condensate problem can therefore turn into a visible indoor problem much faster than many other installation errors.
The drain should follow the manufacturer’s routing requirements and maintain an appropriate path for gravity drainage when the system is designed that way. Avoid accidental uphill sections, crushed tubing, kinks or arrangements that allow water to collect instead of flowing toward the discharge point. The drain should also be positioned correctly in relation to the other components passing through the wall.
The U.S. Department of Energy’s description of a ductless heat-pump installation identifies condensate drainage alongside the refrigerant lines and electrical connections as a basic part of the installation, reinforcing that drainage is not merely a cosmetic accessory.
U.S. Department of Energy — Mini-Split Heat Pump Installation Description
Before closing line-hide or finishing trim, test the drainage according to the manufacturer’s procedure. Finding a drainage mistake while everything is accessible is much easier than discovering it from water appearing on the wall later.

The outdoor unit needs more than a flat place to sit. It requires the manufacturer-specified airflow clearances, service access and a stable installation location. Climate, vegetation, walls, fences, roof runoff and snow can all affect whether a location that looks convenient will remain suitable over the life of the equipment.
The condenser should also be supported according to the manufacturer’s instructions and applicable requirements. A suitable pad or approved bracket can provide the stable base needed for the installation. The DOE description of a mini-split project, for example, identifies an outdoor unit on a concrete pad as part of the physical installation.
Don’t hide the condenser tightly behind shrubs merely because you don’t want to see it. Don’t place it where future service access becomes unnecessarily difficult, and don’t assume every system uses identical clearance dimensions. Check the exact manual.
For heat-pump operation in colder climates, think beyond summer cooling. Snow accumulation, ice, drainage during defrost and local winter conditions can make outdoor placement particularly important.

A homeowner-installable refrigerant connection does not automatically make the electrical installation homeowner work. Depending on the model, a mini split can require a dedicated branch circuit, properly selected overcurrent protection, conductors, grounding, a disconnect and interconnecting wiring. Existing panel capacity and local electrical requirements also matter.
One common mistake is selecting a breaker or wire size from the mini split’s BTU rating or from somebody else’s installation. Electrical requirements should instead come from the exact equipment nameplate, installation documentation and applicable electrical code.
Another mistake is focusing entirely on whether the unit uses a familiar nominal voltage and assuming that makes the project simple. A new branch circuit, outdoor disconnect or panel work can still require qualified electrical expertise regardless of how DIY-friendly the mechanical portion is.
Plan the electrical side before purchasing the system. If the work exceeds your qualifications or local rules require a licensed electrician, budget for that professional work from the beginning rather than trying to improvise around it.
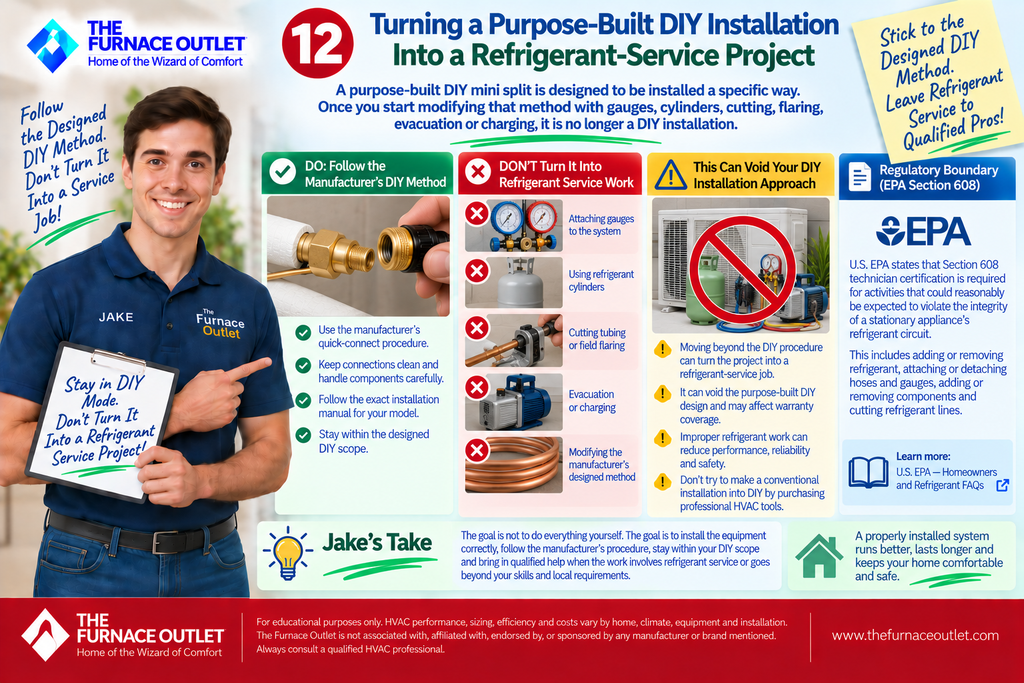
This may be the most important mistake on the list. A homeowner buys a purpose-built DIY system because the manufacturer has engineered a particular installation method, then encounters a problem and begins modifying that method. Soon the project involves gauges, refrigerant cylinders, cutting tubing, field flaring, evacuation or charging.
At that point, the project may no longer resemble the homeowner installation procedure the equipment was designed around.
EPA’s Section 608 guidance is particularly relevant here. The agency states that technician certification applies to activities that could reasonably be expected to violate the integrity of the refrigerant circuit and specifically addresses mini-split installation and refrigerant-related work.
If your manual calls for a purpose-built quick-connect procedure, follow that procedure. If the equipment instead requires conventional evacuation, field refrigerant work or another process outside your skills or regulatory scope, don’t try to transform it into DIY simply by purchasing professional HVAC tools.
The objective is not to prove that every part of an HVAC installation can be performed without assistance. The objective is to install the equipment correctly and preserve the performance, reliability and safety the manufacturer designed into it.
When I look at these mistakes together, a pattern emerges. Most are not mysterious equipment failures. They begin with planning: incorrect sizing, incompatible components, a poor equipment location, an unplanned wall penetration, an unsuitable line-set route, inadequate drainage or electrical requirements discovered too late.
That’s why I would spend almost as much attention on the installation plan as on the installation itself. Read the exact manual before buying accessories or drilling holes. Confirm the matched equipment, map the complete refrigerant and condensate routes, verify the condenser location, determine the electrical requirements and identify which portions of the project genuinely belong within the manufacturer-approved DIY process.
The AHRI Directory can also be useful when researching matched mini-split and multi-split equipment because its certified-product programs cover variable-speed mini-split and multi-split air conditioners and heat pumps.
AHRI Directory of Certified Product Performance — User Guide
A successful DIY installation isn’t the one completed with the fewest tools, lowest cost or least professional assistance. It’s the one where the equipment is correctly selected, every homeowner-permitted step follows the manufacturer’s procedure and the installer recognizes when a particular task should be handed to a qualified professional.
Can a poor DIY mini-split installation reduce efficiency?
Yes. Incorrect sizing, poor indoor or outdoor placement, obstructed airflow and installation errors can prevent the system from delivering the comfort and performance expected from properly selected equipment. ENERGY STAR specifically emphasizes correct equipment sizing as an important part of mini-split performance.
What is one of the biggest causes of water problems after installation?
Condensate drainage deserves immediate attention whenever water appears around an indoor unit. The drain route should be checked against the manufacturer’s instructions for slope, routing, obstructions and connection. Water around the unit should not simply be treated as normal condensation.
Can I cut a pre-charged DIY line set if it is too long?
Do not assume so. Factory-prepared line sets are system-specific, and modification may not be part of the approved installation procedure. Follow the exact manufacturer’s instructions for managing excess length or using an approved extension or coupling.
Does a pre-charged mini split automatically mean I don’t need a vacuum pump?
No. “Pre-charged” can describe different parts of a system and does not universally mean the field-installed refrigerant path requires no evacuation. A genuine no-vacuum homeowner system should explicitly document the approved installation method for the exact equipment.
What should I do if I suspect a refrigerant leak after installation?
Stop and follow the manufacturer’s troubleshooting and leak-verification instructions without improvising refrigerant service. EPA states that Section 608 certification requirements apply to activities reasonably expected to violate the integrity of the refrigeration circuit, including several refrigerant-related service activities.
Is professional help a sign that a DIY project failed?
No. A purpose-built DIY system can allow a homeowner to complete certain manufacturer-approved mechanical tasks while an electrician or HVAC technician handles work requiring different qualifications, tools or regulatory compliance. A hybrid approach can still preserve meaningful DIY participation without extending it into inappropriate work.
Editorial Disclosure: The Furnace Outlet is not associated with, affiliated with, endorsed by, or sponsored by any manufacturer or brand mentioned in this article. We do not receive manufacturer compensation for inclusion or rankings. This content is for educational purposes only. HVAC sizing, installation procedures, refrigerants, electrical requirements and code obligations vary by equipment, home and jurisdiction. Always follow the current installation manual for your exact model and consult qualified HVAC and electrical professionals where appropriate.