Newsletter Subscribe
Enter your email address below and subscribe to our newsletter

HVAC made simple
By Samantha Reyes — the Smart Shopper
Buying a new central air conditioner is only half of the project. The other half—and arguably the part that has the greatest influence on how the equipment actually performs—is the installation. As a homeowner, I would never assume that choosing a highly rated air conditioner automatically guarantees great comfort. The outdoor condenser may have an impressive SEER2 rating and sophisticated compressor technology, but the finished system still depends on proper sizing, airflow, refrigerant setup, electrical work, duct conditions and commissioning.
That is why I think homeowners should understand the installation process before the contractor arrives. You do not need to become an HVAC technician. You simply need to know what a professional installation should generally involve and which questions are worth asking. This guide walks through the process from the initial home evaluation to the final system handover.
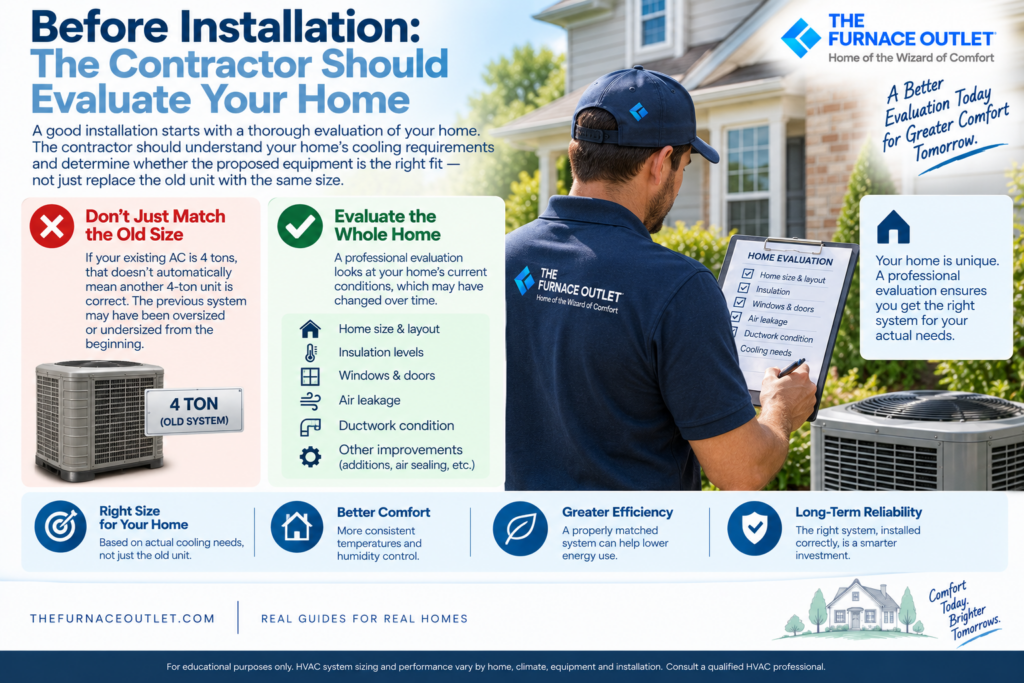
A good installation begins before any equipment is removed from the truck. The contractor first needs to understand the cooling requirements of the house and determine whether the proposed equipment is appropriate for those conditions. One of the biggest mistakes I would avoid is selecting an air conditioner based only on the size of the existing system. If the old house has a 4-ton air conditioner, that does not automatically prove that another 4-ton unit is correct.
The previous equipment may have been oversized or undersized from the beginning. The house may also have changed through new windows, insulation, additions, air sealing or other improvements. A professional evaluation should consider the home rather than simply replacing equipment according to the label on the old condenser.
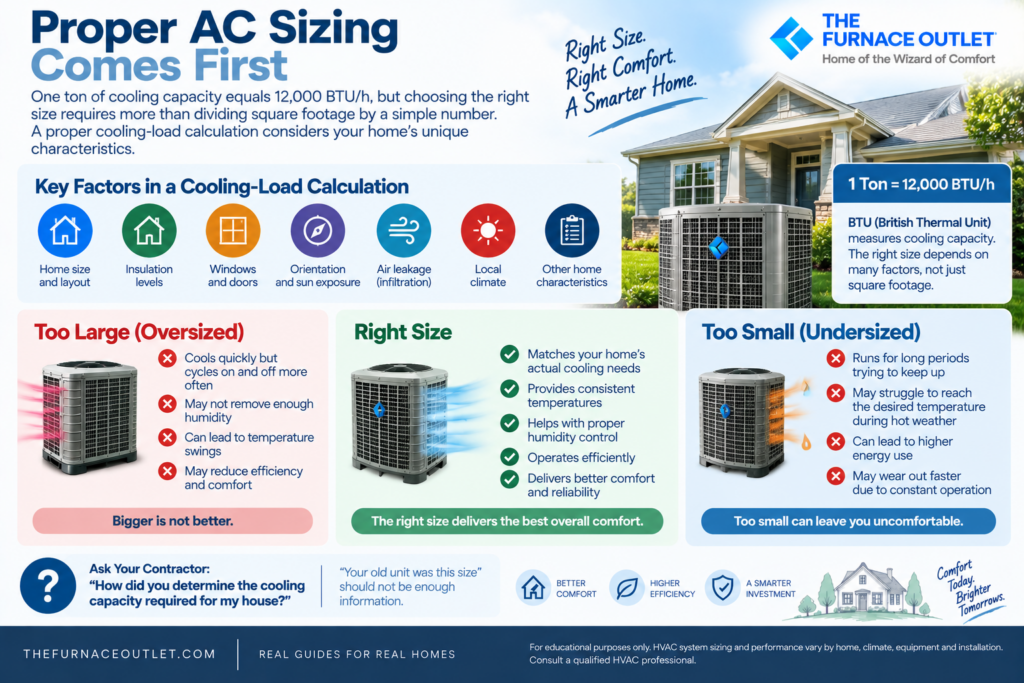
Central air conditioners are commonly described by their cooling capacity in BTUs per hour or tons. One ton of nominal cooling capacity equals 12,000 BTU/h, but choosing the right capacity requires more than dividing square footage by a simple number.
A proper residential cooling-load calculation considers factors such as the home’s size, insulation, windows, orientation, air leakage, climate and other characteristics. Contractors commonly use ACCA Manual J methodology or comparable professional load-calculation procedures for this purpose.
An oversized air conditioner can cool the thermostat area quickly but may operate in shorter cycles than intended. That can affect comfort and humidity control. An undersized system can face the opposite problem, running extensively while struggling to maintain the desired indoor temperature during demanding conditions.
For a major HVAC purchase, I would therefore ask:
“How did you determine the cooling capacity required for my house?”
“Your old unit was this size” would not be enough information for me.
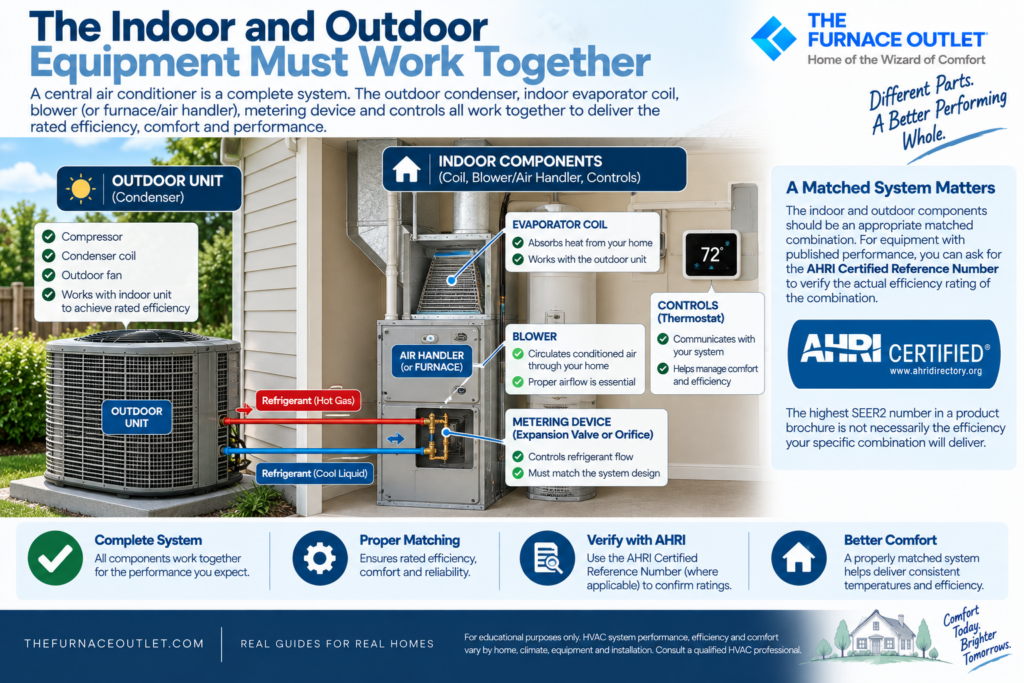
The condenser sitting outside the house is only one part of a central AC system. The indoor evaporator coil, blower or furnace/air handler, metering device and controls all contribute to system performance. This becomes particularly important when replacing only part of an existing HVAC system. A contractor should determine whether the proposed indoor and outdoor components form an appropriate matched combination.
For equipment with published certified performance, homeowners can ask for the AHRI Certified Reference Number for the proposed combination where applicable. This can help verify the efficiency rating of the actual equipment combination rather than relying solely on the highest SEER2 number advertised for an outdoor-unit product family. The maximum efficiency printed in marketing material is not necessarily the efficiency your particular indoor/outdoor combination will deliver.
I would also want the duct system evaluated before installing expensive new equipment. Air conditioners depend on moving the correct amount of air through the indoor coil and distributing conditioned air throughout the house. Leaking, restricted, undersized or poorly configured ductwork can compromise comfort even when the new equipment itself is working correctly.
The contractor may inspect accessible ductwork, supply and return capacity, filtration arrangements and signs of airflow restrictions. Depending on the home, additional testing or duct modifications may be recommended. This does not mean every AC replacement requires new ductwork. It means the contractor should not ignore the distribution system that the new equipment must use.
Once the contractor has recommended a system, I would want the proposal to identify the actual equipment being installed rather than simply saying something like “3-ton high-efficiency AC.” At minimum, I would look for the manufacturer and model numbers of the outdoor and indoor equipment, proposed cooling capacity, efficiency information, refrigerant type, thermostat or controls, warranty information and the major work included in the installation.
I would also clarify whether the quoted price includes permits where required, removal and disposal of old equipment, electrical modifications, drain work, refrigerant-line work, thermostat installation and any duct modifications. The objective is simple: know what you are buying before installation begins.
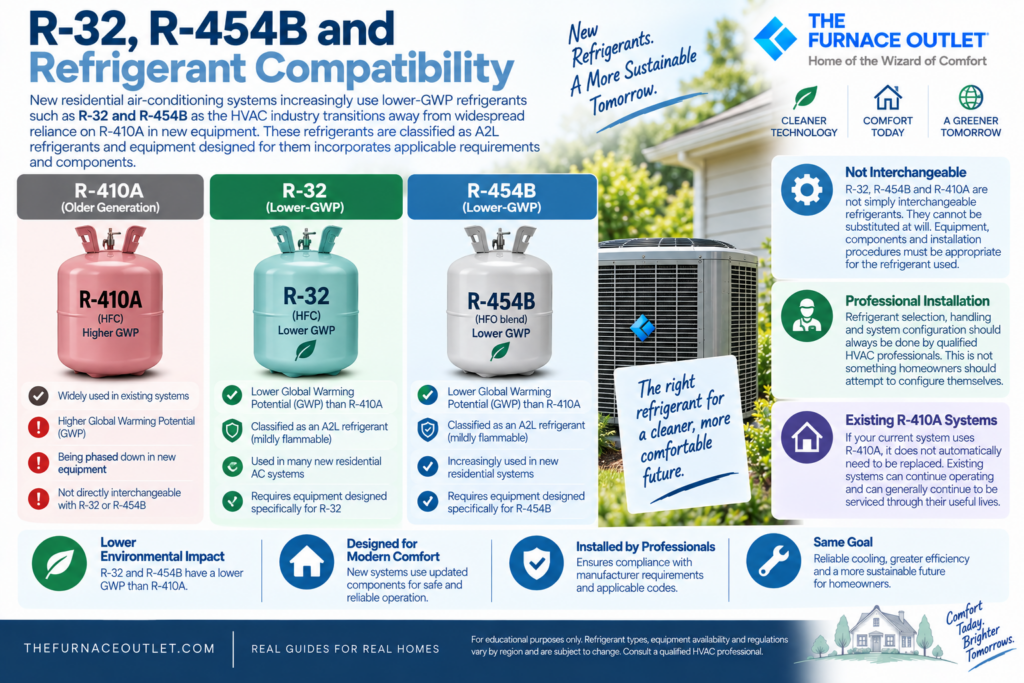
Refrigerant deserves additional attention when purchasing equipment in 2026. New residential air-conditioning systems increasingly use lower-GWP refrigerants such as R-32 and R-454B as the HVAC industry transitions away from widespread reliance on R-410A in new equipment. These refrigerants are classified as A2L refrigerants and equipment designed for them incorporates applicable requirements and components.
This is not something homeowners should attempt to configure themselves. The important point is that the equipment, components and installation procedures must be appropriate for the refrigerant used by that particular system. R-32, R-454B and R-410A are not simply interchangeable refrigerants that can be substituted at will. If your existing system uses R-410A, that alone does not mean it suddenly has to be replaced. Existing systems can continue operating and can generally continue being serviced through their useful lives.
The exact sequence varies depending on the house and equipment, but a central AC replacement commonly takes place through several major stages.
The installation team will normally protect the work area, shut down electrical power to the existing equipment and begin removing the components being replaced. The old refrigerant should be handled using appropriate professional recovery procedures rather than released into the atmosphere. The contractor can then prepare the installation locations for the new indoor and outdoor equipment.
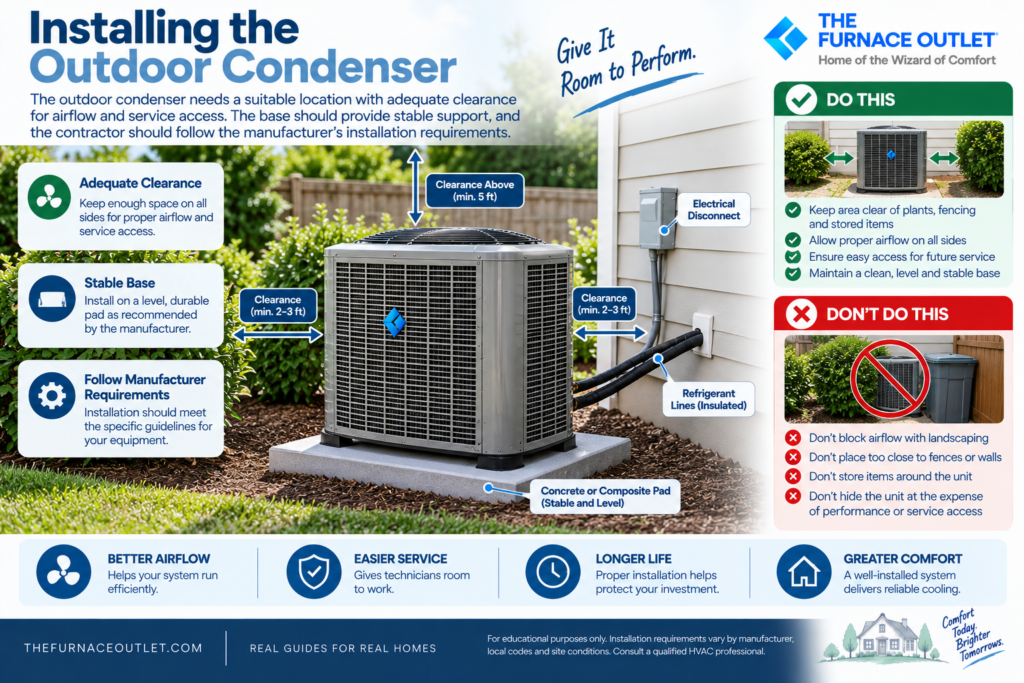
The outdoor condenser needs a suitable location with adequate clearance for airflow and service access. The base should provide stable support, and the contractor should follow the equipment manufacturer’s installation requirements.
I would not want landscaping, fencing or stored items packed tightly around the condenser simply because they make the equipment less visible. The outdoor coil needs airflow, and technicians need reasonable access for future service. The new condenser is then positioned, connected to the refrigerant circuit and wired according to the installation requirements.
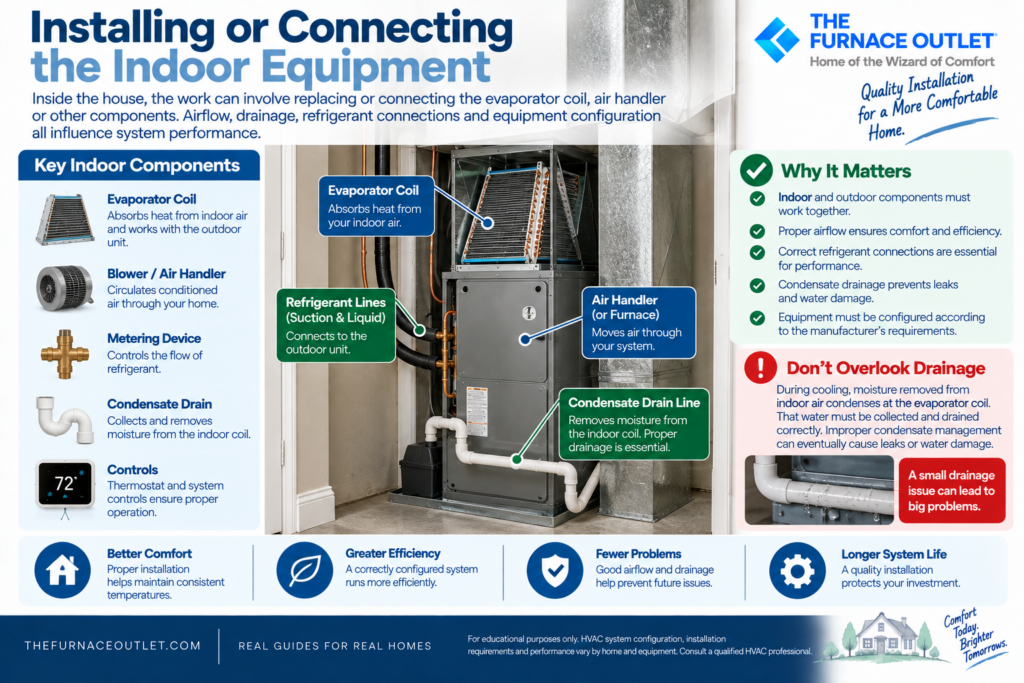
Inside the house, the work can involve replacing or connecting the evaporator coil, air handler or other components depending on the scope of the project. This stage deserves careful attention because the indoor coil must work properly with the outdoor equipment. Airflow, drainage, refrigerant connections and equipment configuration all influence operation.
Condensate drainage is particularly easy for homeowners to overlook. During cooling, moisture removed from indoor air condenses at the evaporator coil. That water must be collected and drained correctly. Improper condensate management can eventually cause leaks or water damage, so drainage is not a minor installation detail.
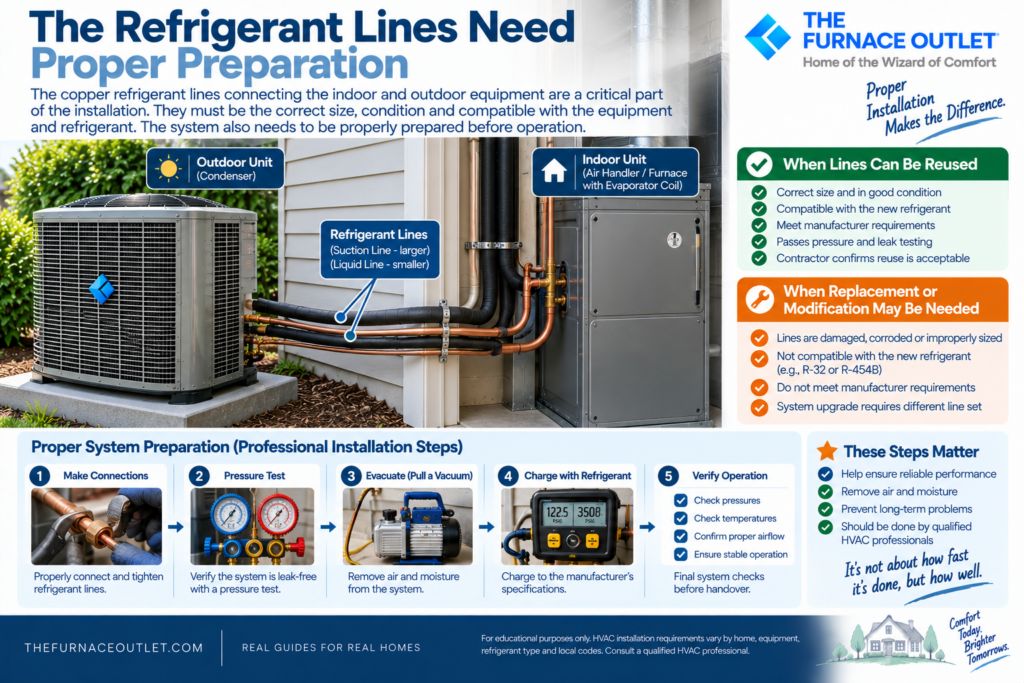
The copper refrigerant lines connecting the indoor and outdoor equipment are another critical part of the installation. Depending on their condition, dimensions, refrigerant compatibility and manufacturer requirements, existing lines may sometimes be reusable, while other installations require replacement or modification. This decision should be made according to the equipment and installation requirements rather than convenience alone.
After refrigerant connections are completed, the system needs to be properly prepared before operation. Professional installation procedures generally include steps intended to verify that the refrigerant circuit is leak-free and remove air and moisture from the system before charging and startup. These are mostly invisible steps from a homeowner’s perspective, but they matter enormously. I would be much more interested in whether these procedures were performed correctly than in how quickly the installation crew finished the job.
The contractor also needs to confirm that the electrical system serving the equipment is appropriate for the new air conditioner. This can involve the disconnect, circuit protection, wiring and other electrical components. Requirements depend on the specific equipment and applicable electrical codes.

The thermostat or communicating control system must also be configured correctly. This is particularly important with multi-stage and variable-capacity systems because their control strategies can be more sophisticated than those of traditional single-stage equipment. If I were purchasing a premium variable-capacity system, I would want the installer to explain which thermostat or proprietary control is required and what functionality I would lose if a different thermostat were used.
One of the most important things homeowners can understand is that an air conditioner turning on does not prove that the installation is complete. After physical installation, the system should be commissioned. Commissioning is essentially the process of verifying that the installed equipment is operating as intended. Depending on the equipment and installation, the technician may evaluate refrigerant operation, airflow, temperature performance, electrical characteristics, controls, drainage and other manufacturer-specified startup parameters.
This is where installation quality becomes particularly important. A system can look beautiful from the outside and still have airflow, refrigerant or configuration problems that affect performance.
I would therefore ask the contractor:
“What commissioning and startup checks will you perform before you consider the installation complete?”
That is one of the most useful questions a homeowner can ask.
It is tempting to stand beside a supply register, feel cold air and conclude that everything is working perfectly. That tells you surprisingly little. A professionally installed system needs to do more than produce cold air. It needs appropriate airflow, proper cycling, condensate drainage, refrigerant operation and controls while maintaining comfortable indoor conditions. The real test of the installation is how the complete system operates—not simply whether the compressor starts.
I would expect a final walkthrough. The contractor should explain how to operate the thermostat or controls, where the filter is located, which filter type or size is appropriate and how frequently it should be checked. This is also the time to discuss maintenance. ENERGY STAR recommends regular HVAC maintenance, including annual pre-season professional checkups, while homeowners should check filters regularly and replace them when dirty. The manufacturer’s maintenance instructions should also be followed.
I would additionally ask the installer to explain any unusual sounds or operating behaviors that are normal for the new equipment, particularly with variable-capacity systems that may operate differently from an older single-stage AC.
Before considering the project finished, I would create a simple HVAC folder—paper, digital or both. I would keep the installation invoice, indoor and outdoor model numbers, serial numbers, warranty documents, registration confirmation, AHRI Certified Reference Number where applicable, permit or inspection documentation where relevant, thermostat information and future maintenance records.
These documents can become surprisingly important years later when you need warranty service, replacement parts or information for a future homeowner.

Do not automatically assume the contractor completed the manufacturer’s warranty registration. Registration requirements differ among manufacturers, equipment and jurisdictions. Some manufacturers may provide different warranty terms depending on whether eligible equipment is registered within the required period.
I would ask the contractor directly:
“Does this equipment require registration for the applicable warranty coverage, and who is responsible for completing it?”
If the contractor completes the registration, request confirmation for your records. Also remember that parts coverage and labor coverage are not necessarily the same thing. A manufacturer may cover an eligible component without covering the technician’s labor to diagnose and replace it.
Once the installation team leaves, I would pay attention to how the system actually behaves. The house should cool reasonably evenly, the thermostat should respond correctly and the equipment should operate without obvious abnormal noises or repeated unusual cycling. There should not be water leaking around the indoor equipment or condensate system.
I would also pay attention to humidity and comfort rather than concentrating exclusively on the thermostat number. Do not panic over every unfamiliar sound. Modern equipment—particularly variable-capacity systems—can sound and operate differently from older equipment. But if something seems consistently wrong, contact the installer rather than waiting months to mention it. The first days after installation are a useful opportunity to identify commissioning or setup issues while the project is still fresh.

As a homeowner, I would want clear answers to these questions:
None of these questions requires technical expertise. They simply help establish that the installation has been completed thoughtfully and that you understand what you now own.
Most homeowners cannot inspect refrigerant charging or measure system airflow themselves, and they should not attempt to perform technical HVAC work. However, you can still recognize warning signs in the overall process. I would be cautious if a contractor recommends equipment without meaningfully evaluating the house, chooses capacity solely from the old condenser, cannot provide exact model numbers, ignores obvious duct problems or does not explain how the system will be commissioned.
I would also question an installation where warranty responsibilities remain vague or where no one can tell me who will register the equipment. The cheapest quote can become expensive if important work was simply excluded from the proposal.

Homeowners understandably spend considerable time comparing Carrier, Trane, Lennox, Goodman, Rheem, Daikin and other manufacturers. Brand comparison has value, but I would not allow it to overshadow the contractor.
Imagine choosing between two properly matched systems with similar efficiency and features. One comes from your preferred brand but will be installed by a contractor who provides little information about sizing, airflow or commissioning. The other comes from another reputable manufacturer and is being installed by a contractor who performs a proper load calculation, evaluates the ductwork, documents the equipment combination and carefully commissions the system. I would give installation quality enormous weight in that decision.
A premium air conditioner does not correct poor installation.
Once the system is operating correctly, the homeowner takes over part of the responsibility. Keep the outdoor condenser reasonably clear of leaves, vegetation and debris. Check the air filter regularly and replace it when dirty. Follow the manufacturer’s maintenance recommendations and schedule professional service as appropriate.
Keep maintenance records as well. They provide a useful history of the equipment and may be important if warranty questions arise later. The objective is not simply to keep the air conditioner running. It is to preserve airflow, efficiency, reliability and comfort over the system’s useful life.
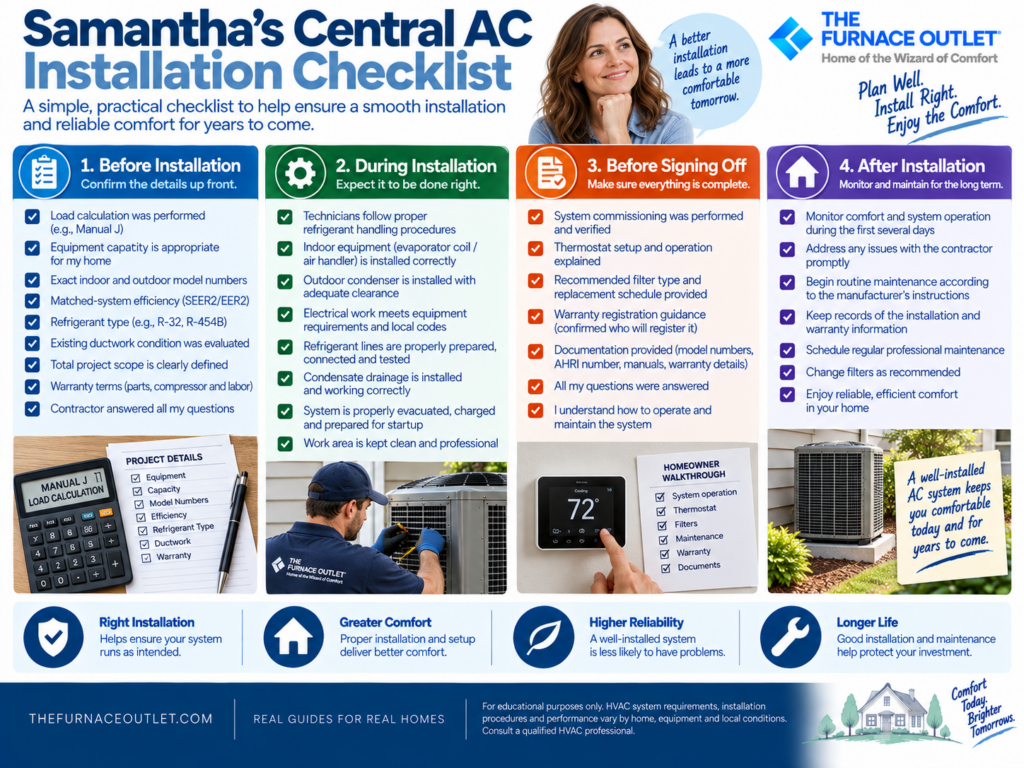
If I were having a central air conditioner installed tomorrow, my checklist would be straightforward.
Before installation, I would confirm the load calculation, equipment capacity, exact model numbers, matched-system efficiency, refrigerant type, duct condition, total project scope, warranty and labor coverage.
During installation, I would allow the technicians to do their work but expect professional refrigerant handling, proper indoor and outdoor equipment installation, appropriate electrical work, condensate management and careful system preparation.
Before signing off, I would expect commissioning, thermostat instruction, filter information, warranty guidance and complete documentation.
After installation, I would monitor comfort and operation during the first several days, address problems promptly and begin maintaining the system according to the manufacturer’s instructions.
That is a much better strategy than simply choosing an AC from a brochure and hoping the installation goes well.
A successful central AC installation begins long before the new condenser is placed beside the house and continues after the installation truck leaves. Proper sizing, matched equipment, airflow, refrigerant procedures, electrical work, condensate management, controls and commissioning all contribute to the finished system.
As homeowners, we do not need to supervise the technical work or tell trained HVAC professionals how to do their jobs. But we should understand the process well enough to ask intelligent questions. My biggest takeaway is simple: don’t buy only an air conditioner—buy a properly designed, installed and commissioned HVAC system.
The equipment determines what the system can do. The quality of the installation plays a major role in whether your home actually receives that performance.
Editorial Disclosure: The Furnace Outlet is not associated with, affiliated with, endorsed by, or sponsored by any manufacturer or brand mentioned in this article. We do not receive compensation from manufacturers for inclusion or rankings. Brand names and trademarks belong to their respective owners. This content is provided for educational purposes only. HVAC sizing, installation requirements, efficiency and performance vary by home, climate, equipment and installation. Homeowners should verify current manufacturer requirements and use appropriately qualified HVAC professionals for installation and service.
U.S. Department of Energy — Proper Sizing of HVAC Systems — Supports the section explaining why proper load calculations and equipment sizing matter instead of simply replacing the old AC with the same tonnage.
ENERGY STAR — Heating & Cooling Maintenance Checklist — Excellent supporting resource for annual professional checkups, filters, coils, refrigerant-related checks and ongoing system maintenance.
AHRI Directory of Certified Product Performance — Particularly useful for your matched-equipment section. Homeowners can use the directory to verify certified performance information for qualifying indoor/outdoor equipment combinations.